
Recover the Recipe, the Original, or Both
RawTherapee work has two separate parts: the source photograph and the settings that develop it. If an image suddenly looks flat, your RAW data may still be intact. The missing element may be a processing profile, a changed loading preference, or a different application version. Conversely, a surviving profile cannot recreate a deleted photograph. Identify which part disappeared before you replace anything.
For example, suppose a landscape still opens but its careful crop and highlight treatment have vanished. Your priority is the matching saved recipe. If the photograph itself cannot open, start with the source file and its surviving copies. A small PP3 file can preserve valuable choices, but it holds processing instructions rather than the camera’s full pixel data. Keep that distinction throughout recovery.
Preserve the Current Editing State
If the correct edit remains visible in an open editor, save its current processing profile separately before changing images. Choose a new name and a healthy destination. Also export a reference image if you can do so safely. These two outputs serve different purposes: the profile can retain editable choices, while the rendered reference records the appearance you are trying to recover.
Next, copy the original image and any nearby profiles into a recovery folder. Include files with additional extensions, because a familiar image name may hide an important companion. Record the installed RawTherapee version and the time of the last good edit. Do not clear the cache, reset preferences, or batch-apply a new preset while you still need to compare possible recipes.
Diagnose Why the Photograph Looks Unedited
A new preview does not necessarily prove that your previous processing settings are gone. Confirm that you opened the same source photograph rather than a camera JPEG, resized export, or duplicate with an identical short name. Compare the complete path, pixel dimensions, camera information, and capture time. Two photographs named DSC_1042 can belong to different shoots, so the filename alone is weak evidence.
Then consider changes since the last successful session. Did you move the RAW files without their companions? Did you use another Windows account, switch RawTherapee versions, or replace the configuration folder? Consider also whether you selected a neutral profile while testing color. Each event suggests a different search location. Write down that event before experimenting, so you can explain why a particular candidate deserves attention.
Separate Appearance Differences from Missing Settings
A different monitor profile, output color space, or processing version can change appearance even when a recipe survives. Compare a known export with the recovered edit at similar size and under consistent viewing conditions. Look for specific changes, such as crop boundaries or exposure values, rather than relying only on an overall impression that the image feels warmer or softer.
If the crop, rotation, and numerical settings still match, investigate rendering conditions before assuming data loss. On the other hand, a completely different crop alongside reset controls makes a missing or replaced recipe more likely. This distinction saves time: searching for deleted files will not solve a display-profile mismatch, and changing display settings will not restore an absent PP3 file.
Free Method 1: Load an Existing Matching PP3
RawTherapee can store processing profiles beside their source images. A companion may look like photo.raw.pp3 rather than simply photo.pp3. Show full file extensions in your file manager, and inspect the original shoot folder and any earlier copied folder. Preserve each candidate under a distinct recovery name. Do not let an automatic synchronization operation decide which recipe replaces another.
Open a working copy of the correct original and use the processing-profile controls to load a copied candidate. Compare the crop, rotation, exposure, white balance, and local adjustments that matter to the photograph. Save a new profile after a successful comparison. Loading a recipe onto a test copy gives you a reversible way to evaluate it without replacing your only surviving evidence.
- Collect the RAW file and every plausibly associated PP3 without renaming the originals.
- Open the copied RAW and load one preserved profile through the profile controls.
- Compare identifiable edits against a known export or your project notes.
- Save the accepted profile separately, then test the next uncertain candidate if necessary.
Match Content before Trusting a Date
A recently modified profile may contain an accidental reset, while an older one may hold the edit you need. Inspect its result rather than choosing the newest timestamp automatically. If several candidates share a name, maintain a simple note identifying their source folders and visible differences. This lets you retain an older crop while considering whether newer tonal changes are useful.
Avoid applying one recovered recipe to an entire shoot immediately. A recipe from the neighboring frame may look plausible but carry the wrong crop, spot removal, or local mask placement. First test one photograph, then validate another representative frame. Only extend the recovery after you understand whether each profile belongs to one specific image or was intentionally designed as a reusable starting point.
Free Method 2: Inspect Existing Cached Profiles
Depending on your preferences, RawTherapee may also store processing profiles in its cache. This is why deleting the cache can be a poor first response to missing edits. Preserve the existing cache and configuration before troubleshooting. Consult the file-location guidance for the version and installation you actually used; an older installation or different Windows account may have a separate location.
Review the processing-profile saving and loading preferences without changing them yet. If you previously enabled both nearby sidecars and cached profiles, the two copies may disagree. The loading preference can affect which version you see. Compare copied candidates deliberately, and retain both sets until you have confirmed the desired appearance. A changed preference can expose an old recipe without any file undelete operation.
Treat the Cache as a Possible Source
A cache is a working store, not a guaranteed archive of every editing decision. Its contents may be missing, version-specific, or already cleaned. Search the preserved copy using filenames, dates, and recognizable profile content where appropriate. If you find no useful recipe, record that result and move on. Repeatedly opening photographs can create fresh settings and make the original problem harder to interpret.
Do not replace an entire active configuration directory merely because another folder contains one promising file. That can introduce unrelated preferences and make the application behave differently. Instead, isolate the candidate processing profile and test it through the normal interface. If a version-specific profile needs its original application version, keep that trial separate from the installation you use for current work.
Free Method 3: Check Profiles Saved with Exports
An earlier rendered output can have its own processing-parameter companion if you enabled the relevant saving option. Look beside delivered JPEG or TIFF files for an existing output-associated profile, including names containing .out.pp3. This can be useful when the input-side companion disappeared. However, the profile exists only if you actually saved it; an exported image does not automatically contain the complete editable recipe.
Copy the output-associated profile and load it onto the matching source photograph. Verify that it represents the desired export, because a proof, web version, and final print may use different settings. Keep the rendered output nearby as a visual reference. If the recovered recipe produces a different appearance, check the processing version and color workflow before concluding that the profile is unusable.
Understand What a Rendered Image Cannot Restore
A finished JPEG can show the target crop and overall appearance, but it cannot generally restore the original RAW development controls. Rebuilding by eye is a new edit, even when the result looks convincing. Name that work clearly so that future readers do not confuse a reconstructed recipe with a recovered original. This matters when you must repeat the same treatment for additional photographs.
Also avoid treating a small embedded preview as a substitute for the full source. It may help identify a photograph, but it can lack the resolution and tonal information needed for delivery. If only a rendered copy survives, assess whether it meets the current purpose. A web illustration may remain usable, while a large print or extensive exposure correction may require the original RAW.
Build a Candidate Comparison That Answers Real Questions
Choose two or three recognizable details before comparing profiles. For a landscape, use the crop boundary, a bright cloud, and a dark foreground area. For a portrait, inspect skin color, white balance, and local corrections. These checkpoints make comparison concrete. They also prevent you from accepting a profile simply because its thumbnail looks broadly similar to your memory of the image.
Keep comparison exports separate from final deliverables. Use descriptive filenames such as crop-candidate-A and print-candidate-B rather than overwriting the client file. Record which source photograph, profile, application version, and output settings produced each test. With that small record, you can reproduce the chosen result later instead of repeating an uncertain recovery process from memory.
Check Local Adjustments at Full Resolution
A recovered global exposure setting can make an image look correct while a local mask remains wrong. Inspect important edges and detailed areas at a useful zoom. Look for halos, shifted corrections, excessive sharpening, or noise treatment that no longer suits the frame. A profile from a neighboring image can pass a thumbnail check and fail these more specific tests.
If your edit relies on external resources, verify their availability too. A missing lens profile, film-simulation resource, or custom configuration can change processing without deleting the main PP3. Record those dependencies alongside the accepted recipe. Recovering them is a separate task from recovering the source pixels, so do not assume that finding one small settings file completes the whole job.
Handle Version Changes without Replacing Evidence
Processing tools can evolve between versions. Therefore, a surviving profile may not produce an identical rendering in every release. Start with the version that last produced the correct output if it remains available through a legitimate installation. Work on copies and keep the original profile unchanged. Save any converted or newly adjusted profile under a different name that identifies the test version.
Compare one controlled export before processing a large batch. Keep the output size, color profile, and relevant quality settings consistent so the comparison measures the recipe rather than unrelated export changes. If a tool behaves differently, document the adjustment you make. That creates an honest recovery record and helps explain why a newly produced print may differ from an earlier proof.
Avoid Resetting All Settings as a Recovery Shortcut
A fresh configuration can help diagnose some application problems, but it does not reconstruct missing editing instructions. Preserve the current configuration first, and use a separate test environment if you need to check defaults. Otherwise, a reset can remove the very paths and preferences that explain where your profiles were stored. Diagnosis should reduce uncertainty rather than remove useful context.
Similarly, reinstalling RawTherapee does not bring back deleted source images or recipes. It may also cause you to use a new configuration path without realizing it. Before reinstalling, confirm whether the problem is application failure, a missing photograph, or missing settings. If the application opens other photographs normally, focus on the affected files and their companions before making broader changes.
Plan Recovery for a Moved or Renamed Shoot
When photographs move between folders, preserve the relationship between each source and its sidecar. Compare old and new folder structures before manually renaming companions. If a backup contains complete pairs, test those pairs together in a separate location. A folder copied before the move may offer a more coherent starting point than isolated profiles gathered from several later locations.
For a renamed shoot, create a mapping from original basename to new basename using trustworthy evidence, such as capture time and image content. Do not guess from consecutive numbers alone. If two cameras produced overlapping filenames, include camera identity in your comparison. A correct mapping can recover many edits efficiently, whereas a guessed mapping can apply plausible but incorrect recipes throughout the shoot.
Keep Multi-Image Work Consistent
After recovering individual frames, compare them as a set. Check whether white balance, exposure treatment, and crop conventions remain consistent across the intended sequence. Some differences may be artistic choices, while others may reveal a mismatched recipe. Use the recovered profile as evidence, but also examine whether the set still meets its original purpose, such as a panorama, product series, or printed selection.
Do not force every recovered frame to share one profile merely to make the set look uniform. That can erase legitimate per-image corrections. Instead, identify which controls were intended to match and which were image-specific. Save new editorial adjustments separately from recovered originals. You can then distinguish the historical edit from improvements made during the recovery and finishing process.
Recover a Mixed RAW and JPEG Delivery Folder
A shoot folder can contain camera RAW files, camera JPEGs, and later exports with similar names. Before loading recovered recipes, separate those roles in your inventory. For example, a camera JPEG may already include in-camera processing, while the RAW needs development. Applying the same recipe to both does not prove that the original edit returned. Compare capture metadata and dimensions, and preserve the files as distinct sources even when their thumbnails look almost identical.
If the delivery folder contains only exports, search the original ingest location and existing complete shoot copies for the RAW-profile pairs. Keep the delivery files unchanged as appearance references. A recovered recipe should be tested against the source it originally described, not simply the first image with a matching short name. This prevents a plausible but incorrect reconstruction from replacing a genuine source that still exists elsewhere in your archive.
Check Crop Intent Against the Intended Output
A crop can be technically valid and still belong to the wrong delivery version. Suppose you prepared a wide website banner and a vertical print from the same photograph. Both profiles may contain careful edits, but only one fits the current task. Compare subject placement, aspect ratio, and important edge details against the relevant brief. Record which version you accept so that a later export does not silently switch to a different composition.
Then inspect whether the output size hides a mistake. A small preview can make an overly tight crop seem harmless, while the full print reveals a clipped hand or missing foreground feature. Export a test at the intended aspect ratio and review the whole frame. Keep any new crop adjustment separate from the recovered profile until you have decided whether you are restoring the historical edit or deliberately creating a revised output.
Preserve Resource Choices for Reproducibility
Some recipes rely on resources outside the main image and profile. Record the exact resource you used when a custom color treatment or correction depends on it. Do not replace an unavailable resource with a similarly named download and assume the result is equivalent. Compare a controlled export first. If you choose a substitute, save that decision as a new revision and retain the recovered original profile for reference.
For a long-term archive, include a short plain-language note describing the application version, source identity, accepted profile, and output purpose. That note does not need every processing value, because the profile already holds the recipe. Its job is explaining which files belong together and why the accepted export matters. This small amount of context can prevent another expensive search when you revisit the same shoot after changing computers or reorganizing folders.
Decide When the Recovered Photograph Is Sufficient
Recovery quality should match the actual use. A complete RAW and correct profile offer the strongest editing flexibility, but a high-quality existing export may satisfy an urgent delivery. Compare the available resolution, detail, crop, and color with that specific requirement. Preserve the native recovery investigation separately if it remains incomplete. Meeting one delivery need does not establish that every original editing decision or source file has been restored.
If you deliver from a surviving export, keep a record of that choice and avoid describing it as a newly developed original. This matters when future revisions require a different crop or stronger tonal adjustment. A clear record helps you estimate those limits honestly. It also lets you resume native recovery later without confusing the temporary delivery solution with the final accepted source-profile archive.
When File Recovery Software Becomes Relevant
If a RAW photograph or a previously saved PP3 has actually disappeared from a readable storage device, file recovery may be worth evaluating. Stop writing new exports to that device first. PandaOffice Drecov can provide a separate search path for surviving file data, but it cannot infer an unsaved recipe from your memory or recreate RAW pixels from a small processing profile.
Use the native profile checks before scanning when the source files still exist. They often answer a settings problem more directly. If you do scan, confirm the file-type support available in your installed edition, because an uncommon extension may need a different search approach from a standard photograph. An SSD whose deleted blocks have already been discarded may offer little recoverable data, regardless of the interface you choose.
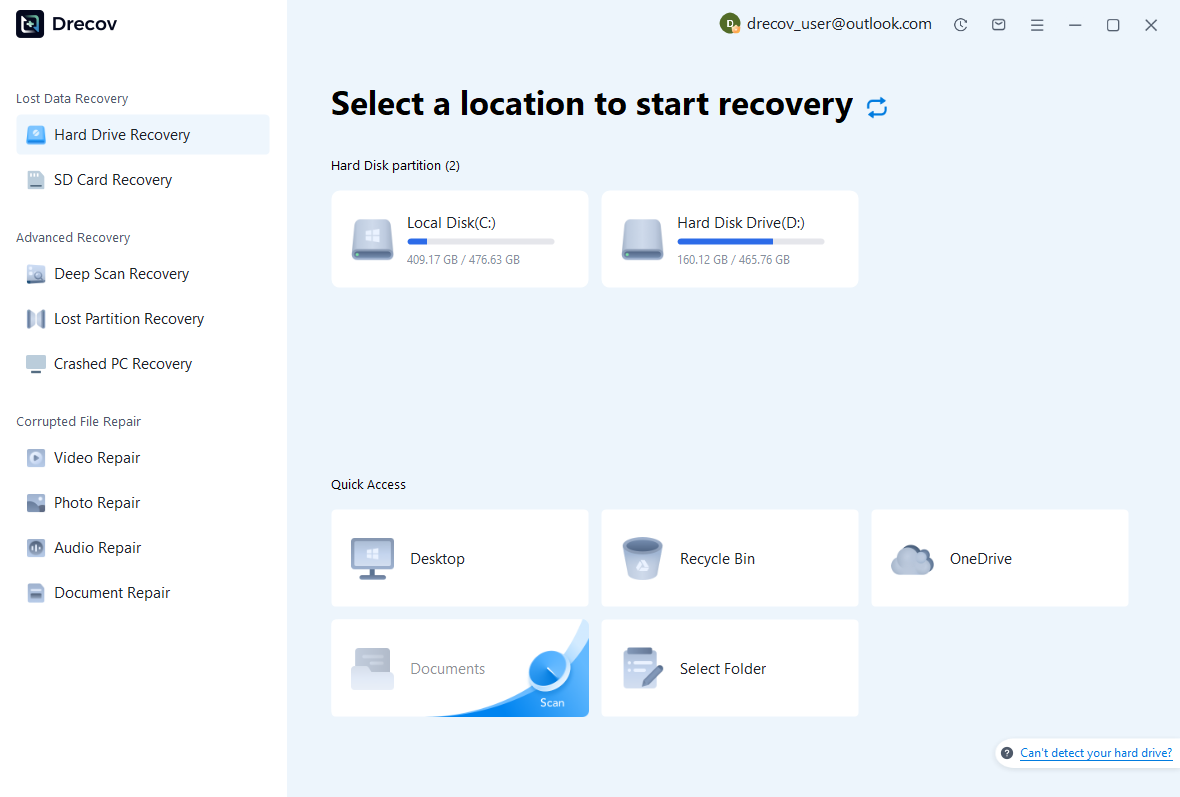
Step 1: Select the Storage That Held the Missing Pair
Choose the physical volume that contained the original photograph or its saved processing profile. If the two lived in different places, treat them as separate searches and note that distinction. Keep the recovery destination on another healthy device, and avoid installing software onto the affected volume. The source-selection screenshot shows the interface only; your actual drive labels and available locations will differ.
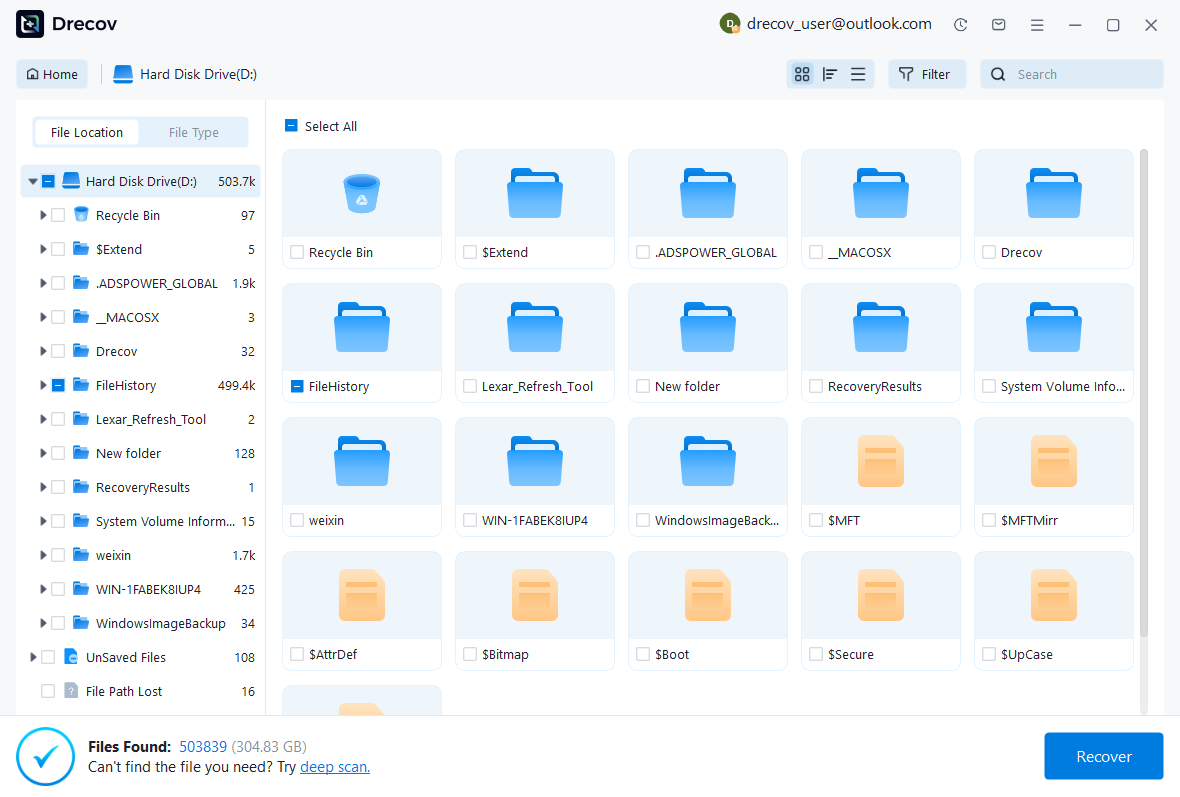
Step 2: Compare File Candidates Against the Shoot
Review available names, paths, sizes, dates, and supported previews. For RAW candidates, compare the actual photograph rather than accepting a familiar basename. For profile candidates, retain plausible files even if a visual preview is unavailable, then inspect their contents through a copied workflow. A matching photo and a valid-looking PP3 can still belong to different editing stages, so preserve competing candidates.
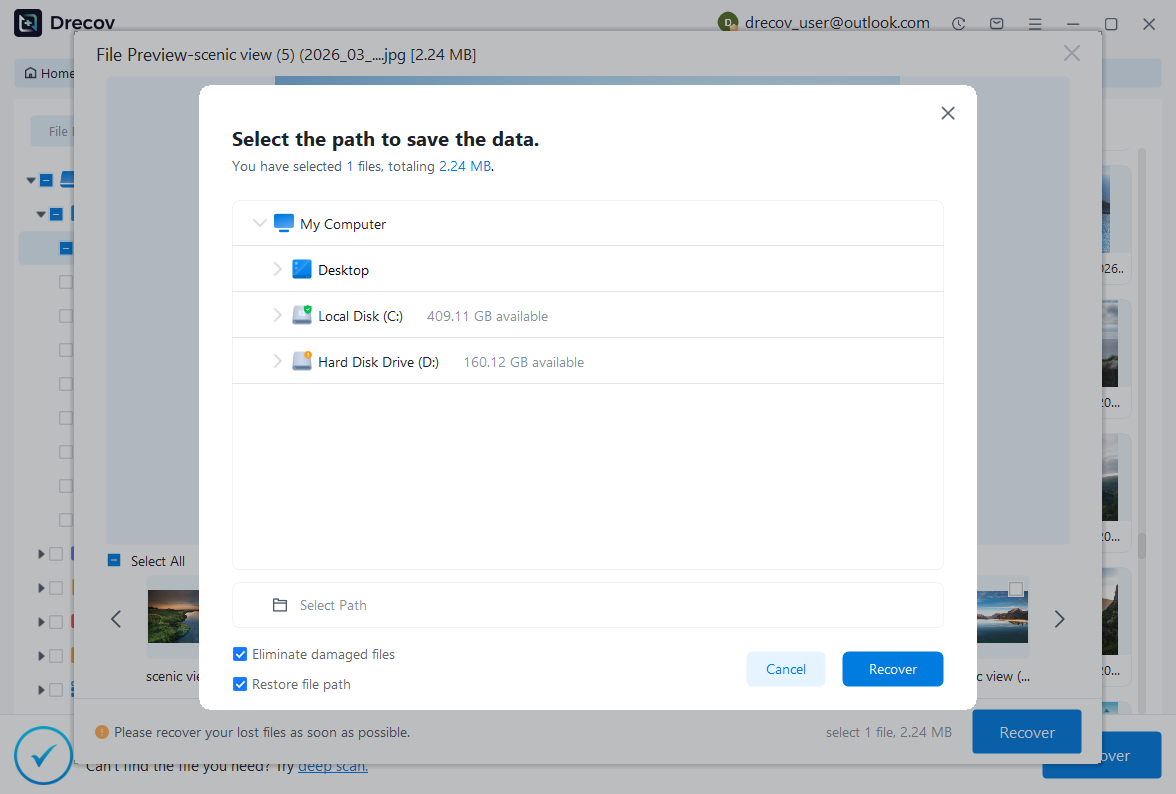
Step 3: Recover Separately and Reopen the Result
Save selected candidates to the separate healthy destination, then duplicate them again for testing. Open the source in RawTherapee, load the candidate profile, and inspect the crop and important adjustments. Export a test image and compare it with a known reference. A successful copy operation alone does not establish that the complete photograph and the intended recipe survived together.
Confirm the Recovery before Resuming Normal Work
A useful final test has three parts: the source opens fully, the chosen recipe produces the intended edit, and a fresh export meets the delivery requirements. Check those parts independently. A photograph can open while using the wrong profile, and a correct-looking preview can hide a problem that appears only in the full-resolution export. Keep the accepted files separate until all three checks pass.
- Confirm the source image identity, dimensions, and usable detail.
- Verify the accepted profile’s crop, tone, color, and important local corrections.
- Produce a controlled export and inspect it at the required output size.
- Preserve the accepted source-profile pair and a short recovery note in a second location.
Protect the Next Editing Session
For future work, store profiles alongside source images when that suits your workflow, and copy both together in a regular backup. If you also keep cached profiles, treat that as an additional convenience rather than the only history. Save separate named profiles before major alternative edits. This gives you a deliberate way to return to a print version or earlier crop without searching temporary working data.
Finally, test your backup with one complete photograph and its recipe. Open the copied source, load the copied profile, and produce a small verification export. This practical test reveals missing companions and external dependencies before a real incident. A folder full of filenames is reassuring, but a reproducible image is much stronger evidence that your editing work is protected.
Related Recovery Resources
Explore the relevant recovery options: Hard drive recovery, External hard drive recovery.
For another recovery case and its practical checks, read the related recovery guide.
Check the vendor guidance for the installed version: official recovery documentation 1, official recovery documentation 2, official recovery documentation 3, official recovery documentation 4.