








Separate Missing Scenes from Missing Asset References
A Unity project can open successfully while important work remains missing. You might see an empty scene, missing scripts, pink materials, or objects whose references have broken. These symptoms do not all mean that the underlying files were deleted. Start by identifying whether you lost a saved scene, an asset, its metadata, or the environment that lets Unity interpret the project correctly.
For example, a model can survive on disk while its original metadata is gone. Unity may then assign a new identity when it imports the model, leaving existing scene references unresolved. Replacing the model with a visually identical copy may not repair those references. Preserve the project first, then look for the matching original files and their relationships rather than collecting isolated assets without context.
Preserve What Is Still Open
If the desired scene remains open with useful unsaved changes, save it under a separate recovery name before closing the editor. Also preserve any unsaved script or asset edits through an appropriate copy. Avoid pressing broad discard or revert actions until you understand which current changes matter. A recovery trial should not erase the only live version of a scene you can still inspect.
Copy the complete accessible project to a healthy location before changing its structure. Include the source Assets, Packages, and ProjectSettings folders, along with other project-specific inputs. Record the editor version and installed dependencies. Keep generated caches separate in your inventory, but do not delete anything from the only surviving project while diagnosing the loss. The source folders and metadata deserve particular attention.
Confirm the Correct Project and Saved Scene
Check the full project path in Unity Hub and the editor. A duplicate project or an older checkout can open with a familiar name and different content. Then inspect which scene is actually loaded. A new empty scene is not proof that the saved production scene disappeared. Search the preserved Assets tree for the expected .unity file and compare recognizable objects or scene organization.
If the expected scene exists, open a copy through the project workflow and inspect the Console. Record missing scripts, unresolved assets, and dependency errors before trying fixes. The first error can explain many later symptoms. For example, a compilation failure can prevent expected behavior even when the scene and script source remain present. File recovery is not the first solution to a dependency-resolution problem.
Distinguish Source Assets from Generated Data
Unity generates imported representations and caches from project inputs. A surviving cache is not a complete substitute for missing source files, original metadata, or saved scenes. Do not assume that a built game or a large Library directory contains a readily recoverable editable project. Keep those artifacts as evidence, but search for the real project sources and existing complete copies first.
Similarly, a scene file does not necessarily embed every texture, mesh, animation, and script it references. Its usefulness depends on the surrounding project. Inventory the missing relationships rather than judging recovery by one recovered scene name. You need a coherent set of source assets and identifiers, plus the project configuration that makes the editor interpret those assets as intended.
Free Method 1: Restore Matching Assets and Meta Files
Unity metadata records important information about imported assets, including their identities. When restoring an existing repository or project backup, keep each asset with its original .meta companion. Restore the matching set from a coherent revision into a copied project. Avoid mixing an old asset with unrelated newer metadata simply because their basenames happen to match.
If a meta file disappeared but a known-good copy survives, compare it before opening the trial project. Keep Unity closed while deliberately replacing copied project files so it does not import an incomplete intermediate state. Then reopen with the appropriate editor version and inspect references. Restoring the original identity can help existing references resolve, but only when the files and project context genuinely correspond.
- Identify the missing or replaced asset and its expected project path.
- Find a coherent existing revision containing both the asset and its original meta file.
- Restore that pair into a preserved trial project while the editor is closed.
- Reopen the project and verify the affected scene, prefab, and asset references.
Do Not Fabricate Identifiers as a Shortcut
Manually assigning a guessed identifier can create collisions or point references to the wrong asset. A familiar filename does not establish the original identity. Use trustworthy existing metadata whenever possible, and keep experimental edits away from the accepted recovery baseline. If the original identity cannot be established, document that limitation and plan a deliberate reference-repair or reconstruction task instead.
For a folder-level loss, preserve folder metadata as well as individual asset companions. Review the complete hierarchy and any project-specific relationships. A project may use packages, assembly definitions, addressable configuration, or other systems that add dependencies beyond the visible scene. Recovering one asset can fix a symptom while leaving the larger feature incomplete, so follow the affected path through the project.
Free Method 2: Open an Existing Saved Scene in a Coherent Copy
Search existing complete project copies and repository revisions for the last acceptable saved scene. Use a separate checkout or copied folder rather than resetting the active project. Keep the editor version consistent initially. A known saved scene can provide a stable baseline, but it may lack changes made after that save. Compare it with surviving screenshots, notes, and current project content.
Once the scene opens, inspect its hierarchy and important components. Check whether objects are inactive, hidden by editor controls, or positioned outside the current view before assuming deletion. Verify the expected scene is enabled in the relevant project flow. These checks can recover access to existing work without restoring files. They also prevent you from overwriting a valid scene while trying to solve a display or selection problem.
Compare Prefab and Scene Responsibilities
Some object changes belong to a prefab asset, while others exist as scene-specific overrides. Recovering an older prefab can affect multiple scenes, and restoring a scene may not restore a changed prefab. Identify where the lost value was stored before choosing a candidate. Inspect both the instance and its source asset in a copied project, and record which relationship you intend to recover.
Avoid applying or reverting every override as a blanket repair. That can replace valid scene-specific settings. Compare the affected component values and child objects deliberately. If only one instance is wrong, a project-wide prefab restoration may be excessive. Conversely, if many scenes share the same broken prefab, repairing isolated instances can hide the common source of the problem rather than restore the intended asset.
Free Method 3: Use an Existing Repository or Source Export
A previously committed project revision can supply scenes, scripts, metadata, and configuration together. Inspect it in a separate working location, including any large-file objects the repository requires. A small pointer file is not the actual texture or model. Verify that the checkout has the real content before concluding that an asset has been recovered or that its import failure proves corruption.
If no native scene survives, existing source exports may support partial reconstruction. A model export, texture set, or animation clip can remain valuable, but it does not recreate all scene relationships, component values, or editor history. Label this work as reconstruction. Keep its source evidence and new changes distinct from genuinely recovered native project files so you can assess the remaining effort honestly.
Be Careful with Package and Plugin Dependencies
An old project can fail to load correctly if required packages or plugins are absent. Review the preserved package configuration and legitimate installation sources. Do not download random replacement plugins merely because an error mentions a familiar name. First determine the version and role of the original dependency. A version mismatch can change serialization or behavior even when assets appear to import successfully.
Keep dependency troubleshooting separate from asset restoration. Record which package changes you make and test them on copies. If the recovered project expects an older editor, opening it directly in a newer version may perform migrations that complicate comparison. Preserve an unchanged baseline before any conversion, and save upgraded results separately until you have verified that the important scene and asset behavior remains intact.
Understand the Limits of Unsaved Scene Recovery
Do not assume that Unity maintains a universal, permanent autosave history for every scene and asset. Available recovery behavior can depend on the version, installed tools, and what reached disk before the incident. If the editor offers a recovery option after a crash, preserve accessible project data and evaluate the offered result. Save a useful recovered scene under a separate name immediately.
If no recovery copy exists and the scene was never saved, an ordinary deleted-file scan may have no complete scene file to find. Focus on surviving source assets and any real recorded project state. A screen capture or built application can help guide reconstruction, but neither automatically supplies the original editable scene. State that limitation clearly when estimating what the recovery has achieved.
Keep Temporary Evidence before Cleanup
After a crash, avoid cleanup tools and broad project resets while useful recovery evidence may remain. Preserve the accessible project directory and relevant logs before troubleshooting. Logs can identify the scene, editor version, or failing asset even when they do not contain the missing content. Use them as clues to choose a recovery path, not as a promise that the scene itself survives.
If a copied project opens only after removing generated data, keep the original preserved copy unchanged. Rebuilding imported data can solve a cache problem, but it cannot recreate absent source assets or their original identifiers. Make that distinction in your notes. A successful reimport proves the surviving inputs can generate usable editor data; it does not prove that every original input was present.
Validate References Beyond the First Scene View
A scene can look correct while hidden dependencies remain broken. Inspect important prefabs, materials, animations, script components, and UI references. Check the Console and test the specific feature that failed. If the project uses additive scenes or runtime loading, opening one scene is only part of validation. Follow the normal entry point in a controlled environment to reveal missing resources used later.
For an asset restored with metadata, check references in more than one place when it is widely shared. Confirm that the intended mesh or texture appears, not merely any asset of the same type. A reference collision can produce plausible but wrong content. Use recognizable visual details, component values, and project-specific behavior to verify identity rather than relying solely on the absence of error messages.
Check Scripts and Serialized Values Together
A recovered script can compile while serialized scene values no longer match its fields. Review renamed fields, component assignments, and defaults around the incident. If a script was moved or recreated with different metadata, existing components may not reconnect automatically. Compare the original companion file and the scene’s expected relationship before making manual assignments that could hide the underlying identity problem.
Then test the restored behavior with a small reproducible scenario. For example, verify that the recovered interaction triggers on the intended object and uses the correct configured value. Keep tests focused on the recovery goal. A successful general play session can miss the exact feature whose data was lost, especially when the affected scene is large or contains several alternative paths.
Review Project Configuration and Build Inputs
Preserve the project’s editor version information, package manifests, and relevant settings with the accepted source. A scene restored into an arbitrary fresh project can behave differently because input, rendering, layers, physics, or build configuration changed. Compare those settings before changing the recovered content to compensate. Otherwise, you may introduce new scene edits for a problem that belongs to the environment.
For teams, coordinate the accepted recovery revision through the existing project workflow after review. Do not mix local experimental metadata with a shared baseline accidentally. Inspect the final file changes and ensure they contain real assets rather than generated noise. A clear recovery checkpoint should explain which identifiers and dependencies were restored, which behavior was tested, and what reconstruction remains incomplete.
Know When Storage Recovery Is the Priority
If the project drive shows repeated read errors, disconnects, or missing unrelated folders, treat it as a storage problem before an editor problem. Avoid repeated imports and builds on that volume. Those operations can write substantial data and make a fragile situation worse. Preserve readable content and choose an appropriate recovery approach for the condition of the device.
For a healthy volume with a recent deletion, a targeted file scan may be reasonable. The recovery target should include source files and matching metadata, not only whatever produces a recognizable preview. On storage that has already discarded deleted blocks, recovery may be limited. No editor setting or recovery interface can guarantee that overwritten or discarded source data will become available again.
Recover a Scene with Several Generations of the Same Asset
A project can contain several versions of a model or texture that look nearly identical. Before restoring one, compare the original path, metadata identity, and the scene that referenced it. A newer export with a familiar name may not be the asset that the scene expects. Preserve each candidate and test it in a copied project. This avoids replacing a valid reference with a visually plausible substitute that changes behavior elsewhere.
Check import settings as well as visible pixels or geometry. Scale, texture interpretation, rig configuration, and other settings can affect the result independently of the source file’s appearance. If original metadata survives, compare it with the current import state before making manual changes. A recovered source and its accepted settings should form one deliberate baseline. Keep any new tuning separate so you can explain which parts of the result were restored and which were adjusted.
Inspect Runtime Loading Paths
Some resources appear only when the application runs a specific feature. A scene preview can therefore look complete while runtime-loaded content remains missing. Follow the actual loading path used by the project and test a representative case. Do not create duplicate assets merely to silence a missing-resource symptom before understanding the expected identifier or path. A workaround can hide the original relationship and make later recovery more difficult.
If the project uses a content-management system or generated catalog, preserve its authoritative configuration and inputs. Regenerate derived data only after the accepted sources are coherent. A generated catalog that points to absent content is not a recovered asset set. Record the environment and build steps used for validation so another person can reproduce the test without relying on leftover caches from your machine.
Keep Package Content and Project Content Distinct
A missing asset can belong to an installed package rather than the project’s own Assets folder. Identify ownership before restoring files into a new location. Copying package content into the project can change references and update behavior in ways that complicate comparison. First restore the legitimate expected dependency and inspect whether the original relationship returns. Treat a deliberate local replacement as a separate change with its own reason.
For custom packages maintained with the project, include their source and configuration in the recovery inventory. A project backup that excludes a local package path may look complete while missing essential code or assets. Test the accepted copy from a location that does not accidentally resolve the old path. This exposes dependencies that your usual workstation may otherwise supply silently.
Review the Accepted Recovery as a Team Asset Change
Before returning the result to shared development, inspect the final asset and metadata changes together. Look for unexpected identifier changes, duplicate resources, and generated files that do not belong in the normal repository. Keep the recovery checkpoint focused and describe the concrete repaired scene or feature. This helps teammates review the relationship changes instead of facing a large unexplained import diff.
If some references required manual reconstruction, list them and test their important uses. Do not assume a repaired reference in one scene covers every prefab or runtime path. Preserve the raw recovered files until the shared baseline passes its relevant checks. A clear accepted asset set, a small recovery note, and a verified independent copy give the team a dependable place to continue work.
When File Recovery Software Fits the Situation
PandaOffice Drecov can provide a search route for deleted scene files, source assets, or metadata on readable storage. It does not automatically repair Unity GUID relationships or reconstruct a complete project from isolated files. Use it after checking actual project locations, saved copies, and existing version control. Native sources with preserved relationships usually provide a clearer starting point than unrelated recovered candidates.
Confirm the file support available in your installed edition before relying on a scan for uncommon project formats. Preserve plausible files even when they lack a visual preview, and compare them through a copied project. Keep the recovered destination separate from the affected volume. The important question is whether the recovered set forms a coherent editable project, not whether the scan lists familiar extensions.
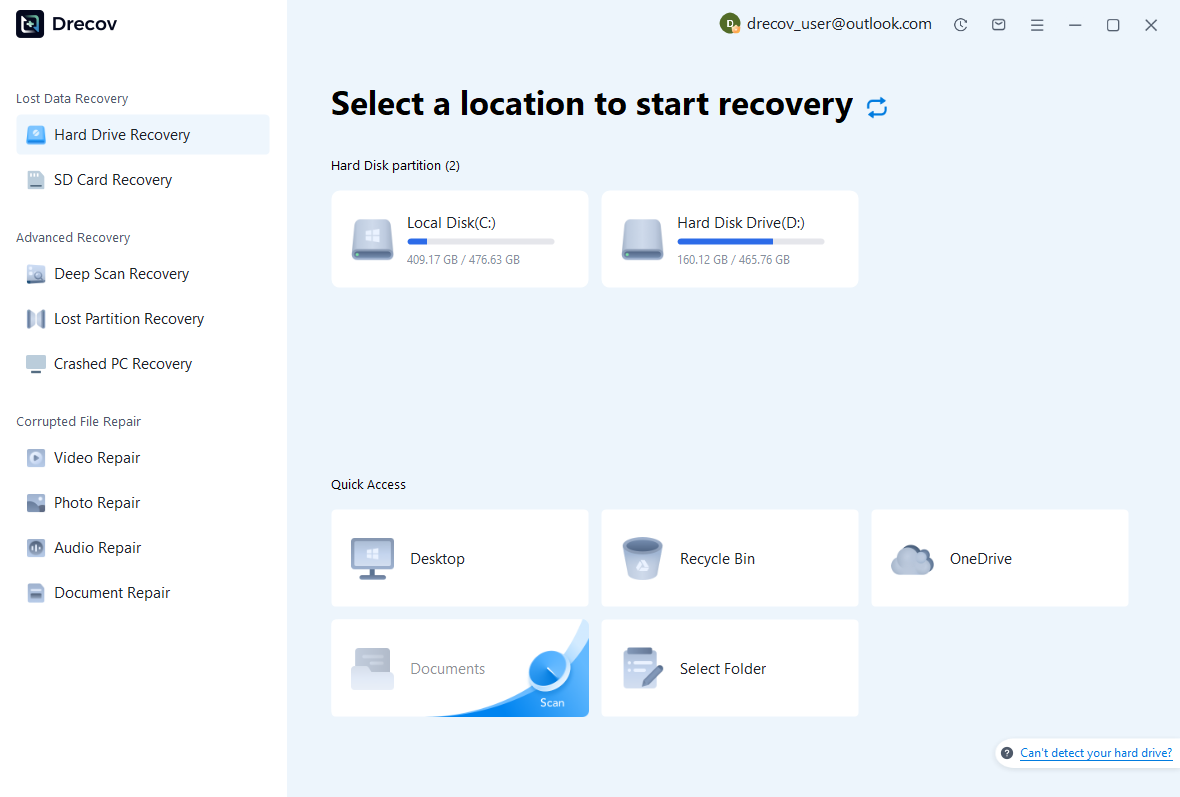
Step 1: Select the Volume Containing the Missing Project Data
Choose the storage that held the actual Assets folder, saved scene, or metadata. If source assets lived in another linked location, record that separate search target. Avoid creating a replacement project on the affected volume. Reserve another healthy destination for recovery outputs, and confirm the volume identity through its capacity and original project path rather than guessing from a drive letter alone.
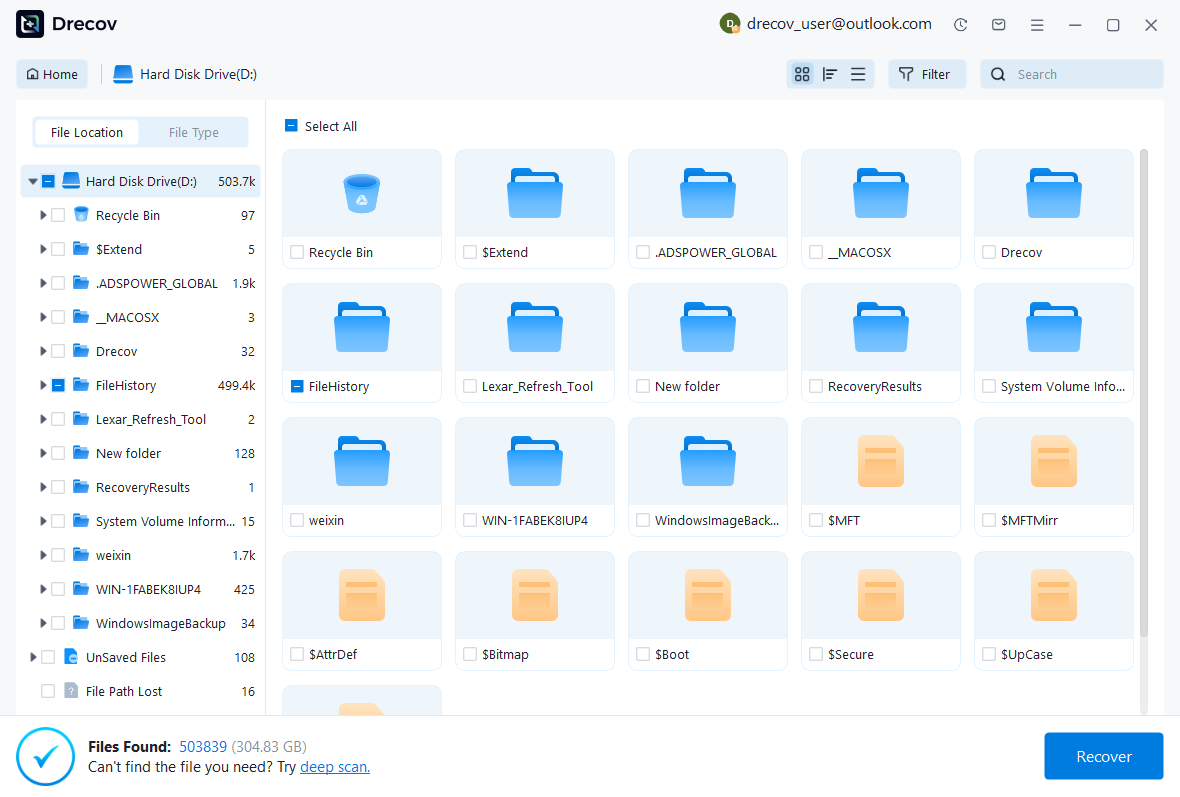
Step 2: Compare Assets, Scenes, and Companion Files
Review available paths, names, sizes, dates, and supported previews. Retain original meta companions with their assets whenever they survive. Keep competing scene versions separately, because the newest candidate may reflect an incomplete save. Inspect recognizable content and project structure after recovery. A visually correct texture does not establish that its original identity or all related scene references also survived.
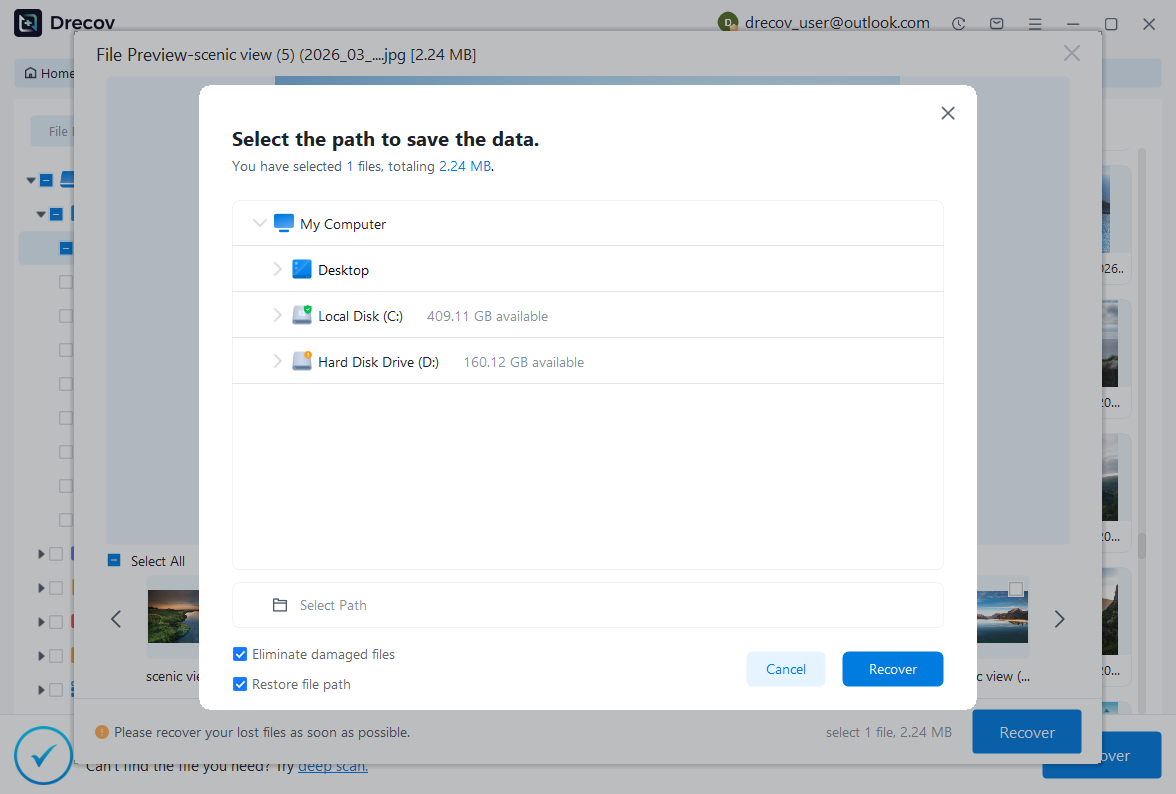
Step 3: Recover Elsewhere and Test a Complete Copy
Save selected files to the separate destination, then assemble a trial project from copies. Use the appropriate editor version, inspect errors, and test the affected scenes and prefabs. Keep the recovered originals unchanged while resolving dependencies. Confirm both visual content and project behavior before replacing your current working baseline. File-copy success is only the beginning of a Unity project recovery.
Confirm a Usable Editable Project
A strong final result includes the accepted scenes, source assets, original metadata where available, and the configuration required to open them. Record any references you repaired manually and any content you reconstructed. That makes the result reviewable and prevents future confusion about which parts came from an authentic saved state. Preserve the verified project in another location before resuming normal production work.
- Confirm the correct project path, editor version, and complete source folders.
- Inspect missing scripts, asset identities, prefab relationships, and important scene references.
- Run focused play-mode or project checks for the feature that was affected.
- Save a coherent recovery checkpoint and test an independent copy of that checkpoint.
Protect Asset Relationships in Future Backups
Keep assets and their meta files together in the project’s normal version-control and backup workflow. Include package configuration and project settings, and verify that large-file content actually reaches the backup. Avoid moving or replacing project files outside the editor without understanding the metadata consequences. A collection of textures and models is useful, but a recoverable Unity project also needs their identities and relationships.
Finally, test restoration of a small complete project copy. Open its saved scene, inspect a prefab, and exercise one representative interaction. This reveals missing source files or package assumptions before a real incident. A successful backup test gives you evidence that the project remains editable, rather than merely showing that a folder with the right name exists on another device.
Related Recovery Resources
Explore the relevant recovery options: Hard drive recovery, External hard drive recovery.
For another recovery case and its practical checks, read the related recovery guide.
Check the vendor guidance for the installed version: official recovery documentation 1, official recovery documentation 2, official recovery documentation 3.





