







Losing precious photos can feel devastating, especially when they are permanently deleted from your phone, computer, SD card, or cloud storage. Family memories, vacation pictures, work files, and sentimental images may seem gone forever. Fortunately, learning how to restore permanently deleted photos is possible in many cases with the right methods and recovery tools.
Modern devices often keep deleted files hidden temporarily before new data overwrites them. This means you still have a chance to recover lost photos if you act quickly. Whether you accidentally deleted your images, formatted your drive, lost files to a virus, or emptied them from the recycle bin, this complete guide explains the best ways to restore permanently deleted photos safely and effectively.
Can Permanently Deleted Photos Really Be Recovered?
Yes, permanently deleted photos can often be restored. When a photo is deleted, the actual file may remain on the storage device until new data overwrites it. If you are wondering how to restore permanently deleted photos, recovery software can help by scanning storage sectors to locate these hidden files and restore them. However, recovery success depends on several factors:
- How long ago the photos were deleted
- Whether new data replaced the deleted files
- The type of storage device used
- The recovery method chosen
The faster you begin recovery, the higher your chances of success.
What Happens When Photos Are Permanently Deleted?
Many people believe deleted photos disappear immediately, but that is not usually true.
How File Deletion Works
When you delete a photo:
- The operating system removes the file reference.
- Storage space becomes marked as available.
- The photo data remains hidden temporarily.
- New files may overwrite the old data later.
Until overwritten, recovery tools may still retrieve the images.
Common Reasons Photos Get Permanently Deleted
Understanding how photos are lost helps prevent future problems.
- Accidental Deletion: Photos may be removed unintentionally while cleaning storage.
- Emptying the Recycle Bin: Files deleted from the recycle bin become harder to recover.
- Formatting Devices: Formatting SD cards, hard drives, or phones erases file structures.
- Virus or Malware Attacks: Malicious software can corrupt or delete image files.
- Factory Reset: Resetting a device wipes stored data completely.
- System Crashes: Unexpected crashes may lead to photo loss or corruption.
First Things to Do After Photo Deletion
Quick action is extremely important after losing photos.
Stop Using the Device Immediately
Avoid taking new photos, installing apps, downloading files, or saving documents. New data can overwrite deleted photos permanently.
Disconnect External Storage
If photos were stored on USB drives, SD cards, or external hard drives, safely remove them immediately to prevent overwriting.
Comprehensive Data Recovery Methods Ranked by Complexity
To help you navigate the retrieval process efficiently, this guide arranges the solutions on how to restore permanently deleted photos from the easiest, built-in system checks to advanced software restoration and professional forensic labs.
How to Restore Accidentally Deleted Photos via Native System Tools
Before moving on to third-party tools, your very first step should always involve checking the local storage caches that operating systems deploy to protect users from sudden data loss events.
Method 1: Check the Windows Recycle Bin
If you are working on a PC, your files might not be permanently gone just yet.
- Step 1: Double-click the Recycle Bin icon on your Windows Desktop.
- Step 2: Type the image extension (like
.jpgor.png) into the top-right search bar to locate your deleted photos. - Step 3: Select the files, right-click them, and choose Restore. The photos will instantly return to their original directory.
Method 2: Use Windows File History Backup
Windows contains an automated backup routine called File History. If you enabled this feature prior to losing your files, you can use it to roll back folder states.
- Step 1: Press the Windows Key + E to open File Explorer and navigate to the folder where your photos were originally saved.
- Step 2: Right-click inside the empty space of the folder and select Restore previous versions from the contextual menu.
- Step 3: A properties window will open showing a list of available older versions. Select a backup version that matches a timestamp before the deletion occurred.
- Step 4: Click Restore to write the folder contents back to your active storage.
How to Restore Photos on Apple Mac Systems
macOS manages file deletion similarly to Windows, utilizing a temporary storage cache alongside a dedicated system backup utility.
Method 1: Check the Recently Deleted Folder in macOS Photos
If you deleted images directly inside the native macOS Photos ecosystem, they bypass the system Trash and go into a dedicated holding zone.
- Step 1: Launch the native Photos application on your Mac.
- Step 2: Look at the left-hand sidebar menu and click on the Recently Deleted tab.
- Step 3: Highlight the specific images you wish to rescue and click the Recover button situated in the upper-right corner of the interface. Note that macOS holds these files for exactly 30 days before purging them.
Method 2: Restore Using a Time Machine Backup
For files deleted from standard directories outside of the Photos app, Apple’s standard Time Machine utility provides an intuitive way to journey back through your storage history.
- Step 1: Connect the external hard drive that you designate for your automated Time Machine backups to your Mac.
- Step 2: Open a Finder window and locate the directory where your missing pictures used to live.
- Step 3: Click the Time Machine icon in the macOS menu bar and select Enter Time Machine.
- Step 4: Use the timeline on the right side of the screen to browse back to a date before the images were erased.
- Step 5: Select the files and click the Restore button to pull them back onto your active system drive.
How to Restore Photos on Mobile Environments (Android & iPhone)
Mobile devices feature cloud-integrated gallery applications that often serve as an excellent safety net when users accidentally erase local files, offering a built-in solution on how to restore permanently deleted photos.
Method 1: Restore from Google Photos Trash (Android)
Android relies heavily on cloud ecosystem synchronization, which frequently preserves images even after they are removed from the device’s physical camera roll.
- Step 1: Launch the Google Photos app on your Android handset.
- Step 2: Tap the Library tab located along the bottom navigation bar, then select the Trash icon at the top.
- Step 3: Press and hold the items you wish to save, then tap the Restore prompt at the bottom. Google Photos holds items here for up to 60 days if your account is backed up.
Method 2: Recover from the Recently Deleted Album (iPhone)
iOS uses a strict safety window that keeps media intact for a month after a user deletes it.
- Step 1: Open the native Photos application on your iPhone.
- Step 2: Tap the Albums option at the bottom of the display and scroll all the way down to the utilities menu block.
- Step 3: Tap on Recently Deleted. You will be prompted to authenticate using Face ID, Touch ID, or your passcode.
- Step 4: Tap Select in the top right, mark the desired pictures, and tap Recover at the bottom of the screen.
Advanced Software Restoration via PandaOffice Drecov Data Recovery Software
When native trash bins are empty and no cloud backups exist, you must look to automated file carving utilities. Professional third-party programs scan the deep storage clusters of hard drives and memory cards to find and piece together file signatures that have lost their directory index entries.
For comprehensive file recovery situations on Windows or external media, utilizing an automated tool like PandaOffice Drecov data recovery software provides an efficient, highly reliable way to reconstruct missing photo structures. This tool is built specifically to address complex data loss scenarios, whether due to a corrupted file index, an accidental format, or a partition crash.
⚠ Warning: Install it on a drive different from the one where your data was lost to prevent overwriting.
Detailed Steps to Restore Data Using PandaOffice Drecov
To ensure your missing files are not overwritten during the recovery action, always follow these procedural steps meticulously:
- Step 1: Connect External Media and Launch the Application. If you are trying to rescue photos from an external camera SD card, a drone microSD card, or a portable hard drive, insert that device into your computer’s card reader now.
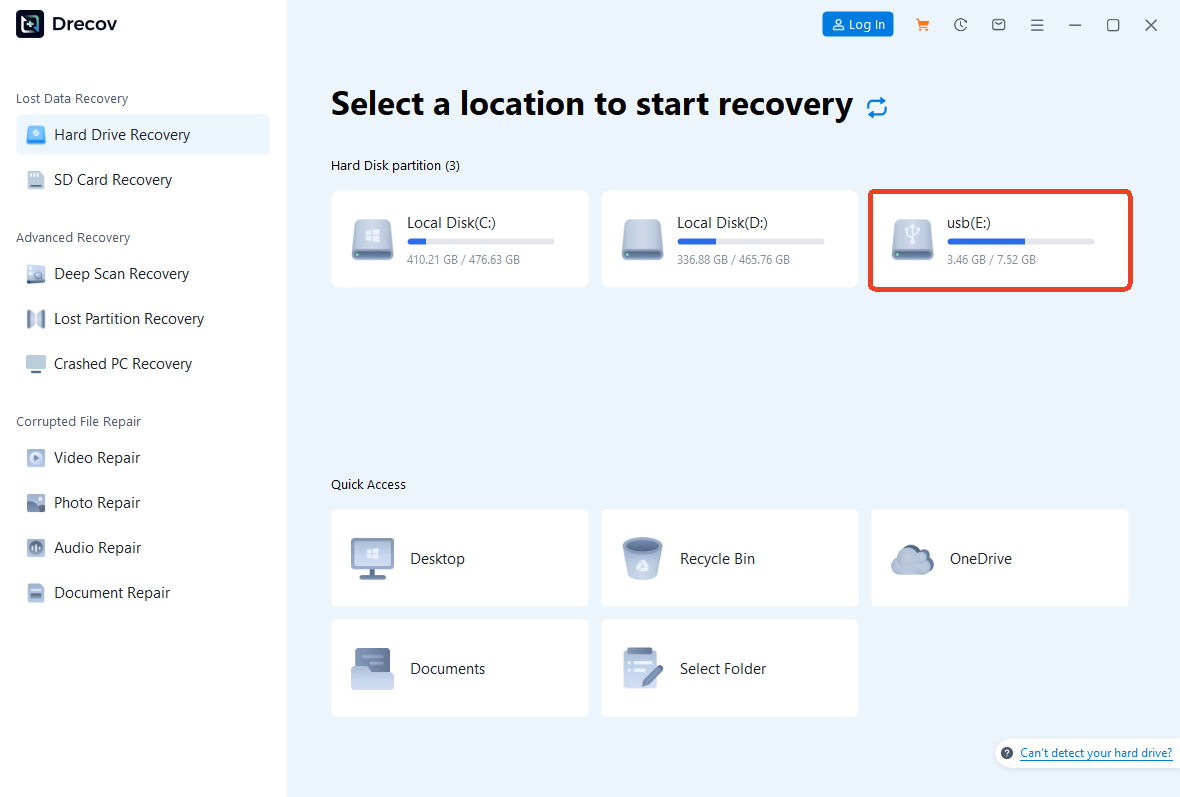
- Step 2: Select the Target Location for Scanning. On the main dashboard interface of the software, you will see an organized layout displaying all active internal partitions, connected external drives, then click the Scan button.

- Step 3: Execute a Deep Scan and Filter the Results. The tool will automatically start running a rapid quick scan followed immediately by an intensive Deep Scan of the raw disk sectors. Toggle the filter setting to Images or look for specific file extensions like
.jpg,.png,.raw, or.nefto narrow down the real-time search results and isolate your photos from other deleted system files.

- Step 4: Preview and Verify the Recoverable Photo Integrity. Once the scanning process finishes, browse through the generated file tree list. Double-click any found photo image thumbnail to open the interactive preview pane. This step is vital because it allows you to verify if the underlying file structure is completely healthy and uncorrupted before you proceed with extraction.

- Step 5: Export and Save Your Recovered Photos to a Secure Location. Tick the checkmark boxes next to all the pictures you want to save. Click the prominent Recover button. A file directory window will pop up asking where you want to export the data. Select an entirely different physical hard drive or storage device from the one you just scanned to complete the recovery safely.
Professional Data Recovery Services
If your storage drive has suffered severe physical damage, third-party software tools will not be able to help. You will need to enlist the help of a professional data recovery lab instead.
When to Use Professional Services
- Physical Component Failures: Your external hard drive makes clicking, grinding, or buzzing sounds when powered on.
- Severe Environmental Damage: The device has been submerged in water, exposed to fire, or suffered a heavy physical drop.
- Completely Unresponsive Internal Flash Chips: Your smartphone or USB flash drive will not turn on or draw power from any computer port.
- High-Value Data Situations: The missing images are irreplaceable corporate assets or legal documents where you cannot risk making a mistake using DIY software.
Professional engineers operate inside highly controlled sterile cleanrooms. They carefully disassemble drive casings under microscopes, desolder flash memory chips directly from circuit boards, and copy raw data onto secure servers using advanced hardware imaging tools. While these specialized services can be costly, they provide the highest possible success rate for physically compromised hardware.
Tips to Improve Photo Recovery Success
To maximize your chances of getting your images back completely intact, follow these best practices:
- Act Without Delay: The shorter the time window between accidental deletion and your recovery attempt, the less chance your operating system has to write background data over the missing files.
- Utilize Deep Scan Frameworks: If a quick scan fails to locate your missing images, always run a Deep Scan. This method analyzes raw data signatures across the entire storage drive, looking for file patterns even if the directory index is entirely missing.
- Export Your Restored Files Elsewhere: Always save your recovered files to a completely different storage drive than the one you are scanning. This keeps the original source sectors pure and unaltered in case you need to run another scan.
- Keep Steady Device Power: Always plug your laptop or phone into a reliable wall outlet before initiating a disk scan. A sudden power loss mid-recovery can corrupt the file system structure or damage your storage media further.
- Avoid Unverified Mobile Applications: Stay away from sketchy mobile apps that promise instant photo restoration directly onto your phone without a computer. These apps often fill your local storage caches with advertisements and background data, which can overwrite the exact images you are trying to save.
How to Prevent Permanent Photo Loss
The most effective way to handle data loss is to stop it from happening in the first place by setting up automated backups.
Implement Cloud Storage Ecosystems
Configure tools like Google Photos, Apple iCloud, or Microsoft OneDrive to automatically sync your media. These services upload your pictures to secure remote servers the moment you take them, providing a reliable safety net if your physical device is broken or lost.
Keep External Hardware Backups
Regularly connect a dedicated external hard drive or a network-attached storage (NAS) system to your computer. Run a complete system backup once a month and store a duplicate copy of your most critical photos on a separate device kept outside your home.
Turn On Automated OS Backup Systems
Make sure Windows File History or macOS Time Machine is turned on and configured to back up your main user directories every day. This creates an automated safety net that allows you to restore older versions of your folders with just a few clicks.
Organize and Label Your Media Collections
Get into the habit of sorting your photos into clearly labeled folders grouped by year or event. Good file management makes it much less likely that you will accidentally delete an important directory while trying to clear out temporary files.
If you ever find yourself needing to look up missing apps or system files alongside your media recovery efforts, you can check out our step-by-step guide on how to find recently deleted apps on iPhone Android. Additionally, if your computer encounters stability issues or crashes during an extraction process, our troubleshooting manual on how to fix Microsoft Word not responding complete guide offers practical solutions for dealing with unresponsive desktop applications.
How to restore permanently deleted photos FAQs
Are permanently deleted photos gone forever?
No, they are often still recoverable. The term “permanently deleted” simply means the operating system has removed the file’s index entry and marked its storage space as reusable. The actual image data remains on the drive until new files are written directly over those sectors.
What is the best software to recover deleted photos?
The right software depends on your specific data loss scenario. Tools like PandaOffice Drecov, Disk Drill, Recuva, and EaseUS are all excellent choices that feature powerful deep scanning tools to safely rebuild lost image files.
Can I recover photos after formatting an SD card?
Yes, a standard quick format simply clears the partition allocation table without erasing the actual data blocks. As long as you have not written new photos to the card after formatting it, recovery software can usually find and restore your original files.
Is free recovery software safe to use?
Legitimate recovery tools from verified developers are entirely safe. To protect your data, always download software directly from the official developer website, run a quick antivirus scan on the installer file, and never download cracked versions from unverified third-party forums.
How long do deleted photos remain recoverable?
There is no set expiration date. Deleted files remain intact for as long as their storage sectors remain unwritten. On active system drives that handle a lot of background data, files can be overwritten within a few hours, whereas on idle storage devices they might remain retrievable for several months.
Conclusion
Learning how to restore permanently deleted photos can help you save irreplaceable family memories and important work files from unexpected data loss. Whether your files were deleted from a smartphone, desktop computer, camera SD card, or cloud service, you have access to a wide range of effective recovery methods today.
Your best approach is to stop using the affected device immediately, check your system’s built-in trash bins, and then deploy a reliable recovery program like PandaOffice Drecov if needed. For severe hardware failures or physical device damage, don’t hesitate to reach out to a professional data recovery lab.






