







To delete video background content, choose a method that matches the footage. Green screen works when the subject was filmed against a clean color. Cropping removes unwanted edges. Masking isolates a controlled area. AI background removal can help with ordinary scenes, but hair, motion blur, shadows, and transparent objects may require manual refinement. Always duplicate the original clip before editing.
Quick Answer
The phrase can also mean deleting a background asset from an editing timeline. That task is different from cutting the background out of pixels already recorded in the clip. Select the background layer and remove it if it is a separate asset. If the scene is baked into the video, use chroma key, masking, cropping, or a supported AI tool.
Understand the Main Limitation
Microsoft describes several options in its Microsoft background removal guidance. Clipchamp can remove a colored video background with its green screen effect, while split, trim, crop, overlays, and deletion handle other unwanted elements. An object embedded inside ordinary footage may not be removable with a simple delete command.
Use the Safest Available Method
For green screen footage, place the replacement image or video on a lower timeline track. Put the subject clip above it, enable chroma key, choose the screen color, and adjust the threshold until edges look natural. Avoid settings that erase clothing or objects that share the background color. Inspect fast motion and fine hair frame by frame.
Check Permissions and File Locations
Cropping is faster when the unwanted area stays near an edge. It changes framing and may reduce the useful resolution. Masking gives more control when the subject moves predictably, but it takes time. AI tools suit short social clips with clear subjects. They can create flicker around hands and hair, so preview the entire result before export.
Avoid Common Risks
A typical problem occurs when an editor deletes the wrong timeline asset and then saves the project. Use Undo while the session remains open. Reimport the original source if only the timeline reference was removed. Check the editor media bin, autosave folder, Recycle Bin, and cloud version history before recovery. The guide to remove video backgrounds explains a safe background workflow.
Typical Scenario
Keep the source clip, project file, replacement background, and exported result in separate folders. The methods in crop video safely help when cropping is a better match than background removal. Use clear names with version numbers so an export never overwrites the camera original.
Troubleshoot the Result
If an original clip was deleted from storage, stop using that drive. Removing an item from a timeline may not delete the source, but deleting it from the media library can. Check the exact editor behavior and the Recycle Bin. The guide to recover deleted video files covers recovery when a local video file is truly missing.
Choose the Right Action
| Situation | Recommended Action | Main Risk |
|---|---|---|
| Content remains available in the original service | Use the official save or management control | Confusing a cloud item with a local file |
| A local file exists but fails | Copy it to a healthy drive and test the copy | Overwriting or repeatedly converting the original |
| A local file was deleted | Stop writing to the source and begin recovery | New data overwriting recoverable sectors |
Protect Local Video Files Before Troubleshooting
Browser fixes, editing changes, cache cleanup, and storage moves can affect local files. Create a separate copy of any irreplaceable recording before you change settings. Keep the original file untouched and test edits on a duplicate. If a drive disconnects, reports read errors, or becomes unusually slow, stop using it. A failing device needs imaging or professional help rather than repeated repair attempts.
Check the Recycle Bin, cloud storage, application export folders, and recent project folders first. Search by file type and modification date when the original name is unknown. Do not install recovery software on the partition that held a deleted file. Installation can write new data over recoverable sectors. Save every restored file to another healthy device.
Recover Missing Media with PandaOffice Drecov
PandaOffice Drecov is a Windows data recovery tool for PCs, USB drives, SD cards, memory cards, hard drives, SSDs, and external drives. It supports photos, videos, documents, emails, audio files, and archives. Its read only recovery mode scans the selected source without using that source as the save destination. Quick Scan looks for recently deleted records, while Deep Scan searches more broadly. Preview before recovery helps users check selected results before saving them.
⚠ Warning: Install it on a drive different from the one where your data was lost to prevent overwriting.
Recover Missing Video Files with Drecov
- Step 1: Open PandaOffice Drecov and choose the original location where the video or project asset disappeared. Select the correct PC folder, USB drive, SD card, memory card, hard drive, SSD, or external drive.

- Step 2: Run Quick Scan first when the file disappeared recently through deletion, a failed transfer, an editing error, or an unexpected application close.

- Step 3: Continue with Deep Scan when Quick Scan misses the required file. Deep Scan is more suitable for older deletion, formatting, damaged folder records, or an unclear original path.
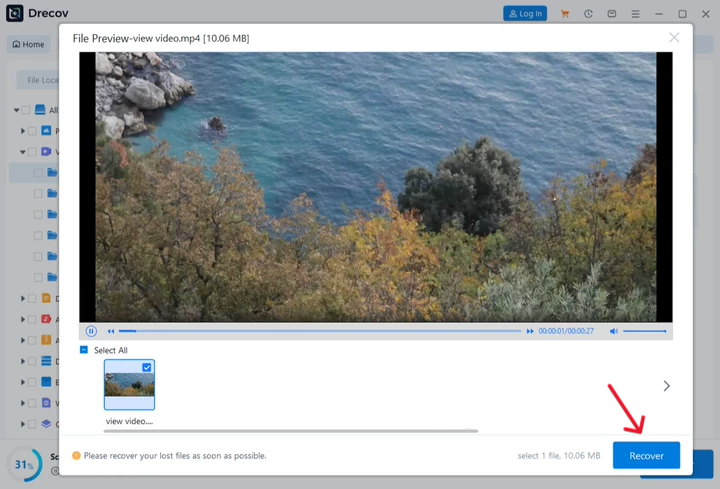
- Step 4: Preview before recovery. Compare the file name, date, size, thumbnail, duration, and playable content so you can select the correct result.
- Step 5: Recover selected files to another healthy drive or external storage device. Never save them to the source location because new writes may overwrite other recoverable data.
- Step 6: Open the destination and verify every restored file. Check the Drecov folder or Recovery folder if the results do not appear in the expected location.
Choose Quick Scan or Deep Scan for Video Recovery
Quick Scan is the best starting point for recent deletion, failed downloads, accidental moves, and interrupted editing. It can return useful results quickly when file system records remain available. Deep Scan searches the selected storage more thoroughly and may locate media after formatting or older loss. Start with Quick Scan, review its results, and continue with Deep Scan only when necessary.
Verify Recovered Files Before Reusing the Source
Open each recovered video from beginning to end. Check the duration, resolution, sound, seek behavior, and final frames. A file that displays a thumbnail may still contain damaged segments. Keep the source device unchanged until essential files pass verification. After verification, create a second backup. Only then should you repair, format, or reuse the original storage device.
Practical Guidance for Delete Video Background
For delete video background, start with the official application control and confirm the destination before changing tools.
With delete video background, keep an untouched original or backup before editing, moving, deleting, or repairing local media.
During delete video background, use one troubleshooting change at a time so the result remains clear and reversible.
Before delete video background, check account access, device permissions, available storage, and network stability before repeating the task.
After delete video background, avoid unknown services that request passwords, login codes, broad browser access, or unnecessary payment.
Frequently Asked Questions
Can every missing video be recovered
No. Recovery depends on whether the content still exists in a service, a backup, device trash, or unoverwritten local sectors. Physical damage and overwritten data require different expectations. Stop using the affected storage as soon as loss is discovered.
Should I use a third party downloader or repair tool
Use official controls first. Review the developer, permissions, privacy policy, and download source before trusting another tool. Avoid services that request passwords, login codes, broad browser access, or payment before showing a verifiable result.
Where should recovered files be saved
Save them to another healthy drive with enough free space. Do not use the source device because new writes can overwrite other recoverable data. Verify the result before repairing or reusing the source.
Preserve the Original Clip Before Editing
Keep a small record of each change, including the setting, original value, result, and file location. This makes troubleshooting reversible and prevents several changes from hiding the real cause. Restart only the affected application first. Reboot the computer when a driver, browser update, or file lock requires it.
Choose Green Screen Crop Mask or AI
Use descriptive file names and a stable folder structure after the task succeeds. Separate originals, working files, and exports. A second copy on another device protects against accidental deletion and hardware failure. Cloud sync can add convenience, but it should not be the only copy of an irreplaceable recording.
Inspect Hair Motion and Edge Quality
Treat unexpected executable files, browser prompts, and login requests as warning signs. A media task should not require an unknown service to control the entire browser or obtain an account password. Cancel suspicious downloads, scan the computer, and return to official application controls.
When planning delete video background, verify the completed file by checking its size, duration, image, sound, and final frames.
For delete video background, stop writing to the source device when an important local file has been deleted or lost.
Conclusion
Start with the official application or browser method, preserve valuable originals, and verify every saved result. When a local file is truly missing, stop writing to its source. PandaOffice Drecov can scan supported Windows storage and recover selected results to another healthy location without promising that every file will return.






