


Digital media dominates our daily lives. Whether you are a content creator, a business professional, or someone who loves capturing family moments, managing video files is likely part of your routine. However, working with large video files often presents two distinct challenges. First, you frequently need to edit these videos to make them fit specific formats or social media layouts. Second, because video editing involves heavy file manipulation, moving items to different folders, and exporting large assets, the risk of accidental data deletion increases dramatically.
This comprehensive guide serves a dual purpose. We will first explore the absolute best methods for how to crop a video on windows. We rank these options from the simplest built-in tools to more advanced software solutions. Following that, we will transition into the ultimate masterclass on data recovery. File loss is a common byproduct of intense video editing sessions. Therefore, we feature advanced techniques and professional tools to ensure your creative work is never permanently lost.
Why Do Video Editing and Data Loss Go Hand in Hand?
Before diving into the operational steps, it is vital to understand why video editing tasks—like learning how to crop a video on windows—so often lead to data recovery scenarios. Video editing requires a massive amount of system resources. When you render, crop, or export a video, your operating system creates large temporary files, reads and writes data rapidly across your storage drives, and taxes your hard drive’s cache.
During these high-intensity operations, several things can go wrong:
- Accidental Deletion: You might delete a raw footage clip thinking you have already exported the cropped version.
- Software Crashes: Video editing software can crash mid-export, corrupting the original project file or the source media.
- Drive Exhaustion: Out-of-memory errors or sudden drive disconnections can lead to partition corruption, making your media library inaccessible.
By understanding both sides of the coin—how to manipulate your media and how to protect it—you become a much more resilient digital citizen. Let us begin with the practical walkthroughs for editing your clips.
How to Crop a Video on Windows
When users search for how to crop a video on windows, they often face a mix of outdated advice pointing to discontinued tools like Windows Movie Maker. Modern versions of Windows provide excellent built-in capabilities, alongside accessible third-party software.
Below, we have arranged the best solutions for how to crop a video on windows, categorized from the easiest built-in system tools to more complex, feature-rich platforms.
Method 1: Using the Built-in Clipchamp App
Microsoft Clipchamp is now the official, default video editing application integrated into Windows 11 and available for download on Windows 10. It provides an incredibly intuitive timeline interface that makes figuring out how to crop a video on windows an absolute breeze without requiring complex technical skills.
- Step 1: Click on the Windows Start menu, type Clipchamp, and press Enter to launch the application. If you cannot find it, you can safely install it directly from the Microsoft Store.
- Step 2: Click on the Create a new video button on the home screen to open a fresh, blank editing project timeline.
- Step 3: Click the Import media button in the top-left corner, navigate your file explorer to locate your target video, select it, and click Open. Alternatively, simply drag and drop your video file directly into the media library tab.
- Step 4: Drag your imported video from the media tab down onto the editing timeline at the bottom of the screen.
- Step 5: Click on the video clip within the timeline to highlight it. A green border will appear around the video preview window above.
- Step 6: Look at the floating toolbar located right next to the video preview window. Click on the Crop icon (which looks like two intersecting framing angles).
- Step 7: Visual cropping handles will appear on the edges and corners of your video preview. Click and drag these handles inward to crop out unwanted areas of the frame.
- Step 8: Once you achieve the desired framing, click the green checkmark button (Done) on the floating toolbar to apply the crop.
- Step 9: Click the Export button in the top-right corner of the window, select your preferred resolution (such as 1080p for high quality), and wait for Windows to save the newly cropped video file to your local storage.
Method 2: Using the Photos App
If you do not want a full timeline editor, you can simply adjust the outer boundaries or aspect ratio of your clip. The native Windows Photos App provides a streamlined alternative for how to crop a video on windows.
- Step 1: Open your Windows File Explorer by pressing the hotkey Windows + E. Next, navigate to the folder where your video file is stored. Right-click the video file, hover over Open with, and select Photos.
- Step 2: Look at the top center of the Photos window. Click on the Edit image/video icon. Alternatively, simply press the native hotkey Ctrl + E to instantly open the editing interface.
- Step 3: The file might open up in the traditional video player. If so, look for the small pencil icon labeled Edit in Photos. You can also select the option to trim and adjust framing.
- Step 4: Select the Crop tool from the upper navigation menu. A bounding box with white corners will immediately surround your video frame.
- Step 5: Use your mouse cursor to drag the corners inward. This frames the exact portion of the video you wish to keep. You can also use the preset aspect ratios found at the bottom of the pane. Options like 16:9, 9:16, or 1:1 will instantly format the clip for specific platforms.
- Step 6: Click the Save as copy button located in the bottom right corner of the application interface. This choice guarantees you do not overwrite your original source file. It preserves a crucial backup in case you need to start over.
The Hidden Danger of Video Editing—Understanding Data Loss
Now that you have mastered how to crop a video on windows, it is critical to address the elephant in the room: data loss. Video production environments are notoriously chaotic. A single wrong keystroke, a sudden power surge during a render, or an automated storage-cleaning script can instantly wipe away gigabytes of irreplaceable video files, system assets, or project backups.
When a video file disappears from your drive, the operating system does not actually scrub the entire file immediately. Instead, Windows marks the storage space occupied by that file as “available for rewriting.” The actual video data remains intact on the physical sectors of your hard drive or solid-state drive until new data overwrites it. This exact window of opportunity is where professional data recovery steps in.
Comprehensive Data Recovery Solutions ranked by Complexity
If you have lost a video clip, an important spreadsheet document, or a collection of web bookmarks during a heavy editing session, do not panic. We have outlined the complete hierarchy of data recovery protocols below. We start with basic system checks and scale up to using specialized recovery utilities.
The Basic Checks
Before assuming the worst, always rule out the simplest explanations. Windows includes built-in safety nets that catch files before they vanish entirely from your machine.
Checking the Recycle Bin
- Step 1: Double-click the Recycle Bin icon located on your Windows Desktop.
- Step 2: Click the search bar in the upper right-hand corner and type the name of your missing video or project file.
- Step 3: If you locate the file, right-click it and choose Restore. This automatically places the file back into its original directory.
Utilizing Windows File History
If you have previously configured an external drive for system backups, Windows File History may have a preserved snapshot of your folder before the file was deleted.
- Step 1: Open the Start Menu, type Control Panel, and press Enter.
- Step 2: Click on System and Security, then click on File History.
- Step 3: On the left-hand navigation pane, click Restore personal files.
- Step 4: Use the green directional arrows at the bottom of the screen to browse through different backup dates. Find the version of the folder containing your lost media, select the files, and click the green Restore button.
Automated Recovery Using Professional Utilities
If the basic checks fail, it means your file has bypassed the system safety nets and is actively vulnerable to being overwritten. This is when you must deploy automated recovery software to deep-scan the storage sectors.
For this scenario, we will look at how to utilize a premium, highly efficient data recovery application designed specifically to parse complex file systems like NTFS, FAT32, and exFAT.
⚠ Warning: Never download or install data recovery software onto the exact same drive partition where the lost files were located! Doing so will write new data to the drive, which can permanently overwrite and destroy the very files you are trying to rescue. If you lost files on your C: drive, install the software on an external flash drive or a secondary D: drive.
Deploying PandaOffice Drecov Data Recovery Software
When standard system methods fail to bring back your lost video projects, utilizing specialized utilities becomes mandatory. The PandaOffice Drecov data recovery software provides an exceptional balance of deep sector scanning, high recovery success rates, and a clean, user-friendly interface that prevents technical errors. It is built to reconstruct broken file headers, making it highly effective at salvaging complex, multi-gigabyte media formats like .mp4, .mov, and .mkv.
Below is the precise, step-by-step breakdown of how to deploy this application to rescue your deleted assets.
Step 1: Launch and Target Selection
Double-click the desktop shortcut to launch the PandaOffice Drecov data recovery software. Upon opening, the main dashboard will display an organized view of all connected storage devices, including local Hard Disk Drives (HDDs), Solid State Drives (SSDs), and external USB media. Hover your mouse over the specific drive or partition where your missing video files were originally stored, and click the Scan button.

Step 2: Monitoring the Deep Scan Engine
The software will immediately initialize a dual-mode scanning sequence. It begins with a Quick Scan to locate recently deleted file pointers, then shifts seamlessly into a Deep Scan. The Deep Scan reads the raw structural signatures of the drive sector by sector.

Step 3: Filtering for Specific Media Formats
Because modern hard drives hold millions of individual files, sorting through everything manually is counterproductive. Use the advanced Filter panel located on the left-hand side of the dashboard. Click on the Video category, or use the top search field to explicitly type in target file extensions such as .mp4 or .mov. This filters out system noise and displays only your lost media assets.
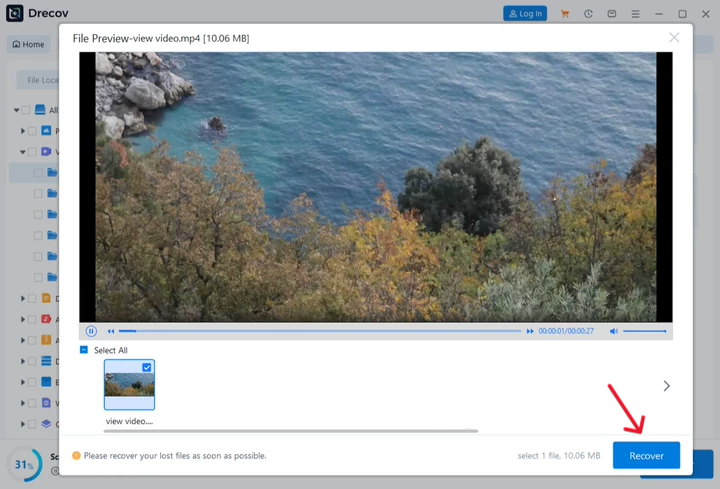
Step 4: File Previewing and Verifying Integrity
Before executing the recovery process, click once on any discovered video file to view it in the built-in preview pane. If the software successfully displays a thumbnail or plays a short clip preview, it proves that the file structure is intact and can be fully salvaged. If the preview shows a corruption error, the file header may have been partially compromised before recovery began.
Step 5: Executing Safe Data Extraction
Check the boxes next to all the video clips, project folders, or documents you want to rescue. Click the large, bright Recover button located in the bottom right corner of the application layout.
⚠️ CRITICAL WARNING: Choose a completely separate physical storage device for your destination path. If you are recovering files from your internal drive, save them to an external hard drive or an attached USB storage stick. Saving them back to the original drive can cause severe file overlapping and corrupt the recovered assets beyond repair. Click OK to complete the extraction.
To help you build a complete foundation in data protection and recovery, review these expert guides covering other common data loss scenarios:
- Recovering Unsaved Office Projects: How to Recover an Unsaved Excel File Complete Guide.
- Securing Web-Based Research Assets: How to Get Your Google Chrome Bookmarks Back.
- Managing Web Video Assets Safely: How to Download Video from Browser Firefox Guide.
Advanced Command-Line and Registry Recovery
If automated utilities need additional help, or if you are dealing with file system glitches where Windows refuses to recognize an entire storage partition, you can turn to native advanced command-line utilities. These methods bypass the standard file explorer interface completely to repair corrupted file indexing.
Method A: Executing the CHKDSK and ATTRIB Command Chain
Sometimes, files are not truly deleted; instead, their directory index attributes have been altered by a malware attack or an editing software crash, making them completely invisible to Windows Explorer.
- Step 1: Press the Windows Key, type cmd, right-click on the Command Prompt result, and select Run as administrator. This is vital as these commands require elevated system privileges.
- Step 2: Type the following command to check and repair errors on your specific drive (replace
X:with the actual drive letter of your corrupted storage device) and hit Enter:$$chkdsk\ X:\ /f$$ - Step 3: Allow Windows to run through its verification stages. Once the command prompt returns to standard input, type the following attribute correction command to strip away hidden system restrictions from your files:$$attrib\ -h\ -r\ -s\ /s\ /d\ X:*.*$$
- Step 4: Close the Command Prompt and open your File Explorer. Check the drive directory for a newly created, unhidden folder containing your missing video files.
Method B: Restoring Broken Folder Paths via the Windows Registry
If your video editing software altered the default storage location paths for your user account folders, your exported videos might be saving to non-existent directories. We can fix this by modifying the Windows Registry back to default values.
- Step 1: Press the hotkey combination Windows + R to open the Run dialog box. Type regedit and hit Enter to launch the Registry Editor.
- Step 2: Carefully navigate through the registry folder tree along the exact path mapped out below:
HKEY_CURRENT_USER\Software\Microsoft\Windows\CurrentVersion\Explorer\User Shell Folders - Step 3: Look at the right-hand side detail panel and locate the key string named My Video.
- Step 4: Double-click on the My Video entry. In the Value data field, confirm that it points directly to the default path:
%USERPROFILE%\Videos. If it points to an odd, corrupted, or missing directory path, change the value back to this default string and click OK. - Step 5: Exit the Registry Editor application completely, restart your computer system to apply the configuration adjustments, and check if your default system folders have successfully re-indexed your missing items.
Part 5: Long-Term Strategy—Proactive Protection for Video Editors
The single most effective way to recover lost data is to ensure you never lose it in the first place. Adopting a proactive mindset will save you hours of panic and keep your workflows uninterrupted. Use this structural checklist to bulletproof your computer system against potential data disasters:
| Protection Strategy | Core Operational Concept | Implementation Frequency |
| The 3-2-1 Backup Strategy | Keep 3 total copies of your video assets, stored across 2 different types of physical media (e.g., an internal SSD and an external HDD), with 1 copy kept completely offsite or in a secure cloud service. | Continuous / Post-Project |
| Dedicate a Scratch Disk | Never use your main operating system boot drive as the temporary cache or render drive for video editing software. Configure a secondary high-speed SSD solely to handle temporary application tasks. | One-time Setup |
| Uninterruptible Power Supply (UPS) | Plug your editing desktop and external storage enclosures into a high-quality UPS battery backup unit. This provides invaluable minutes to save your work and safely shut down your system during a sudden blackout. | Continuous Protection |
| Routine Storage Health Checks | Use native storage diagnostic monitoring tools to watch the S.M.A.R.T. health metrics of your drives, allowing you to catch and replace failing hardware long before total mechanical failure occurs. | Monthly |
Conclusion
Learning how to crop a video on windows is a fantastic and valuable skill that gives you precise creative control over your digital content. Whether you use the simple visual handles of Clipchamp, the quick framing adjustments of the built-in Photos application, or the deep advanced pixel dimensions of VLC Media Player, Windows provides all the flexibility you need.
At the same time, maintaining a solid understanding of data recovery ensures that unexpected software crashes, mistaken file deletions, or storage drive corruptions never derail your creative momentum. By mastering basic checks, utilizing advanced command structures, and keeping robust tools like the PandaOffice Drecov data recovery software close at hand, you can edit with confidence, knowing your files are completely protected every step of the way.


