








Recover the OpenRefine project rather than only its last export
To recover OpenRefine projects, preserve the actual workspace and existing project archives before re-importing a CSV. A cleaned data export and a native project archive contain different information. Therefore, identify whether you need the current table, earlier data states, recorded operations, reconciliation information, or simply a view that disappeared from the browser.
OpenRefine’s history can preserve useful transformations across sessions when the project data survives. An archive can preserve a project milestone, while a saved operations recipe can support a controlled reconstruction from original input. These routes have different prerequisites. A CSV alone does not automatically recreate every earlier state and decision from the missing project.
Record the missing data state
Write down the project title, workspace location, known row count, and a distinctive transformation. Also identify the original input revision. Those details help compare projects with similar names. A table can look familiar while reflecting a different filter, earlier cleanup stage, or changed source dataset, so use concrete content checks rather than the browser tab title alone.
If the project remains available, export an appropriate local project archive before experimenting with history. Preserve a cleaned data export separately when useful. Also stop the application through its supported process before copying workspace data where practical. A stable source set gives you a baseline while you inspect older states or import archive candidates.
Free route 1: reconnect the correct existing workspace
- Identify the workspace location used by the original OpenRefine installation.
- Preserve that workspace before troubleshooting configuration or reinstalling.
- Start the application with the appropriate existing workspace through the supported setup for your environment.
- Open the intended project and compare its data and recorded history.
A project can appear missing when the application uses another workspace or user context. Correcting that location restores access to content that still exists. It does not retrieve a deleted project directory. Also distinguish the local application’s storage from the browser interface: clearing a browser view and losing workspace data are different events with different consequences.
Check the project list and content together
Compare a distinctive column, known record, and history step in the candidate project. Then inspect its row count with filters understood. A similar project title can represent another import or an earlier collaboration copy. Preserve both until you establish which source contains the intended transformations and data revision.
Do not manually merge project-directory internals as a first recovery step. A workspace contains relationships the application expects to manage. Preserve it and prefer supported project import or an isolated copied workspace for testing. This keeps a useful candidate from becoming damaged through an improvised filesystem merge.
Free route 2: import an existing project archive
- Locate a previously exported OpenRefine project archive from the relevant milestone.
- Preserve the archive and use Import Project from the application’s home screen.
- Give the imported candidate a distinct recovery name.
- Compare its table, Undo/Redo history, and relevant reconciliation information.
A native archive can preserve project data and history that a plain data export omits. However, it represents the moment when it was created. Inspect a distinctive recent transformation before assuming it contains the latest cleanup. Also keep the archive separate from the imported working project, so later experiments cannot become the only surviving copy of that milestone.
Distinguish history from current facets
An archive preserves important project information, but current views and applied facets may need separate reconstruction. A project can therefore contain the intended data while looking different after import. Inspect the actual values and history before concluding that the cleanup disappeared. Recreate the necessary view deliberately and record any expression that the view depends on.
If the imported project includes reconciliation results, check whether the corresponding service is available in the new environment. Surviving identifiers and the ability to continue reconciliation are separate questions. Preserve the imported information before refreshing services or applying new suggestions, because a new operation can change the data state you wanted to assess.
Free route 3: inspect a surviving Undo/Redo state
- Preserve the current project as an archive before changing historical position.
- Open Undo/Redo and identify the relevant transformation or earlier milestone.
- Inspect the useful state without discarding the preserved current version.
- Export or archive the accepted recovery separately before continuing cleanup.
Recorded history can help undo an unwanted transformation when the project survives. It does not create a missing source project or restore operations that never reached persistent storage. Also compare the actual table after selecting a historical state. A step label can summarize an operation without revealing every affected value, so content inspection remains necessary.
Keep useful later changes available
An earlier state may restore deleted rows while lacking valid later corrections. Preserve both stages and determine which changes need deliberate reapplication. Do not simply adopt the oldest complete-looking table if it discards verified work. A controlled reconstruction can retain the useful history while making the remaining transformation decisions explicit.
For each accepted state, compare representative identifiers, row counts, and key columns. Then inspect any known edge case, such as a blank value or a multi-valued cell. These checks connect the history operation with the data meaning you need to preserve, rather than treating a completed rollback as proof of correctness.
Free route 4: reapply a saved operations recipe
- Preserve the original input dataset and identify its exact revision and import settings.
- Create a new recovery project from a copy of that input.
- Review an existing saved operations recipe and apply suitable operations through Undo/Redo.
- Compare intermediate and final data, documenting operations that the recipe does not reproduce.
An operations recipe is a reconstruction aid, not a complete substitute for a native project archive. It can depend on column names, import choices, and the original data state. Some interactive work may require separate attention. Therefore, inspect the recipe and test its results rather than assuming it will recreate the old project from any similarly structured CSV.
Compare dependencies before applying operations
Check column names, types, separators, and record structure against the original import. A recipe that refers to the wrong column can fail or produce a plausible but incorrect result. Also preserve the input rather than editing it to make the recipe run. Any necessary adaptation should be a documented reconstruction decision in the new recovery project.
Inspect meaningful checkpoints after major transformations. For example, compare row counts after removal, known identifiers after splitting, and representative values after normalization. A successful operation message only establishes that the application performed something. The content checks show whether it reproduced the intended historical cleanup.
Recover from a cleaned data export with realistic limits
An existing CSV, spreadsheet, or other data export can preserve the current table at its export milestone. Import a copy into a new project and inspect it, but do not assume the original history returned. The export may omit earlier values, deleted rows, or reconciliation context. Label the result as a recovered dataset with limited project history.
Identify which state the export represents
Compare known records, column names, and the distinctive transformation that motivated recovery. Then inspect its row count with export filters understood. A file can be complete for a selected view while omitting records outside that selection. Keep the export and any project archive separately until you establish their actual scope.
If only a partial export survives, preserve it as useful content and identify the missing range. You may reconstruct the rest from original inputs or authoritative sources, but that is new data work. Record those sources and decisions instead of presenting the combined result as a direct restoration of the original project.
Diagnose missing rows before assuming deletion
Inspect active facets, text filters, record mode, and the displayed count. A filtered view can hide rows that remain in the project. Clear or adjust the relevant view controls in a working context and compare known identifiers. Conversely, genuinely removed rows require history or another source rather than repeated changes to the browser display.
Keep row and record concepts clear
A project can organize information in ways where one logical record spans several rows. Compare the intended structure before accepting a count difference as data loss. Then inspect representative records and their associated values. A recovered table with the expected total row count can still have broken grouping or missing relationships that matter for later transformations.
If a browser refresh changes only the visible facets, inspect the saved project data before rebuilding everything. View state and transformation state have different persistence roles. Recovering the view may be a small interface task, while recovering a lost transformation requires history or archive evidence. Keeping those roles separate helps avoid unnecessary reconstruction.
Review reconciliation information after recovery
Inspect surviving identifiers, matches, and judgments for representative records. Then confirm the intended reconciliation service and its availability. An imported project can preserve results while requiring environment setup to continue work. Do not refresh or replace existing matches broadly before preserving the source and understanding what a new service response may change.
Keep verified and uncertain matches separate
A recovered identifier is useful only when it belongs to the intended entity and source. Compare known examples and ambiguous cases. If you reconstruct a match manually, record that decision rather than treating it as restored history. This makes later review easier and prevents an uncertain association from silently entering the accepted dataset.
Also inspect columns derived from reconciliation or external lookups. Their values can reflect the time of the original request. Repeating the lookup may produce newer information, which is a data update rather than historical recovery. Preserve the original result and decide deliberately whether the task needs the old state or a refreshed dataset.
A worked recovery after an unwanted cleanup step
Suppose a transformation removes useful rows and later corrections follow. Preserve the current project archive, inspect Undo/Redo, and locate the state before removal. Compare known identifiers to confirm that the rows return. Then identify the later corrections you still need, rather than accepting the rollback as the complete final solution.
Reconstruct the accepted sequence transparently
Use the preserved input, useful history, and reviewed operations to build a separate recovery project when necessary. Compare intermediate counts and representative values after each major stage. Record any manual decision that the recipe cannot reproduce. This gives another analyst a clear account of the result instead of an unexplained table that merely resembles the old export.
Finally, archive the accepted project and export the intended cleaned dataset separately. Reopen or re-import a test copy and compare the distinctive transformation again. This checks both continued project work and the immediate data deliverable, which preserve different information and should remain clearly identified.
Compare an OpenRefine recovery with a known data milestone
Choose a few records that establish the intended cleanup state, including one ordinary record and one difficult case. Record the expected values, row or record structure, and relevant transformation. Then inspect those examples in each project candidate. A table with the right headers and total count can still contain an older normalization decision or a broken relationship, so content-level comparison remains necessary even when import succeeds.
Inspect the original input before replaying operations
Identify the exact dataset revision and import choices used by the original project. Compare separators, encoding, headers, column names, and any record grouping that affects later operations. A saved recipe can run against a similar file while producing a different result. Preserve the input and document necessary adaptations rather than editing it casually until the recipe appears to work. This keeps reconstruction separate from evidence about the historical analysis.
For a multi-file import, inspect source identification and ordering where they matter. A recovery can include the same records while changing context that later operations relied on. Compare representative identifiers across the sources and retain provenance information. This helps you detect a plausible but incorrect merge and prevents a clean final export from concealing uncertainty about where recovered rows originated.
Use history as a data-state source rather than a label list
A history entry summarizes an operation, but the table at that point shows its actual effect. Inspect the relevant values and counts before and after the candidate step. Then preserve useful states separately where appropriate. This gives you a controlled way to reverse an unwanted transformation while retaining evidence of valid later work that you may need to reapply.
Reconcile restored rows with later corrections
Suppose rollback restores removed records but also discards a later spelling correction. Preserve the current state and the useful earlier state, then identify the correction’s actual scope. Reapply only verified work in a new recovery project. Do not append every old row blindly, since the removal may have been correct for some records. Compare known identifiers and document the decision that distinguishes intentional exclusions from accidentally lost data.
Also inspect transformations that changed structure, such as splitting cells or columns. A restored value can be correct while appearing in a different row or record context. Compare the relationship the next operation expects. This structural check matters when a history recipe depends on previous column creation or grouping, and it provides stronger evidence than simply confirming that the missing text is visible somewhere in the table.
Evaluate an operations recipe according to its dependencies
Review the recipe before applying it and identify the columns, expressions, and input assumptions it uses. Then test meaningful checkpoints in a separate project. Some recorded operations may not reproduce every interactive decision or external response. Keep those limits explicit. A recipe is a powerful reconstruction aid, but a successful application is not proof that it recreates the original project history from arbitrary similar input.
Compare intermediate values rather than only the final file
After a major transformation, inspect a representative record, a count, and any relevant edge case. This helps locate where a reconstruction begins to differ. A final export can look familiar while an earlier normalization changed the underlying data. Intermediate checks make the recovery reviewable and reduce the temptation to patch the output cosmetically without understanding the cause of the difference.
For expressions copied from notes or an older recipe, inspect literal column names and separators carefully. A small translation or transcription change can alter meaning. Preserve the original recipe and record any adapted expression in the reconstruction note. Then compare its actual effect on known records. This connects the technical operation with the intended data-cleaning decision and keeps later reviewers from treating a new adaptation as recovered historical code.
Distinguish project archives from ordinary data exports
A native archive can preserve data and history, while an ordinary export can preserve a selected table state with much less project context. Keep both when available and compare the milestone each represents. A clean CSV can support immediate downstream work without restoring earlier values or reconciliation judgments. State that scope before adopting it as the replacement project.
Inspect the export’s selected view
Determine whether filters or facets restricted the exported data. Then compare known included and excluded identifiers. A file can be complete for the selected view while omitting records that remain important to the whole project. Do not infer full-project recovery from a familiar header and a plausible row count. Preserve the export’s role and seek a native archive or original input for any missing context.
If you reconstruct from a partial export and original data, record which columns and records came from each source. Compare overlapping information before merging. This prevents old and new values from being combined without a clear basis. A smaller verified dataset can be more useful than a larger table whose provenance and transformation state are uncertain.
Recover reconciliation work without silently refreshing it
Inspect surviving identifiers and judgments on representative records, including ambiguous cases. Then identify the reconciliation service and any environment setup needed to continue. Repeating an external lookup can return newer information, which may be useful but is a data update rather than historical recovery. Preserve the existing state before testing refreshed results.
Keep confirmed and reconstructed matches separate
A recognizable entity name does not prove that the recovered identifier points to the intended entity. Compare the actual match and supporting information. If a source lacks the original judgment, record any newly chosen match as reconstruction. This makes the accepted dataset easier to review and prevents an uncertain association from gaining authority merely because it appears in a recovered project.
Also compare columns derived from external lookups or transformations after reconciliation. They can depend on both the matched entity and the time of the request. Preserve those values and decide deliberately whether the task needs the historical state or a current refresh. Clear separation avoids using a modern response as unsupported evidence about what the old project contained.
Test the accepted archive as a real project restore
Export a native archive from the accepted recovery, then import a test copy with a distinct name. Compare the known records, history milestone, and relevant reconciliation information again. Also inspect which views need separate recreation. This practical test verifies what the preservation method actually supplies and helps prevent a data-only export from becoming an assumed complete archive of the analytical work.
Give the next analyst a concise source record
Record the workspace or archive candidate, input revision, reconstructed operations, and specific unresolved gaps. Then keep the accepted native archive and intended cleaned export associated with the same milestone. Another analyst can use the data while understanding its history and limits. If one transformation remains uncertain, state it plainly. A mostly recovered project is valuable when its evidence is preserved and its remaining decisions are reviewable.
Keep the recovered table and its history identifiable
Save the accepted native archive and the intended data export with a shared milestone description. Then compare a known record and transformation after importing a test copy. This verifies that the archive supports continued project work while the export supplies the immediate downstream dataset. Their different roles should remain clear in the handover.
Record an unresolved transformation as a concrete question
If one operation’s intended parameter is uncertain, preserve the alternatives and state the affected columns or records. You can still recover most of the project without silently selecting a convenient value. A specific gap gives another analyst a reviewable decision instead of an unexplained difference hidden in the final table.
Before new cleanup begins, preserve the stable recovery milestone separately. Later transformations can then be distinguished from historical restoration, and a newly found archive can be compared meaningfully. This boundary protects both the recovered evidence and valid new analytical work from becoming an ambiguous mixture of revisions.
When storage recovery can help OpenRefine projects
PandaOffice Drecov may help retrieve deleted saved project archives, workspace files, original inputs, or prior exports on readable storage. It cannot recreate a transformation that never reached disk or infer all history from a final CSV. Use surviving workspaces, archives, and history first, and reduce writes to the affected location while investigating deleted files.
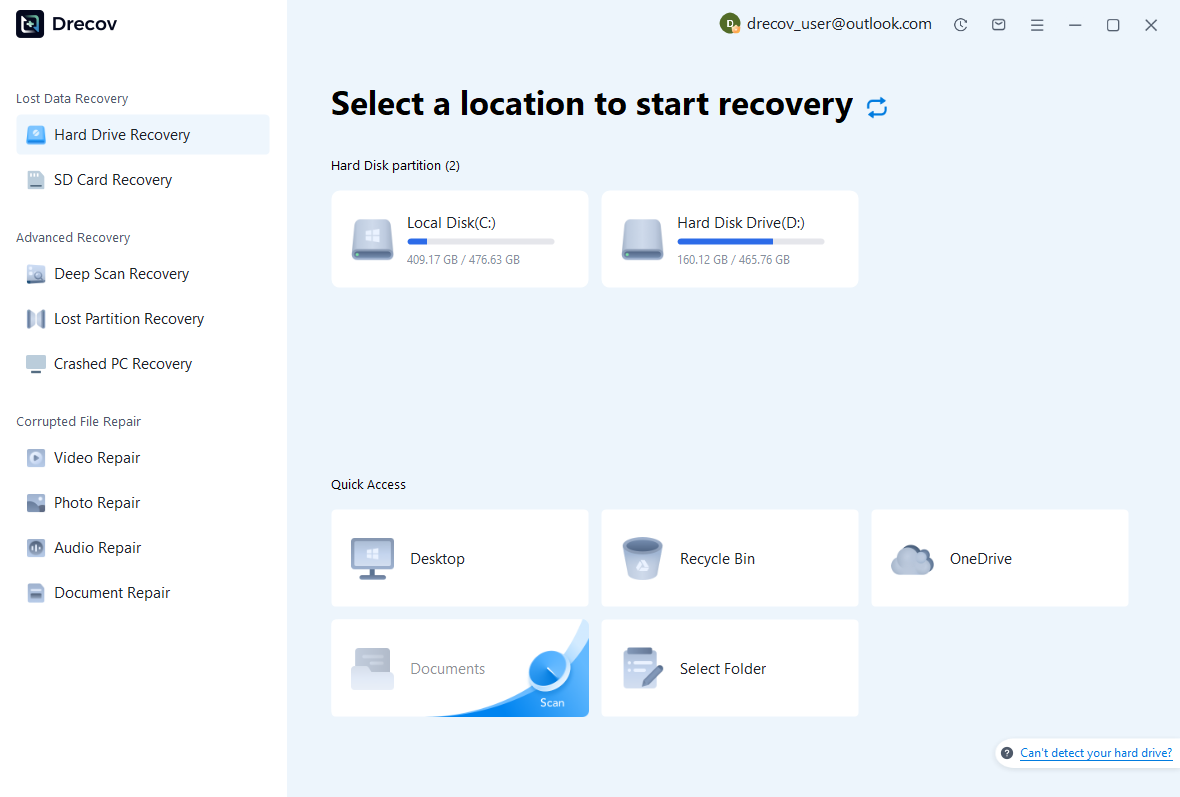
Step 1: identify the actual workspace or archive location
Choose the drive or partition that held the local workspace, project archive, or original input. Record the source component each search targets. Keep recovery output on other healthy storage. If the source repeatedly disconnects or reports hardware read failures, assess that condition before proceeding with a routine software recovery scan.
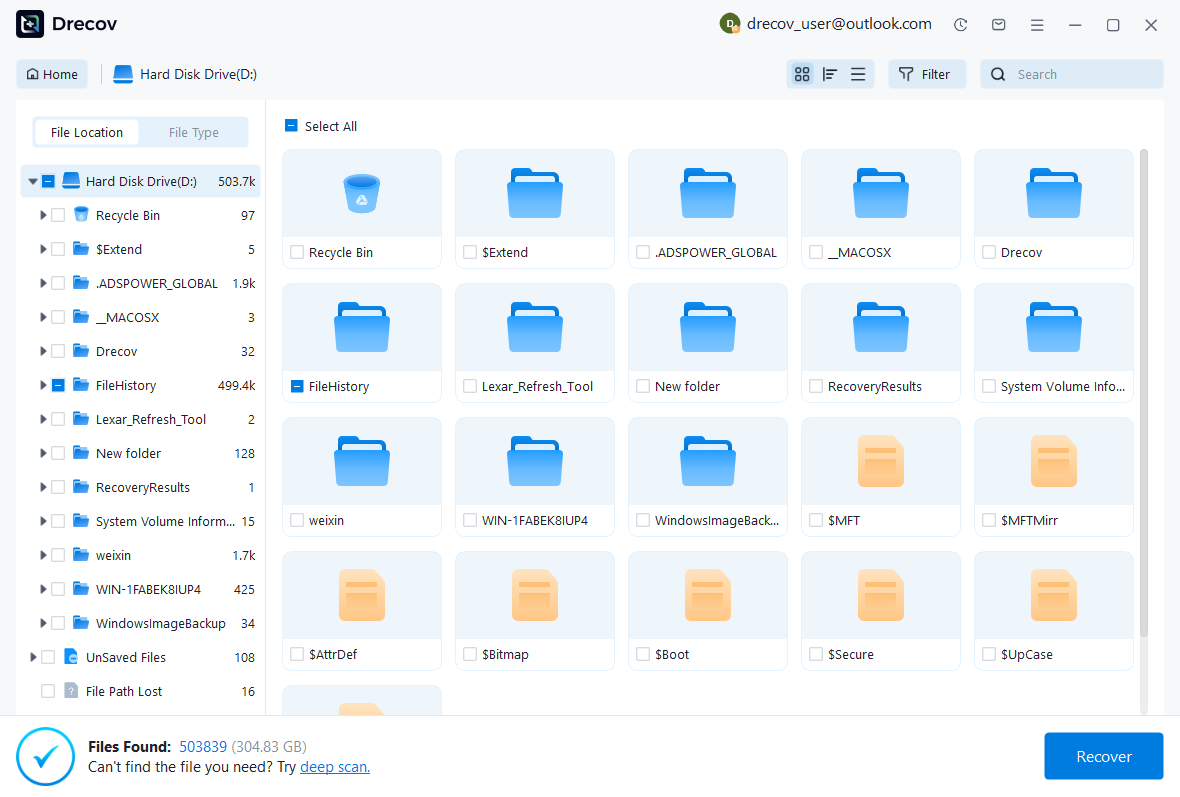
Step 2: compare project and dataset candidates
Review available paths, names, sizes, dates, and supported previews. Preserve plausible archives and workspace candidates without combining unrelated versions. A recognizable CSV header does not establish that project history survived. Keep useful alternatives and assess their table, operations, and context in OpenRefine after recovery.
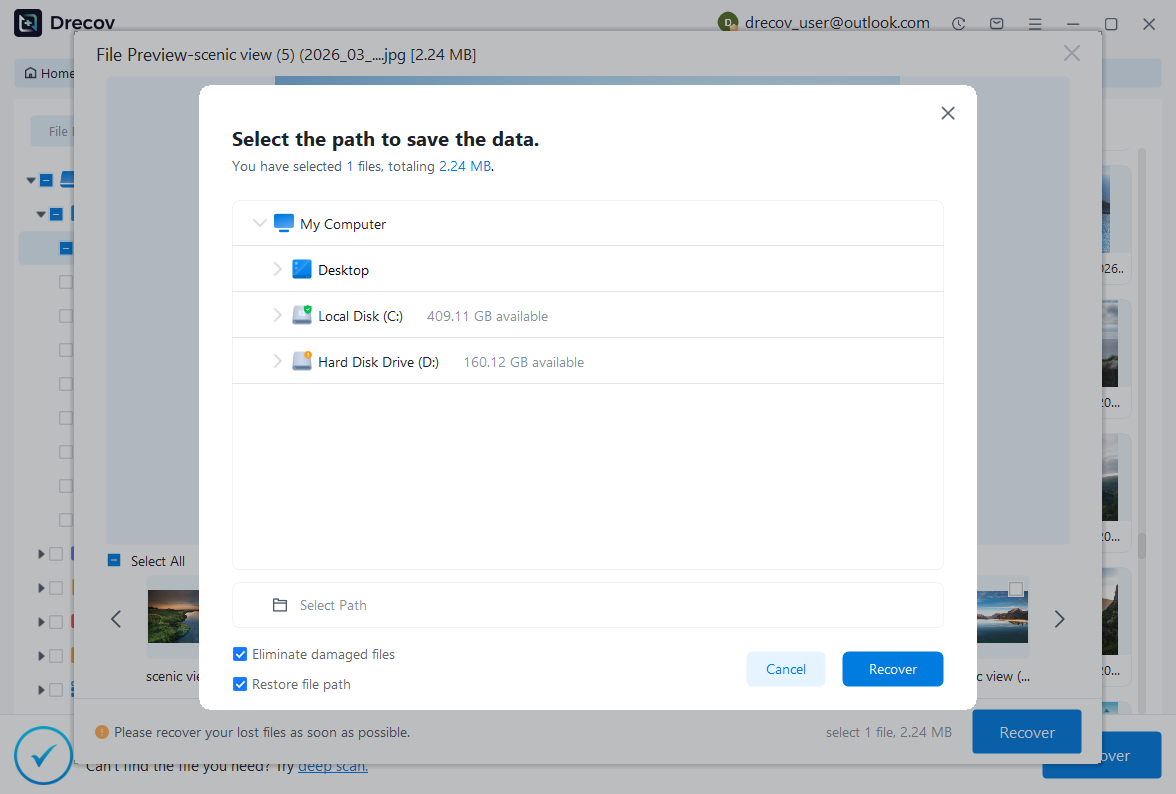
Step 3: restore elsewhere and verify the data state
Recover selected files to a separate destination and preserve an untouched set. Import a working archive or inspect an appropriate copied workspace through the supported application workflow. Compare history, known records, counts, columns, and reconciliation information. Keep uncertain fragments separate from the accepted project so they cannot replace verified material.
Preserve an accepted and reviewable project
Record the workspace or archive source, input revision, recovered history, and reconstructed operations. Then retain both a native project archive and the intended data export from the accepted milestone. This gives the next analyst a reliable connection between the cleaned table and the transformations that produced it.
Test a project archive as an actual restore
Use a copied sample to verify that an archive imports with the expected history and data. Then compare what a plain export preserves and what it omits. This practical test clarifies the difference between saving a table and preserving a project, and helps prevent an export-only copy from becoming the assumed recovery plan for all analytical work.
Related recovery resources
Explore the relevant recovery options: Hard drive recovery, External hard drive recovery.
For another recovery case and its practical checks, read the related recovery guide.
Check the vendor guidance for the installed version: official recovery documentation 1, official recovery documentation 2, official recovery documentation 3.





