








A GIMP crash can leave a recoverable image, an older XCF, or only a rendered export. These sources preserve different levels of editability. A layered XCF can retain structure that a JPEG lacks, while a PNG may preserve a useful final appearance without the original masks or text layers. Start by protecting the available files and identifying whether GIMP actually crashed, remained busy, or closed normally without a saved project.
Quick answer: inspect native recovery and existing layered copies
If GIMP offers recovered images after restart, open and save useful candidates under new names. Then compare existing XCF revisions and original source assets. A surviving export can support a limited salvage or manual reconstruction, but it does not automatically recreate layers. Also, GIMP’s crash recovery is an attempt made under unstable conditions, not a guarantee of periodic historical snapshots or recovery after every power loss.
GIMP and its native recovery features are free. However, they can only use material that reached a surviving file or recoverable application state. A new save cannot recreate an earlier unsaved design. Define the required canvas, layers, masks, text, and output quality before accepting a candidate. A recognizable small preview is useful evidence, but it is not proof of a complete editable production master.
Diagnose the event before closing the application
Busy operation versus an actual crash
If GIMP is still running but appears unresponsive, consider whether a large filter or image operation is still working. Do not force-close it merely because a progress indicator pauses briefly. Inspect the actual state and current official troubleshooting guidance. A forced termination can remove the opportunity to save a useful live image. Also avoid repeated clicks that queue unrelated operations while you wait for a legitimate task to finish.
If the application genuinely crashed or the system lost power, record what happened and the image edited last. Those events do not guarantee the same recovery behavior. A crash handler may have an opportunity to preserve data that a sudden power failure prevents. Therefore, inspect actual recovered candidates rather than assuming that every interruption creates a complete backup. Keep existing project copies and source images untouched while you investigate.
Saved XCF versus exported image
GIMP’s native XCF is the appropriate source for preserving its editable image structure. Export formats preserve different subsets of image information. A flat JPEG can show the composition while omitting separate layers and transparency. A PNG may preserve transparency while still lacking the original editing hierarchy. Compare the actual surviving format and content before deciding whether it meets the next production task.
Also distinguish undo history from saved project structure. An XCF does not provide a permanent archive of every undo step. Reopening it should not be presented as a way to recover every earlier action. If the live session remains available, preserve the image before testing undo. If the session is gone, look for real recovery files, existing XCF versions, or independent sources rather than promising an undo history that no longer exists.
Free route 1: inspect the crash recovery offer
- Preserve readable project files and avoid clearing application data after the crash.
- Restart GIMP and inspect any recovered-image offer for the installed version.
- Open useful candidates and compare the latest editing area and layer structure.
- Save a separately named XCF, then reopen it for validation.
GIMP documents a best-effort crash recovery mechanism, but success depends on the application’s condition at the interruption. A recovered image may omit recent work or fail to appear. State those limits clearly. Also inspect every relevant open image if several were affected. One successful candidate does not establish that all unsaved projects survived. Preserve the useful result before changing preferences or troubleshooting the cause of the crash.
Inspect recovered layers deliberately
Expand layer groups and inspect masks, opacity, blend modes, and visibility. Then compare the area edited last. A composition can look correct while a hidden alternative or editable text layer remains missing. Save the initial recovery before making changes. This preserves the baseline if a later attempt to relink, convert, or simplify the document introduces a new problem.
If the candidate contains only part of the work, record the exact gap. For example, note that the background and mask survived but the latest title did not. That gives another designer a focused reconstruction task. Do not describe the image as fully recovered merely because its thumbnail matches the intended composition. Editability and visual output need separate checks.
Free route 2: compare existing XCF revisions
- Locate your own earlier XCF saves, independent project copies, or archived deliveries.
- Copy candidates into a separate recovery workspace.
- Open them in a suitable GIMP version and compare distinctive revisions.
- Preserve the strongest editable base before reapplying verified missing changes.
An earlier layered project can be more valuable than a newer flat export when the next task requires editing. Compare the actual missing elements rather than selecting only by date. A newer filename can contain an unwanted merge or incomplete save. Also inspect compatibility and the creating application version. A file that behaves differently in another release does not automatically prove that its stored pixels or layers are damaged.
Reconcile useful versions without flattening them
If one XCF preserves the correct background and another contains a useful title, keep both unchanged before transferring content into a new working revision. Check size, placement, and blending behavior after the transfer. A copied layer can interact differently with the destination’s surrounding layers. Compare the resulting composition with a known proof instead of assuming that the transfer reproduces the intended design automatically.
Avoid flattening the accepted master simply to reduce file size or make comparison easier. Create a separate export for delivery where appropriate. Also record the origin of reconstructed elements. This preserves future editability and helps another designer understand which parts came directly from recovery candidates and which parts you rebuilt after the original session disappeared.
Free route 3: rebuild from original source images
- Inventory the original photographs, logos, textures, and other existing source assets.
- Preserve verified originals in a separate project workspace.
- Use a known proof or surviving export to reconstruct the required composition.
- Save a new layered XCF and document recreated masks, text, and adjustments.
Source reconstruction is useful when the layered master has no healthy copy. However, it creates a new project rather than recovering the exact original layer hierarchy. Keep that distinction visible. A high-quality source photograph can support a better rebuild than a small flattened proof. Also compare asset revisions carefully. Two files with the same name can differ in crop, resolution, or subject treatment.
Prioritize irreplaceable edits
Identify which elements are difficult to reconstruct, such as detailed masking or retouching, and which can be recreated from clear instructions. Preserve any candidate that contains valuable unique work even if its overall design is incomplete. Then use independent source assets to rebuild the remaining components. This can save substantial effort without pretending that a partial candidate contains the complete project.
If you recreate a text layer, compare wording, font, spacing, and line breaks against the approved reference. If you rebuild a mask, inspect edges against contrasting backgrounds. Also preserve the untouched original assets. New production edits should remain separate from the evidence so a later recovery attempt can still use the best surviving source without your reconstruction baked into it.
Free route 4: salvage an existing rendered export
- Locate your own PNG, TIFF, JPEG, or other existing output copy.
- Inspect its dimensions, transparency, quality, and visual completeness.
- Preserve it as a separately named limited salvage.
- Use it directly only when it meets the actual delivery requirement, or as a reconstruction reference.
A rendered export can preserve the appearance needed for an urgent task, but its limitations depend on the format and export settings. A small web image may not support print production. A JPEG generally cannot supply the original transparency or separate layers. Therefore, label the result according to what it can actually do. A flat output and an editable master are different deliverables.
Check full-resolution detail
Inspect fine text, gradients, edges, transparency, and large areas where corruption can hide. Also confirm pixel dimensions and the intended output size. A thumbnail can look convincing while the full image contains missing regions or insufficient detail. Do not enlarge a preview and describe the larger file as restored original quality. A new export cannot create detail that the surviving source lacks.
If the export meets a limited deadline, keep the layered-source investigation separate. Document any missing editability so the next designer does not start a revision with false expectations. Also preserve the export’s provenance and original file. A later source recovery may allow a better master, while the current flat salvage remains useful as evidence of the intended composition.
Free route 5: use live-session undo carefully
- Confirm that the image and relevant undo state remain available in the current session.
- Save or duplicate the present useful state before stepping backwards.
- Inspect the specific undo operation that may precede the unwanted change.
- Preserve recovered content separately and compare it with the current design.
This route applies to a surviving live editing session, not to every image reopened after a crash. Undo can remove useful later changes as well as an unwanted operation. Therefore, preserve the current state first and proceed deliberately. Also distinguish a layer visibility change from a destructive image operation. The simplest correction may be a display or selection issue rather than a need to undo substantial work.
Keep the recovery target narrow
If one accidental merge or deletion caused the problem, inspect that point before undoing unrelated edits. Compare the resulting layer structure and visible composition. Then create a new saved candidate. Avoid leaving the only useful result dependent on a fragile unsaved session. Once the content is secure, you can decide which version should become the production master without rushing because the application remains open.
If the required state no longer exists in the live undo history, acknowledge that limitation. Reopening the image does not generate earlier undo steps. Move to actual XCF candidates, recovery offers, and independent sources. This keeps the investigation evidence-based and prevents repeated application restarts from replacing a potentially useful live state with a less informative saved file.
Isolate display and environment problems
If many unrelated images show the same issue, investigate the application environment separately from individual file corruption. Test a known healthy image and compare actual output where appropriate. Also note recent version or plugin changes. A plugin failure does not necessarily mean every open image lost its data. Preserve useful images before troubleshooting, and change one relevant factor at a time so the result remains interpretable.
For one consistently failing XCF, preserve the exact error and test copies through an appropriate supported environment. Do not repeatedly resave the sole original under different extensions. Renaming a damaged XCF to PNG does not repair its internal structure or restore absent layers. Also keep any partial readable material. A candidate that cannot serve as the final master may still preserve a valuable element for reconstruction.
Suppose a designer loses a session containing a product photograph, a detailed mask, live text, and a new background treatment. Native recovery restores the mask and layers but lacks the final text change. A recently exported PNG shows the approved wording. First preserve the recovered XCF and the PNG. Then reapply the verified wording in a new editable text layer rather than replacing the entire master with the flat image.
Next, inspect the mask on contrasting backgrounds and compare canvas dimensions. Check that the new title fits the intended layout at output size. Save, close, and reopen the new XCF, then export a comparison image. Finally, document the manually reapplied text change and retain the original candidates until approval. This produces an editable result while accurately separating recovered structure from reconstructed production work.
Validate the accepted image project
Check canvas size, layer groups, masks, text, transparency, blend modes, and any required color workflow. Inspect the exact area edited before the incident. Then save and reopen the accepted XCF. Export through the intended delivery path and compare full-size output. A successful open and familiar preview do not independently establish that the recovered design meets the next editing or production requirement.
Keep damaged originals, useful recovery candidates, source assets, and reference exports until review finishes. Document missing elements and reconstructed edits. Afterwards, preserve deliberate layered milestones independently and retain suitable final exports. These provide different fallback routes: editable project recovery, source reconstruction, and limited visual salvage when the next interruption does not produce a complete native recovery.
Compare recovery candidates by editing value
Identify what must remain editable
List the layers and controls the next task needs: live text, detailed masks, alternate versions, adjustments, or separated source elements. A flat export can meet a simple reuse requirement while failing a template revision. Define that difference before choosing a candidate. Also inspect the final edited region, because a complete-looking older XCF may lack one important approved change.
Keep a small candidate record with layer structure, canvas dimensions, current wording, and known omissions. Use actual observations rather than a vague quality label. This helps choose between an older editable master and a newer rendered image. Both can be useful when their roles remain clear, and preserving them together can make a focused reconstruction much faster.
Distinguish recovery from new design work
If you recreate a title from a proof or rebuild a mask around a recovered photograph, document that work. It can produce an excellent result without being an exact restoration of the original layer data. Keep the unmodified candidate and source assets separately. This lets the designer compare decisions later and avoids presenting newly reconstructed content as evidence that the original survived.
Also identify uncertain details that the reference cannot establish. A small export may show wording but not the exact font treatment or subtle edge work. Mark those points for normal review. A clear partial recovery with a focused design task is more useful than a confident full-recovery claim that hides changes until the next production revision.
Inspect image quality in the intended workflow
Canvas, dimensions, and output size
Check actual pixel dimensions and the intended delivery size. A small preview can resemble the full composition while lacking the detail required for production. Do not judge quality only at a thumbnail scale. Also compare cropping and canvas boundaries. A recovered image can preserve its central subject while losing an edge element that matters to the final layout.
Keep the highest-quality surviving source unchanged. If you resize or convert it for a specific delivery, save a separate derivative. A larger output file does not recreate detail absent from the source. Record whether the candidate is a full-resolution editable master, a limited rendered salvage, or a visual reference. This makes its practical value clear without overstating what the recovery achieved.
Masks and semitransparent edges
Inspect fine edges against contrasting backgrounds. Hair, shadows, soft transitions, and product outlines can appear correct on white while revealing damage elsewhere. Also compare layer masks rather than only the composited result. A recovered image can look familiar because a flat layer covers a missing editable mask underneath. Test the realistic edit the project will require next.
If you rebuild a mask, preserve the original pixels and document the reconstruction. Compare the result at useful detail and at final output size. Do not apply destructive edge cleanup to the sole candidate before establishing a baseline. A partial source can support a better future method, while an aggressively altered recovery may make it harder to identify what originally survived.
Text and alternate layer states
Open important text layers where they remain editable and compare wording, line breaks, and spacing. Also inspect hidden alternatives or layer groups used by the project. A final-looking composition can omit an alternate version needed for another language or size. The acceptance test should reflect the actual design system, not only one visible export.
Keep delivery-specific copies separate from the editable master. Flattening or simplifying a production output can be appropriate, but it should not consume the recovered structure. Also record any unavailable font or recreated text. This gives the next designer an understandable starting point and prevents a flat emergency file from silently replacing the reusable project.
Use source assets for a controlled rebuild
Compare photograph and graphic revisions
Two source files can share a name while differing in crop, resolution, or content. Compare them against the approved reference before importing. Preserve original asset folders where that context helps identify revisions. Also check whether a logo or graphic remains a suitable source for the output size. A small screenshot may provide a reference while failing the production requirement.
If a recovered XCF preserves valuable retouching but lacks another layer, use it as a base rather than rebuilding everything from a flat export. Transfer verified material into a new working revision and inspect blending behavior. A copied layer can interact differently with surrounding adjustments. Compare the final composition deliberately rather than assuming a successful paste reproduces the intended appearance.
Reconstruct only verified missing changes
Suppose the recovered master contains the detailed mask and layout but lacks a final price update. Use the approved proof to reapply that specific change. Avoid redesigning unrelated areas during recovery, because that makes acceptance harder. Keep a short list of reconstructed edits and generate a comparison export covering the affected regions.
If the proof does not establish a detail, preserve the uncertainty for review. Memory can support drafting a replacement, but it does not prove the original design choice. Also retain every useful recovery candidate until acceptance. A later comparison may reveal that another XCF contains the missing detail you initially planned to rebuild manually.
Establish a durable image baseline
Save, reopen, and export
Save the accepted layered XCF under a clear revision name, close it, and reopen it. Then produce an export through the intended workflow and inspect the complete result. This confirms a durable project rather than a useful image that exists only inside one recovery session. Also check that the accepted design no longer depends on temporary source folders.
Keep the editable master, original source assets, and approved output associated by revision. Document missing structure or reconstructed work. A concise handoff lets another designer continue without opening every historical candidate. It also prevents a limited visual salvage from being used for an editing task that requires layers the recovery never restored.
Test the next backup route
After acceptance, preserve an independent layered milestone and suitable rendered output. Test a representative restore copy in a separate location. Open the XCF, inspect a mask and text layer, and compare the export. This checks the actual design workflow rather than merely confirming that an archive contains a file with the right name.
Keep crash recovery expectations realistic. A best-effort native mechanism can be useful without replacing deliberate saves and independent copies. Also retain unique source assets that no final export can recreate. Together these provide different fallback routes for future incidents: native recovery, editable project restoration, source reconstruction, and limited output salvage when the original layer state is unavailable.
When PandaOffice Drecov may help
A storage scan may help when an XCF, source image, or existing export is genuinely absent from supported local media. PandaOffice Drecov does not reconstruct the original GIMP layer hierarchy from a flattened JPEG or guarantee repair of an unreadable XCF. Check current support and inspect actual candidates. A familiar filename remains only a clue until the image opens and its relevant structure passes validation.
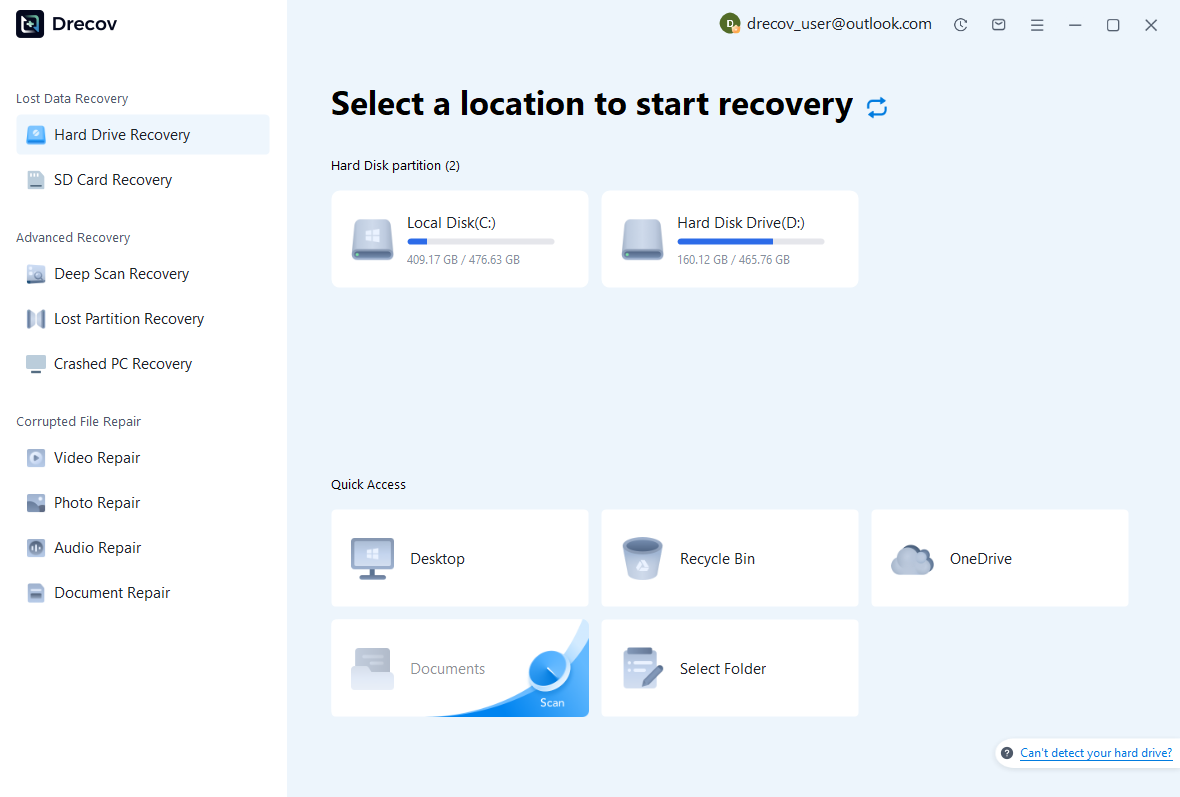
Step 1: select the image storage source
Identify the disk that held the layered project or missing source asset. It may differ from GIMP’s installation disk. Avoid saving new images or installing recovery software on the affected source. If the device becomes unstable or repeatedly fails to read, stop repeated scans and assess its condition. Stable access matters before any utility can provide reliable image candidates.
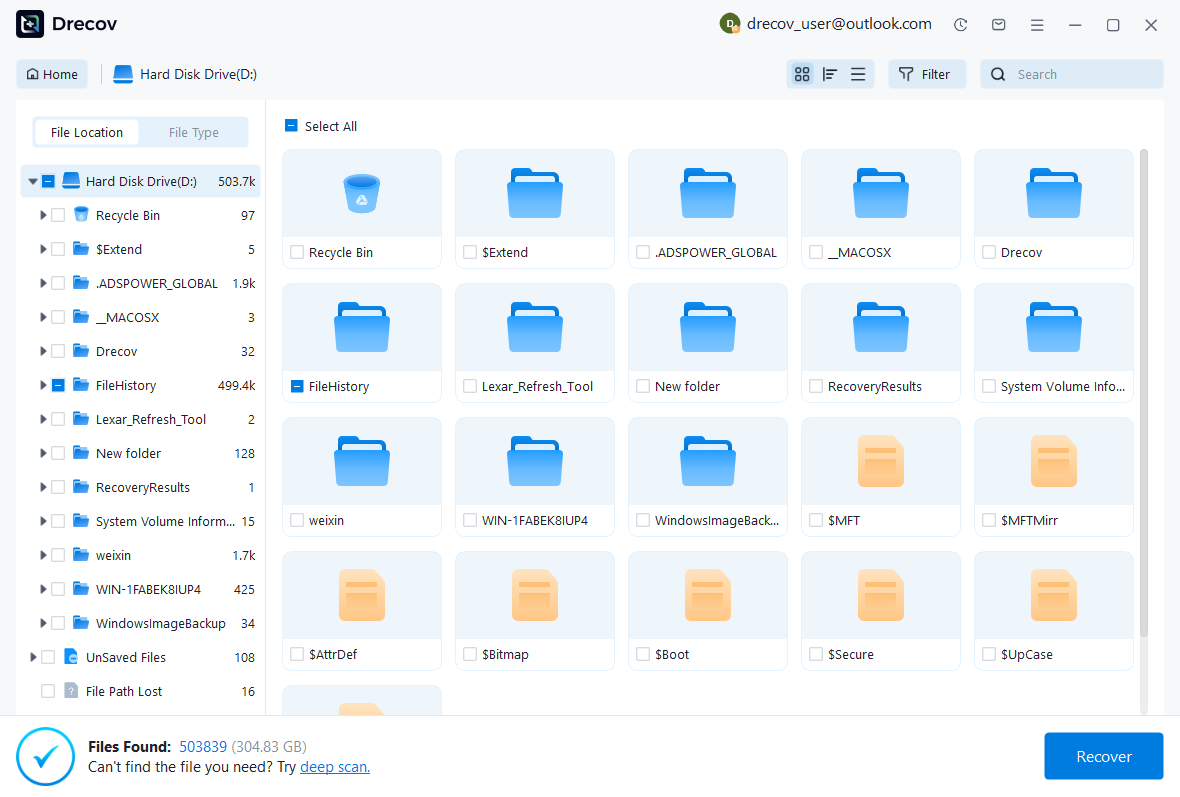
Step 2: compare layered and rendered candidates
Use available path, date, name, and format filters. Preserve several plausible XCF revisions and useful exports. A large file can still contain damage, while a smaller older master may remain editable. Preview can help identify content but may not test every layer. Record each candidate’s origin and limitations so you can choose the strongest source for the actual design task.
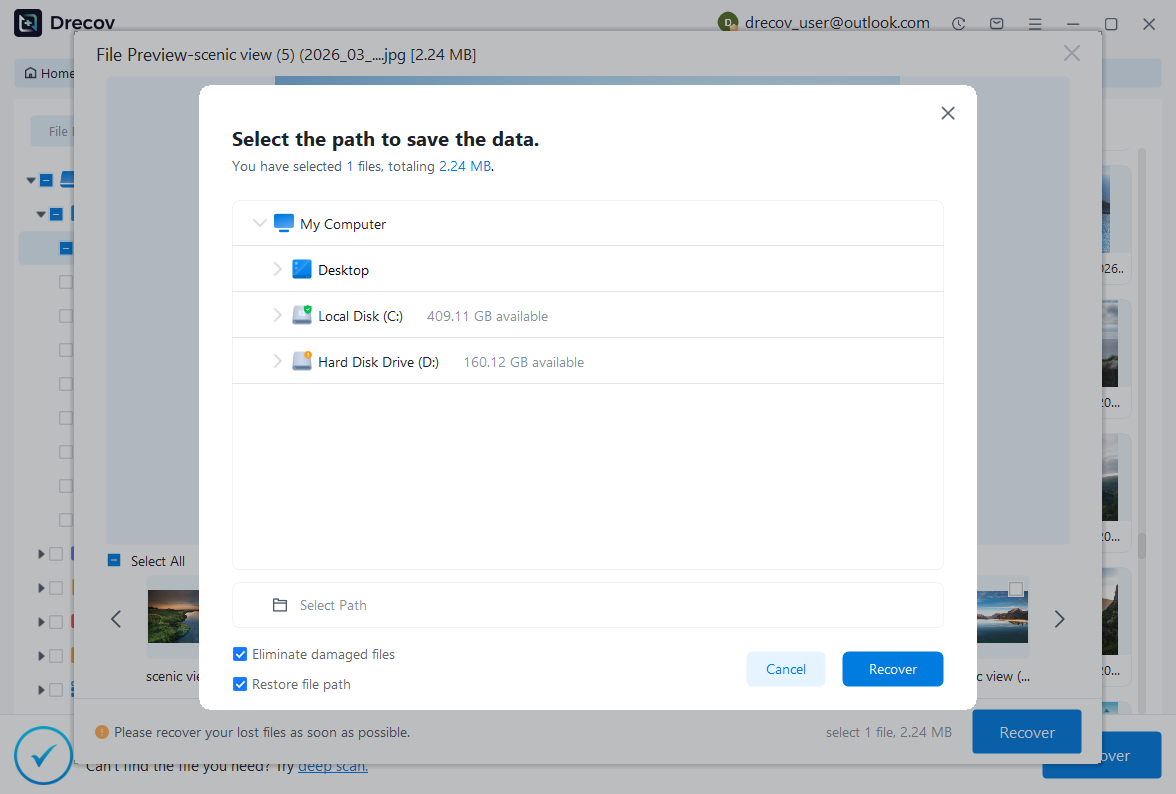
Step 3: recover elsewhere and inspect in GIMP
Save useful candidates to a different healthy physical disk. Review licensing and preview limitations before purchasing. Then open copies in GIMP and inspect both visual appearance and editable structure. If a proprietary XCF has no preview, acknowledge that uncertainty rather than claiming success from its name. Finally, validate the saved master and intended export. Storage retrieval and design acceptance are separate checks.
Related recovery resources
Explore the relevant recovery options: Hard drive recovery, External hard drive recovery.
For another recovery case and its practical checks, read the related recovery guide.
Check the vendor guidance for the installed version: official recovery documentation 1, official recovery documentation 2, official recovery documentation 3.





