







If your VLC video freezes but audio continues, first compare the same moment in another player and play a second known-good clip in VLC. Those two tests separate a particular recording from VLC’s decoding or display path. Keep the original unchanged; conversion and file recovery are not the first response to a stuck picture.
The continuing soundtrack means some parts of playback still work. It does not prove that every video frame is readable or that the file needs repair. A useful diagnosis follows what changes between tests, rather than applying unrelated audio-delay fixes.
Find out whether the freeze follows the file or the player
Record a repeatable timestamp
Replay the clip from a little before the freeze and note the time. Observe whether the progress indicator keeps advancing and whether seeking farther ahead restores the picture. Try once more from the same starting point. Avoid repeatedly scrubbing an unstable source just to produce more failures.
Repeated freezing at one timestamp gives you a specific point to compare. Freezes at varying moments suggest a different pattern, such as workload or delivery trouble. Neither observation alone proves corruption, but each tells you what to test next.
Change one part of the comparison
Open that file in another player you already trust and test the same interval. Then play a small known-good local clip in VLC. Record both outcomes. A problem limited to VLC across several files deserves a different approach from one recording failing everywhere at one timestamp.
Successful playback elsewhere does not guarantee that every frame is intact. Players can tolerate damaged data differently. Still, it makes a VLC-specific path worth investigating before you rewrite the recording. Keep all comparison copies clearly named so you do not accidentally test a previous conversion.
Check the source route before changing decoding settings
Separate local playback from a network or cloud source
If you are watching from a share, cloud folder, or stream, compare an authorized complete local copy on healthy storage when available. Let the copy finish before playback. A local version working normally suggests that access or delivery contributes, rather than proving the remote original is damaged.
Do not keep downloading over the location of missing footage if data was recently deleted there. Use another healthy destination. A stream can also have service-side interruptions that changing your local codec settings will not repair.
Watch for storage instability
Repeated disconnections, serious read errors, or an unusually unreliable copy operation change the priority. Stop direct playback tests and seek advice about an appropriate image or professional recovery. A player cannot repair a physical problem simply by buffering longer.
If the source reads reliably but only this export freezes, check the original recording or project export history. A fresh supported export from intact source media is more meaningful than repeatedly converting the already problematic copy. Preserve that copy as evidence until you have a verified replacement.
Test VLC’s video path with reversible changes
Record the current VLC version and your existing settings before making adjustments. This walkthrough concerns the desktop interface; mobile menus differ. VideoLAN’s desktop preferences documentation identifies the Video and Input/Codecs sections and the reset entry point.
Compare hardware decoding with the alternative
In desktop VLC, open Tools, then Preferences, and inspect Input/Codecs. Where your installed version offers Hardware-accelerated decoding, record the current setting and test disabling it. Save the change, close VLC completely, reopen it, and replay the same interval.
This is a comparison, not a permanent universal recommendation. Software decoding may increase processor workload and can perform worse on demanding material. If nothing improves, restore the previous value before testing a different setting. Do not change several controls together and guess which one helped.
Compare the video output option
Open the Video preferences and inspect the Output selection available in your version. Note the original value, choose another appropriate installed output option, save, and restart VLC before testing. Different versions and graphics systems expose different choices; do not install an unknown driver merely to imitate a screenshot.
A changed output helping several clips suggests a rendering-path issue rather than a recovered file. Check both windowed and full-screen playback if the original symptom depended on that transition. Keep the smallest change that produces a repeatable improvement.
Reset preferences when earlier experimentation muddied the result
If many unrelated settings were changed, document custom hotkeys, audio preferences, and other choices you need. Use Tools, Preferences, then Reset Preferences, confirm as appropriate, and restart VLC. This returns player settings toward defaults; it does not rewrite the original media.
Recheck the same clip before adding custom settings back. If the freeze survives a reset and affects multiple known-good files, use an official supported VLC update and the computer manufacturer’s graphics guidance. Avoid unofficial codec bundles as a blanket remedy.
Do not mistake a workload problem for lost video
Compare with a less demanding clip
Close unnecessary high-workload applications after saving their work. Test a modest local video and compare it with the demanding recording. A high-resolution or complex stream can expose a limit that a simple clip does not. That difference is useful even without a benchmark.
Use Task Manager to observe whether CPU or GPU load rises while the picture freezes. Such activity is a clue, not proof that a particular component is defective. Do not advertise a guaranteed performance gain from disabling acceleration, increasing a cache, or buying new hardware based on this one test.
Preserve the source while testing an alternative export
If you control the original project, export a short representative section using a supported delivery format and a new filename. Make sure the check covers the interval that previously froze. Test the new result in VLC and another player before exporting or replacing an entire archive.
Renaming MP4 to another extension does not change its video stream. Likewise, an AVI-specific repair option is not a general reconstruction tool for every recording. A successful conversion can produce a playable copy without proving that every original frame survived.
Recover a missing original only when files really disappeared
Skip this branch if all original recordings remain available. When a source clip was deleted, check backups, the recording device, and the Recycle Bin before altering the only surviving export. A recovered original may allow a new export, but it is a separate task from changing VLC settings.
Drecov retrieves lost local files from suitable Windows storage. Read-only recovery mode, Quick Scan, Deep Scan, filters, and supported previews help identify candidate recordings. Lost Partition Recovery can locate data from a lost partition. These capabilities do not recreate missing frames inside an existing damaged file or fix graphics hardware.
Prepare another destination before Step 1
Stop new writes to the source and prepare a separate healthy device. Do not install the software on the affected partition. Unstable access calls for imaging advice or a specialist, not more direct scans. Overwrites and SSD TRIM may reduce the remaining recoverable content.
⚠ Warning: Install it on a drive different from the one where your data was lost to prevent overwriting.
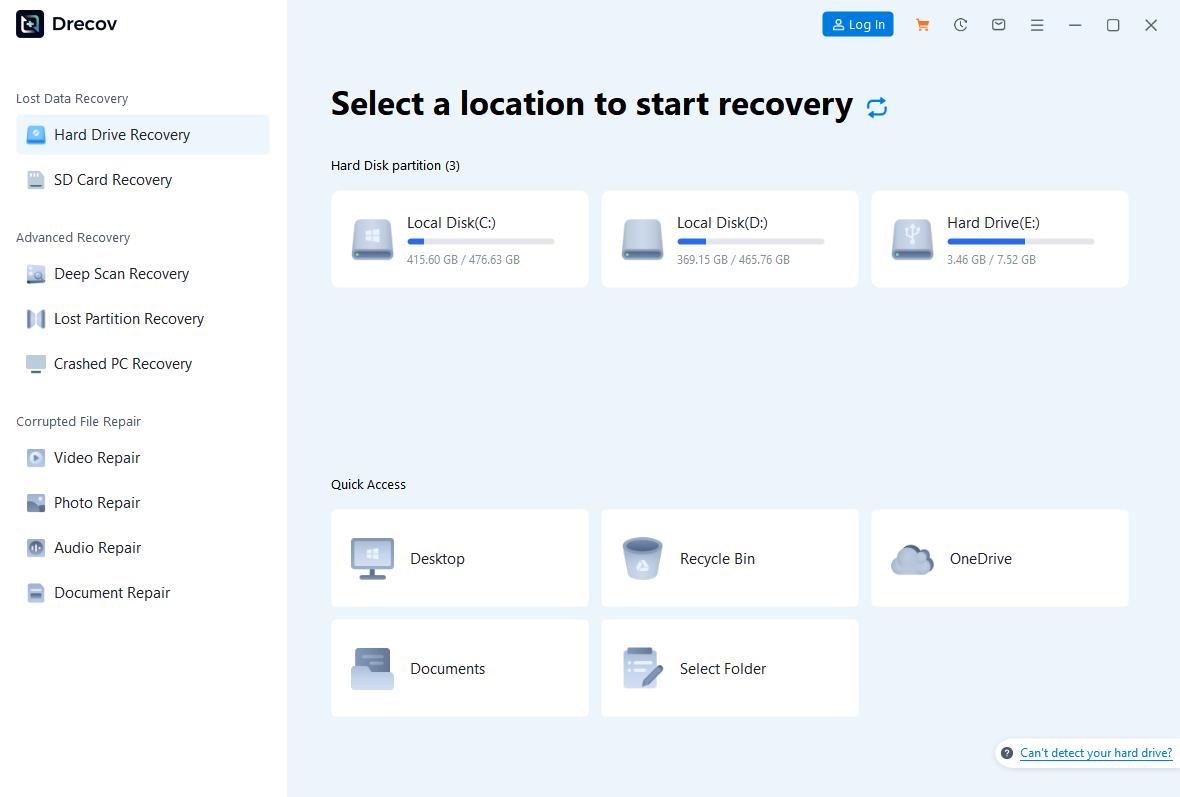
Step 1: Open Drecov and choose the original recording location
Select the stable volume or folder that held the missing source clip. A cloud-only recording needs its service’s recovery route if no local copy ever existed. Identify camera originals separately from compressed exports with similar names.
Step 2: Run Quick Scan and compare expected clips
Look for recognizable folders, recording dates, and file types. Check alternate takes if the project used more than one recording. The video recovery page explains this missing-footage workflow more broadly.
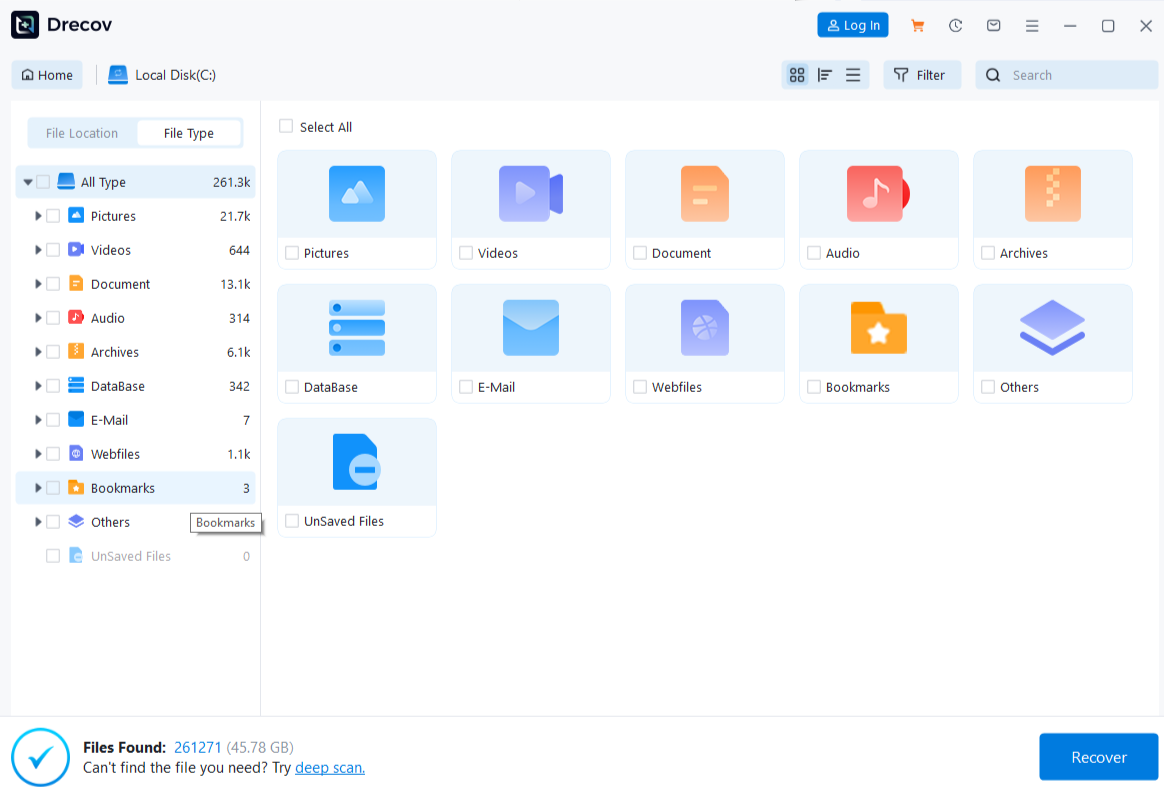
Step 3: Use Deep Scan only if needed and stable
Continue when Quick Scan does not locate the originals and the source remains reliable. Stop if reading worsens. More scanning cannot guarantee a complete video. Other lost local assets belong to the separate file recovery task, not a VLC repair claim.
Step 4: Narrow the results and inspect supported previews
Use available names, paths, dates, and types to identify plausible recordings. Preview representative supported clips where possible. An intact opening frame does not establish that the previously frozen interval or the end of the recording is usable.
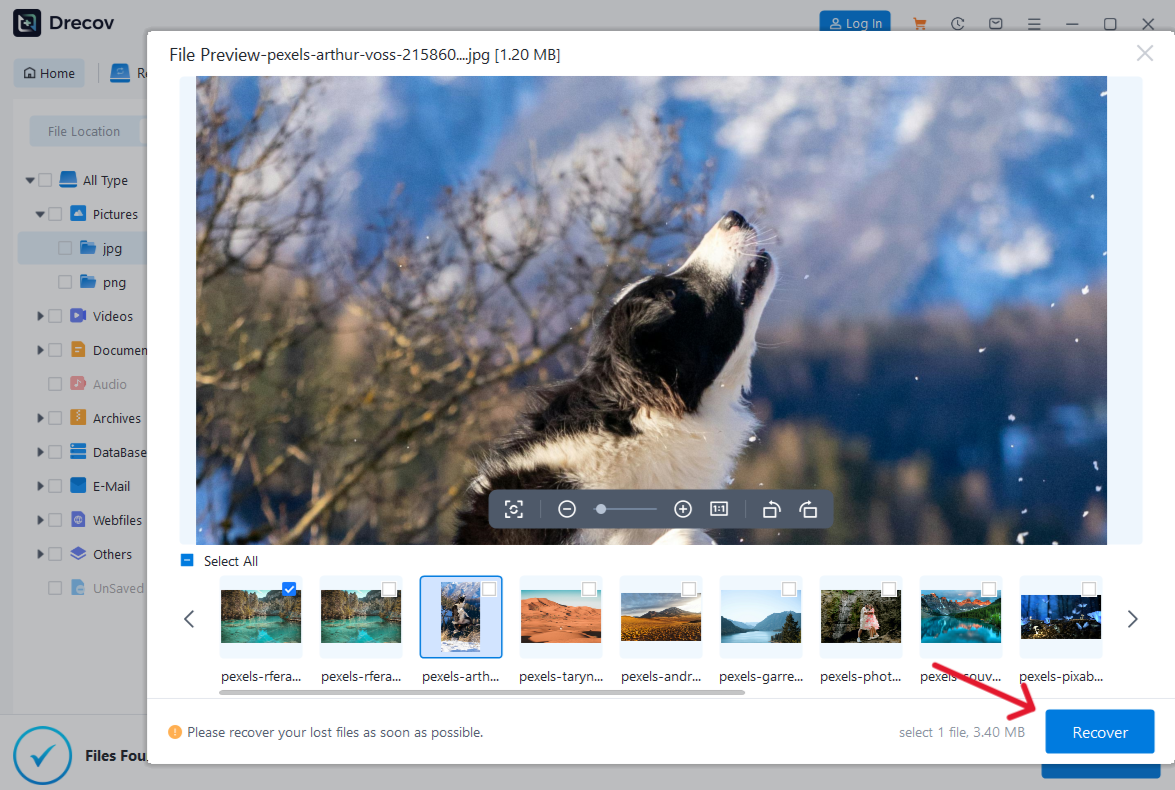
Step 5: Save elsewhere and test the relevant timestamp
Recover to the other healthy device, never the source. Look in Drecov Folder or Recovery Folder if the output location is unexpected. Play the saved recording at the troublesome timestamp and several later points. Verify duration and sound before re-exporting, cleaning, formatting, or discarding the old copies.
⚠ Warning: Install it on a drive different from the one where your data was lost to prevent overwriting.
FAQs about a frozen VLC picture
Does continuing sound prove the video is undamaged?
No. Audio and video can encounter different decoding or data problems. Compare the same interval in another player and test another clip in VLC.
Should I change audio synchronization?
Not for a picture that stops advancing. Audio-delay controls address timing differences, not necessarily a frozen video decoding or display path.
Is disabling hardware decoding always better?
No. Treat it as a reversible comparison. Software decoding can increase processor demand and perform worse on some systems.
Will converting the file repair every frame?
A conversion may produce a playable result while skipping or concealing damaged material. Preserve the source and check the actual interval that failed.
Can Drecov fix VLC preferences?
No. Drecov is relevant to lost local recordings. Player configuration and existing-file repair require their own appropriate methods.
Conclusion
Diagnose the frozen picture with a repeatable timestamp, another player, and a known-good clip. Check delivery and make one reversible video-setting change at a time. If an original recording was deleted, Drecov may help retrieve it from stable local storage, but save elsewhere and verify the problem interval before rebuilding the video.
⚠ Warning: Install it on a drive different from the one where your data was lost to prevent overwriting.





