
Recover digiKam organization separately from original photos
To recover digiKam albums and tags, preserve the existing database and original image folders before rescanning or writing metadata. An unavailable collection path, missing catalog information, and deleted photographs require different responses. Therefore, identify which part of the collection disappeared instead of assuming that rebuilding thumbnails will restore your originals or personal organization.
The database can preserve catalog relationships, while embedded metadata and XMP sidecars can preserve selected information according to prior settings. Neither source necessarily contains everything. Start with a known photo, one distinctive tag, and the actual collection path. Those examples help you compare candidates and show what the recovery really supplies.
Preserve the current collection state
Close digiKam normally before making an ordinary copy of a local database where practical. Preserve the relevant database set, configuration information, original images, and sidecars. If you use another database backend, use its supported consistent backup process. Keep an untouched source and a separate test copy so that rescanning or synchronization cannot erase the only useful evidence.
Record the exact symptom: missing albums, empty tags, unavailable originals, or simply stale thumbnails. Also note the installed version and database type. A catalog that opens with familiar thumbnails may still point to missing files, while an apparently empty view can result from a restrictive filter. These distinctions determine whether your next step should target the view, collection location, or saved data.
Free route 1: correct an existing collection location
- Inspect the collection settings and the path associated with an unavailable album root.
- Locate the exact existing image directory in the preserved storage.
- Correct the collection reference in a working setup through digiKam’s supported controls.
- Open representative originals and compare their album organization and metadata.
This route restores access to files that still exist. It does not recreate deleted photographs. Also avoid adding the same folder repeatedly as a new collection before understanding the existing reference. That can complicate the catalog comparison and make it harder to distinguish old relationships from newly scanned records.
Confirm original access rather than thumbnail visibility
Open a known photograph at full resolution and inspect its actual dimensions and content. Then check its original path. A cached thumbnail can remain visible after the original disappears, so it is not proof of file recovery. Conversely, a stale thumbnail does not establish that the original is damaged. Keep those checks separate and preserve any available original before rebuilding caches.
For moved folders, compare a distinctive filename and scene rather than selecting a similarly named directory by appearance. Camera basenames can repeat. Once the correct path resolves, inspect the tags and album relationships associated with several images. A path repair can restore access while leaving a separate catalog-revision question unresolved.
Free route 2: inspect a consistent existing database backup
- Identify the database backend and a coherent existing backup from the relevant milestone.
- Preserve the current database and prepare an isolated working copy of the candidate.
- Open that candidate with suitable version and collection settings.
- Compare known albums, tags, ratings, and original-image references before adoption.
A database backup may preserve organization that was never written into image files. However, it can predate later catalog work. Inspect a distinctive recent tag and a known album change, not just the overall photo count. Also preserve related local database files where appropriate, because different files can serve catalog, recognition, similarity, or cache roles.
Keep backend migration separate from recovery
Do not change database engines merely to test whether a catalog reappears. First establish a usable candidate in an appropriate environment. A migration can introduce another variable and alter the structure you wanted to inspect. Preserve the source and compare the application’s behavior before planning any deliberate migration as a separate task.
If the backup contains the correct tags but expects older collection paths, reconnect those paths in the test environment. Then open the actual images. This distinguishes surviving organization from missing media access. A candidate can be useful for one part of the recovery while still requiring original-file restoration or a controlled merge of later catalog changes.
Free route 3: read surviving embedded or XMP metadata
- Preserve the images, existing sidecars, and current database before synchronization.
- Inspect metadata settings to determine which source and fields digiKam will read.
- Test reading metadata on a small known selection in an isolated collection or working copy.
- Compare tags, captions, ratings, dates, and relevant face-region information before broad use.
This route depends on information that was actually written before the loss. Enabling sidecar writing now cannot reconstruct earlier database-only tags. Also inspect the direction of synchronization carefully. Writing the current empty catalog into files is different from reading useful existing metadata into a new catalog, and choosing the wrong direction can overwrite your strongest recovery source.
Check source precedence and filename conventions
A collection can contain embedded metadata and sidecars with different values. Determine which source your settings prioritize and preserve both before choosing. Also inspect the actual sidecar naming convention. A sidecar for one image must not be attached to another merely because the basenames look similar. Compare the associated original and a known metadata value.
Test hierarchical tags and captions, not just a simple star rating. Different applications can store or interpret fields differently. A successful rescan may therefore restore some information while omitting other organization. Keep the missing fields explicit and retain a database backup when it preserves richer relationships than the available file metadata.
Free route 4: restore surviving original-image copies
- Identify the exact missing originals and their expected collection paths.
- Locate verified copies in an existing image archive or authorized original source.
- Restore copies into a separate recovery structure and reconnect the intended collection.
- Compare image content, resolution, metadata, and catalog associations.
An existing original can restore photographic content without restoring all catalog work. Conversely, a database can preserve tags while lacking the actual pixels. Keep those outcomes separate. Also compare the full-resolution file rather than substituting a small preview or shared messaging copy, which may have lower quality and stripped metadata.
Compare edited and original versions deliberately
A folder can contain a camera original, a developed export, and a reduced delivery copy of the same scene. Identify which one the catalog entry originally represented. Replacing a RAW with a JPEG does not restore the same editing source. Preserve useful alternatives, but label their roles so that the recovered collection does not silently change the available image quality.
After reconnecting, inspect orientation and capture details without applying broad corrections immediately. Some display differences reflect metadata interpretation rather than changed pixels. Preserve the source and test narrow adjustments in a copy. This avoids introducing new edits while you are still determining what the recovery candidate contains.
First clear filters and inspect the tag tree and selected image properties. Then compare a known image with its saved metadata and any database candidate. A hidden view, a database revision difference, and absent file metadata can all look like lost tags. Each needs a different next step, so record the exact evidence before running a collection-wide operation.
Use a small comparison sample
Choose an image with nested tags, another with a caption, and one with a distinctive rating or date. Inspect the database view and the underlying metadata source for each. This reveals which fields survive and how your settings interpret them. A controlled sample is more informative than a broad rescan whose changes you cannot easily explain afterward.
If one source preserves useful tags and another preserves later captions, keep both and plan a deliberate reconciliation. Do not assume the newest timestamp identifies the best values. A synchronization operation can create a recent date while propagating an unwanted state. The actual field content and your documented collection milestone provide stronger evidence.
Recover face information with realistic limits
Face regions, confirmed names, and recognition state do not all have the same storage role. Inspect what your prior metadata settings actually preserved and compare it with a known image. An existing database may contain organization unavailable from a newly scanned sidecar set. Therefore, do not promise complete recognition recovery merely because some person tags reappear.
Validate the association with the correct face
For a representative photograph, compare the person name and region placement with the image itself. A recovered name without a verified region relationship may be incomplete. Also inspect multiple faces in one photograph, since a simple tag list cannot establish which person belongs to which area. Keep uncertain information separate rather than inventing associations to fill the catalog.
If recognition must be rebuilt, preserve the recovered originals and known confirmed metadata first. Then treat any new detection or training as new catalog work. This makes the result understandable and protects surviving human-confirmed information from being confused with newly inferred suggestions.
A worked recovery after moving a photo collection
Suppose albums become unavailable after a folder move, while thumbnails and tags remain visible. Preserve the catalog, inspect the collection root, and reconnect the exact original directory. Then open known photographs at full resolution. This addresses access first without discarding catalog information that may already be intact.
Resolve a separate metadata gap afterward
If the images return but recent tags are missing, compare a database backup and existing sidecars. Test reading the relevant metadata on a small selection in a separate setup. Record whether the source supplies the missing tags or only older values. This staged approach keeps a simple path problem from turning into an uncontrolled catalog rebuild.
Finally, compare several albums, nested tags, and original file types. Close and reopen the accepted setup and repeat the checks. A session that works before closing can still rely on an accidental temporary path. Reopening establishes that the saved recovery configuration supports continued collection management.
Build a digiKam acceptance sample around personal organization
Choose photographs that represent the information you actually need: one with nested tags, one with a caption, one with a rating, and one with several identified people. Then inspect those examples in each catalog candidate. A large photo count says little about whether your organization survived. This sample connects the recovered database or metadata to practical collection tasks and makes the remaining gaps visible before you commit to a broad rebuild.
Open the full-resolution file and inspect the scene, dimensions, and capture details. Then compare its metadata. Camera basenames can repeat across years or devices, so a same-name match can attach plausible tags to the wrong photograph. Preserve uncertain candidates separately until you identify the exact source. This matters especially when a recovered database expects an old directory structure and several similarly named image folders are available.
For a known tagged image, inspect both the complete hierarchy and its leaf tag. A simple keyword can survive while its organization differs. Also compare captions and multilingual fields where relevant. Metadata compatibility is field-specific, so success with one rating does not establish that all personal information transferred. Record which fields the source actually supplies and avoid overwriting richer surviving database values merely to make the collection appear synchronized.
Recover collection access without creating a second catalog problem
A moved root directory can make every album unavailable while the original database remains useful. First preserve that database and inspect the old root reference. Then establish the exact new location of the corresponding images. Repair the known collection through supported controls before adding another collection or launching a full scan. This keeps the existing organization available while you solve the narrower access problem.
Inspect changes at the collection boundary
After reconnecting a root, inspect a shallow album, a nested album, and a directory containing unusual file types. Then open the originals and compare known tags. This helps reveal a partial path repair that works for one branch but misses another. Keep the original directory relationships in your notes so that you can distinguish an unavailable folder from a genuinely missing image.
If the collection spans several storage locations, assess each separately. One drive can be available while another remains disconnected. Do not interpret the resulting mixed view as proof that the whole database is damaged. Preserve useful accessible originals, identify the unavailable root, and plan the appropriate source repair. A staged recovery is easier to verify and avoids rebuilding valid catalog information to compensate for a storage location that simply is not present.
Decide whether metadata reconstruction is sufficient
A new catalog populated from surviving files can restore useful tags and captions when those values were written previously. However, it may not reproduce every application relationship or database-only decision. Compare the reconstruction with your acceptance sample and define what the next task requires. If you only need to find and export a set of photographs, a limited reconstruction may be useful. If you need the complete personal catalog, a consistent database candidate deserves separate investigation.
Review read direction before collection-wide work
Inspect the settings that control reading from files or sidecars and writing database values back to them. Preserve both sources before choosing a direction. An empty new catalog should not overwrite useful historical metadata merely because synchronization sounds like a repair. Test a small selection in a separate setup and compare exact values afterward. This provides evidence about the chosen operation rather than relying on its name.
Also inspect conflicts between embedded data and sidecar data. One may contain an older caption while the other holds a recent correction. Decide which value is supported by your records and preserve the alternative. A field can be recoverable without a single automatic rule identifying the preferred revision. Keeping that decision explicit makes the accepted collection more trustworthy than a broad operation that silently selects whichever source has priority in the current settings.
Keep face labels and recognition state distinguishable
A named person tag, a face-region rectangle, and the application’s recognition model serve different roles. Inspect the relevant sources and compare a representative photograph with several faces. A tag list alone cannot establish which region belongs to which person. Likewise, a recovered rectangle does not prove that all training or confirmation history survives. State the actual result instead of treating any visible person name as complete face-catalog recovery.
Verify a multi-person image carefully
Compare each recovered label and region with the photograph itself. Then inspect whether the application presents it as confirmed or still needing review where relevant. Keep uncertain associations separate. If you rebuild recognition after recovering originals, record that as new catalog work. This protects surviving verified information from being mixed with newly inferred suggestions that happen to produce a similar-looking people view.
For collection handover or migration, preserve the database source and metadata settings alongside a short sample checklist. Another installation can read the same files differently if its source precedence or enabled fields differ. A useful recovery record identifies those assumptions without pretending that every internal model transfers through XMP. The practical goal is a collection whose known information and unresolved recognition work are clear.
Assess thumbnail and cache recovery honestly
Thumbnails can identify a scene and help you locate its intended original, but they often contain fewer pixels and less metadata than the source. Inspect the actual dimensions before using one as emergency salvage. A recognizable image in the catalog does not prove that the camera file remains accessible. Keep the thumbnail’s role separate from original-photo recovery and avoid allowing a reduced preview to replace a missing full-resolution file silently.
Compare a preview with any surviving export
If the original is unavailable, an existing developed export may provide better quality than the catalog preview. Compare dimensions, compression, crop, and visible detail. Then identify whether it represents the intended image revision. The export can support delivery or reconstruction while lacking RAW editing latitude. Preserve it as a limited replacement and keep the original-file gap in the catalog record until you find or recreate an appropriate source.
Do not spend time rebuilding every cache before checking the originals. Cache regeneration can solve a presentation issue when valid source images exist, but it cannot recreate missing camera data. First establish what content survives, then rebuild convenience data in the working setup if needed. This sequence keeps effort focused on the valuable material and reduces the chance of mistaking a clean interface for a complete recovery.
Confirm the accepted catalog after a fresh start
Close the recovered setup normally, reopen it, and inspect the same acceptance sample. Open originals, search a nested tag, read a caption, and check an important album path. This tests the saved configuration and database rather than a temporarily working session. Then preserve a consistent backup of the accepted milestone and retain the original evidence separately. The recovery should support ordinary collection use without depending on an accidental temporary directory.
Record the remaining work as specific collection gaps
List missing originals, uncertain metadata fields, unresolved face associations, and any reconstructed organization. Keep the list concrete: one album or field is more useful than a broad note that some metadata might differ. You can then resume verified work while addressing the remaining items. Clear limits make a partial recovery valuable and prevent a populated catalog from becoming an unsupported claim that all personal organization and original images returned.
Review a recovered album through its actual contents
Open a small album and compare the expected originals, file types, and distinctive metadata. Then inspect a nested album and a known recent addition. This reveals whether the accepted catalog repairs the whole intended collection rather than one convenient directory. A populated thumbnail grid can conceal missing originals, so include full-resolution opening in the check.
Preserve field-level uncertainty
If tags return while captions remain older, record those results separately. Avoid a broad statement that all metadata recovered. A specific field comparison gives you a practical correction task and protects useful values from another indiscriminate synchronization pass. Preserve the source that supplied each disputed value until you establish the intended revision.
For a future migration, retain a consistent database backup alongside the original images and the metadata settings that matter to your workflow. Then test a copied sample in a separate setup. This shows which information travels with the files and which depends on the catalog, making the next recovery plan more reliable than an assumption that XMP contains every personal organizational decision.
When deleted-file recovery can help digiKam
PandaOffice Drecov may help retrieve deleted original photos, XMP files, or existing database backups on readable storage. It cannot recreate a full-resolution original from a thumbnail or infer database-only organization that never reached a surviving source. Use collection and metadata routes first, and reduce writes to the affected storage while evaluating recovery.
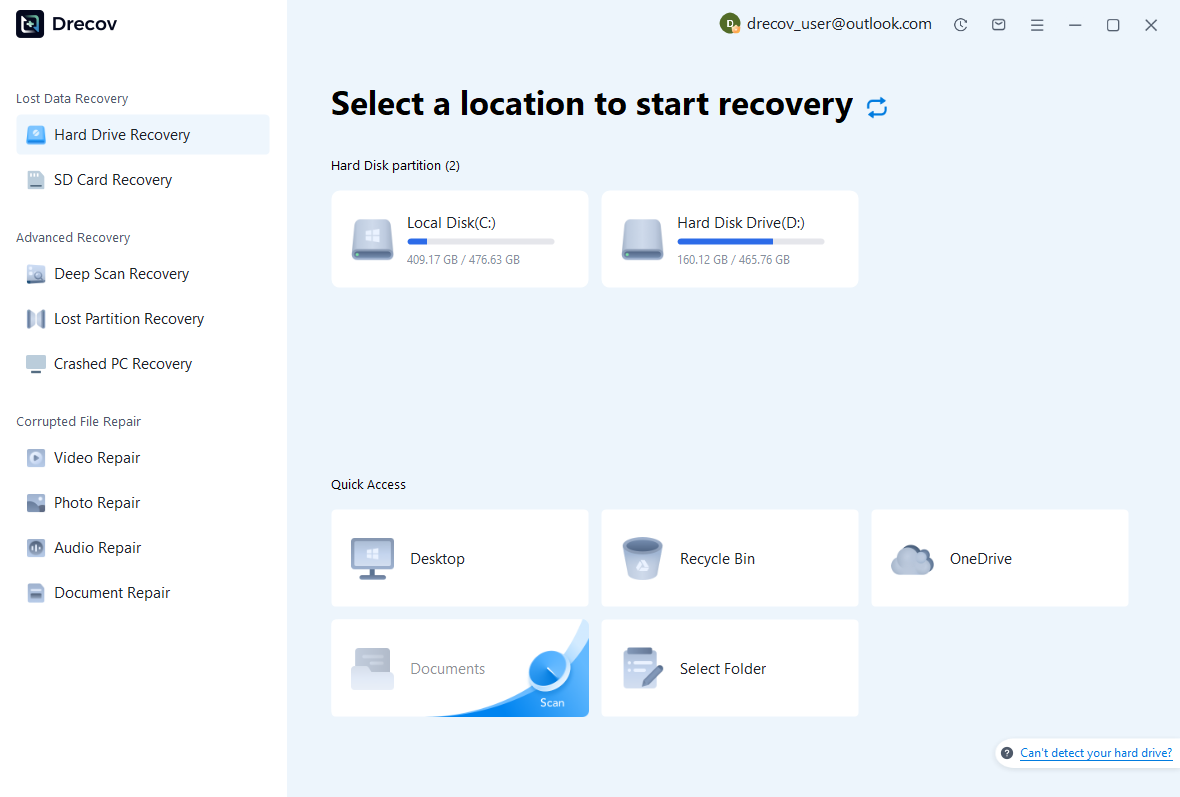
Step 1: identify image and catalog storage
Select the drive or partition that held the missing originals, sidecars, or local database candidate. These locations may differ, so record what each search targets. Keep recovery output elsewhere. If the storage repeatedly disconnects or reports hardware read failures, assess that condition before proceeding with an ordinary deleted-file scan.
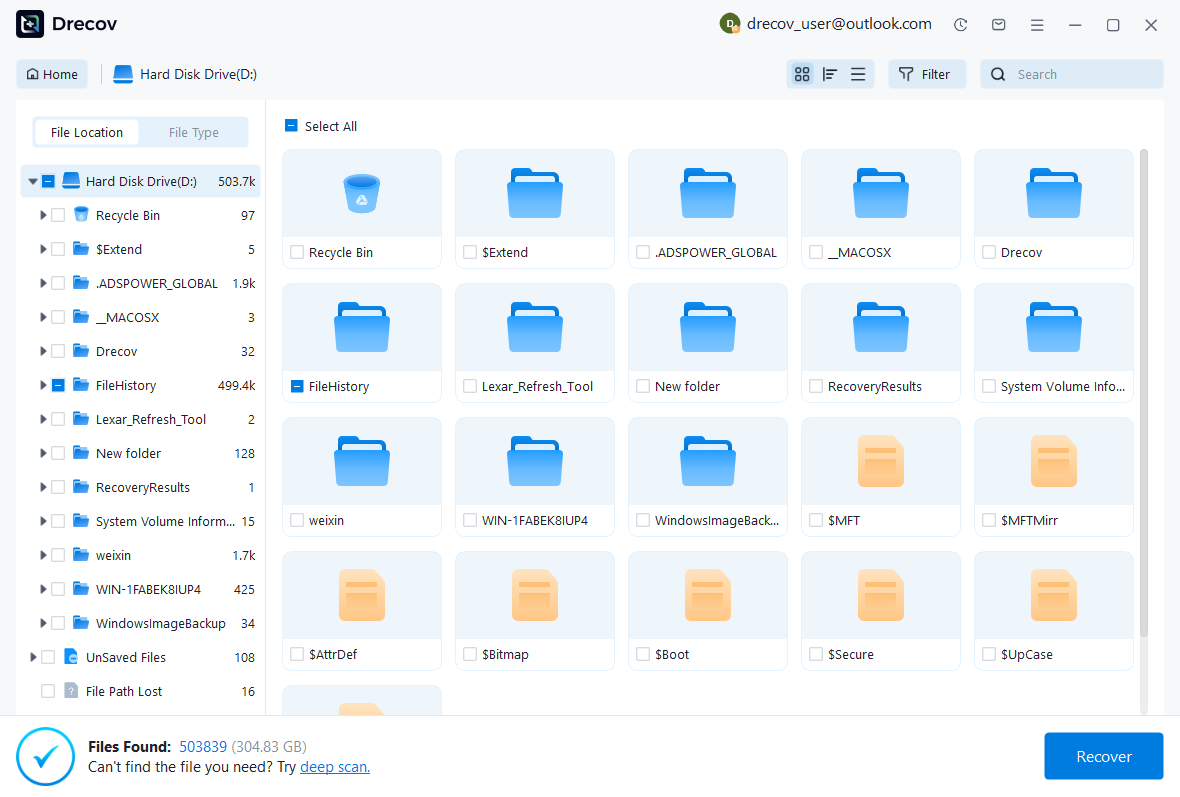
Step 2: compare full-resolution and metadata candidates
Review available paths, names, sizes, dates, and supported image previews. Preserve matching sidecars and useful database candidates alongside originals. A recognizable preview does not establish that the complete photo or its catalog relationships survived. Keep several plausible versions when necessary and compare them in the appropriate application after recovery.
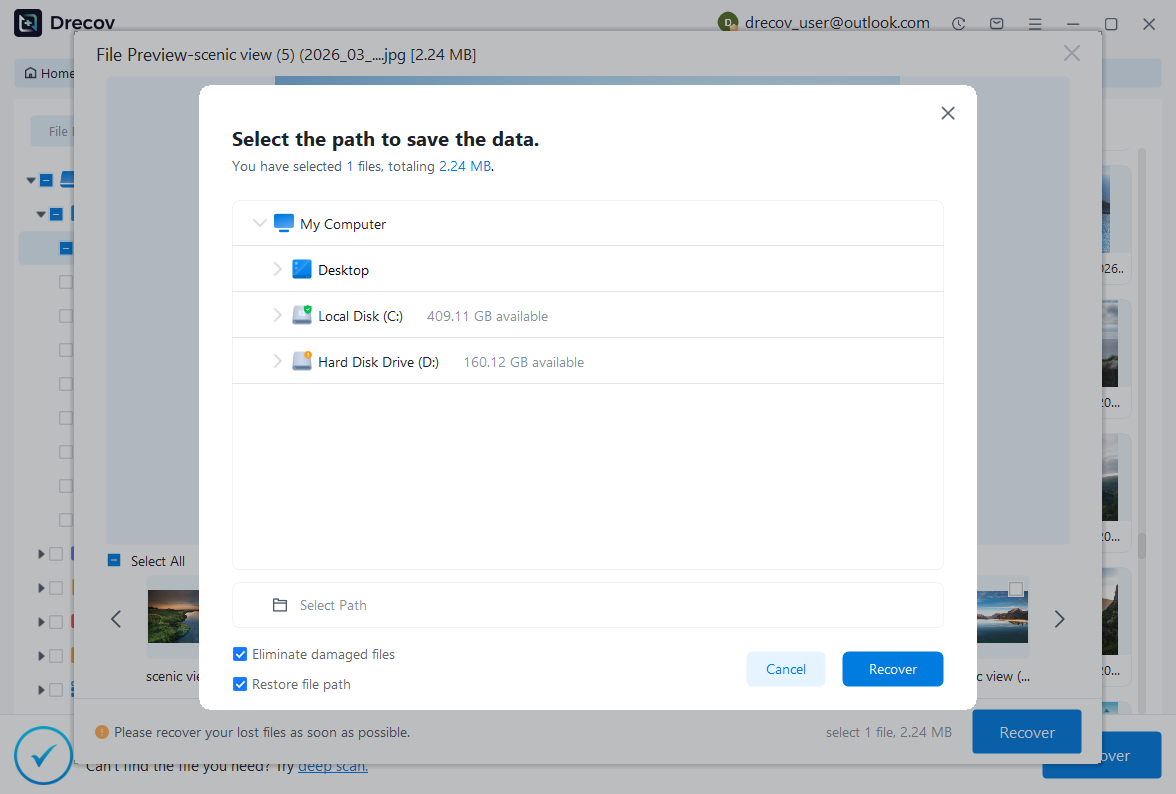
Step 3: restore elsewhere and test the collection
Recover selected files to another healthy destination and preserve an untouched set. Then use a working setup to reconnect originals or inspect catalog candidates. Compare full-resolution images, tags, captions, and relevant relationships. Keep uncertain files separate from the accepted collection so that an incomplete candidate cannot overwrite verified material.
Preserve an accepted collection milestone
Record the database source, collection paths, metadata settings, and any fields you reconstructed. Then preserve the original photos and an appropriate consistent catalog backup. This gives the next organization task a reliable baseline and clarifies which information depends on the database rather than on embedded metadata alone.
Test a small catalog restoration
Use a copied sample collection to verify your actual backup and metadata workflow. Open originals, inspect nested tags, and compare a caption after restoring into a separate setup. This practical test reveals what your protection preserves and helps identify any remaining database-only information that needs a separate consistent backup.
Related recovery resources
Explore the relevant recovery options: Hard drive recovery, External hard drive recovery.
For another recovery case and its practical checks, read the related recovery guide.
Check the vendor guidance for the installed version: official recovery documentation 1, official recovery documentation 2, official recovery documentation 3.