







A folder full of plain picture icons can look alarming. With thumbnails missing, first open one photo rather than trying to repair it. A normal, full-size image means the original still works; File Explorer simply has no usable preview to display. Start with the folder view, then compare a local image with a cloud file before clearing anything.
This distinction saves unnecessary work. A thumbnail helps you recognize a file, but it is not a backup of that file. Rebuilding previews cannot restore a deleted photograph. Equally, recovery software will not switch Explorer from a list of icons to a picture grid.
Use two files to identify what actually stopped working
Choose a familiar JPEG that you know opens correctly. Try opening a second photo in the affected folder and record the result. Avoid moving an entire photo collection while you investigate. Keeping the files in place makes the comparison easier and avoids accidental duplicates.
Compare the preview with the original
Double-click the first image, enlarge it, and inspect a recognizable detail. A blank Explorer icon followed by a clear photograph points toward preview generation. With an error message, a zero-byte file, or a missing folder, protect or locate the original instead of repeatedly rebuilding its miniature.
For video, watch beyond the first frame and seek to a later scene. A tiny still image cannot establish that the whole recording works. Keep this test short if the storage device repeatedly disconnects or struggles to read files.
Compare an ordinary local image with the affected location
Use a small, known-good JPEG already stored locally. Compare its preview with an item inside OneDrive, a network share, or a specialist photo folder. Local JPEG previews working normally make a system-wide failure less likely. Trouble limited to one location deserves a location-specific check.
Write down that difference in plain language: “local JPEG works; cloud JPEG does not” is more useful than “all pictures are broken.” Never change file extensions to make the icons look familiar. A renamed extension does not convert the underlying image.
Make sure Explorer is allowed to display thumbnails
Choose a picture-friendly view
Open the folder in File Explorer and select View, then Large icons or Extra large icons. Details and List emphasize filenames rather than picture previews. Wait for a modest folder to finish loading before deciding that nothing changed.
Compare the same two files again. A larger icon layout producing normal pictures resolves the display issue; no repair is needed. Folder settings can differ, so a working Pictures folder does not prove that another folder uses the same layout.
Check the option that deliberately hides previews
On Windows 11, open Explorer’s three-dot menu and choose Options. Windows 10 normally exposes Options through the View tab. In Folder Options, open View and clear Always show icons, never thumbnails. Select Apply, then OK, and revisit the test folder.
The wording matters: selecting that box requests icons instead of thumbnails. Changing this display preference does not rewrite the photos. On a managed work computer, ask IT about a setting that immediately returns or cannot be changed instead of bypassing organizational controls.
Follow the cloud or file-type clue, not a random fix list
For OneDrive, confirm the file is actually available locally
Check the OneDrive account and sync status before downloading a large collection. Right-click one affected file and choose Always keep on this device when that option is available. Allow the download to finish, then reopen the folder in a large-icon view.
Microsoft’s OneDrive thumbnail guidance recommends checking icon size and local availability. Test a single file first so you can see whether availability changes the result. Downloading requires a working connection and enough local space.
A file present in the cloud but absent locally is not automatically deleted. Check the correct account in the browser when needed. Do not unlink accounts or delete sync folders merely to refresh a thumbnail; those changes introduce a different problem.
For one format, check preview support separately from playback
JPEGs showing previews while RAW photographs, HEIC images, PDFs, or certain videos do not suggests a format-specific path. An application may open a format even when Explorer lacks an appropriate thumbnail handler. Check the application or format provider’s documented Windows support.
Install only a relevant extension from a trusted publisher if the format requires one. Random codec bundles and registry scripts add unnecessary variables. Keep an original unchanged while testing a supported export; converting every file simply to obtain previews can sacrifice useful information.
Video containers add another wrinkle. Two files ending in MP4 can contain different codecs, so one working thumbnail does not prove universal support. A missing preview alone is not evidence that the recording needs repair.
Rebuild cached previews only after the originals pass the test
Cache rebuilding fits a narrower situation: ordinary local files open, picture-friendly settings are enabled, yet their previews remain blank or stale. Before clearing cached previews, finish pending saves and close photo editors. There is no reason to delete originals, empty the Recycle Bin, or format storage for this test.
Clear only the thumbnail category
Search Start for Disk Cleanup and open the Windows utility. If asked to choose a drive, select the Windows system drive. Review the cleanup categories carefully, clear unrelated selections, and select only Thumbnails. Confirm that limited cleanup rather than accepting every suggested deletion.
Reopen your small test folder afterward and allow previews to regenerate. Initial loading can take longer because Windows no longer has those cached images. Avoid repeating the cleanup while it is rebuilding; that simply removes the work you are waiting to see.
Check whether the result survives reopening
Close Explorer, return to the same folder, and compare the same filenames. If the previews remain correct after reopening, the cache reset appears to have helped. Missing pictures returning after a cleaning utility runs point toward that utility’s cache settings rather than recurring photo damage.
When only a work share is affected, report the folder path and local comparison to IT. Network policies can differ from personal-folder behavior. A full Windows reset is disproportionate to a thumbnail-only symptom and can disrupt applications without addressing the actual cause.
If the originals are gone, change to a recovery task
Stop preview troubleshooting when a file search shows the actual photos are missing. Check backups and the Recycle Bin first. For cloud files, inspect the service’s own deleted-items and version features. A cached miniature cannot replace the original resolution or the full video.
Drecov is Windows data recovery software for finding lost local files. Its read-only recovery mode, Quick Scan, Deep Scan, filtering, and supported previews help examine candidates without treating a preview cache as the target. Lost Partition Recovery can help when the original partition disappeared; it does not change Explorer settings or repair hardware.
Prepare before Step 1
Stop writing to the source and prepare another healthy device for results. Do not install the software on the partition that held the missing files. Repeated disconnections, serious read errors, or physical damage call for imaging advice or professional recovery, not repeated scans. Later writes and SSD TRIM may limit what remains recoverable.
⚠ Warning: Install it on a drive different from the one where your data was lost to prevent overwriting.
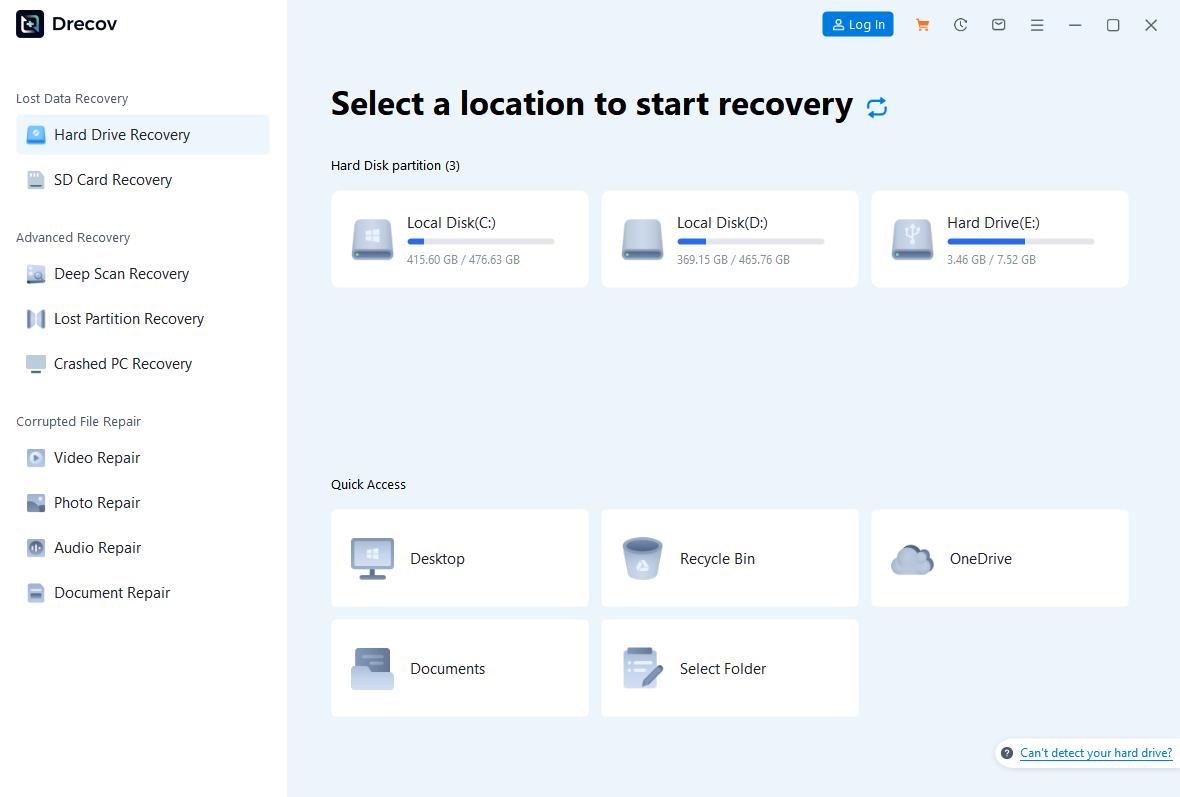
Step 1: Open Drecov and select the original photo location
Choose the stable Windows volume or original folder that contained the photographs, not a thumbnail-cache directory. A cloud-only original that never existed locally needs the cloud service’s recovery route. Confirm the source by its actual location rather than choosing the first familiar drive letter.
Step 2: Run Quick Scan and inspect recognizable candidates
Start Quick Scan and look for the former photo folder or expected filenames. Compare dates, image types, and available paths. For a mixed project, identify both photographs and associated video clips rather than selecting every small image result.
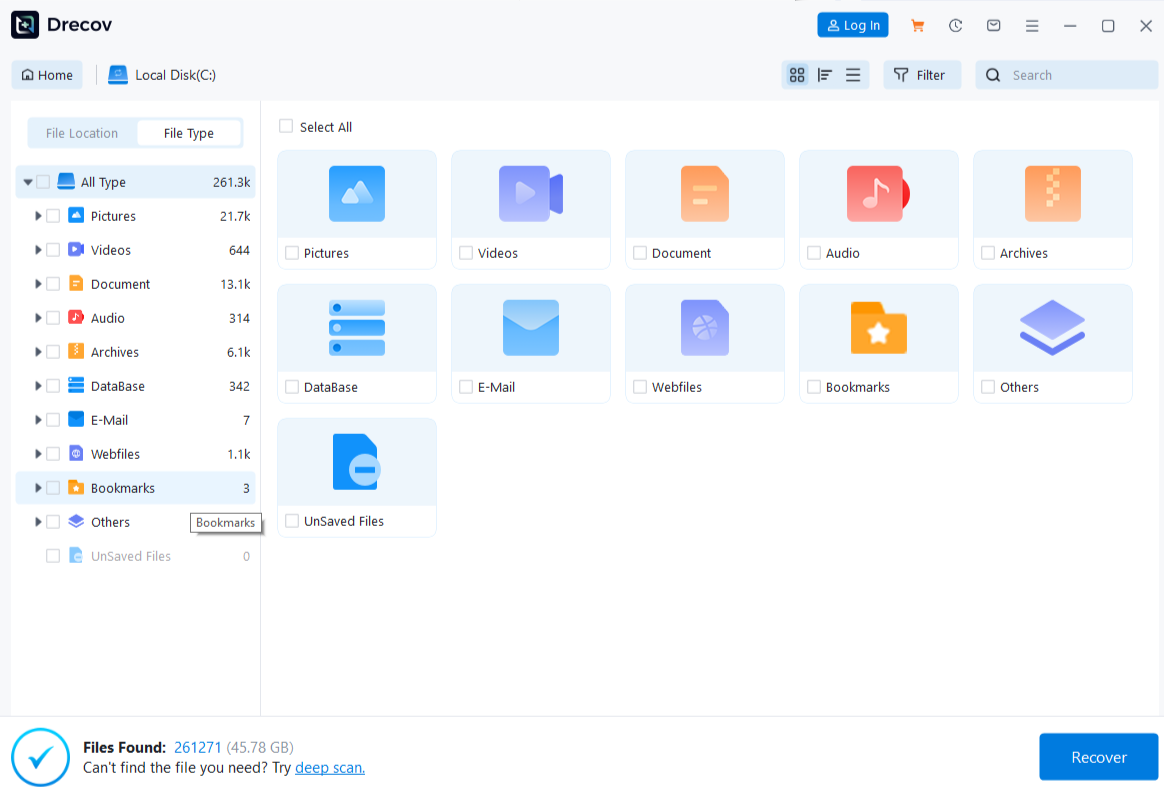
Step 3: Use Deep Scan only if needed
Continue with Deep Scan when the desired originals remain absent and the device stays stable. Stop if reading becomes unreliable. A longer search does not guarantee success or recreate overwritten data. The photo recovery page explains the broader missing-image task.
Step 4: Find and preview the full files
Use available filename, type, path, and date information to narrow results. Preview representative supported images and inspect visible detail. A recognizable miniature may be a separate low-resolution file, so compare dimensions where available. Previewing one image cannot certify every item in a collection.
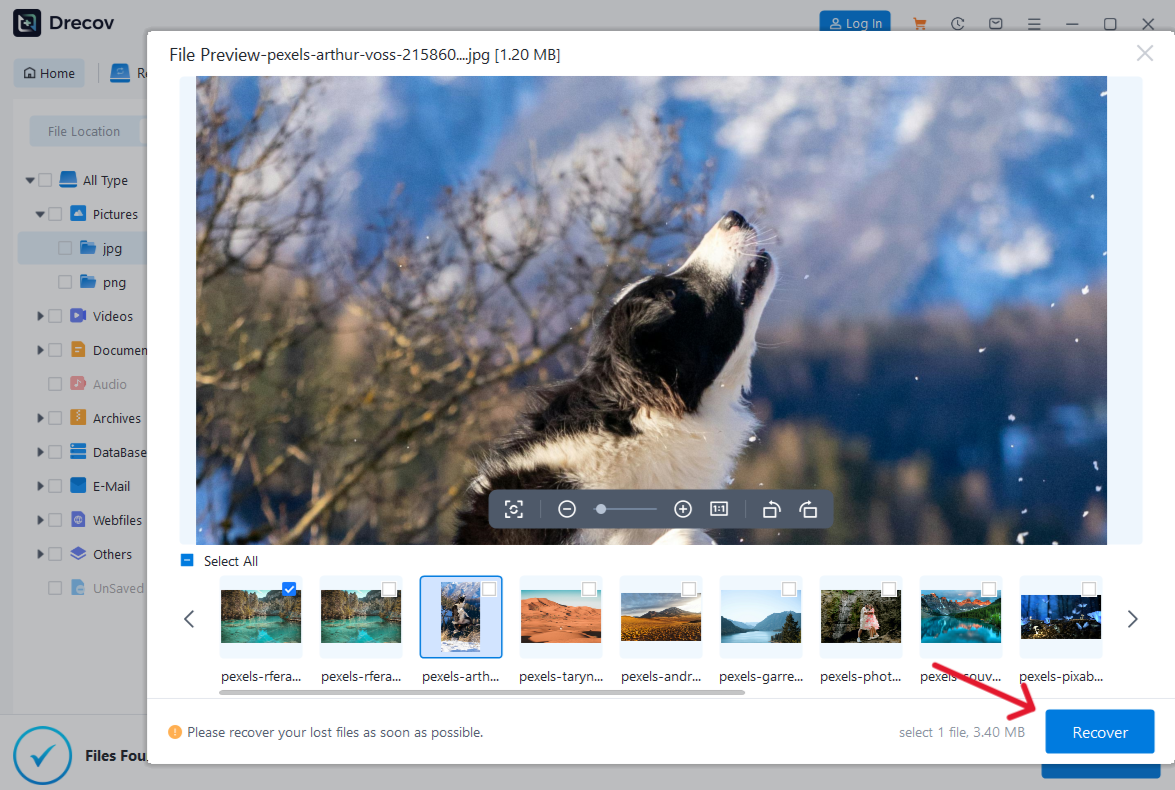
Step 5: Save elsewhere and verify before further changes
Recover selected files to the other healthy device, never the source. Check Drecov Folder or Recovery Folder if output is not where expected. Open saved photos in an image viewer and inspect resolution and important details. For recordings, follow video recovery guidance and test playback at several points before deleting, cleaning, or formatting anything.
⚠ Warning: Install it on a drive different from the one where your data was lost to prevent overwriting.
FAQs about missing thumbnails
Does a plain image icon mean my photo is damaged?
No. Open the actual file and inspect it first. A clear full-size image with a generic Explorer icon usually warrants display, availability, or preview-support checks rather than image repair.
Will clearing thumbnails delete my photographs?
Clearing only the Thumbnails category removes cached previews, not the original photographs. Other cleanup categories do different things, so review selections instead of approving a broad cleanup.
Why do only some videos lack a preview?
Different codecs or preview handlers can produce different results despite matching extensions. Test playback and compare a known-good local recording before deciding that any data is missing.
Should I recover files when all the photos still open?
Recovery is unnecessary for a purely visual Explorer problem. Keep normal backups, then fix the display path. Scanning does not enable thumbnail generation.
Can a thumbnail restore a deleted original?
A cached preview is not a full-resolution backup. Search for the original in backups, cloud storage, or an appropriate local recovery scan rather than expecting the miniature to recreate lost detail.
Conclusion
Resolve missing thumbnails by proving which layer failed: the original, Explorer’s view, local availability, or format support. Once ordinary files open correctly, consider rebuilding the cache. Drecov belongs to the separate case where genuine local originals disappeared; recover those to another device and verify them before making further changes.
⚠ Warning: Install it on a drive different from the one where your data was lost to prevent overwriting.





