







Recover Godot source before rebuilding generated data
To recover Godot projects, begin with the source directory rather than an exported executable. A working project normally depends on project.godot, scenes, scripts, resources, and original assets. Generated import data serves a different role. Rebuilding a cache can help Godot read surviving originals, but it cannot recreate a deleted script or restore an earlier scene arrangement from nothing.
Record the engine version, expected main scene, a distinctive node, and the last working revision. Also preserve the exact error message. A missing project in the Project Manager, a scene parse error, and an unavailable texture require different investigations. Starting from a concrete symptom helps you choose a useful recovery path without making broad changes prematurely.
Preserve a complete working copy first
Close the editor and copy the entire surviving project directory, including hidden files where relevant. Keep an untouched copy before reopening it. If the project uses version control, preserve the repository metadata and uncommitted working files too. A remote repository may contain committed history while omitting the latest local scene changes you still need.
Use the original compatible engine version for initial inspection when practical. Opening a project in a different major version can trigger conversion or compatibility issues that obscure the original failure. Perform any upgrade on a separate copy and record it as a new change, rather than mixing version migration with the first recovery attempt.
Native route 1: import the surviving project directory
- Locate the directory containing the intended project.godot file.
- Preserve that directory and confirm that its scenes and scripts exist.
- Use Import in the Project Manager and select the existing project file.
- Open the copied project and inspect the expected main scene.
A project can disappear from the Project Manager list while its source remains intact. Re-importing the existing project restores access to those files; it does not recover deleted content. Compare the full directory path and distinctive scene content before declaring success. A different checkout can use the same project name while containing an older build.
Check the startup configuration separately
If the project opens but will not run, inspect the configured main scene and the actual scene path. A moved or renamed scene can leave a stale reference. Test the intended scene directly in the working copy, then update configuration only after confirming the correct target. This avoids treating a startup path problem as a damaged project database.
Also inspect case and spelling in resource names. A project that worked on one filesystem can expose path inconsistencies elsewhere. Compare the exact stored paths with the actual files rather than renaming many folders speculatively. Record any corrected references so the accepted source remains understandable to other contributors.
Native route 2: restore a coherent repository revision
- Preserve uncommitted changes and the current repository before switching revisions.
- Identify a known working commit from history.
- Check out that revision into a separate recovery directory or worktree.
- Restore required large-file content and test the project with the matching engine.
An existing Git repository can preserve scenes, scripts, and assets that were actually committed. It cannot recover an uncommitted file merely because the repository exists. Use history to identify the relevant paths and compare the incident with the commit timeline. A selective restoration may be enough when one scene changed, while a coherent earlier checkout helps diagnose broader breakage.
Keep dependent files at compatible revisions
A scene may depend on a script API, a custom resource, and an asset introduced together. Restoring only the scene from an older commit can create new errors. Compare the related files and test a complete known working revision first. Then decide whether to bring forward specific changes or restore a carefully selected group of files.
If the project uses Git LFS, a pointer file is not the original asset. Confirm that the actual large-file content is available in the recovery checkout. A successful clone does not guarantee every texture, recording, or model is usable. Open representative assets independently and check Godot’s import results before treating repository recovery as complete.
Native route 3: reconnect surviving scene resources
- Read the error message and identify the exact missing resource path.
- Search the preserved source tree for the original asset or script.
- Correct the reference in a copied project using supported editor tools where possible.
- Reopen the scene and test its dependent behavior.
A scene can fail because an external resource moved even though the resource itself survives. Preserve both the scene and the candidate asset before changing paths. Match the resource by content and role, not only by a similar filename. Reconnecting an unrelated script can remove one error while silently changing the scene’s behavior.
Inspect text scenes cautiously
Godot’s TSCN format describes scene nodes and resources in text form. A copied file can help you inspect a reported path or parse location. However, text visibility does not make arbitrary edits safe. Keep the original, make one understood change at a time, and let Godot validate the working copy after each correction.
If the file has a merge conflict, resolve it with knowledge of the intended node and resource relationships. Deleting conflict markers without deciding which values belong can produce a loadable but incorrect scene. Compare the parent revision or another intact checkout, and record any scene structure you reconstruct manually rather than claiming a direct historical restoration.
Native route 4: rebuild generated imports from surviving originals
- Preserve the full project before changing any generated data.
- Confirm that original textures, audio, models, scripts, and resources exist.
- Use the compatible editor’s supported reimport workflow in the copied project.
- Compare imported assets and scene behavior after regeneration.
Generated import data can be rebuilt when the original source assets and necessary import settings survive. This is a repair of derived data, not a way to recover deleted originals. Do not start by deleting directories from the only surviving project. Preserve version-specific settings and inspect documentation for the engine release you actually use.
Preserve import settings that affect appearance
A model or texture can import successfully with settings that differ from the old project. Compare scale, orientation, compression, animation selection, and material behavior where relevant. A scene that opens without an error may still render or animate differently. Use a known visual reference and inspect an important gameplay interaction before accepting the regenerated result.
Godot versions handle generated directories and resource identity differently. Avoid applying a cleanup recipe from another major version blindly. If a source asset still fails after a controlled reimport, inspect that asset independently and preserve its error details. Repeatedly regenerating caches cannot repair missing bytes inside a damaged model or audio file.
Separate source recovery from exported-game salvage
An exported game is a distribution artifact, not a complete substitute for the original editable source project. It may omit editor information or contain transformed resources. Keep any surviving build as a behavioral reference, but search for the actual repository, project archive, and original assets first. Those sources provide a clearer route to continued development.
Use a build as evidence of behavior
A working build can show the intended level layout, animation timing, interface flow, or collision behavior. Record those observations if you must reconstruct a scene manually. Do not assume that every script, comment, and editor arrangement can be recovered exactly from the build. Label reconstructed content and retain the build separately from the new source.
For licensed third-party assets, locate the legitimate original downloads or your own project backups. Re-importing those assets can restore missing inputs, but it does not recreate custom edits unless those edits survive elsewhere. Compare the exact asset version and any local modifications before substituting a fresh download into an accepted recovery project.
Diagnose a scene that loads but behaves incorrectly
Check the node tree, attached scripts, exported properties, signal connections, and referenced resources. A scene can parse successfully while a missing connection prevents a button from working. Start with the smallest reproducible behavior from the incident, then compare a known working version. This narrows the problem more effectively than rewriting the entire scene.
Check inherited and instanced scenes
A scene can depend on another scene that changed or disappeared. Inspect the original scene and any inherited overrides in the working copy. A restored child scene may still show different properties because the parent revision differs. Keep compatible scene groups together while testing, and document any override you deliberately recreate.
Also inspect autoloads and project-level settings when multiple scenes fail in the same way. A missing shared script can explain a widespread symptom. Recover that shared dependency from a verified source rather than patching each affected scene independently. Then rerun the original behavior check to confirm the common cause actually accounts for the failure.
Protect local changes while using version history
Before restoring tracked files, preserve untracked assets, ignored working material, and local modifications. A clean repository history does not necessarily include an artist’s latest texture or a designer’s unsaved scene. Compare the working tree with the repository and identify which files exist only locally. Keep those files outside destructive checkout or cleanup operations.
Review each source’s limits
A remote branch may preserve committed code but not local exports. A project ZIP may include assets but omit repository history. A teammate’s checkout may contain a newer scene with an older script. List the strengths and gaps of each candidate before combining them. This helps avoid a patchwork recovery that opens but cannot reproduce the intended behavior.
When combining useful changes, keep a small change log with source revision and path. Test the project after each meaningful group of changes. If the behavior fails again, that record gives you a specific comparison point. A single large merge of uncertain files makes it much harder to distinguish an old defect from a recovery mistake.
Work through a missing level scene example
Suppose the Project Manager opens the game, but the main level reports a missing texture and script. Preserve the source tree and read the exact resource paths. If the original files moved to a new folder, reconnect them in a working copy. Then inspect the level’s objects and run a short known interaction to verify the corrected references.
Compare an intact revision before reconstructing
If the files are truly absent, open a separate known working repository revision. Compare the scene, script, texture, and related resource settings as a group. Restore the smallest compatible set into your recovery candidate. This preserves useful later work elsewhere while giving the missing level a coherent set of dependencies.
If no source survives, use screenshots or a build only as reconstruction references. Record which node arrangement and behavior you recreated manually. A playable replacement may meet the immediate development need, but it does not prove the original level source returned. Keep that distinction in the recovery record and in any handoff to teammates.
Verify the project beyond a successful editor launch
Run the intended main scene, visit the affected level, exercise input, and inspect a representative save or load operation if the project uses one. Then test an export in the intended environment. Editor success and distribution success are separate checks, especially when resources, plugins, or export settings differ between recovery candidates.
Create an acceptance checklist from the incident
Use specific observations: the character spawns at the correct marker, a signal opens the right panel, an animation plays, and a known texture appears at the intended scale. These checks make the recovery assessable. A generic statement that the game runs can hide missing content or behavior outside the initial scene.
Preserve the accepted source revision and the engine version used to test it. Include necessary original assets and documented dependencies in a complete backup. Then open a copied project in a separate location to verify that it does not depend on a temporary recovery folder. This catches path assumptions before the project returns to ordinary development.
Inventory Godot files by their role
Separate source scripts, scene descriptions, original assets, import settings, generated data, and exported builds in your recovery notes. This classification helps you choose the right source. A repository revision may preserve scripts and scenes while an artist’s original model lives in a separate archive. A generated import folder may help the editor, but it should not become the assumed replacement for missing originals.
Trace one broken dependency end to end
Choose a failing scene and write down its script, external resources, inherited scene, and project-level dependencies. Then check which ones exist in each candidate source. This small dependency map can explain why restoring one file did not solve the error. It also helps identify a coherent group of files to retrieve from an earlier revision.
For example, a scene may reference a custom resource that uses a script-defined class. Recovering the texture alone will not restore that relationship. Inspect the actual error and the source graph before copying unrelated files. A focused dependency check is more useful than repeatedly regenerating imports for a script or resource that is truly absent.
Compare engine compatibility before repairing a scene
Record the version that last opened the project successfully and the version used for the recovery test. Major-version differences can affect syntax, resources, and conversion behavior. If the old version is legitimately available, use it to establish a baseline on a copy. Otherwise, preserve the source and document the migration as an additional task.
Keep conversion output out of the original source
A converted project may become useful, but it should not overwrite the only surviving pre-conversion candidate. Preserve both and compare a distinctive scene after migration. If a new error appears, you can then determine whether it existed before the conversion. Without that separation, recovery and migration changes become difficult to distinguish.
Also inspect plugins and editor extensions that the project expected. A missing extension can explain a configuration or editor problem without implying that scenes disappeared. Use legitimate compatible dependencies and keep their versions in the record. Do not silently replace a project-specific tool with another one that changes the workflow or resource behavior.
Recover a missing script through actual history
When the repository contains the deleted script, inspect its history and the commits that changed its consumers. Restore a known compatible revision in a separate checkout first. Then run the affected scene. This validates the script in its original context before you try to transplant it into a newer working tree with potentially different node paths or resource interfaces.
Preserve local-only changes
A committed script may be older than the work lost during the incident. Compare local editor backups, legitimate external copies, or a teammate’s preserved source when available. Record which changes you can verify. Do not describe the repository version as the final script merely because it is the newest version that Git happens to contain.
If only a fragment survives, preserve it unchanged and reconstruct the missing behavior in a new working file. Use tests or concrete gameplay checks that reflect the intended feature. The resulting script can meet the development goal while still being a reconstruction. Keeping that distinction helps later code review and avoids inventing historical authorship or exact wording.
Inspect scene identity and references after copying assets
A copied asset can have the right content while the project still refers to another path or identity. Use the engine’s supported editor workflows and version-specific resource guidance to inspect the relationship. Avoid broad filesystem renames in the only source tree. Test one affected scene before applying the same path correction across many files.
Check instancing and exported properties
An instanced scene can load with default values while losing important overrides. Compare an object whose exported properties changed, then inspect its behavior in the parent scene. A successful standalone scene test may miss those differences. Recovery should preserve how the scene is used in the game, not only whether its file parses independently.
Signal connections deserve a similar check. Click the intended control, trigger the expected event, and confirm the receiving behavior. A signal name visible in a script does not prove the connection survived in the scene. Record any reconnection you make manually so the accepted source explains both restored files and deliberate repairs.
Validate original assets independently of the editor
Open a recovered texture, model, or audio file in an appropriate tool before blaming Godot for an import failure. A truncated original may have a familiar filename and a small preview but lack usable full content. Preserve the candidate and compare another source. Reimporting cannot supply missing data that no valid original contains.
Compare technical properties that affect gameplay
For textures, inspect dimensions and transparency. With audio, compare duration and channels. For models, compare scale and available animation where relevant. Those properties can change behavior or appearance even when Godot imports the file successfully. Use the actual asset role in the game to decide which checks matter rather than relying only on a generic file-open test.
If you substitute a legitimate new asset, document it as a replacement. A similar model can have different collision assumptions, skeletons, or materials. Keep the old recovered candidate for reference and test the affected scene thoroughly. This prevents a visible improvement from hiding a compatibility problem introduced during recovery.
Reconstruct only what the evidence supports
A gameplay recording can reveal timing and visible layout, but it does not establish the exact node tree or script implementation. Use it to define behavior, then build a new source version with clear notes. Mark uncertain values and seek an authoritative source when a detail matters. The reconstruction can be useful without pretending to recover invisible implementation choices.
Use a playable build as a comparison oracle
List a few observable behaviors from the surviving build and reproduce them in the recovered source. Compare a menu transition, a level interaction, and an animation event. These checks support functional similarity. They do not prove that hidden systems, unused scenes, or comments returned, so keep the acceptance claim limited to what you actually tested.
Preserve any original build and its associated date. If the reference itself predates the lost source, it may lack newer intended features. Record that limitation before using it as the target for reconstruction. Otherwise, you could accidentally remove valid later work while trying to make the source match an older distribution artifact.
Prepare a source archive that restores independently
After accepting the project, create a complete source milestone with original assets and the required repository or dependency information. Open a copied version in another location using the documented engine version. Test the affected scene and the main application flow. This reveals absolute paths or external resources that the original working directory may have hidden.
Keep the recovery changes reviewable
Record restored paths, source revisions, corrected references, regenerated imports, and manually rebuilt behavior separately. A teammate can then review the accepted state without guessing which files came from which candidate. This record also provides a useful starting point if a later bug turns out to depend on an older resource or script that you deliberately replaced.
A clear accepted milestone should include what remains unresolved. If an optional scene or custom tool is still unavailable, say so and keep its references. That prevents future cleanup from erasing the only clue to its original role and lets development continue with a precise understanding of the recovery’s scope.
When storage recovery can help Godot source
PandaOffice Drecov may help retrieve deleted local scenes, scripts, original assets, project archives, or repository files from readable storage. It cannot recreate unsaved code from an import cache or guarantee a complete editable project from an exported game. Prefer coherent source backups first and reduce writes to storage that may still hold deleted files.
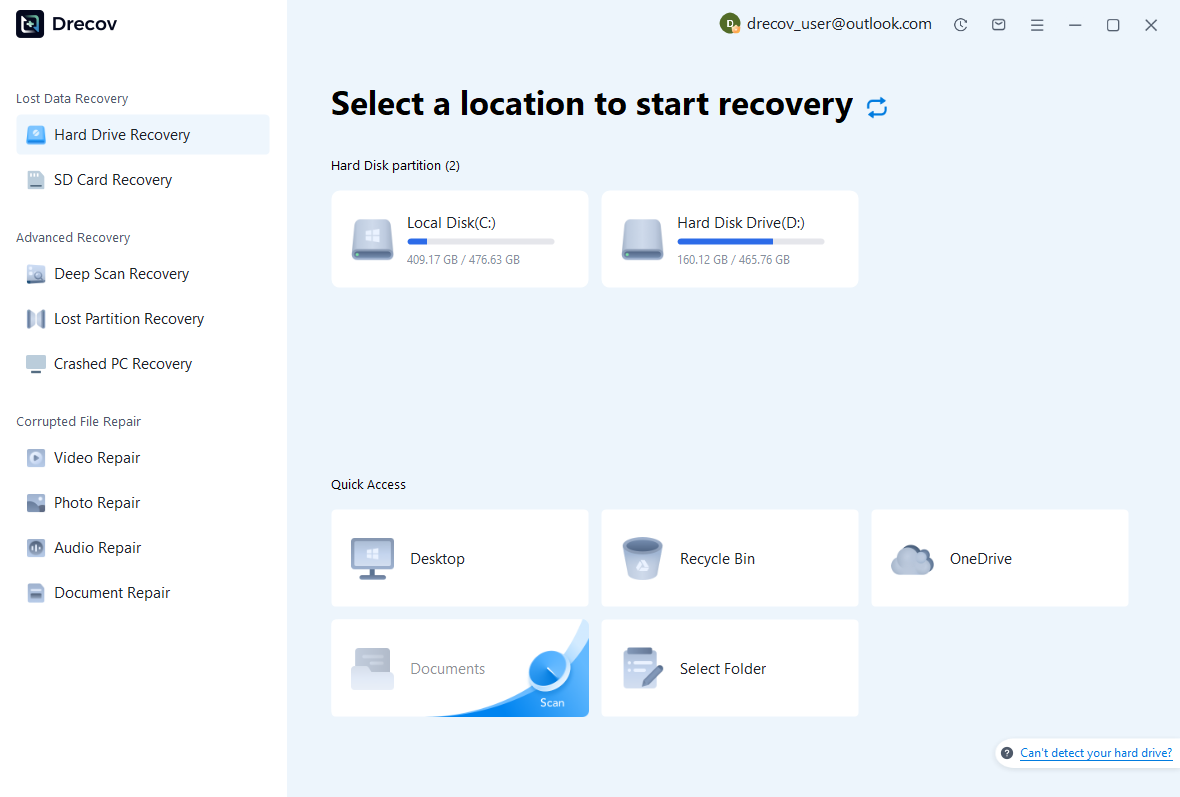
Step 1: identify the actual source location
Choose the drive or partition that held the project source, local repository, or backup archive. Distinguish that location from a build output directory. Keep recovered output on other healthy storage. If the source repeatedly disconnects or reports hardware read failures, assess the device condition before continuing with a routine software scan.
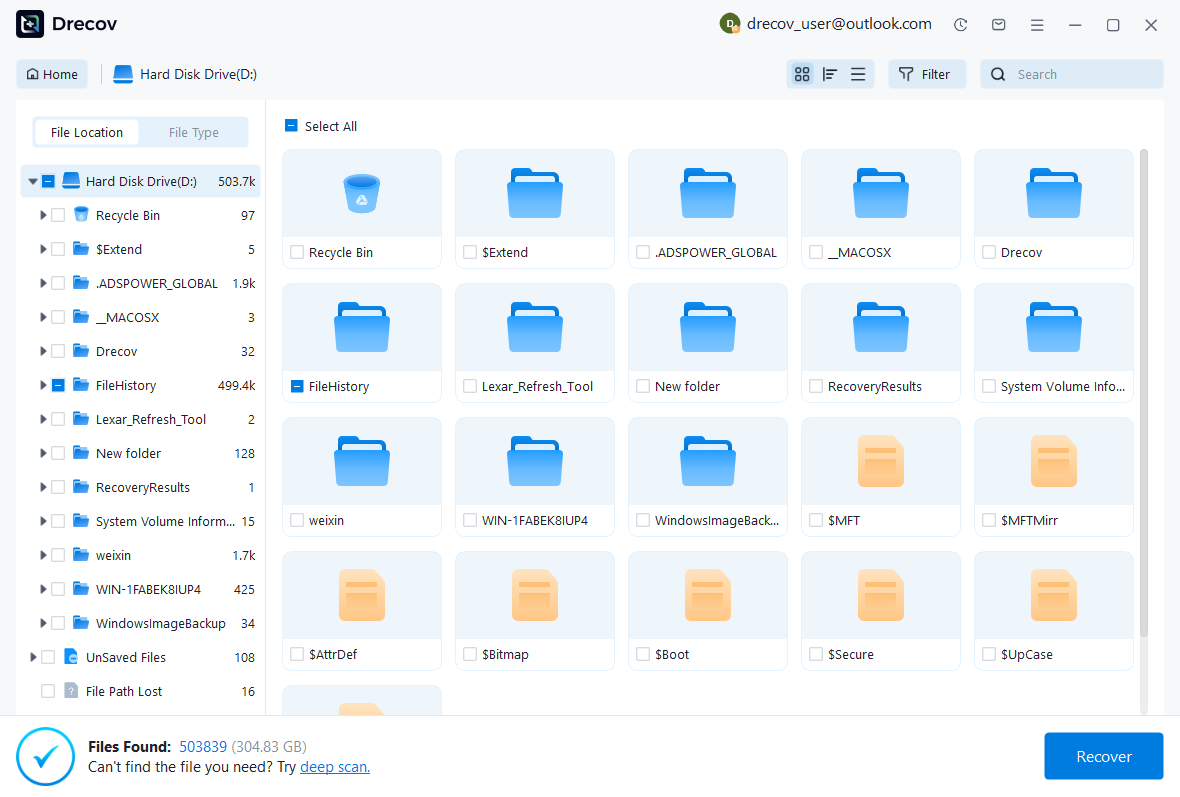
Step 2: compare scenes and dependency candidates
Review available paths, file sizes, dates, and supported previews. Preserve plausible scenes, scripts, and original asset folders as separate candidate sets. Recognizable text inside a TSCN file does not prove that its referenced resources survived. Keep alternate versions until you can test their relationships in a compatible Godot editor.
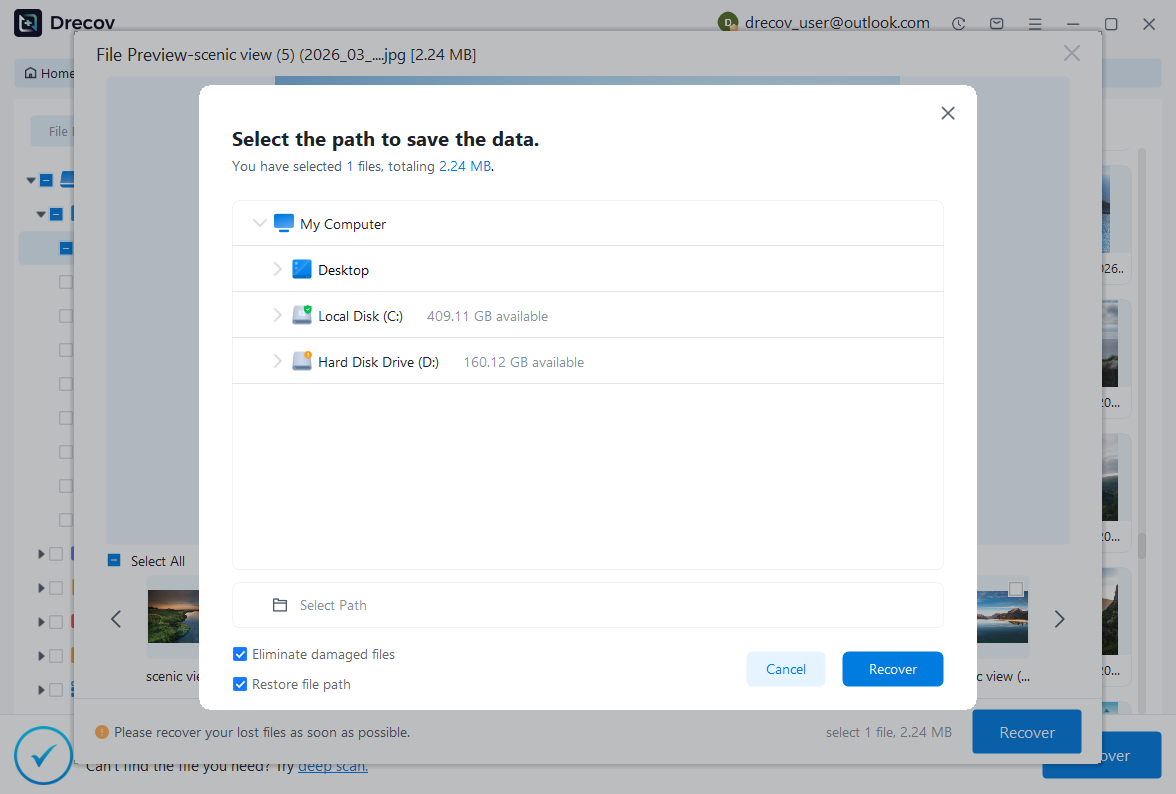
Step 3: restore elsewhere and run the copied project
Recover selected files to a separate destination and retain an untouched set. Import a working copy through the Project Manager, resolve only understood paths, and inspect the affected scenes. Test scripts, signals, resources, gameplay, and an appropriate export. Record reconstructed behavior and missing dependencies before calling the source project ready for further development.
Preserve a reproducible development state
Keep the accepted source, its required assets, the engine version, and the incident-specific test results together in your recovery record. A copied project should open and pass those checks without the temporary recovery directory. This makes the result a usable development milestone rather than a collection of promising files.
Related recovery resources
Explore the relevant recovery options: Hard drive recovery, External hard drive recovery.
For another recovery case and its practical checks, read the related recovery guide.
Check the vendor guidance for the installed version: official recovery documentation 1, official recovery documentation 2, official recovery documentation 3, official recovery documentation 4.





