







The best photo recovery software for your situation should help retrieve the original pictures you need, not just small images that resemble them. Start with the source device, the file formats and what you want to do with the recovered photos. A recognizable preview is helpful, but you still need to verify dimensions and image detail after saving. Meanwhile, an unavailable RAW preview does not by itself prove that the file is unrecoverable.
Stop adding photographs or other files to the affected storage. Check the original capture device, independent backups and the correct deleted-items location before installing recovery software. Keep that installation away from the partition containing lost photos. A device that repeatedly disconnects or develops serious read errors needs imaging or specialist advice rather than repeated direct scans.
Drecov helps you search for missing photographs
Drecov is Windows data recovery software for lost local files, including photos. Its read-only recovery mode examines stable accessible storage through Quick Scan and, when needed, Deep Scan. Available filters and file information help narrow the results. Supported previews help identify candidates before you recover selected files to another healthy device.
For photographs, use those features to find the shoot, original folder or recognizable subject rather than selecting every image in a results list. Lost Partition Recovery can help when the source partition disappeared. The program does not restore original resolution from a thumbnail, repair physical damage or guarantee overwritten pictures. Specific camera-format and preview support still needs checking before you rely on it.
⚠ Warning: Install it on a drive different from the one where your data was lost to prevent overwriting.
Choose for the pictures you actually need
Everyday photos and an accessible source
A guided search can suit someone recovering family pictures from stable Windows-accessible storage. Drecov offers scanning, filtering and supported previews within that workflow. Before a full recovery, save a few important examples to another device and inspect them. A tool that finds many cached images has not necessarily found the originals from your holiday.
A different Windows search option
Recuva provides another Windows recovery approach, including a documented option for searching damaged or reformatted disks. Check whether it recognizes your source and the photo types you need. Its presence in a search result does not establish that a particular camera file will preview or recover correctly. Use a separate healthy destination regardless of which program you choose.
Content-based recovery when names are missing
PhotoRec searches for file content using signatures rather than promising the original folder organization. That can be useful when directory information has disappeared. Expect additional sorting and verification, particularly when results have generic names. Keep a record of the saved output so later renaming does not make it impossible to trace a photograph back to its recovery result.
Do not scan when a complete copy already exists
An original still in the Windows bin may need only Restore. Existing verified backups or untouched camera copies can also solve the problem without another scan. The Recycle Bin recovery route is worth checking for deleted PC copies. Photos on other devices or cloud services can have different deletion behavior.
When choosing the best photo recovery software, compare source access, file support, useful result information and safe output. Read current recovery conditions before paying for a tool. An advertised file count or recovery percentage cannot tell you whether your specific photograph retains the detail needed for printing or editing.
When recovery software cannot preview RAW photos
Separate recovery support from preview support
A program may list a file without displaying its image. Preview depends on the application’s supported formats and the camera’s file structure. An absent preview is therefore a question to investigate, not a guaranteed failure or guaranteed success. Do not assume that seeing the extension means the program understands every camera model that uses it.
Check a compatible viewer before judging the result
Adobe’s supported camera list illustrates why camera-specific RAW support matters. That list concerns Adobe software, not Drecov’s preview engine. Check the application you intend to use and its camera support. If you need an update or another viewer, install it away from the source partition while recovery remains necessary.
Once you have saved a plausible file to a separate healthy device, open a working copy in a compatible application. Compare it with a known-good photograph from the same camera when available. If both fail in the same viewer, compatibility deserves attention. A result that fails in compatible applications may instead be incomplete or damaged; preserve it and look for other copies.
A JPEG partner can help recognition, not replace the RAW original
Some shooting workflows produce separate image versions. A readable JPEG can help identify the scene, but it does not establish the condition of a corresponding RAW file. Keep each version until you confirm what it contains and what your editing work requires. Similar names and capture times are clues rather than proof of a complete pair.
Recover a representative group with Drecov first
Prepare storage for the recovered photographs
Check backups and stop writes to the source. Install Drecov on a different healthy location, not the partition that contained the lost photos. Prepare another healthy physical device with space for originals and alternative versions. Source instability means you should stop direct scanning and obtain imaging or professional recovery advice before continuing.
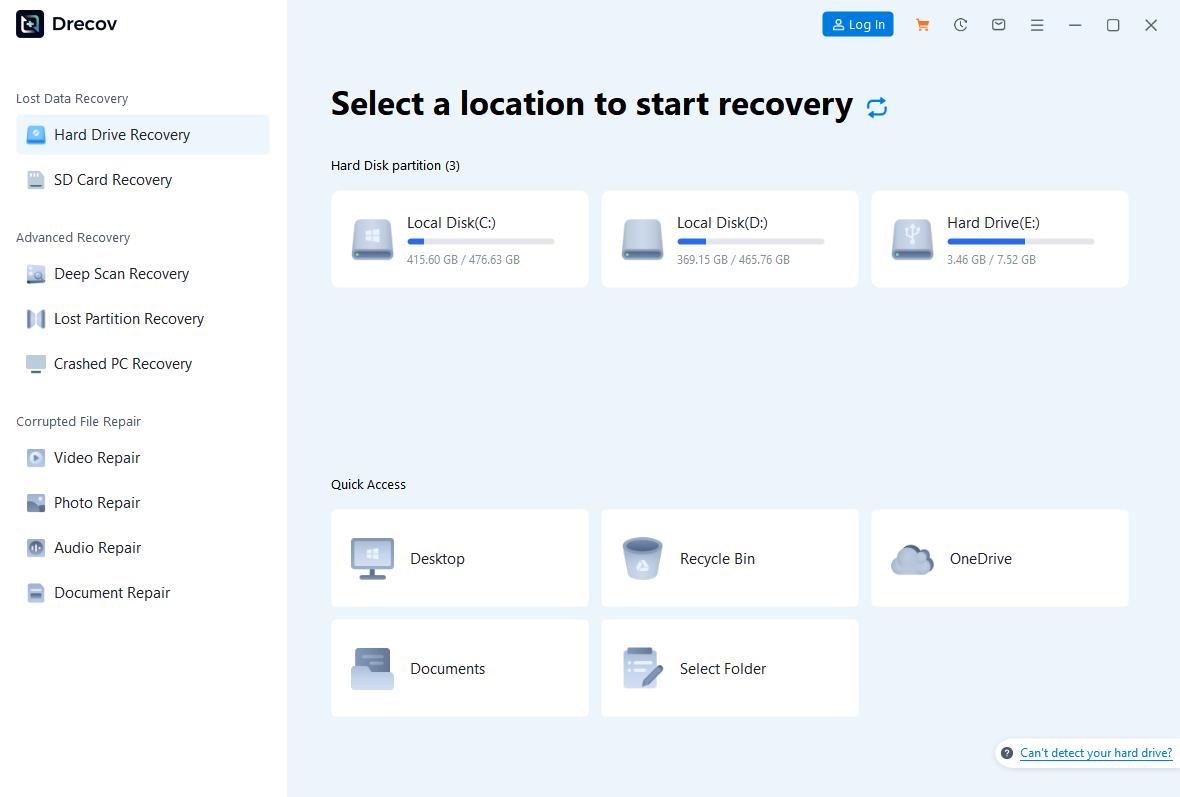
Step 1: Open Drecov and select the original photo location
Choose the stable volume or device that held the images before deletion. Identify the actual device instead of following an old shortcut to a gallery. Use the applicable Lost Partition Recovery mode when the original partition has disappeared. Do not initialize or recreate that partition merely to give it a familiar letter.
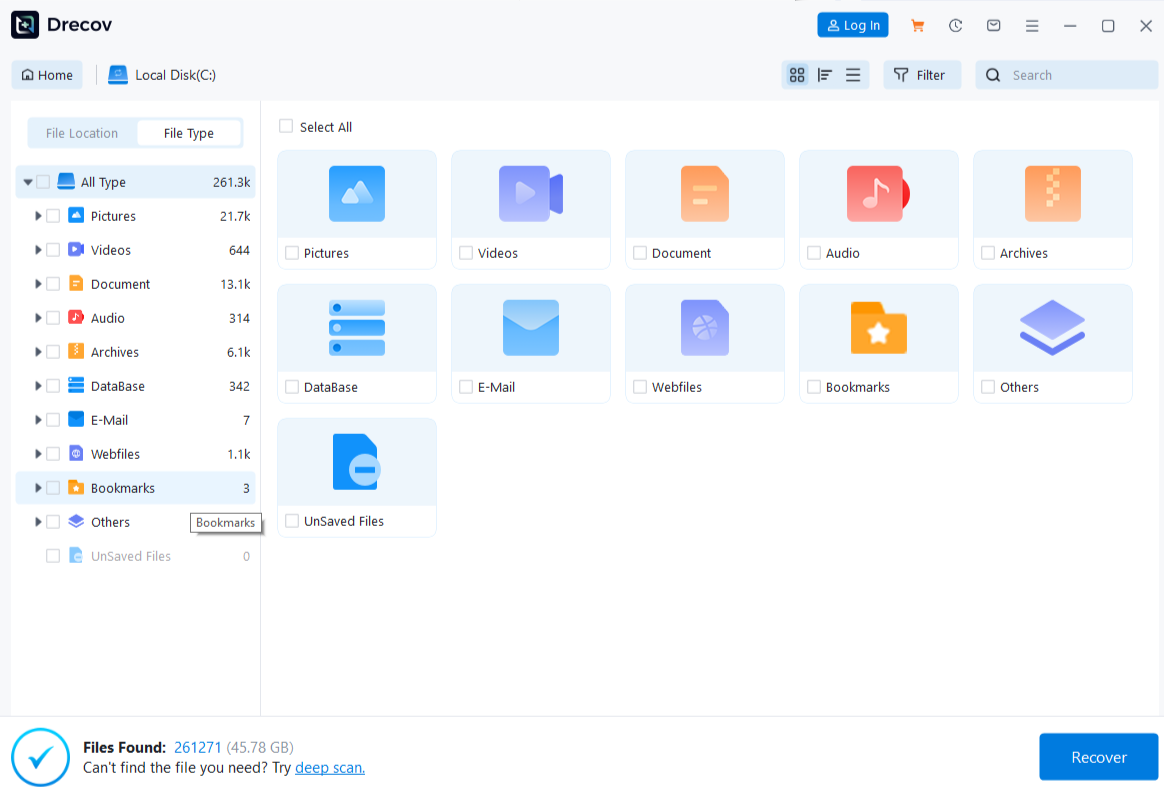
Step 2: Run Quick Scan and look for the shoot
Browse familiar folders and compare available filenames, dates and types. Select several photographs from different moments, including one you know well. A mixed collection can contain small web exports and cached previews alongside camera files. Keep those distinctions in mind when the first recognizable subject appears.
Step 3: Use Deep Scan when needed and stable
Continue if Quick Scan does not locate the images and access remains reliable. Stop at worsening reads or repeated disconnects. A deeper search cannot recreate data that later writes fully replaced, and SSD TRIM can further limit what remains. Do not repair or format the source between recovery attempts.
Step 4: Narrow the results and inspect supported previews
Use available file type, name, path and date information. Inspect recognizable details in supported previews, but do not infer full resolution from a small display. Keep several plausible versions if their roles are uncertain. The photo recovery overview offers related guidance on protecting original images.
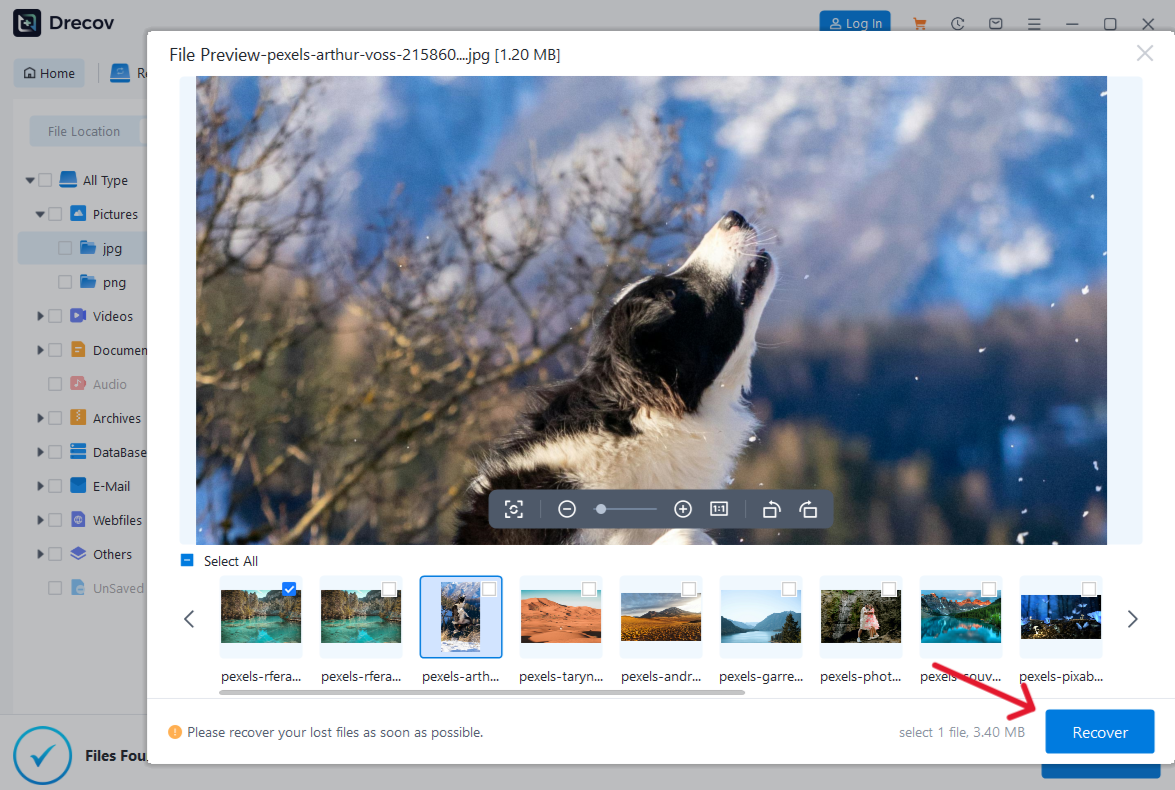
Step 5: Save elsewhere and examine real image detail
Recover selected images to the separate healthy device, never back to the source. Check Drecov Folder or Recovery Folder if output appears elsewhere than expected. Open working copies and inspect dimensions, important details and the intended editing workflow. After verification, you can consider repairing, formatting, initializing or reusing the source. Related missing project assets may require broader file recovery.
⚠ Warning: Install it on a drive different from the one where your data was lost to prevent overwriting.
Use an original-image check before clearing duplicates
Inspect the part of the picture you need
Open the saved photo at a useful viewing size and examine faces, text or other important detail. Check its pixel dimensions instead of relying on the recognizable scene alone. A small thumbnail can look convincing on a results screen but become unsuitable for a print or crop. Preserve larger plausible versions until you have compared their actual content.
Keep intact output and organize working copies
Retain the untouched recovery folders, then organize a second working set by event or capture date. Keep a record of new names alongside the recovered filenames. Do not remove near-duplicates automatically during the first review. One version may contain a full image while another preserves a useful edit or date clue.
FAQs
Is there one best photo recovery software for every camera?
No. Source condition, file format and camera support matter. Confirm the relevant capabilities and test recovered examples rather than choosing solely by a general ranking.
Does a missing RAW preview prove corruption?
Not by itself. Check format and camera support, recover a plausible file elsewhere, and test a working copy in a compatible viewer.
Can software turn a thumbnail into the original?
Finding a thumbnail does not restore discarded image detail. Look for the full original in other results, backups or the capture device, and verify its dimensions.
Should I run a photo repair before recovery?
Preserve the source and retrieve missing originals first. Repairing an existing damaged file is a separate task and should use a copy rather than the only surviving result.
Where should recovered photographs go?
Use another healthy physical device with enough free space. Verify the photographs there and make another independent backup before reusing the source.
Conclusion
The best photo recovery software is the one that fits your source and helps you verify the originals you need. Drecov provides a Windows workflow for searching, locating and recovering missing photos from stable accessible storage. Treat preview limitations carefully, save elsewhere and examine real image detail. Keep uncertain versions until you have a verified full-size copy, not merely a familiar-looking miniature.
⚠ Warning: Install it on a drive different from the one where your data was lost to prevent overwriting.






