
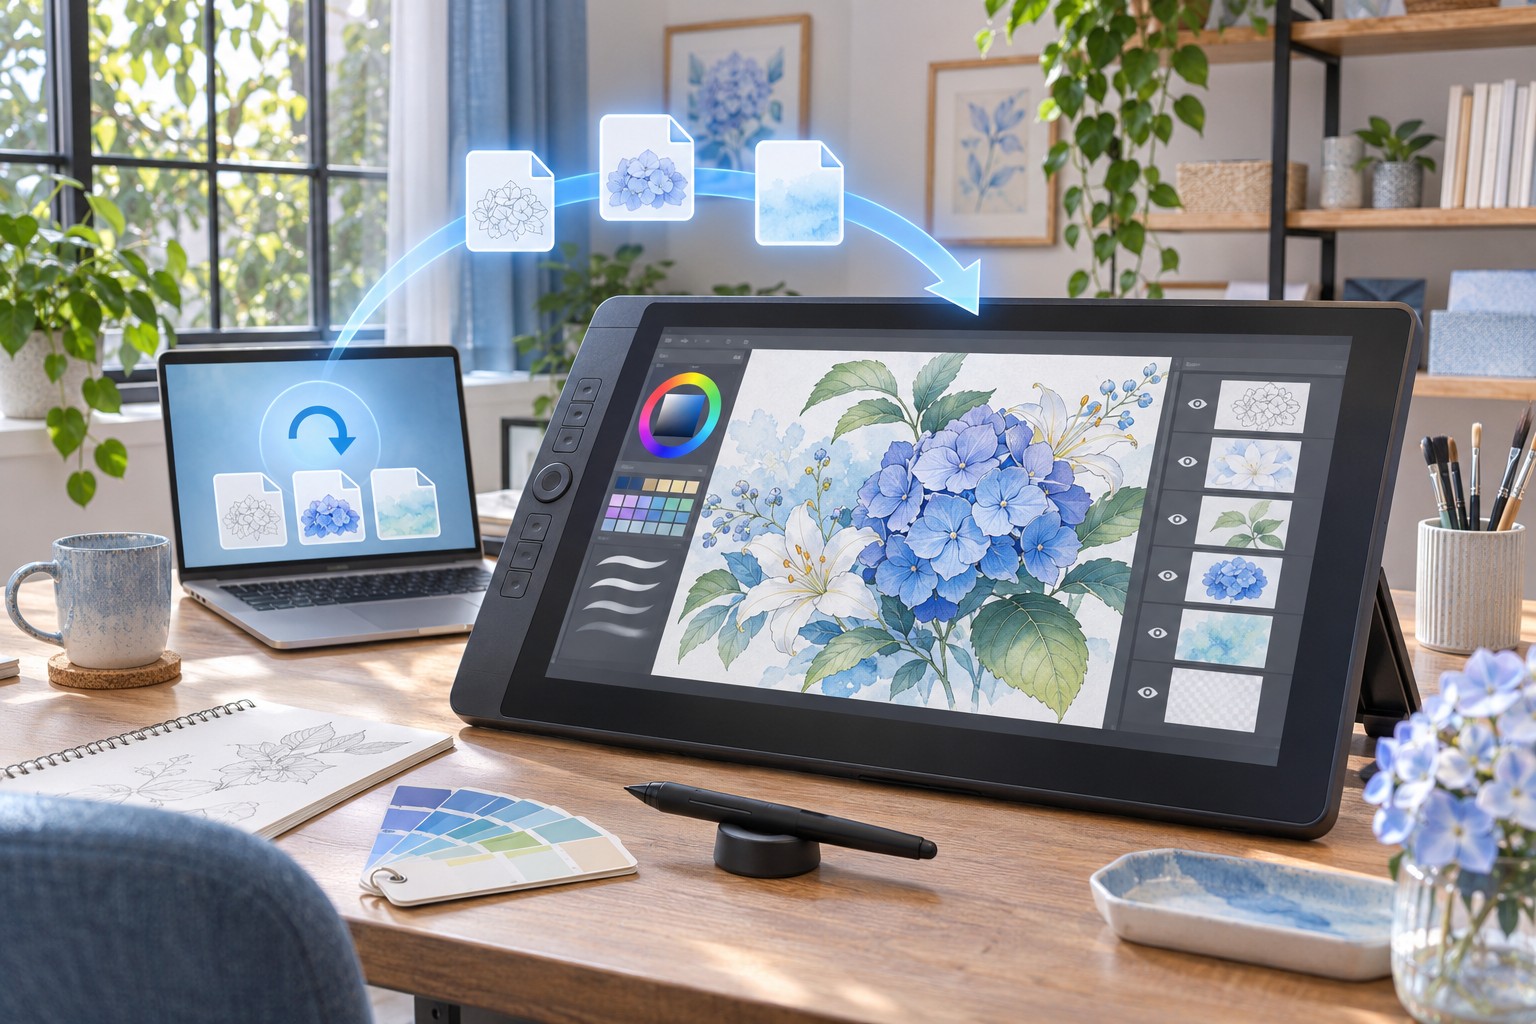
Identify the Missing Artwork State
Clip Studio Paint recovery can involve an unsaved canvas, an overwritten native file, a deleted drawing, or a missing copy in the project list. These situations leave different evidence. A recovery canvas can preserve recent work after an abnormal exit, while an existing backup may hold an earlier saved version. Start by identifying what disappeared and whether the original file still exists on storage.
For example, a drawing that opens without yesterday’s painted layer may need an older backup comparison or a surviving recovered session. A file listed in Clip Studio but missing from its actual path requires a different search. Preserve the accessible artwork and related backup evidence before reinstalling, cleaning application data, or overwriting the damaged file. Your first goal is keeping every plausible source available for comparison. The free methods here use existing application data or a backup you already have. They do not make Clip Studio Paint, a cloud plan, or additional storage free; use only features available under your legitimate current access.
Preserve a Useful Open Canvas Immediately
If the desired artwork remains visible, save a separate native copy under a new name on healthy storage. Avoid replacing the only previous file while testing. Also export a reference image if practical, keeping it separate from the editable master. The reference records appearance, while the native document can preserve layers and other editing structure that a flattened output cannot restore.
Record the application version, operating system, original file path, and incident time. This article focuses on desktop recovery, because tablet and smartphone storage and saving behavior differ. Preserve accessible backup folders and project files before broad maintenance. Do not assume that the same path or retention behavior applies to every release, especially if you migrated from an older installation or another Windows account.
Check the Actual File Behind the Project Entry
A thumbnail or project-list entry is not proof that the full editable file remains healthy. Locate the actual .clip file and preserve it. Confirm that you opened the intended document rather than a similarly named older copy or flattened export. Compare canvas size, recognizable layer names, and a distinctive recent detail. These checkpoints help distinguish the wrong version from genuine data loss.
If the application reports an unsupported or unreadable file, record the exact message and file size. Do not immediately rename the extension to another format. Renaming does not convert internal artwork data or repair an interrupted save. Keep the original bytes unchanged and test copies. A preview can survive while the full document is damaged, so judge recovery by the editable canvas, not only the thumbnail.
Distinguish a Native Master from an Export
A PNG or JPEG can remain valuable for delivery or reference, but it normally lacks the original editable layer structure. A layered export may preserve more information, yet application-specific features can still differ. Inventory native CLIP files, existing backups, layered exports, and flattened outputs separately. This makes it clear whether you recovered the original working document or only a usable visual substitute.
Also identify any linked or project-level material relevant to your workflow. Multi-page work can involve management information and several page files rather than one isolated image. Preserve the complete related set before experimenting. A single recovered page may be useful, but it should not be described as a complete recovered publication if other pages or project relationships remain missing.
Free Method 1: Save an Offered Recovered Canvas
Clip Studio Paint can save recovery information when the relevant option is enabled. After an abnormal exit, the application may restore a canvas on the next startup if useful recovery data survives. Inspect the offered result and save it under a separate native filename immediately. Do not continue for a long editing session without turning that temporary recovery success into an ordinary saved document.
Compare the recovered canvas with the last known good state. Check the specific missing stroke, layer, or revision rather than assuming the latest visible tab contains every final edit. Recovery information is recorded at intervals and may not include changes made immediately before the incident. Preserve the result even if partial, then compare it with existing saved backups to decide which source offers the best baseline.
- Preserve accessible original artwork and recovery evidence before cleanup or repeated launches.
- Inspect any canvas restored after the abnormal exit and identify useful recent content.
- Save that canvas as a separate native document in a normal healthy project location.
- Compare its layers and recent details with the original file and available backups.
Understand Recovery Information Limits
Enabling canvas recovery after an incident does not recreate earlier unsaved work. A normal close, discarded canvas, or missing recovery record can leave no useful session state. Consult the settings for your installed version and distinguish recovery information from ordinary file saving. Do not describe the feature as an unlimited historical archive or assume that every unsaved canvas must have a recoverable copy.
If the application does not restore the canvas, move to real existing backup files rather than repeatedly restarting. Preserve any accessible recovery material first. A repeated launch can change working state without providing new evidence. If only a partial canvas returns, save it and note the missing areas. Partial recovery is still valuable when its limits are clear and the preserved result remains editable.
Free Method 2: Compare Existing Native Backup Copies
On desktop, Clip Studio Paint can create backup data associated with opening and saving artwork. The official guidance identifies folders such as InitialBackup and DocumentBackup. Use Clip Studio’s maintenance workflow to open the backup location appropriate to your version instead of assuming one universal filesystem path. Preserve candidate files before opening them, and keep the original damaged or overwritten artwork unchanged.
Compare actual contents rather than choosing the newest filename automatically. Initial and later save-related copies can represent different points in the drawing’s history. An older candidate may contain the missing layer, while a newer one may already include the accidental deletion. Open copies, inspect recognizable details, and save accepted results outside the application’s managed backup directories so normal retention behavior does not become your storage policy.
Build a Visual Version Comparison
Choose several distinctive details before reviewing backup candidates. For a painting, use a recent edge correction, a color adjustment, and a small added object. For line art, inspect the specific repaired contour or panel detail. Compare these at useful zoom levels and note which candidate contains each. This is more reliable than judging versions from thumbnails, which can hide important differences.
Keep a simple candidate inventory with source folder, apparent date, canvas size, and important layer differences. If you decide to combine material, preserve both native sources first. Copy only through an appropriate supported workflow and verify blending and placement afterward. A visual merge is a new recovery edit, so save it under a separate name rather than overwriting the evidence that supplied its parts.
Free Method 3: Use a Previously Backed-Up Cloud Copy
If you had already backed up the artwork through Clip Studio’s cloud workflow, inspect the actual available cloud copy or past version. This requires prior backup; signing in after the incident does not create historical artwork. Download a candidate separately and compare it with local copies before deciding which one should become the accepted master. Avoid replacing useful local evidence with an unverified remote version.
Check the limitations of your account and application version, including which versions remain available. A cloud thumbnail does not establish that the desired latest layered file exists there. Open the downloaded native document and inspect its contents. If the remote copy is older but coherent, it may provide a useful baseline for merging salvaged local work or reconstructing a small missing section.
Avoid Synchronizing an Unverified Replacement
A damaged or incomplete local file should not automatically become the version you propagate everywhere. Preserve independent copies before using synchronization as a recovery step. Compare the accepted native document first and confirm which direction the transfer will use. Synchronization keeps locations aligned; it does not necessarily preserve a separate untouched historical copy unless the service and settings explicitly provide one.
For a multi-device workflow, identify which device last held the useful version. Preserve that local file before opening and resaving through a different environment. Compare canvas dimensions, page structure, and important layers. A file can be current on one device and older on another, so use actual contents and a clear timeline rather than assuming that the device with the newest application has the newest artwork.
Use Existing Layered Exports as a Partial Alternative
If the native master is unavailable but a layered export survives, open a copy and inspect what it retains. Check masks, blending, text, vector content, and other features important to the drawing. A layered format can preserve useful editability without preserving every Clip Studio-specific behavior. Save the accepted result as a new native recovery document and record any features that required reconstruction.
If only a flattened output remains, assess whether it meets the immediate purpose. It may be sufficient for a web illustration or reference, while further painting or print production may need more information. Continuing to paint over a flattened image creates a new editable document around the surviving pixels; it does not recover the original layers. Keep that distinction clear when sharing the result or estimating remaining work.
Preserve Color and Resolution Evidence
Compare canvas dimensions, resolution settings where relevant, and color behavior across candidates. A small proof export can look correct on screen while lacking the detail needed for a large final output. Keep the highest-quality surviving version unchanged, and avoid repeated lossy resaving. If a backup differs in color, inspect the workflow and profile context before applying broad corrections that may hide the original cause.
Use a known accepted export as a visual reference when available. Compare it under consistent viewing conditions and at a useful size. A difference in display settings can make a correct file appear wrong, while a missing adjustment layer can produce a real document change. Separate those possibilities before you repaint or flatten the recovered master to force a superficial match.
Inspect Layers Beyond the Composite View
A composite image can look acceptable while important editing structure is absent. Inspect layer order, visibility, clipping relationships, masks, and blending modes. Toggle critical groups carefully in a trial copy to verify that expected content actually exists. A flattened preview or hidden duplicate can make the document look complete even when the editable layer you need is missing.
For line work, check whether vector or raster content retains the expected editability. For text, confirm wording and appearance as well as whether the installed fonts resolve correctly. If a font is unavailable, preserve the text content before making substitutions. A visually similar replacement may be useful, but it is a new editorial choice rather than evidence that the original typography survived.
Check Masks and Adjustment Effects Specifically
A missing mask can expose artwork that should remain hidden, while a missing adjustment can change the whole image subtly. Compare important boundaries and tonal relationships at a useful zoom. Do not flatten the recovered document simply to make it resemble a reference before inspecting those structures. Flattening can conceal the cause and remove remaining opportunities to edit the recovered layers separately.
If you merge layers from different candidates, verify their alignment and dependencies. A copied adjustment may rely on a clipping relationship or group structure that differs in the destination. Preserve both sources and test the merged result under a new name. Record the meaningful change so you can distinguish the recovered material from the new arrangement you created to make it usable.
Validate Multi-Page and Animation Work Separately
For a multi-page project, inspect page count, order, and the actual page files. A recovered management entry or cover thumbnail does not prove every page survives. Open representative pages and the specific affected range. If some pages are missing, list them clearly and preserve intact ones independently. Avoid broad renaming or moving while you still need to understand the project’s existing file relationships.
For animation, check the timeline, frame assignments, playback range, and relevant layers. A recovered drawing can survive without the intended exposure or ordering. Scrub through the affected section and compare with a known render. Save any timing reconstruction as new work after preserving the recovered baseline. A correct still frame is useful evidence, but it does not validate the complete animation sequence.
Test Save, Reopen, and Export
After accepting a candidate, save it as a new native document in a normal project folder and reopen that saved copy. Inspect the same important layers and details again. This confirms that the result is durable beyond the recovery session. Keep raw backups unchanged until this test passes, because a canvas that looks correct once may still have unresolved save or dependency issues.
Then produce a verification export suitable for the intended use and inspect it separately. Check dimensions, transparency, color appearance, and critical detail. Keep that output with the accepted native document as a reference. A successful export does not replace the layered master, but it provides a practical comparison point and helps reveal issues that a thumbnail or quick editor glance can miss.
Compare an Older Backup with a Newer Partial Canvas
Sometimes an older native backup preserves complete layer structure while a newer recovered canvas contains only a valuable late detail. Keep both sources unchanged and decide what the detail depends on before merging. A highlight or texture layer may rely on a mask, clipping group, or blending setup from its original document. Copying only the visible layer can change its effect even when the pixels themselves survive.
Build a trial merge under a new name and compare the relevant area against a reference export. Check placement, transparency, and neighboring edges at useful zoom. If the result needs manual adjustment, record that as a recovery edit. This gives you a usable master while preserving the distinction between an intact historical file and a new combination assembled from several surviving sources.
Review Print and Web Versions Separately
A drawing can have several legitimate delivery versions with different crops, dimensions, or color treatment. Identify which version each backup represents before choosing the accepted master. A web proof may look familiar but lack detail or margins required for print. Compare the intended output requirements and preserve alternative versions until you know whether they contain unique useful work.
Do not upscale a small flattened proof and describe it as recovery of the original high-resolution artwork. It may provide an emergency visual substitute, but its editing and detail limits remain. Keep the native recovery investigation separate from that delivery decision. A clear record helps you explain what can support future revisions and what would require reconstruction from the available lower-resolution evidence.
Inspect Small Editable Elements Deliberately
Text, selection-dependent corrections, and tiny masked details can disappear without making the whole painting look obviously broken. Choose several small checkpoints that matter to the artwork’s purpose, such as a signature, label, or corrected contour. Inspect their actual layer content and appearance. A thumbnail comparison cannot establish that those elements survived, especially when several backup versions share the same overall composition.
If you substitute a missing font or redraw a label, preserve the original recovered text and record the replacement. This makes the accepted result useful without confusing a new editorial decision with recovered evidence. For client work, compare the final output with the relevant approved reference rather than a different earlier proof. The accepted recovery should meet the correct version’s requirements, not merely resemble any familiar image.
Separate the Recovery Archive from the Active Master
Once the accepted native file passes reopening and export checks, place raw candidates in a clearly separate archive. Keep a short index of which backup or recovery canvas supplied the final result. Do not work indefinitely inside an application-managed backup directory, whose retention behavior serves recovery rather than your long-term project organization. A normal project location with independent protection gives the accepted master a clearer future.
If some original structure remains missing, list it explicitly and preserve the best available alternative. A flattened but complete image and a partially editable native file can both be valuable for different reasons. Keep them labeled and avoid overwriting one with the other. This organized partial result supports future reconstruction and prevents another editor from assuming that every layer or page is present simply because the artwork opens successfully.
When File Recovery Software May Be Useful
PandaOffice Drecov may help search for a native artwork file or existing backup that was deleted from readable storage. It cannot guarantee repair of an internally damaged CLIP file or reconstruct original layers from a flattened preview. Check native recovery canvases and existing backups first. Those sources are more likely to preserve meaningful document structure than isolated file remnants with uncertain completeness.
Stop unnecessary writes to the affected volume before scanning, and use another healthy destination for outputs. Confirm the file support available in the installed edition, particularly for native formats that may not offer a visual preview. If the storage shows repeated read errors or disconnects, prioritize appropriate data preservation rather than repeated application trials. The condition of the source device matters as much as the chosen interface.
Step 1: Select the Volume That Held the Missing Artwork
Choose the storage containing the actual native file or backup folder. If you moved the project or changed accounts, record the relevant original locations before scanning. Avoid installing recovery software or saving fresh exports onto the affected volume. Reserve a separate healthy destination for candidates, and confirm device identity through its role and capacity rather than relying only on a familiar drive letter.
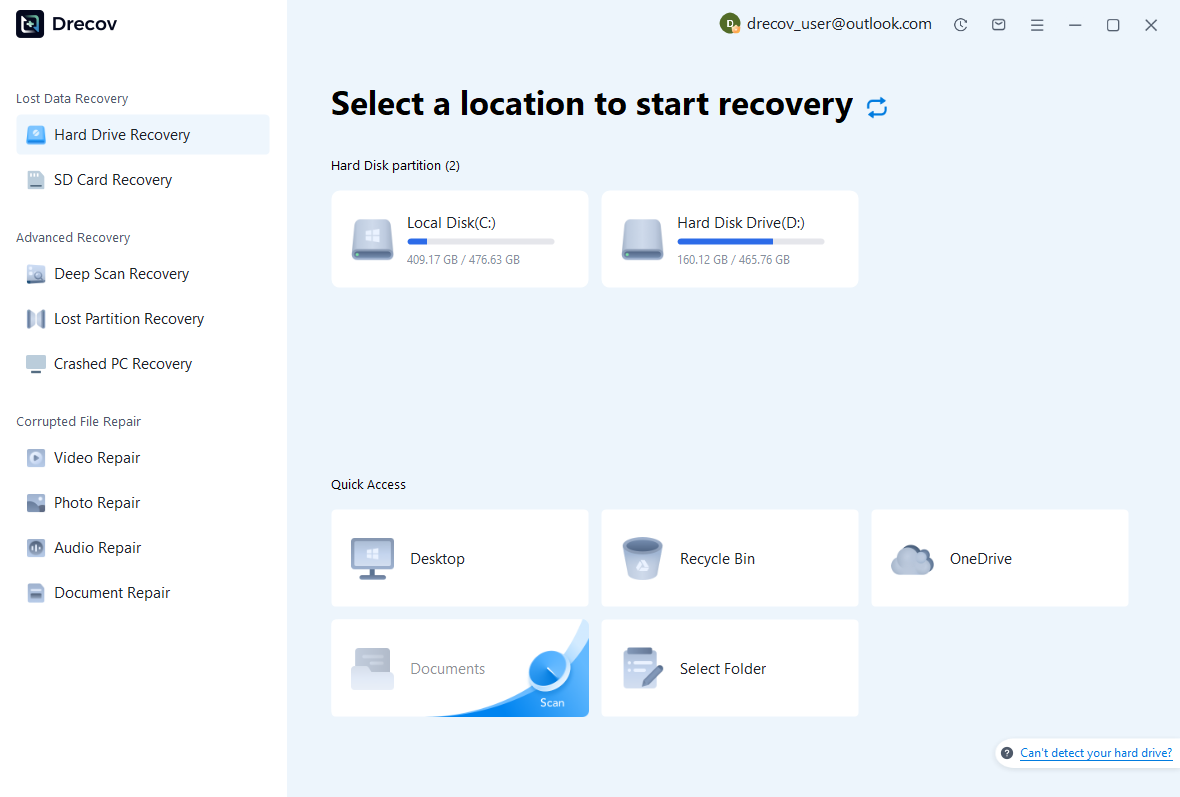
Step 2: Compare Native Files and Alternative Versions
Review available paths, names, dates, sizes, and supported previews. Retain competing artwork versions separately, including useful layered exports when relevant. A recent candidate may reflect an interrupted save, while an older backup may be coherent. Compare actual document contents after recovery. A recognizable thumbnail or plausible filename does not prove that all layers, masks, pages, or animation data remain intact.
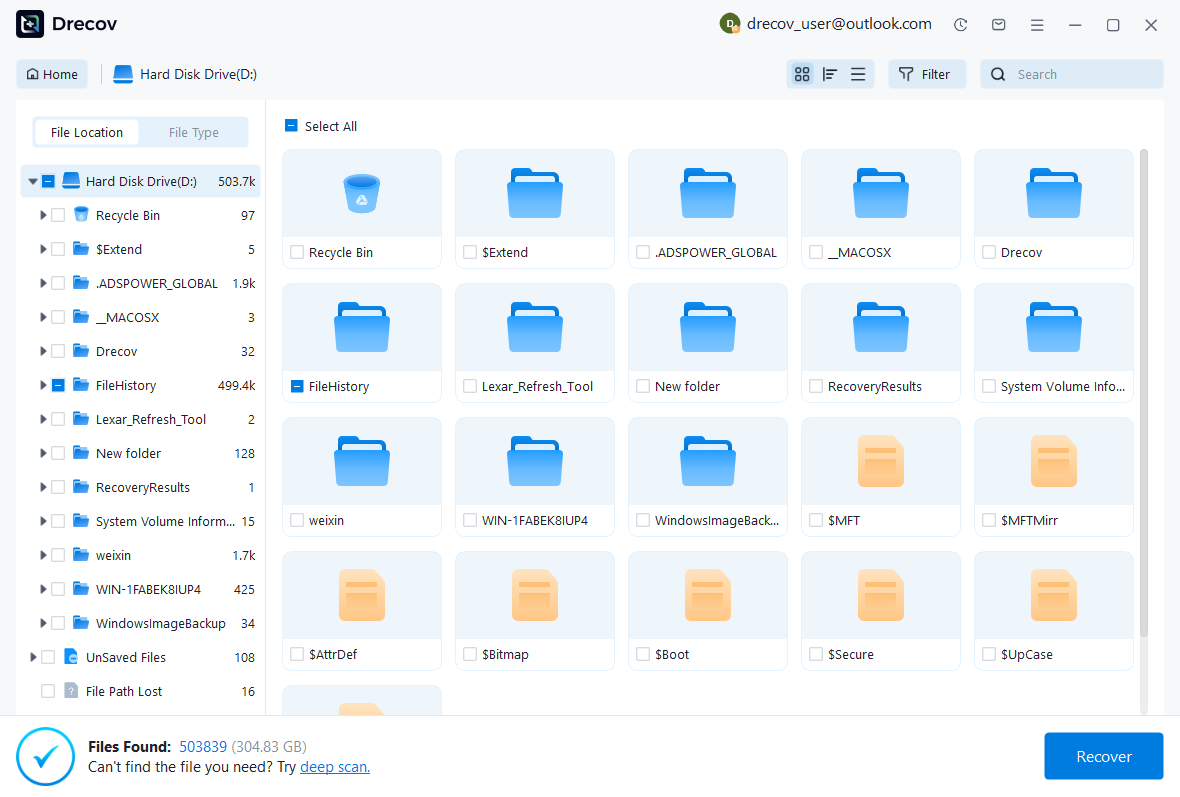
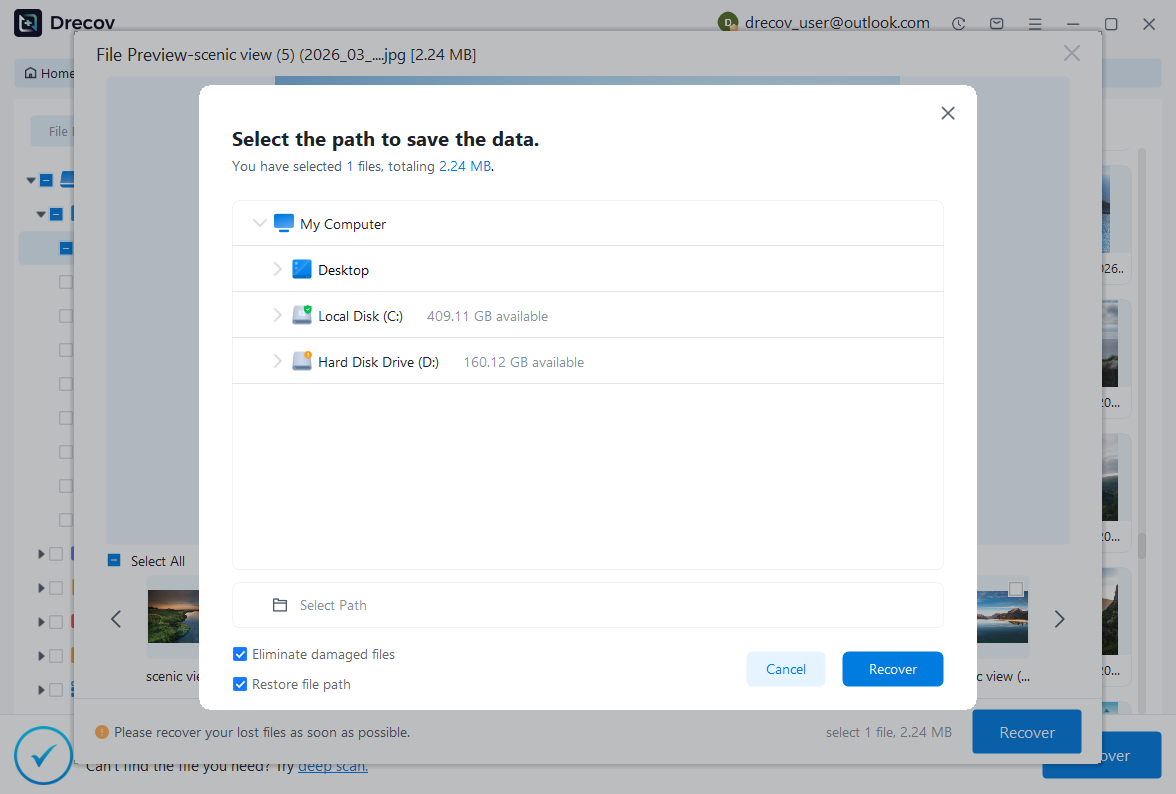
Step 3: Recover Elsewhere and Verify Editability
Save candidates to the separate destination and open copies in Clip Studio Paint. Inspect important layers, masks, text, and project-specific structure before continuing work. Save a new native recovery document, reopen it, and produce a verification export. Keep raw recovered files unchanged until the accepted result passes the checks appropriate to its purpose, and record any remaining partial recovery or reconstruction.
Establish an Accepted Artwork Master
Record which source supplied the accepted artwork and which edits you made during recovery. Identify any missing layers, pages, or animation ranges explicitly. Include the application version and the save-and-reopen test result. This gives you a dependable master and prevents later confusion between a recovered original, an older backup, and a reconstructed continuation based on flattened output.
- Confirm the accepted file’s identity, dimensions, and important visual details.
- Inspect layers, masks, text, and any multi-page or animation structure.
- Reopen a freshly saved native copy and check a separate verification export.
- Preserve the accepted master and recovery notes independently before resuming production.
Protect Milestones with Verified Copies
Save deliberate native milestones before major revisions, and keep an independent backup outside application-managed recovery folders. Check your actual canvas-recovery settings and test them with disposable work. If you use cloud backup, verify the transfer and available version behavior rather than assuming every local save is already protected remotely. Keep layered masters alongside useful final exports according to your project needs.
Finally, test restoration of one complete artwork copy from the backup location. Open it, inspect a masked layer and a small important detail, then save a separate trial version. This confirms that your protection preserves editable content rather than only thumbnails or flattened previews. A verified native backup gives you a clearer and less stressful starting point when another drawing session goes wrong.
Related Recovery Resources
Explore the relevant recovery options: Hard drive recovery, External hard drive recovery.
For another recovery case and its practical checks, read the related recovery guide.
Check the vendor guidance for the installed version: official recovery documentation 1, official recovery documentation 2, official recovery documentation 3.