








Recover the VEGAS Edit and Its Source Media Separately
To recover VEGAS Pro projects, identify whether the missing component is the VEG timeline, an original recording, a backup state, or only a derived preview. The project describes editing decisions and references media. It does not automatically contain every source recording. A waveform peak file can support display without being a recoverable substitute for the audio it represents.
Record the application version, project path, intended duration, and a distinctive event or transition. Also note the last useful save and whether the failure followed a crash, overwrite, or folder move. Those incidents lead to different candidates. Start with the exact missing component rather than treating every playback problem as deletion of the project.
Preserve the Project before Repeated Saves
Copy the surviving VEG, existing backups, automatic-save candidates, and required media to a separate recovery location. Keep an untouched source set and use working copies. If the project is still open with useful edits, save a separate native milestone before closing it. Preserve the prior version instead of overwriting it with the first candidate that opens.
These routes use an existing legitimate VEGAS Pro installation and its native recovery features without purchasing a separate recovery utility. VEGAS Pro itself is commercial software. Use the installed release’s documentation for exact backup locations and behavior. A retention rule or temporary filename from another version should not become a universal recovery promise.
Native Route 1: Save an Offered Automatic Recovery
- Preserve the saved project and any surviving automatic-save candidates.
- Start the appropriate VEGAS installation and inspect its recovery offer.
- Compare a distinctive recent event and relevant effect.
- Save the accepted recovery under a new ordinary VEG filename.
VEGAS can preserve an automatic backup and offer it after an interrupted session. Availability depends on the settings, version, and surviving data. The candidate may predate the final changes. Inspect actual content before accepting it, and avoid assuming a temporary automatic-save file persists indefinitely after normal application exits.
Compare the Actual Edit Milestone
Check a clip boundary, transition, or automation change made near the incident. Then inspect another recent section. A familiar timeline duration can hide an older arrangement. Keep the previous saved project separately because it may contain another useful difference. The recovery candidate is a source to assess, not automatically the definitive latest edit.
After saving the candidate, reopen a working copy and inspect the same section. This checks persistence outside the recovery session. Confirm that its required media remains available too. A project that loads successfully can still point to missing originals or use another take with a similar filename.
Native Route 2: Open an Existing Project Backup
- Locate a surviving backup associated with the intended VEG file.
- Preserve the original backup and copy it to a separate test directory.
- Prepare the copied candidate as a usable VEG file where the supported workflow requires it.
- Open it and compare the missing edit before saving a new accepted milestone.
An existing backup can preserve an earlier saved project state. Its date and contents determine whether it helps. Removing a backup suffix on a copy can expose an existing native candidate where appropriate, but renaming does not repair arbitrary damaged data. Preserve the original format and record what you changed while preparing the working copy.
Keep Older and Newer Information Available
The backup may retain a deleted event while the current project contains valid later work elsewhere. Preserve both and compare their differences. Transfer only understood changes in a working candidate and inspect event relationships afterward. A combined recovery can meet the editing need while still requiring a record of its sources.
If the candidate fails to open, retain the exact error and compare another useful milestone. Do not keep saving over the original until one version seems to work. A compatibility problem, unavailable source, and unreadable native file are different conditions, even when each initially prevents normal editing.
Native Route 3: Restore a Media-Inclusive Project Copy
- Locate an existing complete project copy or archive.
- Preserve the original and restore a working set elsewhere.
- Open the project and inspect the media it actually contains.
- Compare the incident section and any required alternate sources.
VEGAS can save project copies with associated media through supported options. A candidate’s completeness depends on the options used when it was created. A compact copy may preserve only material needed by the chosen edit or contain trimmed derivatives. Inspect the actual source scope before assuming every unused take and full recording survived.
Distinguish Full and Trimmed Source Copies
A trimmed media copy can support the saved timeline while limiting later changes outside the retained range. Compare handles, alternate takes, and full source duration where relevant. A successful render of the current edit does not prove the archive supports every revision you might want to make. Keep the original full recordings when they survive.
If the project depends on media outside the copied directory, record those references and preserve the legitimate originals separately. Test the accepted copy from its intended location. A project that works only while an old external path remains available is not yet an independent restore.
Native Route 4: Reconnect Verified Original Media
- Identify the exact unavailable source reported by the project.
- Locate the original recording or image in preserved storage.
- Reconnect it using the supported VEGAS workflow.
- Compare event content, timing, channels, and the intended edit.
A moved source can make a valid timeline appear broken without deleting its editing decisions. Reconnecting the correct media can restore useful access. Match the actual performance or image, not just the filename. Another take with a similar name may load successfully while changing the meaning or synchronization of the edit.
Separate Originals from Derived Files
Waveform peaks, proxies, thumbnails, and caches serve different roles from original recordings. A peak display file does not contain the full audio simply because its name resembles the recording. Inspect the actual source candidate independently. Rebuilding a derived display can help the editor use surviving media, but it cannot recreate missing source bytes.
If only a lower-quality proxy survives, preserve it as potentially useful partial content and compare its limitations. It may support reference work or an emergency reconstruction while failing the intended full-quality delivery. Record that outcome clearly rather than reconnecting it silently and describing the original media as fully recovered.
Diagnose Playback Trouble before Rolling Back
Check event mute states, track routing, preview context, and the availability of the original source. A valid project can play incorrectly because the environment or routing changed. Preserve the candidate and identify the smallest reproducible symptom. Replacing the whole edit from an older backup can discard useful work without solving the actual cause.
Follow the Affected Source through the Edit
Inspect a known source in the media context and then its event on the timeline. Compare the intended channels and output route. If the source works independently but not in the project, investigate event and routing settings. If the source itself fails, return to media recovery rather than repeatedly editing the timeline around a damaged file.
Also inspect project settings relevant to the symptom. A frame-rate or interpretation difference can affect motion and timing without deleting any events. Record the original context before changing global settings, and compare a distinctive passage afterward. This keeps a recovery check from becoming an unintended creative revision.
Verify Takes, Trims, and Event Boundaries
A recovered project can contain the expected event while selecting another take or using an earlier trim. Compare a distinctive action or spoken phrase at the boundary. Then inspect the source relationship and the neighboring event. A timeline that looks familiar at ordinary zoom may still contain an important content difference.
Review Transitions Across Their Full Range
Preview before, during, and after a transition. Check overlap, duration, and any keyframed behavior. A single still can look correct while the transition plays differently. If you recreate the transition from a reference render, record that reconstruction instead of claiming the original parameter values returned directly.
For a source that changed location or format, compare its duration and interpretation before correcting trims manually. A wrong source can shift the apparent boundary and lead you to rewrite a valid edit. Establish the intended recording first, then assess the event’s native timing information.
Inspect Audio and Synchronization Independently
A project can recover picture while audio remains absent, offset, or differently routed. Choose a distinctive synchronization event and compare it early and later in the section. A matching opening does not establish that the entire recording aligns. Preserve original sources while you inspect channels and timeline relationships.
Keep Mix State and Recording State Distinct
A recovered recording can supply the performance while an older project lacks the final mix automation. Conversely, a project can preserve the mix but lack the original audio source. Record those outcomes separately. This helps you choose the next recovery source without assuming one successful playback check solves every part of the production.
If you substitute a rendered stem or combined mix, document its role and limits. It can support delivery without restoring the original separate tracks and processing controls. Keep the native project and full recordings when available so continued editing remains possible beyond the immediate emergency output.
Preserve Plugin and Effect Context
A project can depend on legitimate effects, fonts, or other resources from the original environment. Missing components can change the result even when the VEG file opens. Record the required versions and preserve the original candidate before substituting an effect. A substitute that renders successfully is not proof that the earlier processing state returned.
Compare a Passage Where the Effect Matters
Use a section with a distinctive color treatment, motion, or sound change. Compare the actual controls and the rendered result. If you rebuild the appearance manually, save that as a separate milestone and record the reference. This preserves the difference between exact native recovery and a useful approximation made during production repair.
Do not resave the only source through a reduced environment before preserving it. A new save can reflect unavailable or substituted components. Keeping an untouched candidate leaves another opportunity to restore the legitimate original environment if the missing dependency becomes available later.
Work through a Crash after a Late Edit
Suppose VEGAS closes after you move a scene and change its audio fade. Preserve the saved project and any existing automatic-save candidate. Inspect the recovery offer, compare scene position and fade behavior, and save a new accepted project. Then verify the original recordings before treating the restored timeline as complete.
Compare Backups before Reconstructing
An older backup may preserve a useful event that the automatic recovery lacks. Keep both and combine only understood differences in a working candidate. Test the incident passage and another unaffected section. Record copied or reconstructed decisions so the result remains traceable rather than becoming an unexplained mixture of project versions.
Work through Missing Media after Relocation
If a project opens after a drive move but reports unavailable recordings, preserve the VEG and locate the actual source folder. Reconnect a verified recording and compare a distinctive event. Then inspect other relevant folders and source types. One successful reconnection does not establish that the whole production’s dependencies returned.
Test an Independent Project Copy
Use an appropriate supported media-inclusive save workflow once the edit works. Inspect whether the copy retains full sources or trimmed derivatives according to your chosen options. Open a copied project from its planned location and export a sample. This checks whether the accepted recovery still relies on temporary or old external paths.
Inventory VEGAS Candidates by Project and Media Role
List saved VEG projects, automatic-save candidates, existing backups, full recordings, proxies, peak files, and rendered output separately. Record each milestone and its verified purpose. This prevents a derived display file from being mistaken for original media and helps identify a coherent project copy that includes dependencies missing from another candidate.
Choose an Edit-Specific Acceptance Passage
Select a section with a distinctive take, trim boundary, transition, and audio event. Use the same passage for every comparison. A project can contain the expected track names while selecting another take or using an earlier boundary. The sample should test the actual edit decisions that motivated recovery rather than only a familiar opening frame.
Add a later synchronization event and a section with important processing. This broadens the comparison enough to reveal a wrong source or missing effect without requiring a full render immediately. Record what the sample establishes and keep unresolved sources visible instead of declaring the whole production complete after one successful playback.
Preserve Automatic-Save Material before Normal Exits
Automatic-save candidates can be temporary and version-dependent. Preserve what currently exists before repeated launches, saves, or application exits. Use the actual installed release’s documented path and behavior. An enabled preference does not prove the latest useful event reached a surviving candidate, and changing the interval after the incident cannot recreate earlier work.
Save the Recovery as an Ordinary VEG
After inspecting an offered candidate, save a new normal project and reopen a copy. Compare the acceptance passage and required source references. This demonstrates persistence outside the recovery session. Keep the previous saved project and automatic-save source until you understand the useful differences between them.
If the automatic candidate is older than the final edit, preserve it as an earlier useful milestone rather than rejecting it entirely. Another backup or source can supply the missing section. Record the combination deliberately in a separate accepted project so its recovery history remains understandable.
Prepare Existing BAK Candidates without Altering Originals
A legitimate backup can preserve native project information under an additional suffix. Copy it first and use the supported opening or preparation workflow for its actual format. A suffix change can reveal an existing VEG candidate; it does not repair arbitrary corruption. Keep the original filename and source context in the recovery record.
Compare the Correct Take and Event Range
An older backup can contain the right event while another candidate contains a later mix change. Inspect actual source identity and in/out relationships. A timeline block that occupies the same screen position is not proof that it uses the same performance. Preserve both native sources until you decide which material belongs in the accepted edit.
If the candidate fails, record whether the error concerns the project file itself, version compatibility, or missing media. Those observations require different solutions. Do not repeatedly rename the only file while guessing; a clear preserved baseline is more useful than a candidate whose original state has disappeared through experimentation.
Assess Media-Inclusive Copies by Their Creation Options
A project copy can preserve full source recordings or a more compact set prepared for a particular edit. Inspect the actual contents and the options used when known. A copy that renders the current timeline may still omit unused takes or source ranges required for later revisions. Keep full originals when they survive.
Inspect Handles and Alternate Material
For a trimmed copy, compare how much source remains outside the visible event boundaries. A later edit may need those handles. Check alternate takes if the recovery goal includes them. This distinguishes a complete source archive from a useful delivery-oriented copy, without incorrectly dismissing either artifact’s practical value.
Also inspect any external paths left in the project. A successful open on the original machine can hide a dependency outside the copied folder. Test from the planned location and compare the acceptance passage before treating the package as an independent restore.
Separate Peak Data, Proxies, and Original Recordings
A peak file describes waveform display rather than containing the full original recording. A proxy serves another derived role and may have lower quality or different properties from the original. Identify the candidate’s actual type and inspect the source independently. A familiar filename is not enough to establish full media recovery.
Record the Quality of Partial Salvage
If a proxy is all that survives, preserve it and compare what it can support. It may be useful for reference or emergency reconstruction while failing the intended final-quality output. Describe that result accurately. Do not silently substitute a derived file and claim the original full-resolution source returned.
Likewise, a rendered final mix can preserve audible content while losing separate tracks and effects. Keep it as a valuable output milestone, but distinguish it from a recovered editable multitrack production. The next editing task determines whether that limitation is acceptable.
Reconnect Sources Using Performance Evidence
Match the original recording through a distinctive visual action or spoken phrase. Compare duration, channels, and relevant technical properties as supporting evidence. Several takes can share generic names and similar thumbnails. Reconnecting the wrong one can remove an error message while changing the edit’s meaning or synchronization.
Verify Boundaries after Reconnection
Inspect the affected event’s start, ending, and relationship to its neighbor. A source with another starting point can make a valid project trim appear incorrect. Establish source identity and interpretation before rebuilding the edit. This preserves useful native decisions that a rushed repair might otherwise overwrite.
If you reconstruct a boundary from a reference output, record that decision. A useful approximation is different from direct restoration of the exact original trim. Keep the reference unchanged and save reconstructed work as a distinct milestone so future comparisons have a clear starting point.
Compare Processing and Automation in Context
A project can load with unavailable plugins or altered processing while its recordings remain intact. Inspect the legitimate required environment and a passage where the effect matters. Preserve the original project before substitutions. A new effect that renders successfully can support delivery without restoring the old parameter behavior or automation relationship.
Test Both Static and Changing Values
Compare an important value before a transition, during it, and afterward. A matching control position on one frame does not prove the curve survived across time. Listen or watch the actual passage and inspect the native relationship. Record any manually recreated processing rather than attributing it to the backup automatically.
If many tracks differ similarly, inspect shared routing or processing before altering each one independently. A common dependency can explain a widespread symptom. Correct one understood cause in a working copy and rerun the acceptance passage to connect the improvement with a specific repair.
Validate the Real Export Rather Than Preview Alone
Render a short representative section to a new directory and inspect it in an appropriate independent player. Compare picture, sound, timing, and the relevant effect. The editor preview can conceal a missing dependency or differ from the output path. Keep test renders separate from original surviving exports so their source remains clear.
Preserve a Production-Ready Recovery Record
Record accepted project milestone, full or trimmed media scope, substituted components, reconstructed decisions, and remaining gaps. Keep the native source and reference output together with that record. Another editor can then assess continued editing options without assuming that a playable movie means the full original production returned intact.
When Storage Recovery Can Help VEGAS Files
PandaOffice Drecov may help retrieve deleted local VEG projects, existing backups, original recordings, or complete project copies from readable storage. It cannot turn a peak file into the missing recording or infer every editable decision from a rendered movie. Prefer surviving native candidates and verified sources first, and reduce writes where deleted files may remain.
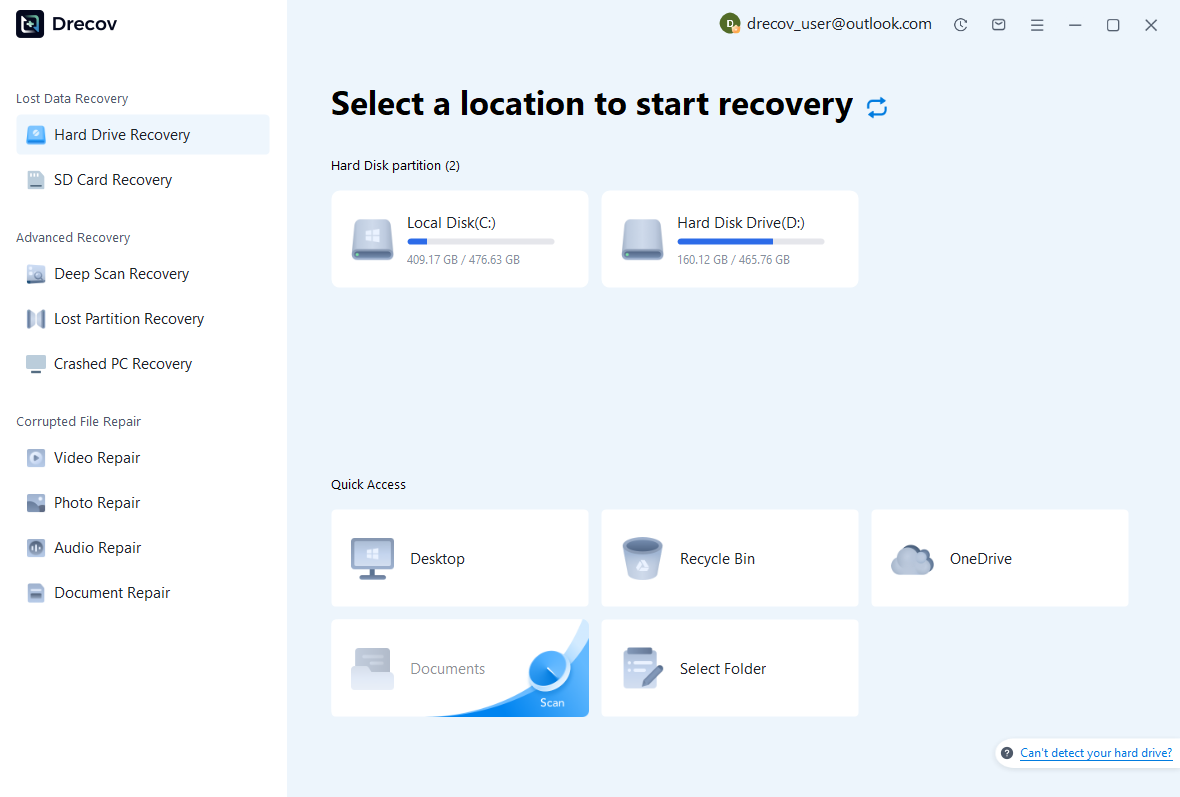
Step 1: Identify Project and Original Media Storage
Choose the drive or partition that held the project, configured automatic-save data, backups, or original sources. Record which component each search targets. Keep recovered output on other healthy storage. Assess repeated hardware read failures or disconnections before proceeding with a routine software recovery scan.
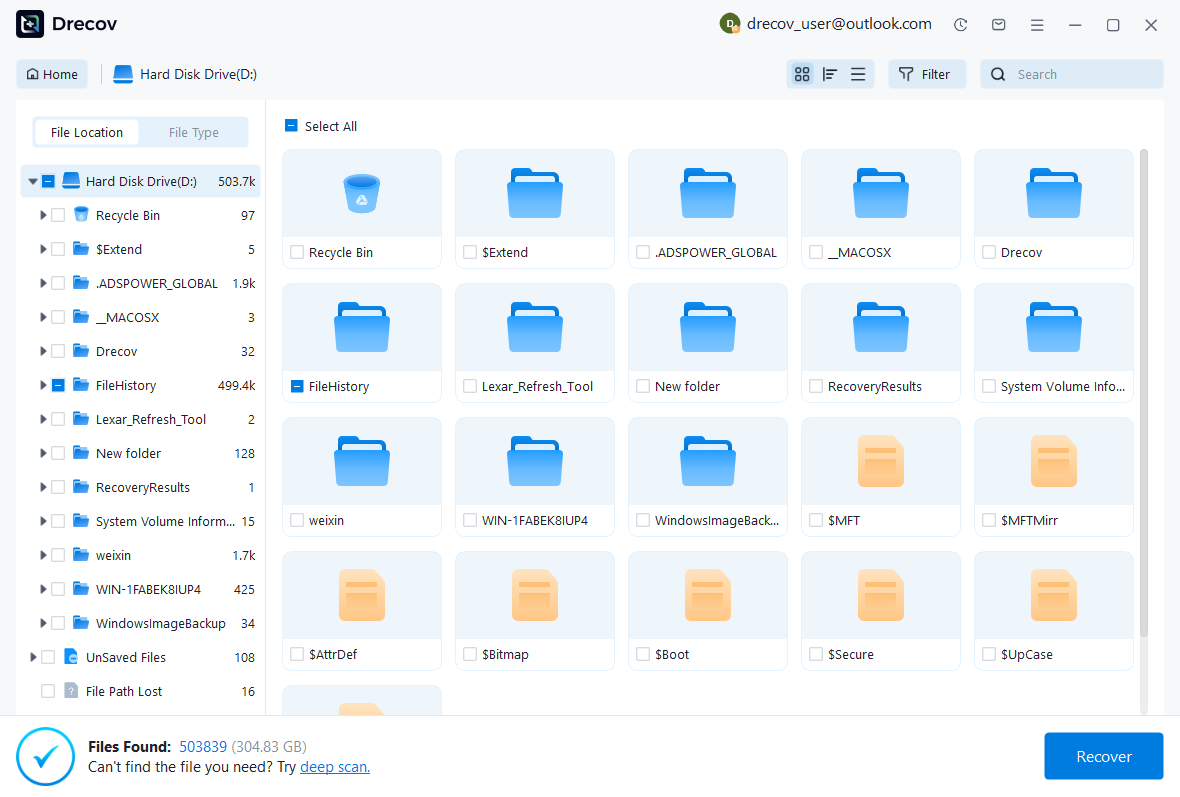
Step 2: Compare Native and Media Candidates
Review available paths, names, dates, sizes, and supported previews. Preserve coherent project milestones and original source candidates separately. A familiar waveform or video preview does not establish that the original recording is complete. Likewise, a VEG file can preserve useful structure while its source media remains missing.
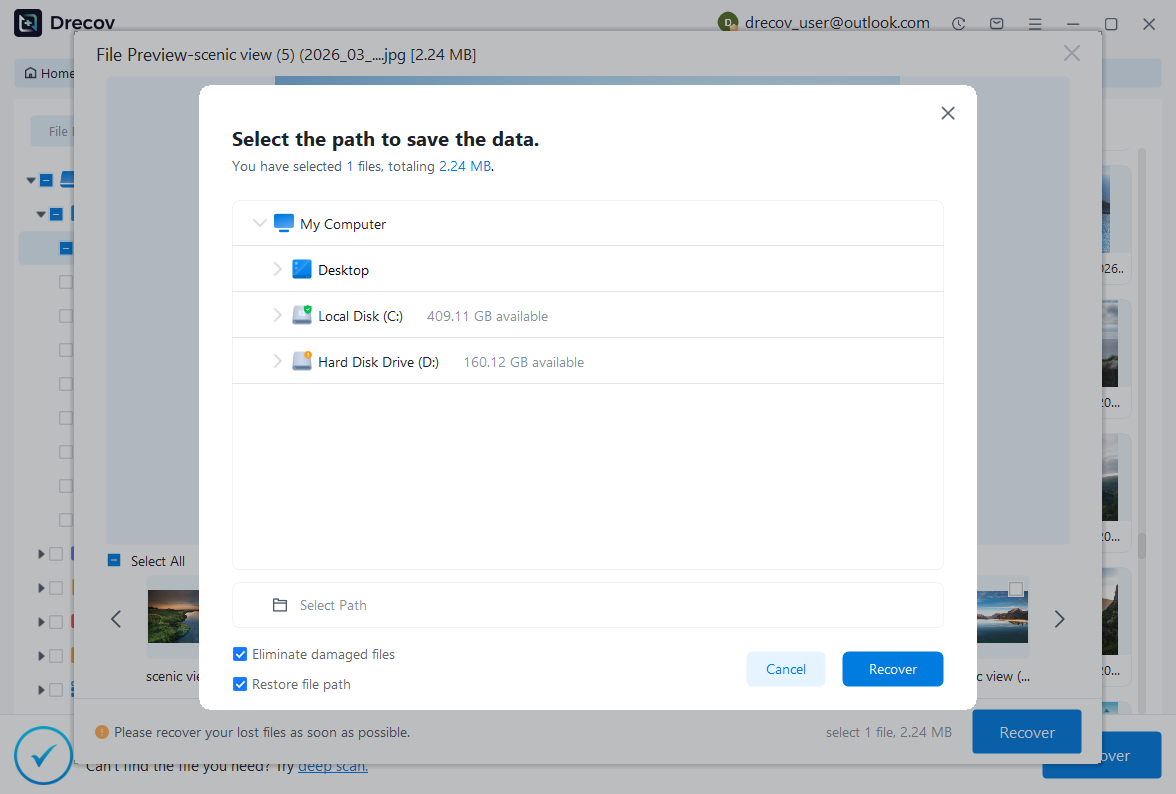
Step 3: Restore Elsewhere and Verify the Production
Recover selected files to a separate destination and retain untouched originals. Open a working project in the appropriate VEGAS environment, reconnect verified sources, and inspect takes, trims, transitions, effects, audio, and timing. Export a representative section and review it independently. Record partial sources and reconstructed decisions before accepting the project.
Keep an Editable and Assessable Recovery Milestone
Preserve the accepted project, required original media, dependency information, and a reference export with a short recovery record. Test a copied restore from its planned location. This provides a practical return point for continued editing rather than relying only on an output movie that cannot recreate its original timeline.
Related Recovery Resources
Explore the relevant recovery options: Hard drive recovery, External hard drive recovery.
For another recovery case and its practical checks, read the related recovery guide.
Check the vendor guidance for the installed version: official recovery documentation 1, official recovery documentation 2.





