








Recover the Camtasia Project and the Recording It References
To recover Camtasia projects, distinguish the editable TSCPROJ from original TREC recordings and rendered video. The project records editing decisions and references source files. A recording can preserve captured content without the final edit. A rendered MP4 can preserve an output milestone without the editable timeline, cursor information, or separate tracks the project originally used.
Record the Camtasia version, project location, recording path, and a distinctive edit or spoken phrase. Also identify whether the missing component is the project, recording, or packaged copy. A project that opens with unavailable media differs from a missing recording. Those cases need different sources and verification steps.
Preserve the Complete Surviving Folder
Copy the project and its known resources before changing filenames or reinstalling. Keep an untouched set and use working copies. If a standalone project folder or existing archive survives, preserve the complete candidate rather than extracting only the file with the most familiar extension. The surrounding structure may provide the media needed for continued editing.
These native routes use an existing legitimate Camtasia installation without purchasing a separate recovery utility. Camtasia itself is commercial software. Use the installed version’s documentation, especially for automatic saving and project packaging. Do not apply a fixed autosave directory from another release as if every installation uses the same path and retention behavior.
Native Route 1: Save an Available Recovered Project
- Preserve the saved project and existing recovery candidates before repeated launches.
- Open the appropriate Camtasia installation and inspect any recovery offer.
- Compare the candidate’s timeline and a known recent edit.
- Save the accepted candidate under a new project name.
Camtasia can preserve project recovery information according to its settings and surviving data. A candidate may help after an interrupted session, but it may predate the final changes. Compare the actual edit rather than treating the recovery prompt as proof that every recording and edit survived. Enabling protection after the incident cannot recreate the past session.
Check the Specific Editing Milestone
Inspect a distinctive trim, callout, or transition that changed near the incident. Then compare another recent section. A project can contain the expected recording while lacking the final editing decisions. Preserve useful alternatives and save the accepted candidate separately so another source remains available if you discover a missing element later.
Reopen a copied accepted project and repeat the same check. This tests persistence outside the recovery session. Keep the original candidate and recording files untouched until the normal saved project proves usable. A successful timeline display does not establish that the media required for the final render remains available.
Native Route 2: Restore an Existing Packaged Project
- Locate a previously created project ZIP or complete standalone project copy.
- Preserve the original candidate and restore a working copy elsewhere.
- Open it through the supported Camtasia workflow for that format.
- Compare its timeline, recordings, generated content, and relevant edit milestone.
A properly preserved package can include source material that a lone project file references externally. Its completeness depends on the actual workflow and contents. Inspect the candidate rather than assuming every archive contains every original recording. An older package may provide a coherent usable edit while omitting later changes.
Distinguish a File from a Folder
Some workflows use a project folder whose name resembles the project file. Inspect the actual item type and contents instead of assuming every search result ending with a familiar suffix is the editable file itself. Preserve the complete structure and open the intended project through the application. This avoids mistaking a folder or shortcut for a damaged project document.
If a packaged candidate opens but lacks a recording, identify whether that source originally lived outside the package. Keep the timeline context while investigating the missing media. Rebuilding an edit from scratch is unnecessary when the project structure survives and the original source can still be reconnected.
Native Route 3: Reconnect the Original TREC Recording
- Identify the unavailable recording referenced by the project.
- Locate the legitimate original TREC file in preserved storage.
- Reconnect it through the supported project workflow.
- Compare captured content, duration, track availability, and timeline alignment.
A TREC recording and a TSCPROJ serve different roles. Moving the recording can leave an otherwise valid project unable to display its source. Reconnecting the correct recording can restore editing access. Match the actual captured content and technical context rather than choosing another recording with a similar filename.
Do Not Treat Renaming as Conversion
Changing a recording’s extension to MP4 does not automatically convert its container or restore its project relationships. Preserve the original and inspect it through a compatible Camtasia environment. If a recording fails to open, retain its exact error and compare another valid candidate rather than repeatedly renaming the only source.
Also inspect the tracks that the recording actually contains. Separate microphone, system audio, camera, or cursor-related information depends on what the original session captured. Do not promise those components merely because a TREC file exists. Compare the actual media and the editing features the recovered project needs.
Native Route 4: Use Existing Output as a Limited Reference
- Preserve original rendered videos and any intermediate exports.
- Identify the actual edit milestone each output represents.
- Create a separate reconstruction project if native sources are unavailable.
- Document which editable tracks and parameters remain missing.
A rendered video can preserve a useful deliverable even when the project is lost. It does not automatically return separate recordings, editable callouts, or cursor behavior. Use it as output or a reconstruction reference according to its actual content. A new project built around the rendered video remains different from the original editable production.
Compare the Whole Required Segment
An export can stop early or omit a later correction. Inspect the beginning, incident section, and ending independently. Compare a distinctive spoken phrase or title rather than relying on duration alone. A file named final may represent an older milestone, and a playable first frame does not establish that the full output survived.
If you recreate a callout or transition from the output, record that work. A visually close replacement can support continued production without proving that the original editable object and parameter values returned. Preserve the reference unchanged so another editor can assess the reconstruction’s evidence and limits.
Diagnose Missing Media before Replacing the Edit
Read the missing-file information and compare the stored source path with its actual location. A file move can break references without deleting the project or recording. Preserve the timeline and reconnect the verified original where possible. Re-importing every recording into a blank project can discard surviving editing information unnecessarily.
Check Identity Beyond the Recording Name
Use a distinctive on-screen event or spoken phrase to identify the source. Several recordings can share a generic name while containing different takes. Compare duration and the relevant captured tracks as supporting evidence. A wrong recording can load successfully and still produce an incorrect edit or synchronization relationship.
After reconnection, inspect the clip’s start and end and a known edit boundary. A source with a different capture length can shift the intended trim even if the opening looks familiar. Keep original candidates and record any manual timing repair rather than assuming a resolved path means the whole project is correct.
Preserve Audio and Camera Relationships
A screen recording can depend on several captured components when they were enabled during recording. Compare the actual microphone, system sound, camera, and screen material in the recovered project. An audible mix does not prove every separate editable track survived. Keep source recovery and final output playback as separate checks.
Inspect a Distinctive Synchronization Event
Choose a spoken phrase, on-screen click, or another event that connects picture and sound. Compare it near the beginning and later in the recording. A candidate can begin in sync while diverging later because it represents another take or altered source. Record any replacement component and its alignment method.
If only a combined rendered track survives, retain it as useful content while documenting the editing limit. You may reconstruct a new arrangement around that track, but the result does not restore the original separate audio or camera controls. This distinction matters when someone expects to revise the recording after recovery.
Verify Cursor Effects and Editable Annotations
A project can regain the screen recording while a recent cursor effect, callout, or animation is absent. Inspect a section where that edit matters and compare the native object or effect settings. A rendered reference can show the intended appearance, but it may not contain the underlying information needed to edit the effect independently.
Separate Captured Information from Added Effects
Some features depend on information in the original recording, while others are editing decisions in the project. Identify the missing component before rebuilding it. Recovering a project does not manufacture capture information that the original recording never contained. Conversely, reconnecting a valid recording does not automatically restore a deleted timeline effect.
If you rebuild an annotation manually, record its source and save that work as a new milestone. Keep the recovered native state separately. This makes it easier to distinguish original loss from creative changes introduced while finishing the video and gives later revisions a clear baseline.
Inspect Project Compatibility on a Copy
A project may require a compatible Camtasia version and resources from its original environment. Preserve the candidate before any upgrade or conversion. Record the version that successfully opens it. A failure in another release is not automatically proof that the source is corrupt, so inspect the exact message and supported compatibility guidance.
Keep Conversion and Recovery Distinct
If you convert a working project for a newer environment, save the result separately and compare the incident section. Check media, effects, and timing after conversion. The converted project can support continued editing while the untouched earlier source preserves another recovery option if the change introduces a discrepancy.
Do not use an unrelated patching tool or modify project internals speculatively just to make a file open. Prefer a known valid recovery candidate or the supported vendor workflow. Preserve the exact damaged source and error details if specialist help becomes necessary, without discarding a useful original during experimentation.
Work through a Crash after a Tutorial Edit
Suppose Camtasia closes after you trim a demonstration and add an explanatory callout. Preserve the saved project and available recovery data. Open the offered candidate, inspect the trimmed phrase and callout, and save a separate project. Then verify the original TREC recording is available and supports the relevant editing features.
Test a Short Export Independently
Render the incident segment to a new directory and open the output in an appropriate player. Compare picture, sound, timing, and annotation appearance. This tests the actual delivery path rather than relying only on an editor preview. Keep the original render and the new test output clearly labeled so their origins remain distinct.
Work through a Project Moved without Its Recording
Imagine a TSCPROJ opens after a folder move but reports missing source material. Preserve the project, locate the original recording, and reconnect it in a working copy. Compare the distinctive screen event and synchronization. If the recording is absent, retain the edit’s reference information while investigating another legitimate source or backup.
Create a Complete Accepted Copy
Once the edit works, use an appropriate supported packaging or standalone-project workflow for the installed version. Test a copied result from another location with its dependencies understood. This catches reliance on the temporary recovery directory before you treat the project as independent and ready for handoff.
Create a Camtasia Source Map before Restoring
List the TSCPROJ, TREC recordings, packaged copies, generated assets, and rendered videos separately. Beside each, record the milestone and what you verified. This map prevents a useful recording from being mistaken for a complete edited project. It also identifies when a packaged candidate contains media that a lone project file references elsewhere.
Choose a Tutorial-Specific Acceptance Segment
Select a section with a distinctive screen event, spoken explanation, and editable annotation. Use it for every candidate comparison. A recording can preserve the screen while a project lacks the callout or trim. A project can preserve the editing decisions while pointing to an unavailable recording. The sample should test both roles.
Add another section later in the tutorial to check synchronization and source continuity. A matching opening can hide a different take or missing later material. Compare the actual captured content and timeline context instead of assuming identical duration or similar thumbnails establish the correct recording.
Inspect Auto-Save Behavior for the Installed Version
Use the actual application preferences and surviving recovery context, not a hardcoded directory from an old tutorial. Preserve candidates before profile resets or repeated saves. Automatic saving can protect project state, but its existence does not prove the newest recording and every final edit reached a usable recovery source.
Save a Recovered Candidate as a Normal Project
After inspecting the recovery offer, save a separate ordinary native project and reopen a copy. Compare the acceptance segment again. This checks persistence outside the recovery session. Keep the original candidate and previous saved project until you know which useful differences each one contains.
If a recovered candidate predates the final callout, record that gap and compare another native source. Do not overwrite a stable older project with a partially useful recovery merely because the application offered it automatically. The accepted milestone should follow verified content rather than the order in which candidates appear.
Distinguish a Standalone Folder from Its Project File
A search can return both a project folder and a file with a similar name. Inspect their actual types and contents. Keep the complete standalone structure together and open the intended native file through Camtasia. Mistaking the folder for the document can produce a misleading error without establishing that the publication source is damaged.
Test the Package’s Actual Media Scope
Open a copied package or standalone project in a separate location and inspect its media references. A complete-looking directory can still omit a recording that originally lived elsewhere. Compare the acceptance segment and identify any external paths. Keep the original package untouched until the working copy demonstrates useful continued editing.
If the package contains an older coherent tutorial, preserve its milestone clearly. It can support an immediate recovery while lacking later revisions. Record any new edits you reconstruct from another source rather than attributing them to the packaged copy automatically.
Match TREC Recordings through Captured Events
Choose a distinctive window change, mouse action, or spoken phrase to identify the recording. A generic filename can describe several sessions. Compare the actual content, duration, and captured components. A recording that imports successfully can still be the wrong take, making a valid timeline’s trims appear incorrect.
Keep Container and Project Roles Separate
A TREC is not converted into an ordinary video by changing its extension, and a TSCPROJ does not contain the full recording merely because it opens. Use a compatible supported workflow to inspect the legitimate source. Preserve the original bytes and record the exact error if the recording itself fails.
When only a rendered video survives, keep it as useful output or reference. It can preserve visible action while losing capture-related information and separate editing controls. Label that limitation before building a new project around it, so another editor does not expect the same flexibility as the original recording.
Verify What the Recording Actually Captured
Separate microphone, system sound, camera, and cursor information depends on the original recording choices and available source. Inspect the actual components rather than promising them from the extension alone. A combined audible track can support playback while omitting a separate source needed for later editing.
Compare Synchronization at Several Positions
Use a recognizable click or spoken cue near the beginning and later in the recording. A replacement source can start correctly while diverging afterward. Check the original duration and timeline relationship before manually retiming a large section. Preserve current and candidate sources until the cause of the difference is understood.
If you substitute an audio or camera component, record its source and alignment decision. A practical replacement can support delivery without constituting exact recovery of the historical capture. Keeping that provenance visible helps a later editor assess what can still be changed independently.
Recover Editable Annotations with the Right Evidence
A callout’s appearance in a rendered video does not supply its original editable object. Compare native project candidates for the annotation and its timing. If no native source survives, reconstruct it in a separate working project using the strongest reference. Record the new object as reconstruction even when it closely matches the old output.
Inspect the Relationship to Screen Action
An annotation can be present but appear at the wrong moment after a source mismatch or trim change. Compare the underlying screen event and the annotation’s timeline position together. Correct an understood relationship in a working copy before rebuilding the design. This can preserve useful native work that would otherwise be recreated unnecessarily.
Also inspect any cursor effect or recording-dependent feature separately. Some behavior needs original capture information, while other behavior comes from project settings. Recovering one component does not manufacture the other. Keep the accepted scope precise so the tutorial remains assessable for future revisions.
Keep Version Conversion Out of the Only Original
If a candidate needs a supported newer environment or conversion, preserve the original project and note the successful application version. Save the converted result separately. Compare the acceptance segment, media references, annotations, and output afterward. A technically successful conversion can still introduce a difference that requires review.
Record Substituted Dependencies
A missing legitimate resource can alter appearance or behavior without deleting the project. If you substitute a resource, preserve the native candidate and document the change. This gives the recovery a clear boundary and leaves another opportunity to restore the original environment if the needed component becomes available later.
Avoid undocumented internal edits or unrelated patching tools as the default response to an opening error. A valid native recovery candidate or complete package provides a clearer route. Keep the damaged source and exact error unchanged when further specialist assessment is necessary.
Build a Complete and Testable Tutorial Milestone
Once the edit works, preserve an appropriate supported complete project copy with its required media. Reopen a working copy from the planned location and export the acceptance segment to a new folder. Compare picture, sound, annotations, and timing independently. This verifies practical production behavior instead of relying only on the editor’s current preview.
Keep a Clear Handoff Record
Record the project milestone, original recordings, reconstructed annotations, substituted components, and unresolved gaps. Keep a reference output alongside the native source set. Another editor can then distinguish direct recovery from reconstruction and continue from a known baseline rather than assuming that a playable tutorial means every original editable component returned.
When Storage Recovery Can Help Camtasia Files
PandaOffice Drecov may help retrieve deleted local projects, existing automatic saves, original recordings, or packaged copies from readable storage. It cannot recreate unsaved edits that no source preserved or extract every original editable component from a rendered video. Prefer coherent native candidates first and reduce writes where deleted project files may remain.
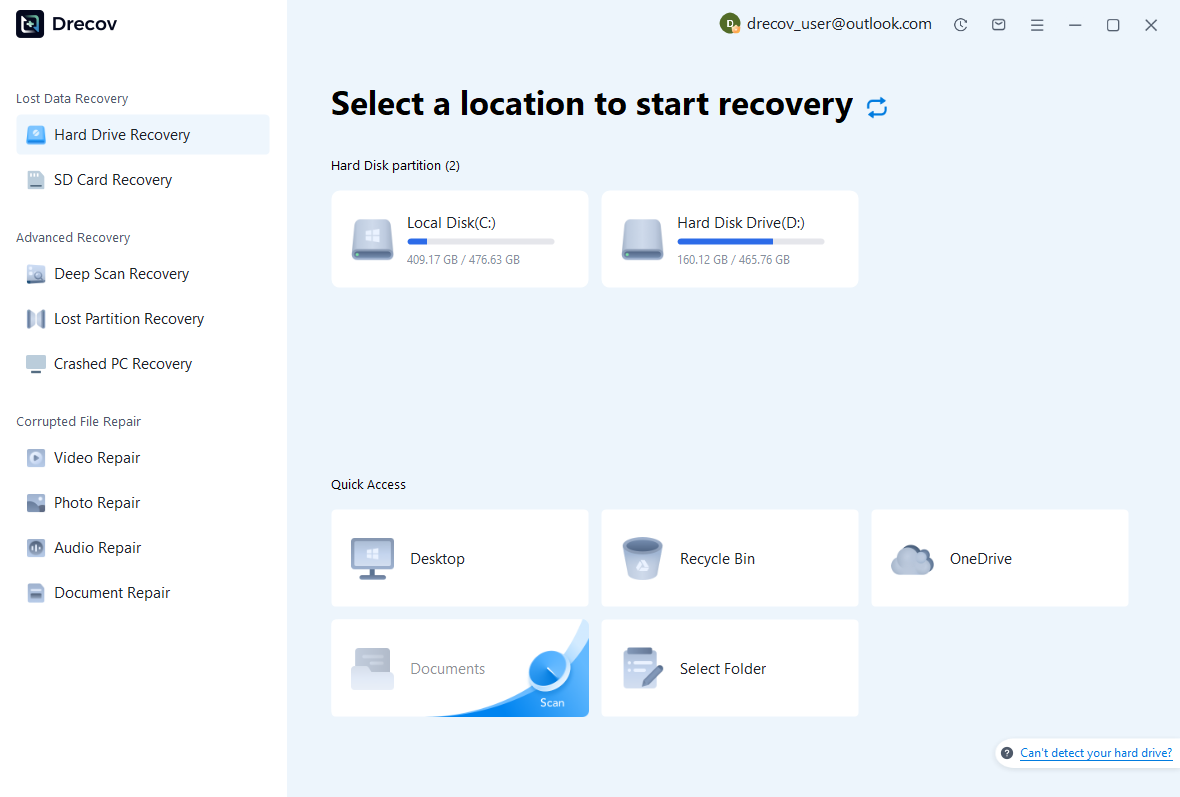
Step 1: Identify Project and Recording Storage
Choose the drive or partition that held the project, configured recovery data, original recordings, or packaged copies. Record which component each search targets. Keep recovered output on separate healthy storage. Assess repeated disconnections or hardware read failures before continuing with a routine software recovery scan.
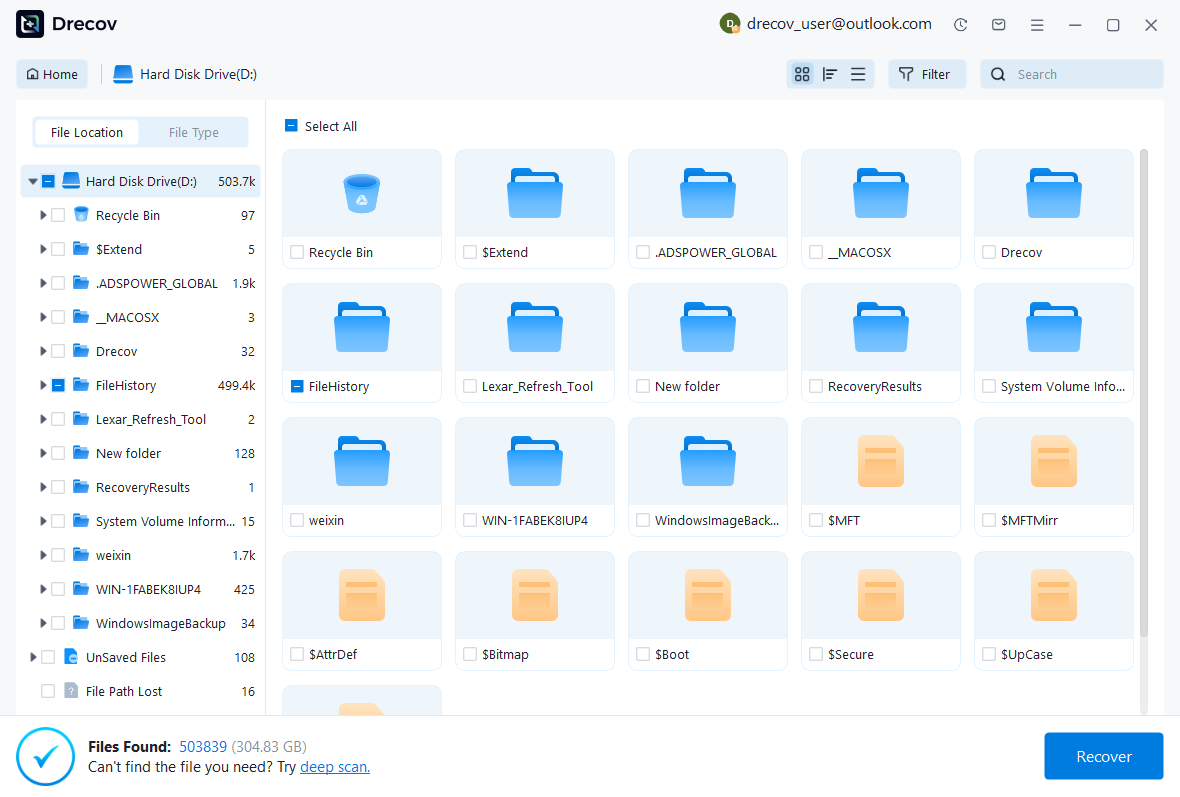
Step 2: Compare Projects and Original Sources
Review available paths, names, dates, sizes, and supported previews. Preserve plausible project milestones with their source context instead of combining unrelated recordings immediately. A playable video does not establish that editable project information survived. Likewise, a project file can contain useful structure while its recording remains unavailable.
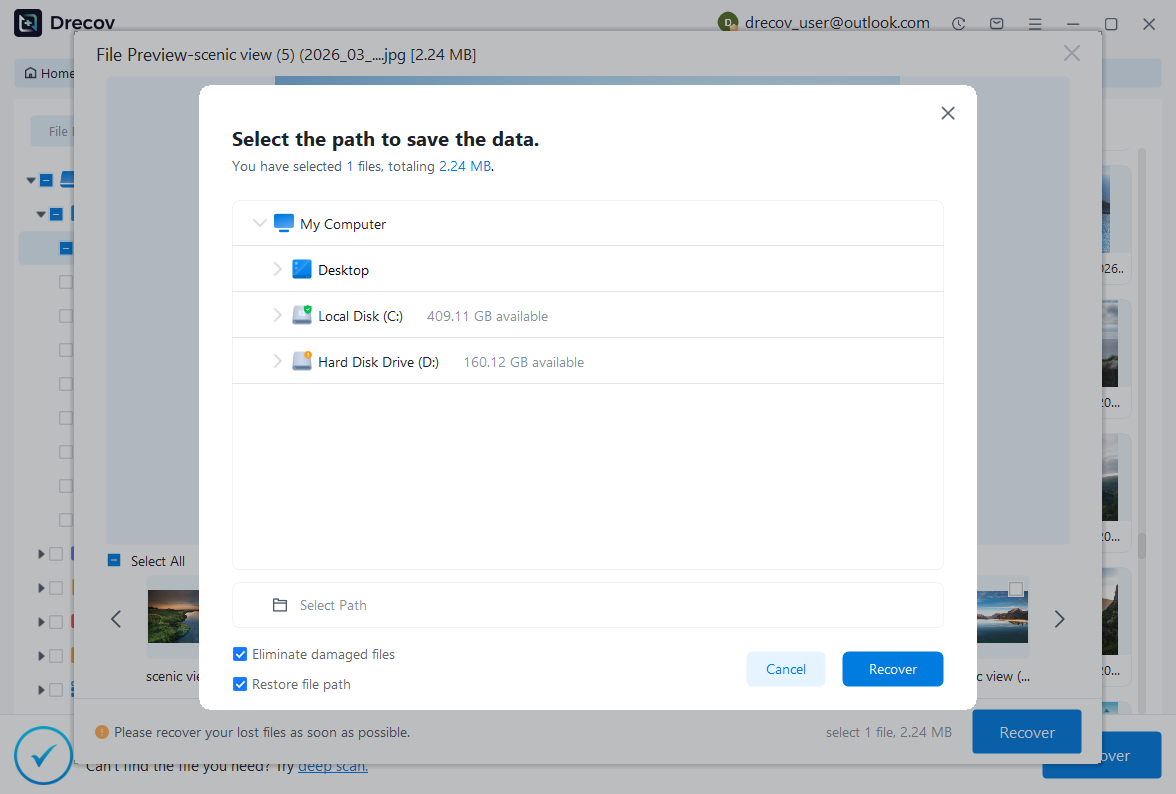
Step 3: Restore Elsewhere and Verify the Edit
Recover selected files to a separate destination and retain untouched originals. Open a working project through a compatible Camtasia environment, reconnect verified recordings, and inspect timing, sound, annotations, and relevant capture features. Export a representative segment and compare it independently. Record reconstructed elements before accepting the project for continued editing.
Preserve a Tested Editable Tutorial
Keep the accepted project, required recordings, relevant assets, and a reference output with a short recovery record. Test a copied restore from its planned location. This preserves a practical route back to the production’s editable decisions rather than relying only on a video that cannot reveal how the original tutorial was assembled.
Related Recovery Resources
Explore the relevant recovery options: Hard drive recovery, External hard drive recovery.
For another recovery case and its practical checks, read the related recovery guide.
Check the vendor guidance for the installed version: official recovery documentation 1, official recovery documentation 2, official recovery documentation 3.





