






Backup and recovery software solves two different problems. A backup program saves copies before trouble starts; a recovery program searches for files after the available copy disappears. If you deleted a document this morning, check the Recycle Bin and your existing backups before scanning the drive. If nothing is missing yet, set up a backup now and test whether you can restore one file. The right choice depends less on a feature list than on what happened to your own files.
Start with the moment the file went missing
Imagine finishing a presentation on Friday, then noticing on Monday that the newest version is gone. A backup from Thursday is useful, but it cannot contain Friday’s final edits. A recovery scan might find a local copy of that later version if the original storage is stable and its data has not been overwritten. Neither method promises to recreate work that was never saved. This timing question should guide the first action, not the name on a software package.
If the document still exists but opens with yesterday’s changes, look for version history in the application or backup. If the entire folder vanished, check the Recycle Bin, cloud trash, synced devices, and any external backup drive. Keep the affected disk quiet while you investigate. Downloading tools, copying large folders, or making a new backup onto that same disk can overwrite recoverable data.
There is also an important difference between a working file and the only remaining copy. When one copy looks damaged, preserve it before trying a repair. When several dated copies exist, open them separately and identify the latest intact version. Do not overwrite the current file simply because an older backup seems to restore successfully. Use a different folder for the test and compare the contents first.
What a dependable backup should actually do
A backup is more than a folder that you copied once. It needs a destination separate from the computer, a schedule that runs without relying on your memory, and a way to find an earlier version after an accidental edit. The destination could be an external drive, a network location, or a storage service supported by your chosen tool. Which one fits depends on how often your files change and whether you can protect the destination from the same accident that affects the PC.
Decide which folders matter before choosing settings
Start with the files you could not easily replace: current projects, family photos, financial records, and any application exports. Note where each application really stores them. A desktop shortcut is not always the data location. If a game or business app keeps its live data under a profile folder, confirm that the folder is included rather than assuming every document lives in Documents. Backing up irrelevant caches while missing the working folder creates a comforting but false sense of coverage.
Keep at least one copy away from the source disk
An external drive that remains plugged in can help with a failed internal disk, but accidental deletion or malicious software may reach a continuously connected destination. A disconnected or otherwise isolated copy offers a different kind of protection. You do not need to understand every technical term to use this principle: one problem should not be able to erase both the original and every copy. Protect the backup with appropriate access controls and know where its recovery information is stored.
Test a restore, not just a successful job message
Choose one small file you recognize. Restore an older version to a new folder on a healthy drive, then open it. Check the date, content, and any images or attachments. A green completion message tells you a job ran; this test tells you whether a real file can return. Repeat after major changes to the backup setup. The test is especially useful when files sit outside the standard user folders or when the backup destination was changed.
Windows and open-source options for different comfort levels
Windows File History is a practical first check when you want versions of personal files and already have a separate drive or network destination. Microsoft documents how to turn it on through Control Panel and how to restore a previous version to a different location. Its coverage depends on the folders included in the configuration, so inspect that list before trusting it with a special project folder. Follow the official File History instructions for the current Windows interface.
If you want an open-source application with a desktop interface, Kopia offers encrypted snapshots and supports local, network, and supported remote destinations. Decide where its repository will live before starting; a repository on the same failing disk is not a separate backup. Make one small snapshot and practice browsing and restoring a file. Encryption is useful only if you can retain the required credentials safely. Losing access information can make an otherwise intact backup unusable.
Restic is another open-source backup project with Windows support. It suits people comfortable with commands and scripted jobs. That flexibility is valuable for a repeatable routine, but a command-line tool is not automatically the right answer for someone who cannot verify what a command will include or delete. If you choose it, start with the project’s current documentation, protect the repository password, and rehearse a restore before relying on a schedule.
These options differ. File History offers Windows version browsing. Kopia gives a graphical path to snapshots. Restic favors commands. None searches an unbacked-up drive for a deleted file simply because its name contains “backup.” Also, no backup program can supply an older version from a date before you first enabled it. If you are already facing a loss, check existing copies before setting up a new backup on the affected source.
When no backup contains the missing file
First confirm that the file is truly absent. Search for its exact name and likely extensions, inspect the Recycle Bin, and check other signed-in accounts or synced folders. A moved file can look deleted. If the file was removed locally, the Recycle Bin recovery options are an easy place to begin. Emptying the Bin does not itself reveal whether older backup versions exist, so check those separately.
Once no usable copy remains, stop writing to the original storage. Do not install a recovery tool on the partition that held the missing file, and do not restore results there. A drive that clicks, disconnects, reports an implausible capacity, or becomes very slow during simple reading needs a different response. Repeated direct scans can make unstable hardware worse; consider a suitable image or a professional service. Software scanning belongs to stable, correctly recognized storage with a plausible logical-loss scenario.
Drecov is a Windows data-recovery option for that stable local-loss branch. It can search a PC drive or a recognized external device after deletion or access loss. Quick Scan, Deep Scan, file-location and type filters, and preview help you identify candidates before saving them to another healthy destination. Lost Partition Recovery addresses files in a missing partition; it is not a partition-table repair or a substitute for a backup. Drecov does not repair a failing drive, recreate fully overwritten data, or generate a historical version that never existed.
⚠ Warning: Install it on a drive different from the one where your data was lost to prevent overwriting.
Step 1: choose the original location
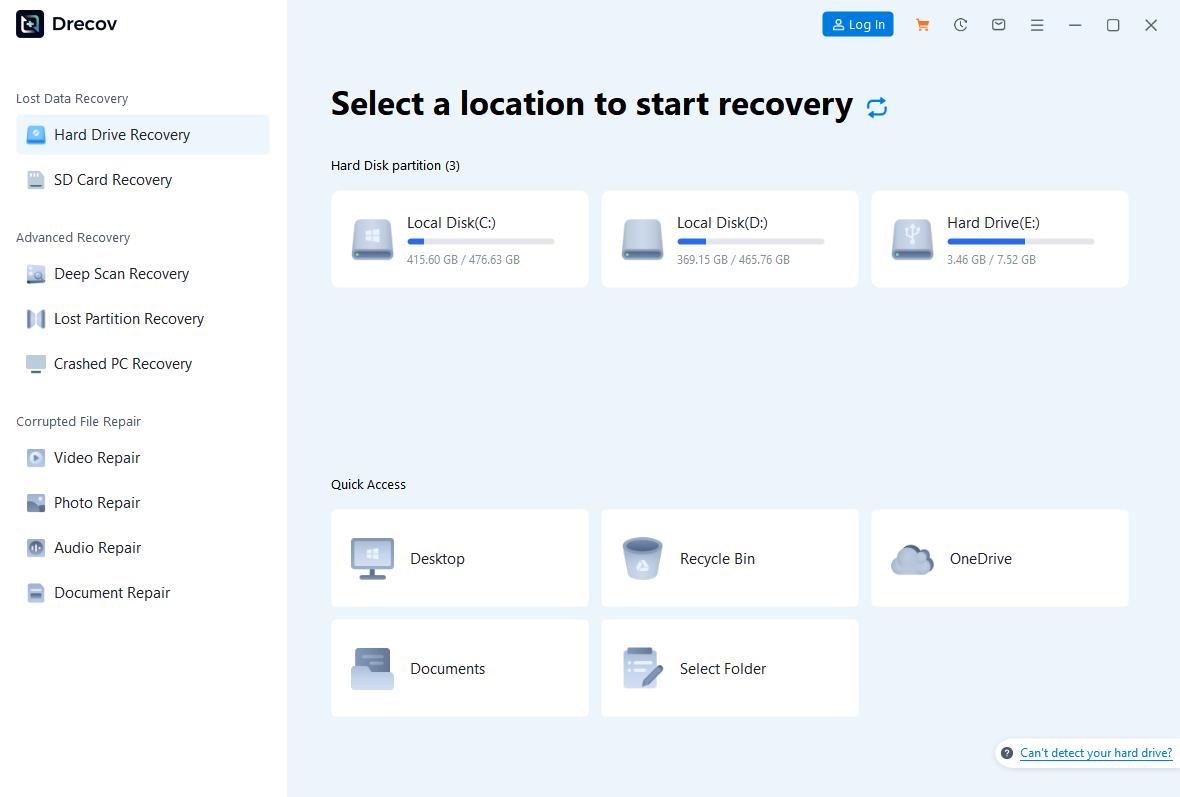
Open Drecov and select the drive or partition where the missing file last existed. If it disappeared from a USB device, select that device only after Windows recognizes it consistently. Do not choose the backup destination by mistake. Prepare a separate healthy drive with enough space for the results. If you need to install the program, install it away from the source partition.
Step 2: scan, then narrow the result
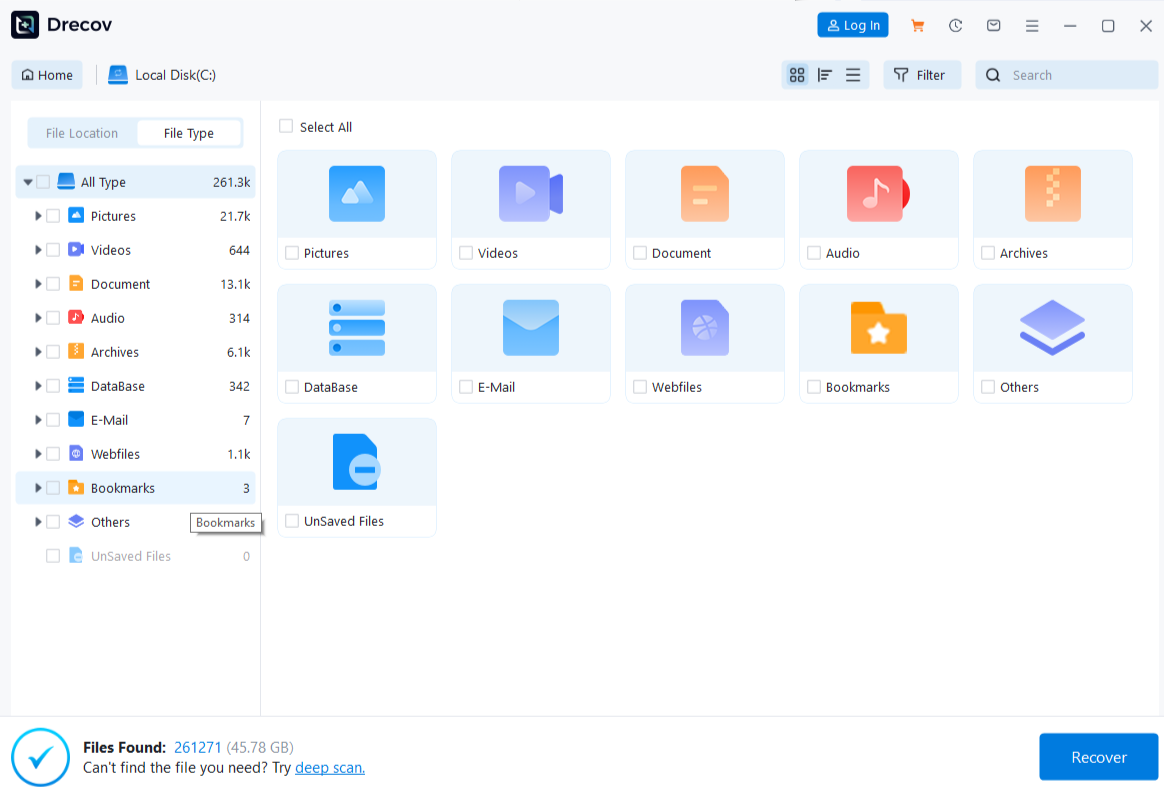
Run Quick Scan first. If it does not show the file and the source remains stable, use Deep Scan. Filter by filename, type, or former path when those details are available. Preview a few likely files rather than selecting everything with a familiar extension. A preview is evidence about that sample, not a guarantee that every page, frame, or embedded object is intact.
Step 3: save elsewhere and verify
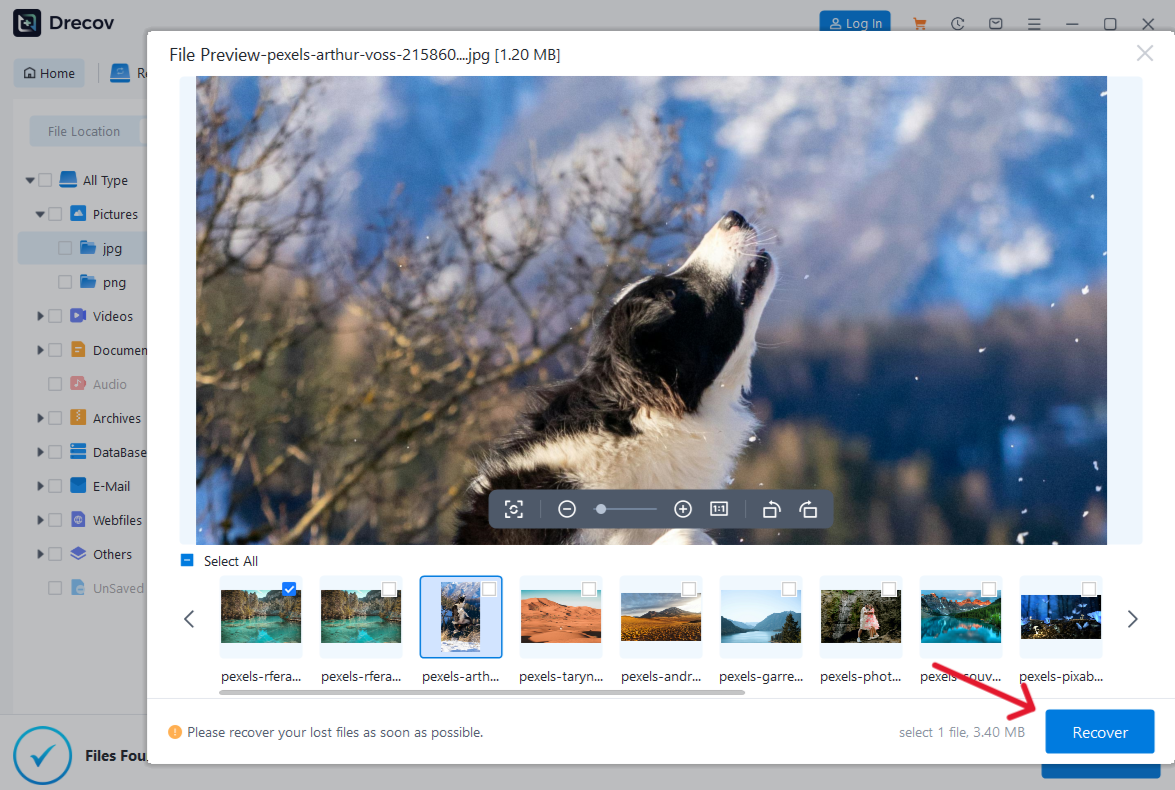
Recover selected candidates to the separate healthy drive, never back to the source. If output does not appear in the folder you expected, check Drecov Folder or Recovery Folder on the chosen destination. Open a sample of the recovered files and compare their contents with the version you needed. Only after that check should you resume repairs, formatting, or a new backup setup on the original device. For broader file-loss methods, see file recovery on Windows.
⚠ Warning: Install it on a drive different from the one where your data was lost to prevent overwriting.
Build a routine you can trust next month
A backup plan should survive ordinary human mistakes. Make a short list of the folders you changed this week, then check whether the chosen backup actually includes them. Look at the date of the newest saved version. If the drive has not been connected for weeks, a perfectly configured schedule may still leave a gap. Fix that gap before you need the file, not after. Keep a reminder to reconnect the destination and test another restore.
Use one clear rule for new files: decide where the authoritative working copy lives, and verify that location is protected. People often edit a copy in Downloads while their backup protects Documents. Another common trap is moving a project to a USB drive without adding the drive to the backup routine. The USB recovery guide can help after a local loss, but it is not a reason to leave removable storage unbacked-up.
Record how to access the backup without the original PC. A replacement computer may not have the same account, application, or drive letters. Keep recovery instructions and credentials in a safe place separate from the device. If you use encrypted snapshots, verify that the password works during a test restore. The point is not to build the most elaborate system; it is to make returning one important file predictable when you are under pressure.
FAQs
Is recovery software a replacement for backup software?
No. A backup preserves dated copies before a loss. Recovery software searches a source after loss and depends on what remains accessible. If an important file has been overwritten, a prior backup may still help while a scan may not.
Should I run a backup job immediately after deleting a file?
Not onto the affected drive. First check existing versions and stop unnecessary writes to the source. Creating a fresh backup may copy the current, already-missing state and may use the space where deleted data remained. Save new material to another device while you investigate.
Which tool is easiest for a first Windows backup?
For ordinary personal folders, try the Windows File History workflow if its folder coverage and destination match your needs. A graphical open-source snapshot tool may suit a different destination or policy. Choose the one you can configure correctly and test, rather than the one with the longest feature list.
Can a recovery scan find a file from an old cloud account?
Only if a local copy once existed on the Windows storage you can scan. Check the cloud provider’s trash and version history first. A local scan cannot inspect a provider’s server or restore a copy that was never stored on the PC.
How often should I test restoration?
Test after the initial setup and whenever you change important folders, devices, or storage credentials. A small real-file restore is more informative than checking the backup screen alone. Choose a new sample periodically so you notice coverage gaps.
Conclusion
Choose backup and recovery software by the state of your files. Set up a separate, testable backup for work that still exists; restore an older version when one is available. If a local file is already gone and no copy helps, protect the source before any scan. On a stable Windows device, Drecov can look for that missing file, let you preview candidates, and save results elsewhere for verification. It complements a reliable backup routine rather than replacing one.
⚠ Warning: Install it on a drive different from the one where your data was lost to prevent overwriting.