







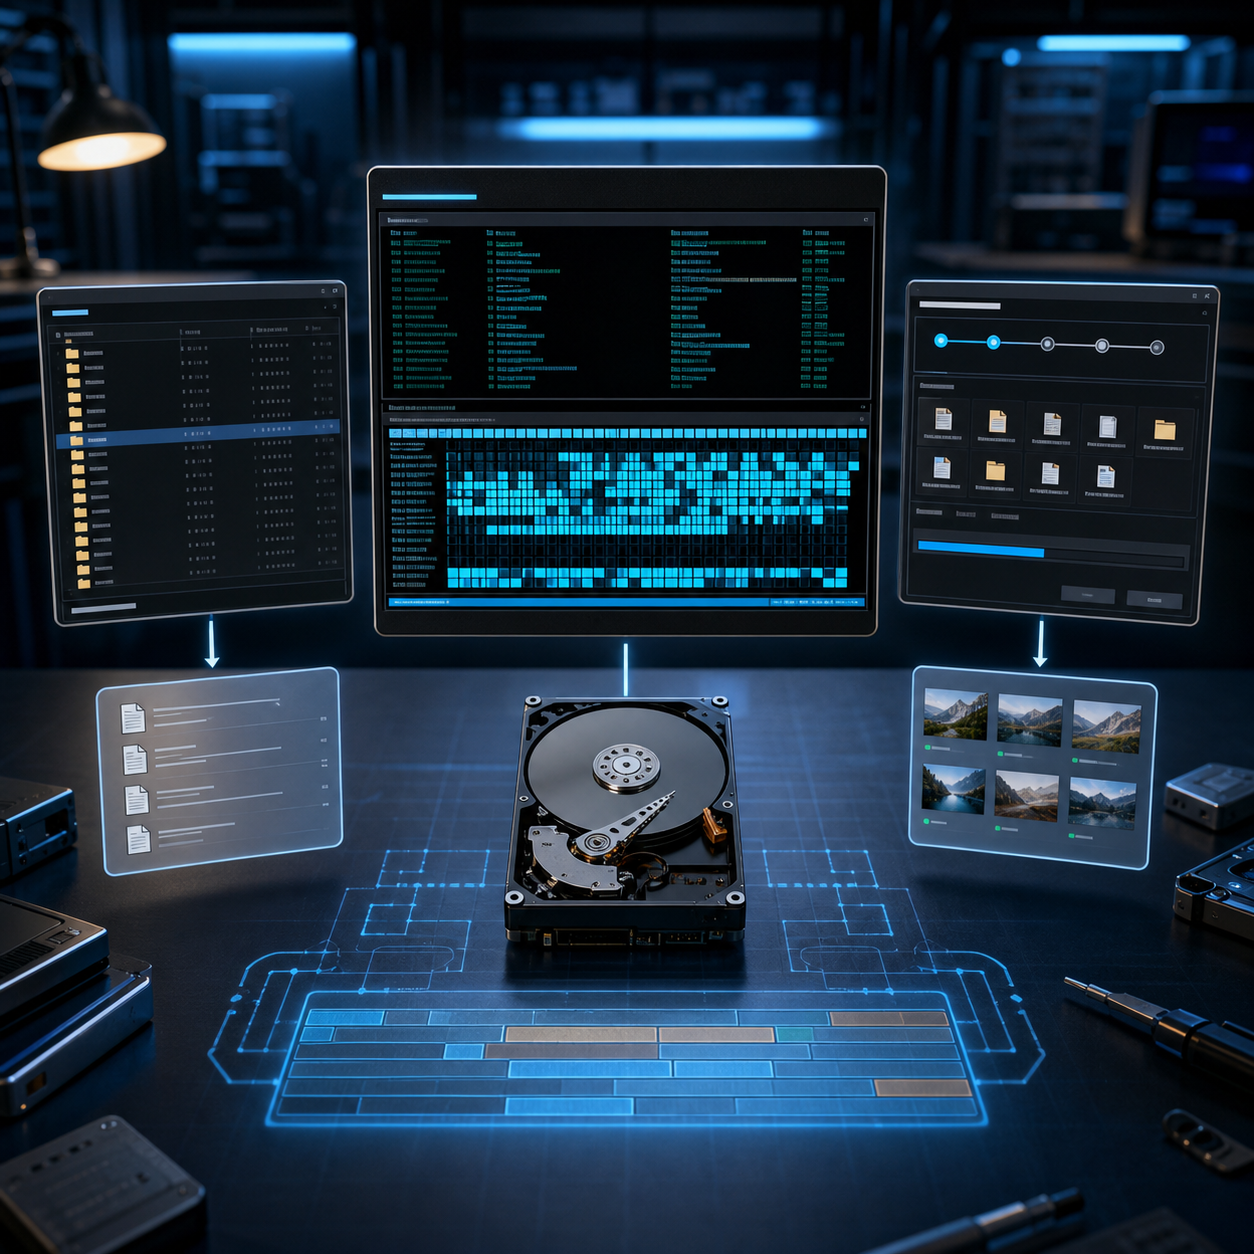
This TestDisk review explains what the open-source utility can do, where it is genuinely strong, and why its text-based workflow requires more care than a typical consumer recovery app. TestDisk is best known for finding lost partitions and repairing certain file-system structures. It can also list and copy files from supported volumes, but it is not a one-click answer for every deleted-file case.
The second half of this guide compares Recuva vs Drecov for Windows users who mainly want to scan, preview, and recover individual files. The three tools overlap in data recovery, yet they solve different problems. Understanding that distinction helps you avoid writing unnecessary changes to a damaged disk.
TestDisk Review: Quick Verdict
TestDisk is a strong choice for technical partition recovery. It is free, open source, cross-platform, and especially useful when a partition disappears, a partition table is damaged, or a supported boot sector needs repair. Its ability to inspect partition structures and list files before applying changes makes it valuable in the hands of a careful user.
However, TestDisk is not the easiest first tool for casual Windows users. Its keyboard-driven interface, technical terminology, and disk-writing options create a steeper learning curve. For ordinary deleted-file recovery on a healthy, readable drive, Recuva or Drecov may provide a more direct scan-and-recover workflow.
What Is TestDisk?
TestDisk is free and open-source recovery software from CGSecurity. It runs on Windows, macOS, Linux, and several other operating systems. Its main purpose is recovering lost partitions and making non-booting disks usable again when the problem was caused by faulty software, accidental partition-table changes, or certain file-system errors.
The program works in a terminal-style interface. You move through disks, partition-table types, analysis results, and repair options with the keyboard. This design is lightweight and works well in recovery environments, but it assumes the user can identify the correct physical disk and interpret partition information accurately.
Main TestDisk Features
Lost partition detection and partition-table recovery
TestDisk can analyze a disk for existing and previously defined partitions. Quick Search looks for recognizable structures first, while Deeper Search performs a more extensive pass when the expected partition is not found. After reviewing the results, an experienced user can choose to write a corrected partition structure to the disk.
Boot-sector and file-system repair
Depending on the file system, TestDisk can repair or rebuild certain boot sectors, recover an NTFS boot sector from its backup, repair the Master File Table from its mirror, and locate backup superblocks for ext-family file systems. These are structural repair operations, not general-purpose fixes for physical media damage.
File listing, copying, and limited undelete support
Before changing a partition table, TestDisk can list files in many discovered partitions. This is an important verification step: recognizable folders and filenames make it more likely that you selected the correct structure. TestDisk can copy files from supported partitions and offers undelete functions for selected FAT, exFAT, NTFS, and ext2 scenarios.
Cross-platform operation and disk-image support
TestDisk is available for multiple operating systems and can work with disk images. When a drive is unstable, the safer professional approach is normally to create a sector-level image or clone first and perform logical recovery on the copy. Continuing to scan failing hardware can worsen damage or make later recovery harder.
TestDisk Pros and Cons
| Pros | Cons |
|---|---|
| Free and open source | Text-based interface has a steep learning curve |
| Excellent focus on lost partitions and disk structures | Selecting the wrong disk or partition layout can be risky |
| Runs on Windows, macOS, Linux, and more | No polished thumbnail gallery or consumer-style preview |
| Can list and copy files before writing changes | Recovery support varies by file system and damage type |
| Includes useful boot-sector and MFT repair functions | The Write command changes on-disk structures |
| Can work with disk images | Not designed to repair physically damaged hardware |
The biggest advantage is control. TestDisk exposes structural information that simpler applications hide. Its biggest drawback is the same: a user must understand what the program is showing. A green partition entry or a successful search is not by itself proof that every file is recoverable.
TestDisk vs PhotoRec: Do Not Confuse Their Roles
TestDisk and PhotoRec are distributed together, but they use different recovery strategies. TestDisk concentrates on partitions and file-system structures. PhotoRec performs signature-based file carving: it searches raw data for known file patterns and can recover content even when the original directory structure is unavailable.
File carving has a tradeoff. Recovered files may lose their original names, folders, and timestamps, and fragmented files may be incomplete. Start with structural recovery or file copying when the file system is readable. Use carving when those methods cannot locate the needed data.
How to Use TestDisk Safely
Stop using the affected drive before recovery. If it clicks, disconnects, reports an unstable capacity, or appears intermittently, do not keep scanning it with software. For a logically damaged but stable drive, save recovered files to a different physical disk. The following workflow summarizes the official TestDisk sequence.
Step 1: Start TestDisk and create a log
Launch TestDisk with administrator privileges when required. Choose Create to start a new log file. The log records detected disks and recovery choices, which can be helpful when reviewing a complicated case. Avoid saving logs or recovered files to the affected volume.

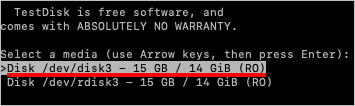
Step 2: Select the correct physical disk
Compare the displayed model and capacity with the affected device, then highlight the correct disk. Selecting the wrong device is one of the most serious mistakes in this workflow. TestDisk usually detects the partition-table type automatically; accept the suggested type unless you have reliable evidence that it is wrong.
Step 3: Analyse the disk and search for partitions
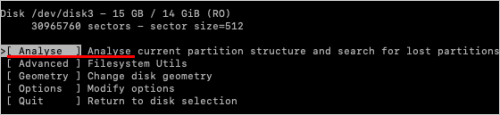
Choose Analyse to review the current partition structure, then run Quick Search. If the missing partition is not found, use Deeper Search. A deeper scan can take substantially longer because it examines more of the disk for partition signatures.
Step 4: Verify files before choosing Write
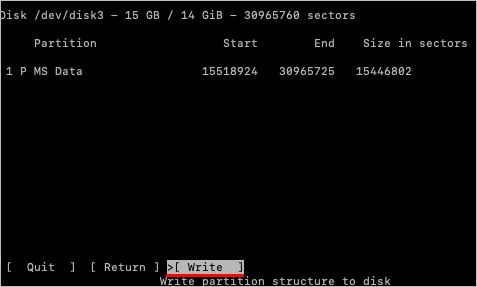
Highlight a candidate partition and use the file-list command to inspect its contents. Confirm that the expected folders and files appear and that the partition boundaries make sense. When possible, copy critical files to a separate healthy disk before modifying any partition structure.
Write is not a preview command. It commits the selected partition table to the disk. Choose it only when the complete layout has been verified. If you are uncertain, stop and seek experienced help rather than guessing. After a correct write, a restart may be required for the operating system to reread the partition table.
When TestDisk Is the Right Choice
- A partition disappeared after an accidental partitioning operation.
- The partition table is damaged but the physical disk is stable.
- You need to inspect a lost partition and copy accessible files.
- A supported boot sector or NTFS MFT needs a specific structural repair.
- You are comfortable verifying disk geometry, file systems, and partition boundaries.
Do not use TestDisk as a routine repair experiment on a physically failing disk. Also avoid writing a new structure merely because a scan displayed several possibilities. In those cases, imaging the device or consulting a recovery specialist is safer.
Recuva vs Drecov: Which Is Better for File Recovery?
TestDisk addresses partition and structural problems, while many Windows users simply need to recover deleted files from a readable drive. For that job, the more direct comparison is Recuva vs Drecov. Recuva is a lightweight Windows utility with a familiar wizard and a free edition. Drecov provides a more visual location-scan-preview-recover workflow for internal and removable storage.
| Comparison | Recuva | Drecov |
|---|---|---|
| Best fit | Simple deleted-file cases on readable Windows storage | Users wanting a guided workflow for deletion, formatting, RAW drives, and lost partitions |
| Interface | Wizard plus Advanced Mode | Visual scan, filter, preview, and recovery screens |
| Scan options | Normal scan and Deep Scan | Quick Scan and Deep Scan workflow |
| Typical devices | Internal drives, USB drives, memory cards, and other Windows-readable media | HDDs, SSDs, external drives, USB drives, SD cards, and other memory cards |
| Result review | File list, status indicators, and preview for supported files | Path/type filters, search, and preview for supported files |
| Free option | Free edition available | Check the current official download and licensing terms |
| Learning curve | Low for the wizard; moderate for Advanced Mode | Low for the guided workflow |
| Physical damage | Not suitable | Not suitable |
Choose Recuva when…
- You recently deleted a file from a healthy Windows drive.
- You want a compact wizard and a free basic recovery option.
- You know the file type or original location and want a narrow search.
- You are comfortable evaluating Recuva’s file-condition indicators.
Choose Drecov when…
- You prefer a modern visual scan and preview process.
- You need to filter a large result set by path, type, size, or name.
- The loss followed formatting, a RAW volume, or a missing partition rather than simple deletion.
- You want one guided workflow for internal drives and common removable storage.
Neither product guarantees a successful recovery. Deleted content may already be overwritten, SSD TRIM may remove recoverable blocks, and physically damaged hardware needs a different approach. Always install recovery software on a healthy drive and save restored files somewhere other than the source.
How to Recover Files with Drecov
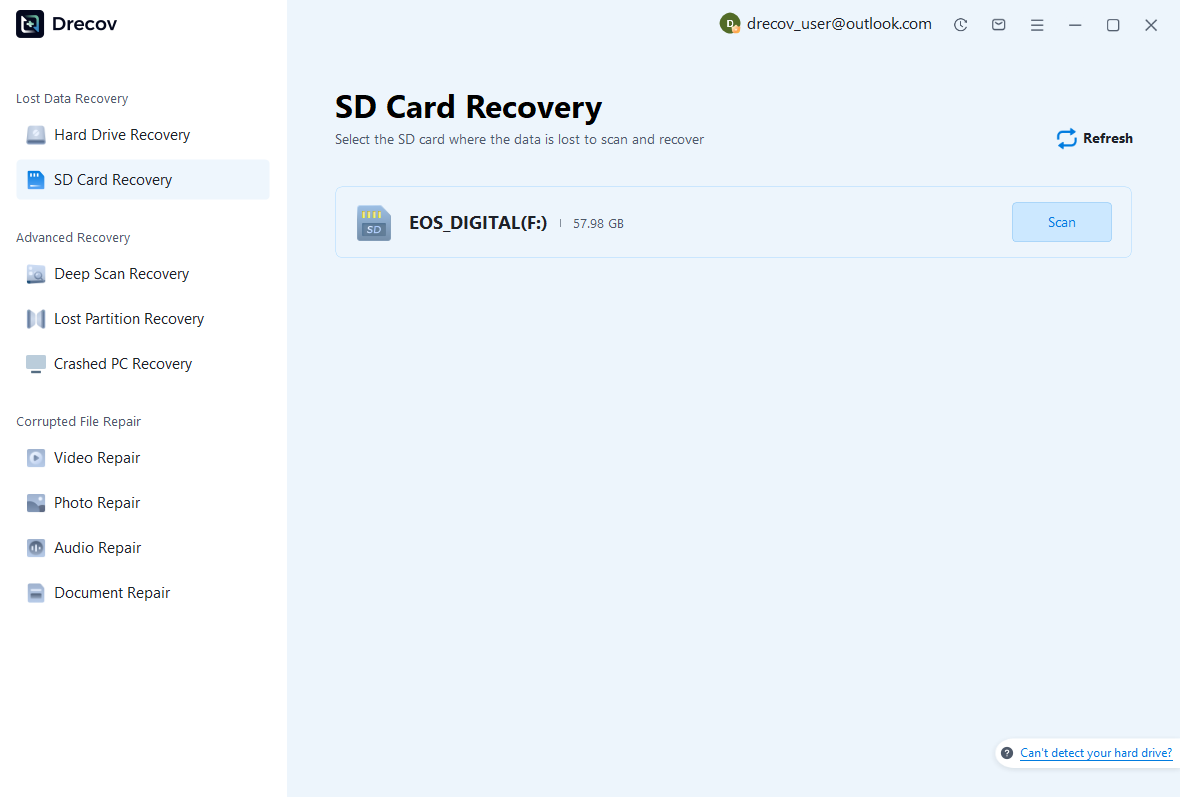
Step 1: Select the affected location
Connect the affected device, open Drecov, and select the disk, partition, or specific location where the files were lost. Do not install the program onto the source volume if avoidable. Confirm the drive by model, capacity, and letter before scanning.
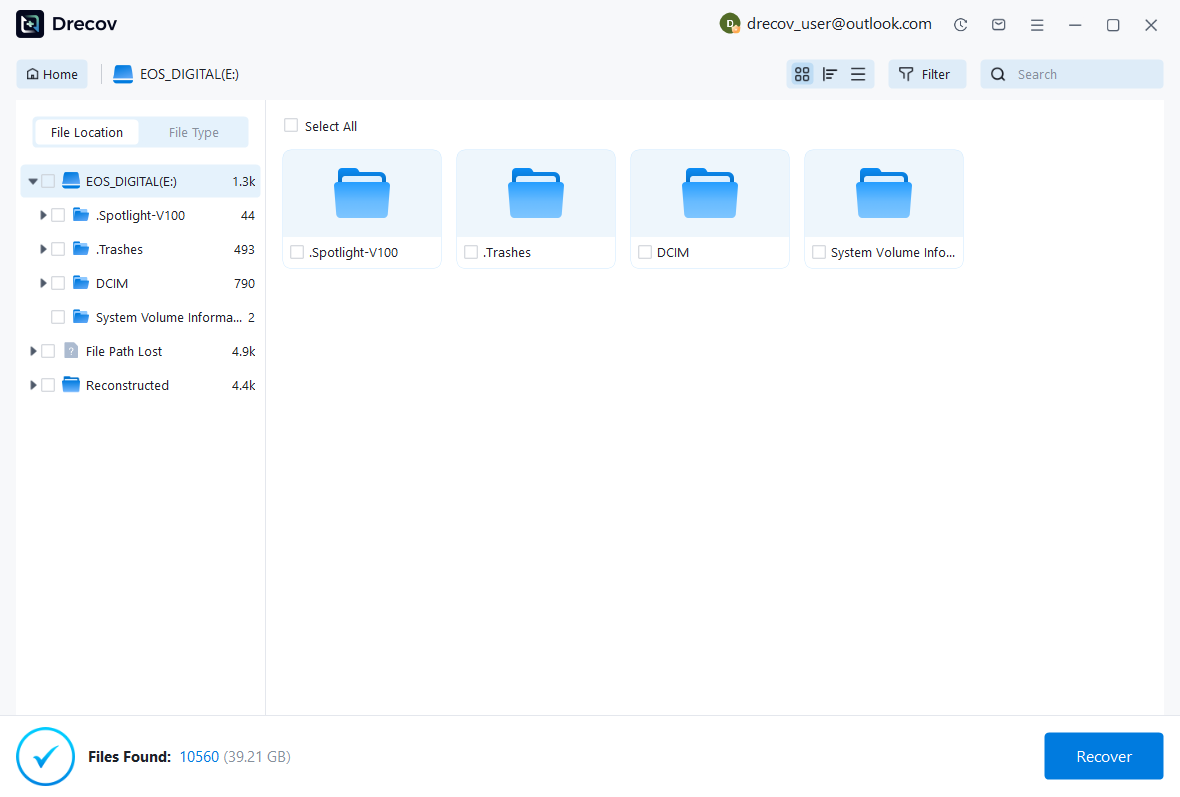
Step 2: Scan and filter the results
Start the scan and allow the quick results to populate. Use Deep Scan when the expected files are missing. Narrow the result set with file type, path, size, name, and other available filters instead of recovering everything blindly.
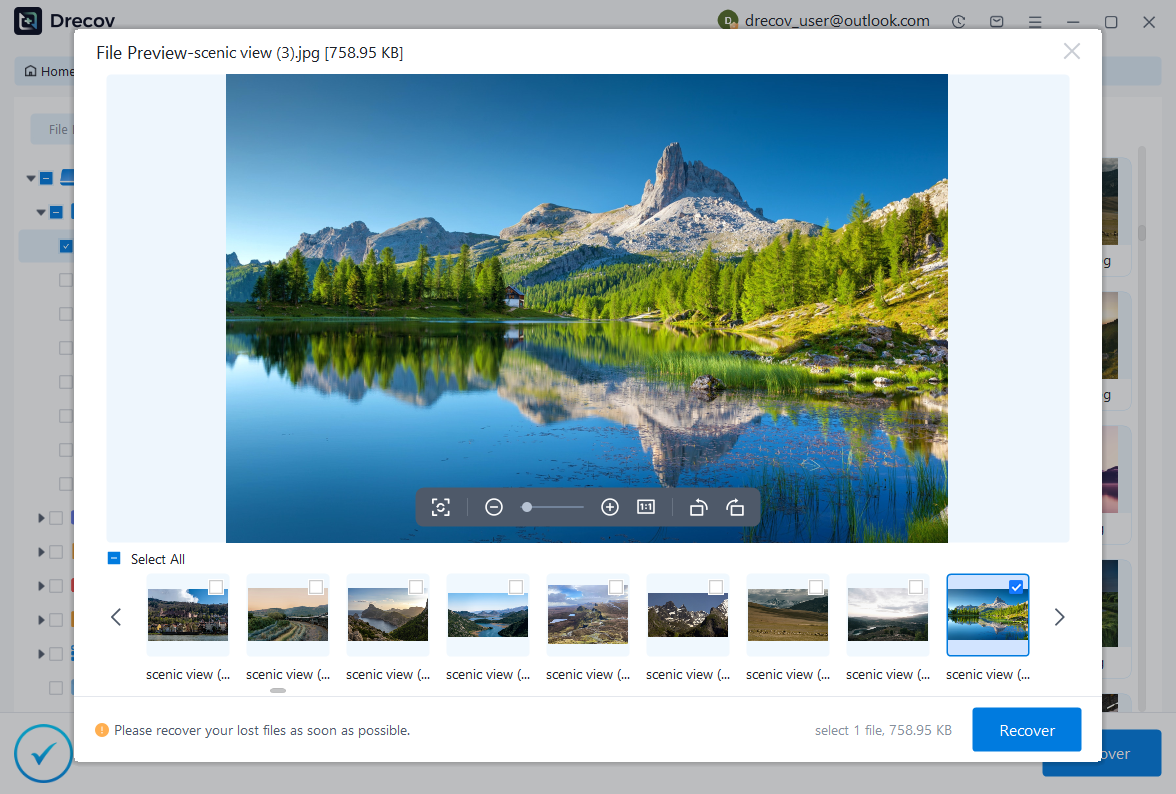
Step 3: Preview and recover to a safe destination
Preview representative documents, photos, or other supported files to check whether their contents are intact. Select only the items you need, click Recover, and choose a destination on a different physical disk. Open several restored files before reusing or repairing the original storage.
Essential Recovery Safety Rules
- Stop writing new data to the source immediately.
- Do not format a RAW or unreadable drive just to make it accessible.
- Install the recovery program on another volume.
- Save recovered files to a different physical disk.
- For unstable hardware, make an image or clone before logical recovery.
- Do not use TestDisk’s Write option until the complete partition layout and files have been verified.
- Keep more than one backup after recovery is complete.
Final Verdict
TestDisk remains one of the most capable free tools for lost-partition analysis and selected file-system repairs. It rewards technical knowledge, careful verification, and a conservative recovery plan. It is not the best first choice for everyone, and it should never be used to experiment on a physically failing drive.
For normal Windows file recovery, choose Recuva when the case is simple and a lightweight free utility is enough. Choose Drecov when you prefer a guided interface, broader logical-loss coverage, and visual filtering and preview. If the missing partition itself is the central problem, TestDisk may be the more appropriate specialist tool.
TestDisk, Recuva, and Drecov FAQs
Is TestDisk really free?
Yes. TestDisk is free and open-source software. Download it from the official CGSecurity website to reduce the risk of bundled or modified installers.
Can TestDisk recover permanently deleted files?
It can undelete files in certain supported file systems and can copy files from discovered partitions. Results depend on the file system, the loss event, and whether the data has been overwritten. PhotoRec may be useful for raw file carving when file-system recovery fails.
Is TestDisk safe for beginners?
Its read-only analysis and file-listing steps are relatively safe when the correct disk is selected. Commands that write a partition table or repair file-system structures require expertise. Beginners should copy files first, work from an image, or get help before committing changes.
Should I choose Recuva or Drecov?
Choose Recuva for a recent, straightforward deletion when you value a compact wizard and free basic option. Choose Drecov for a more visual recovery workflow and common cases involving formatting, RAW drives, or lost partitions. Compare the current editions and licensing before downloading.
Can any software recover data from a physically damaged drive?
Software cannot repair damaged heads, motors, platters, or flash-memory electronics. Repeated scans can stress unstable media. Disconnect a clicking, overheating, intermittently detected, or electrically damaged device and consult a professional recovery service.
Why must recovered files go to another drive?
Writing recovered data back to the source can overwrite other lost files that have not yet been restored. A separate healthy physical disk prevents the recovery output from competing with the original data.
Product features and license terms can change. Review the current official documentation before downloading or purchasing. This article addresses logical recovery, not physical drive repair.





