








Recuva vs Drecov is a useful comparison for Windows users who want to recover deleted or missing files without jumping immediately to a professional recovery lab. Recuva is a familiar lightweight utility with a free edition, a wizard, a standard scan, and a deeper scan for harder-to-find deleted files. PandaOffice Drecov uses a modern scan, preview, and recover workflow for common Windows storage problems.
Neither tool can guarantee recovery. Success depends on whether the original data has been overwritten, whether the storage device is physically healthy, and whether the file system remains readable. This review explains the differences, shows both workflows, and helps you choose the more suitable tool for the actual loss scenario.
Recuva vs Drecov: Quick Verdict
Choose Recuva for a straightforward deleted-file case on a readable Windows drive when you want a compact utility and a free basic recovery option. Its wizard is easy to understand, and Advanced Mode gives you filters, file-condition indicators, and Deep Scan.
Choose Drecov when you prefer a more visual workflow for scanning, filtering, previewing, and restoring files from internal drives, external drives, USB flash drives, or memory cards. It is also positioned for a broader set of common Windows loss cases, including deletion, formatting, RAW drives, and lost partitions.
What Is Recuva?
Recuva is Windows file recovery software from the company behind CCleaner. Its official product page describes recovery of pictures, music, documents, videos, emails, and other deleted files from Windows computers, the Recycle Bin, memory cards, external hard drives, USB devices, cameras, and music players.
The product provides a normal scan and a Deep Scan. It also includes secure overwrite, which is a deletion feature rather than a recovery feature: it intentionally makes selected deleted content harder to restore. Recuva Professional adds virtual hard drive support, automatic updates, and priority support. Users should obtain the installer from the official CCleaner website rather than an unofficial or modified download.
What Is PandaOffice Drecov?
PandaOffice Drecov is data recovery software for Windows. Its public documentation covers common logical data-loss situations such as accidental deletion, formatting, system crashes, partition loss, inaccessible volumes, and RAW drives. It scans locally connected HDDs, SSDs, external drives, USB flash drives, SD cards, and other memory cards.
Drecov organizes the main job into selecting a location, running a scan, filtering or previewing the results, and saving chosen files to a safe destination. Quick Scan is useful for recent loss, while Deep Scan searches more extensively when the expected files do not appear immediately.
Recuva Free and Professional: Main Differences
| Feature | Recuva Free | Recuva Professional |
|---|---|---|
| Deleted-file recovery | Included | Included |
| Deep Scan | Included | Included |
| Virtual hard drive support | Not listed | Included |
| Automatic updates | Not included | Included |
| Priority support | Not included | Included |
| Best fit | Occasional basic recovery | Users needing VHD support and product support |
The free edition is the main reason many users try Recuva first. A paid upgrade does not change the fundamental rule of recovery: overwritten content cannot be reconstructed. Check the current official edition comparison before purchase because features and license terms can change.
Recuva: Strengths and Limitations
Recuva strengths
- A free edition for basic deleted-file recovery
- A simple wizard that asks what was lost and where it was stored
- Normal and Deep Scan options
- Support for internal drives and common removable media
- File-condition indicators that help prioritize results
- Advanced Mode for users who want more filters and detail
Recuva limitations
- It is a Windows-only product.
- The interface is functional but feels dated beside newer recovery applications.
- A Deep Scan may identify file fragments without restoring usable filenames or folders.
- Finding a file entry does not mean its original contents are intact.
- It is not a substitute for imaging an unstable drive or handling physical damage.
- Secure overwrite is irreversible and must not be confused with recovery.
How to Use Recuva to Recover Deleted Files
The following four-step workflow follows Recuva’s standard wizard. Install and run the program from a healthy drive. If the lost files were on the Windows system drive, minimize computer use because installation, browsing, and updates can overwrite deleted data.
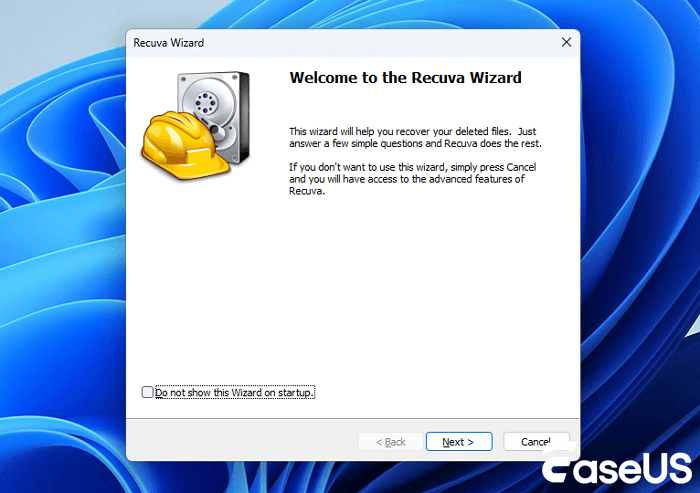
Step 1: Start the Recuva Wizard
Open Recuva and select Next on the welcome screen. Connect an external drive or memory card before starting if that is the device you need to scan. Experienced users can leave the wizard and work in Advanced Mode, but the wizard is sufficient for a normal deleted-file search.
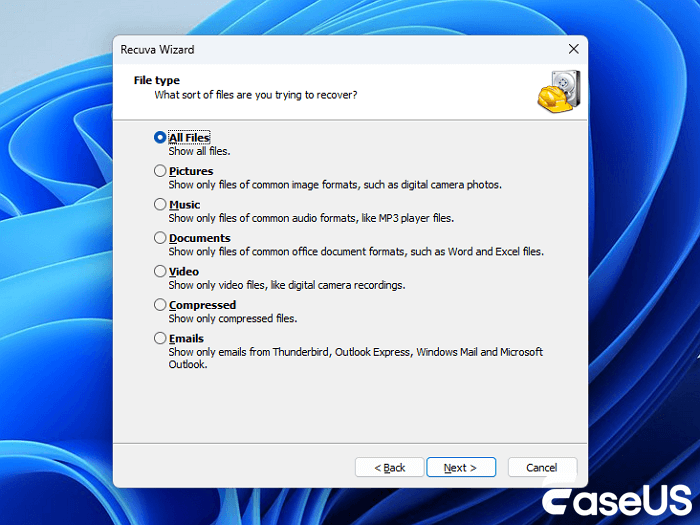
Step 2: Select the type of file
Choose Pictures, Music, Documents, Video, Compressed files, or Emails when you know what is missing. Select All Files if several formats were lost or you are uncertain. A narrower choice can make the result list easier to review, but it does not improve data that has already been overwritten.
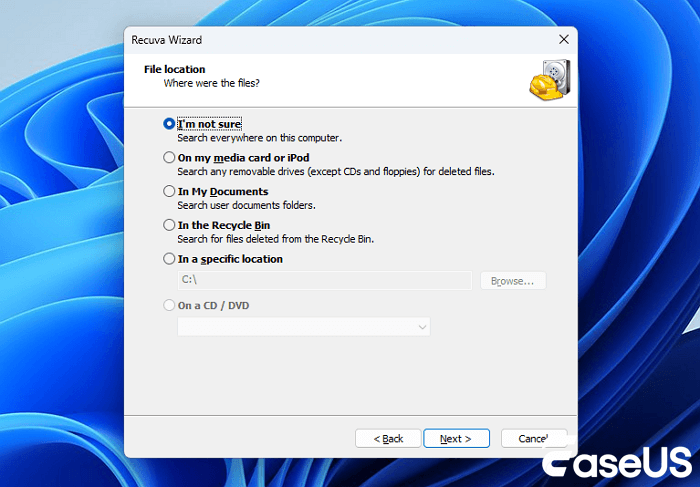
Step 3: Tell Recuva where the files were stored
Select the original location: a removable device, Documents, the Recycle Bin, or a specific folder. Choose I’m not sure only when the source location is genuinely unknown, because scanning a defined location is usually faster and reduces irrelevant results.
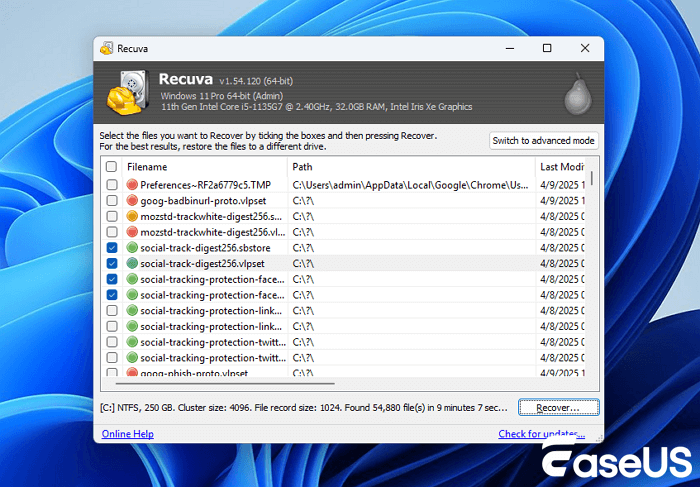
Step 4: Review results and recover to another drive
After the scan, review the condition indicator, filename, path, and available preview information. Check the files you want and select Recover. Save them to a different physical drive. If a standard scan does not find the files, return to the scan options and try Deep Scan, but avoid repeatedly scanning hardware that is disconnecting or making unusual noises.
Recuva workflow screenshots are adapted from the referenced EaseUS review. Interface details may vary by Recuva version.
Recuva vs Drecov: Feature Comparison
| Comparison point | Recuva | Drecov |
|---|---|---|
| Best suited to | Recent deletion on a readable Windows drive | Common Windows deletion, formatting, RAW, partition, and removable-media cases |
| Interface | Classic wizard plus Advanced Mode | Modern location, scan, preview, and recover flow |
| Free option | Free basic edition available | Download and scan options depend on the current product edition |
| Scan choices | Normal Scan and Deep Scan | Quick Scan and Deep Scan |
| Preview and filters | Available for supported results; Advanced Mode offers more detail | Filtering and preview are central to the workflow |
| Storage focus | Windows drives and common rewritable removable media | Windows internal drives, external drives, USB media, and memory cards |
| Virtual hard disks | Professional edition lists VHD support | Not presented as a core consumer workflow |
| Secure overwrite | Included as a deliberate erasure feature | Focused on recovery rather than secure erasure |
| Learning curve | Low in Wizard Mode | Low |
Which Tool Is Easier to Use?
Both products are approachable, but they guide the user differently. Recuva asks two useful questions before scanning: what type of file is missing, and where was it stored? That makes the wizard efficient for a recent, clearly understood deletion. Advanced Mode exposes the result list and additional options without turning Recuva into a full forensic suite.
Drecov starts with the storage location and keeps the visual sequence consistent through scanning, filtering, preview, and recovery. It is easier when the user wants to browse several categories of files or when the problem is described as a formatted, RAW, or lost partition rather than a single deleted item.
Who Should Choose Recuva?
- You recently deleted files from a healthy, readable Windows volume.
- You want to try a free basic recovery utility first.
- You know the file type and original location.
- You prefer a small wizard and a traditional result list.
- You need Recuva Professional’s listed virtual hard disk support.
Who Should Choose Drecov?
- You want a modern guided workflow on Windows.
- You need to examine a formatted, RAW, inaccessible, or lost partition.
- You are scanning an HDD, SSD, USB drive, SD card, or other memory card.
- You want filters and file preview integrated into the main workflow.
- You prefer one interface for both quick and deeper scans.
How to Recover Files with Drecov
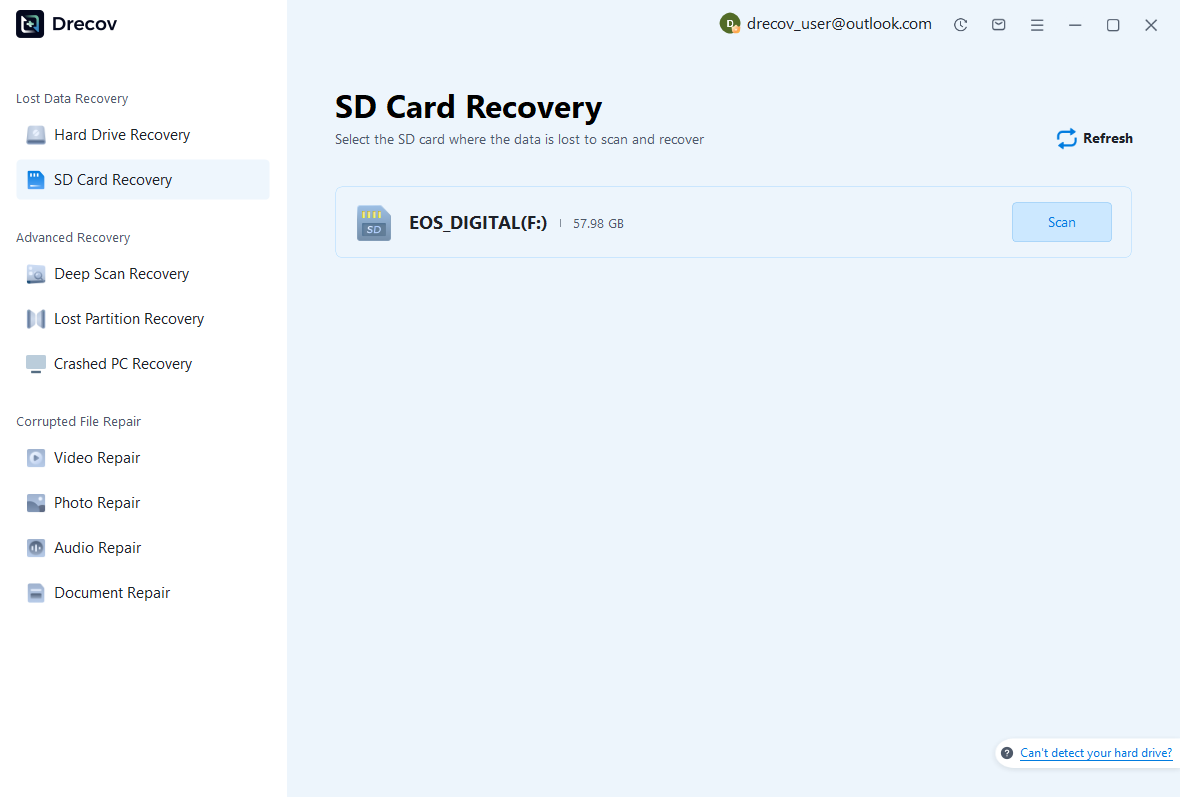
Step 1: Select the affected location
Install Drecov on a healthy drive, open it, and select the disk or partition where the files were lost. Do not install the software on the affected storage device.
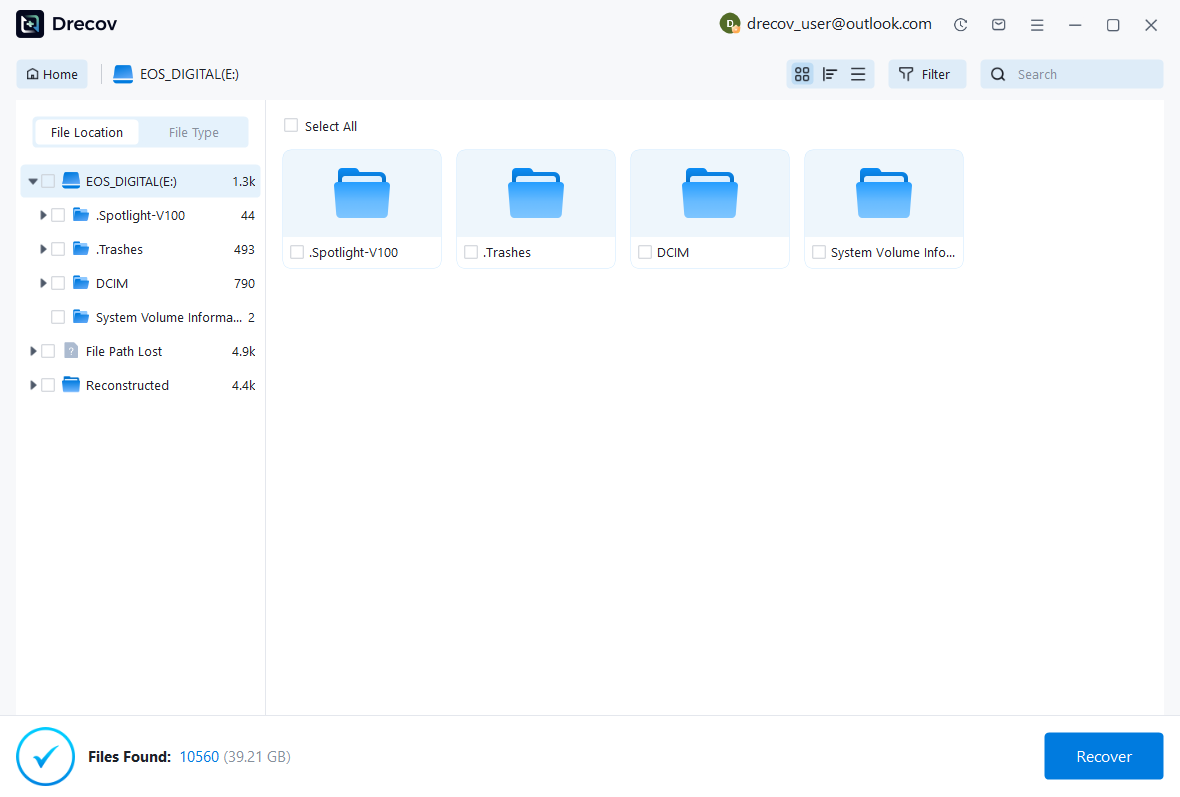
Step 2: Scan, filter, and preview
Start the scan and use file type, path, and other available filters. Preview important files where supported. Let the deeper scan finish if the expected files do not appear during the initial result phase.
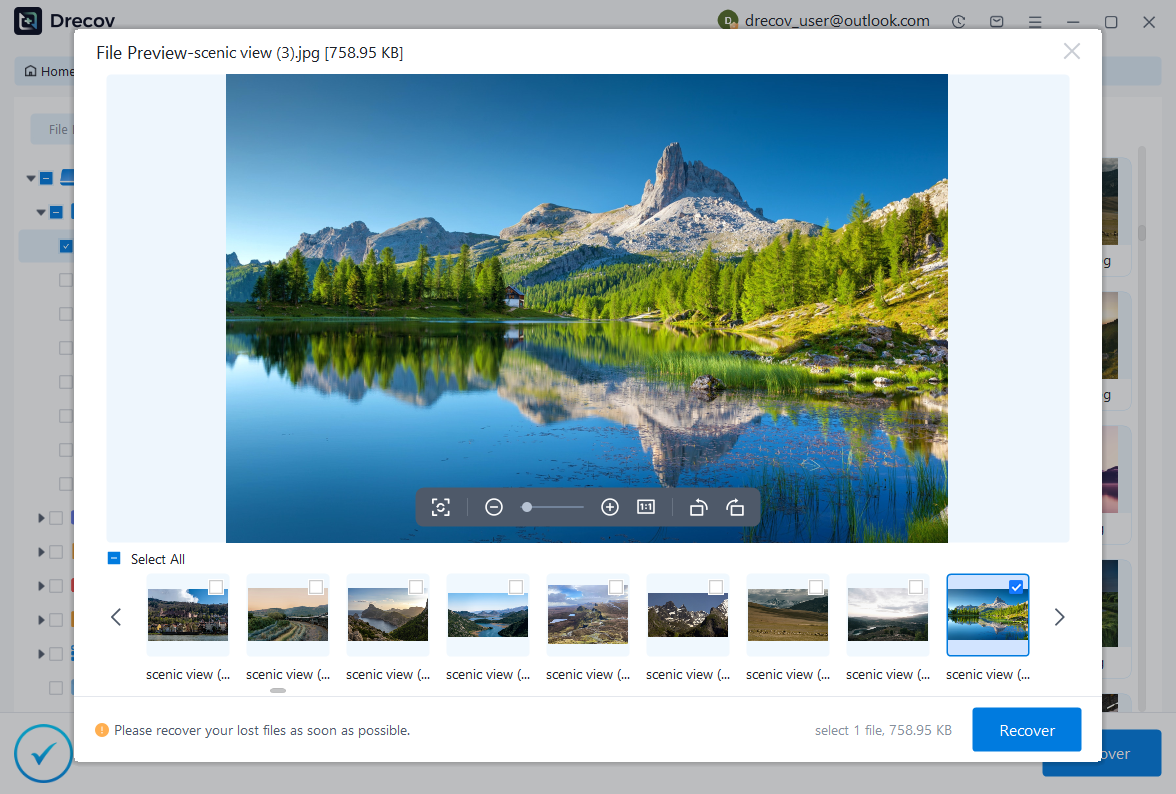
Step 3: Recover to a safe destination
Select the files you need and recover them to another physical drive. Open representative files afterward to verify their contents before reformatting or reusing the original storage.
Recovery Safety Rules
- Stop writing to the source. New data may overwrite deleted content.
- Recover elsewhere. Never save restored files back to the drive being scanned.
- Do not use secure overwrite. That Recuva feature intentionally destroys recoverable content.
- Do not run repair tools first. CHKDSK, formatting, initialization, and partition changes can alter evidence.
- Stop when hardware is unstable. Clicking, overheating, repeated disconnects, or unreliable detection can indicate physical damage.
- Use an image or professional service for critical cases. Repeated scans can stress failing media.
Final Verdict
In the Recuva vs Drecov comparison, Recuva remains attractive for recent deletion on a readable Windows device, especially when a user wants a free, compact utility and understands the source location. Its Wizard Mode is simple, and Deep Scan gives it a second chance when a normal scan is insufficient.
Drecov is the better fit for users who want a newer visual workflow and broader guidance around common Windows storage scenarios. Its scan, filter, preview, and recover sequence is easy to follow across internal and removable devices. Choose according to the case, not a marketing recovery-rate claim, and always protect the source before scanning.
Frequently Asked Questions
Is Recuva really free?
Recuva has a free edition that includes basic file recovery and Deep Scan. The Professional edition adds features such as virtual hard disk support, automatic updates, and priority support.
Can Recuva recover overwritten files?
No. Recuva may still display a filename or record after the associated storage clusters have been overwritten, but the original content cannot be reconstructed.
Does Recuva work on macOS?
No current macOS edition is listed on Recuva’s official product pages. It is a Windows recovery utility.
Should I enable Deep Scan immediately?
Start with the normal scan for a recent deletion on a healthy drive. Use Deep Scan if the expected files are missing. If the drive is unstable, stop scanning and consider imaging or professional help.
Why does Recuva find a file that will not open?
The directory record may remain even though some or all content clusters have been overwritten. A green condition indicator or visible filename is helpful, but it is not an absolute guarantee that the file is intact.
Which is better for a formatted or RAW partition?
Drecov is positioned more directly for formatted, RAW, inaccessible, and lost-partition recovery. Recuva can search damaged or newly formatted drives, but it is best known for deleted-file recovery on readable Windows storage.
Product features and license terms can change. Review the current official documentation before downloading or purchasing. This article addresses logical recovery, not physical drive repair.





