








R-Studio vs Drecov is not simply a contest between two products that do exactly the same job. Both can help recover lost files, but they are designed around different users. R-Studio emphasizes technical control, broad file-system support, RAID reconstruction, disk imaging, and remote recovery. PandaOffice Drecov focuses on a guided Windows workflow for recovering deleted, formatted, or inaccessible files from common storage devices.
This comparison explains those differences without declaring a universal winner. The right choice depends on the storage problem, the condition of the device, and how comfortable you are with advanced recovery settings.
R-Studio vs Drecov: Quick Verdict
Choose R-Studio if you are an IT professional, technician, or experienced user who needs RAID reconstruction, network recovery, disk imaging, a hex editor, or support for several operating-system file systems. Its depth is its main advantage, but that depth also creates a steeper learning curve.
Choose Drecov if you mainly need to recover files on a Windows PC and prefer a simpler scan, preview, and recover process. It is the more approachable fit for everyday cases such as accidental deletion, formatting, lost partitions, RAW drives, USB flash drives, memory cards, and external hard drives.
What Is R-Studio Data Recovery?
R-Studio is professional data recovery software from R-Tools Technology. It should not be confused with the similarly named RStudio development environment used for the R programming language. The recovery product is built for storage analysis and supports Windows, macOS, and Linux file systems, including NTFS, ReFS, FAT, exFAT, APFS, HFS+, Ext, XFS, and UFS families.
Its standout tools include damaged RAID reconstruction, recovery over a network, byte-for-byte disk imaging, S.M.A.R.T. monitoring, raw-file signature searching, and a hexadecimal editor. These tools are valuable when a case goes beyond a typical deleted-file scan. They also assume that the operator understands partitions, storage layouts, and the risks of working with a failing drive.
What Is PandaOffice Drecov?
PandaOffice Drecov is Windows data recovery software designed around common home and office recovery situations. Its public product information highlights recovery after deletion, formatting, system crashes, partition loss, and RAW-drive problems. It can scan internal and external drives, USB devices, SD cards, and other memory cards.
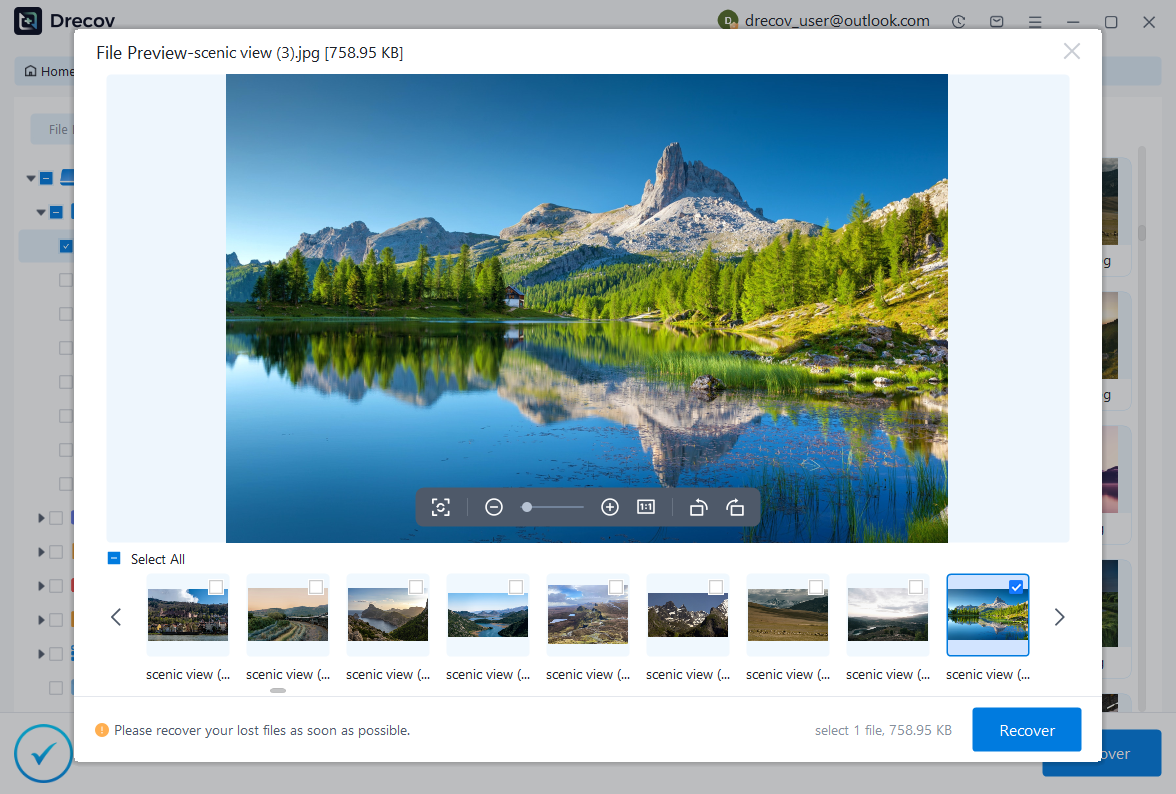
Drecov offers Quick Scan for recent, straightforward loss and Deep Scan for more difficult cases. Results can be filtered and previewed before recovery, which helps users confirm that they have found the right files before saving them to another device. Its interface is intended to keep the main workflow understandable: select a location, scan, review results, and recover.
R-Studio vs Drecov at a Glance
| Comparison point | R-Studio | Drecov |
|---|---|---|
| Best suited to | Technicians, IT teams, advanced users | Home and office Windows users |
| Main workflow | Detailed storage analysis and configurable recovery | Guided scan, preview, and recover process |
| Operating-system focus | Windows, macOS, and Linux editions | Windows 11, 10, 8.1, 8, and 7 |
| File-system breadth | Extensive cross-platform file-system support | Focused on file systems and devices commonly used with Windows PCs |
| RAID recovery | Advanced RAID reconstruction is a core capability | Not presented as a core consumer workflow in public product materials |
| Network recovery | Remote recovery tools are available | Focused on locally connected storage |
| Disk imaging | Advanced image creation and processing tools | Read-only scanning is emphasized for safer recovery |
| Preview | Available for supported files | Available before recovery |
| Learning curve | Higher | Lower |
Detailed Feature Comparison
1. Ease of Use
Drecov has the advantage for a user who wants to start a scan without learning storage terminology. Its location-first workflow is easier to follow, and the distinction between Quick Scan and Deep Scan makes the initial decision clear. Preview and filtering tools reduce the effort required to sort through a large result set.
R-Studio provides more information and more choices. That is useful when you know what to do with scan parameters, partition structures, RAID geometry, or disk images. For a first-time user, however, the number of technical controls can make it harder to decide which action is safest.
2. Advanced Recovery and RAID
R-Studio is the stronger option for complex logical storage. Its RAID tools can help reconstruct supported arrays when the original controller information is missing or damaged. It also supports virtual block RAID layouts, automatic RAID parameter detection in suitable cases, disk images, and detailed low-level inspection.
Drecov is better evaluated as a conventional Windows file recovery tool. Its public materials concentrate on deleted files, formatted partitions, lost partitions, RAW volumes, and removable media. If your case involves a broken RAID array, a NAS, or recovery over a network, R-Studio’s specialist toolset is more relevant.
3. Deleted and Formatted File Recovery
For ordinary deletion or accidental formatting, both products address the essential task: scan the source, identify recoverable files, preview results where possible, and save recovered data elsewhere. Drecov keeps this process direct and is likely to feel more comfortable to a nontechnical Windows user.
R-Studio gives experienced users more ways to refine the scan and interpret the storage structure. That extra control can matter when partitions have been reformatted, file-system metadata is damaged, or a standard scan returns confusing results. It does not guarantee that a particular file will be recoverable; overwritten data remains unrecoverable regardless of software.
4. File Systems and Platforms
R-Studio has the broader cross-platform profile. Its official documentation lists many Windows, macOS, Linux, Unix, and optical-disc file systems. This makes it a practical lab tool when storage devices arrive from different operating systems.
Drecov is a Windows application. That narrower focus is not necessarily a disadvantage if all your work happens on Windows PCs. It means the product can concentrate on a familiar consumer workflow rather than expose the full range of cross-platform analysis tools.
5. Preview, Filtering, and Workflow
Preview is important because a filename alone does not prove that a file is intact. Both tools provide ways to inspect supported files before recovery. Drecov emphasizes filters and preview as part of its guided flow. R-Studio combines preview with more technical views and scan controls, which can be valuable during a complex investigation.
R-Studio Data Recovery Workflow: Step by Step
R-Studio’s recovery workflow offers more control than a typical one-click recovery application. The exact labels can vary slightly by version, but the following six-step process shows the normal Windows workflow. If the source drive is unstable, create an image first and work from that image rather than repeatedly scanning the physical device.
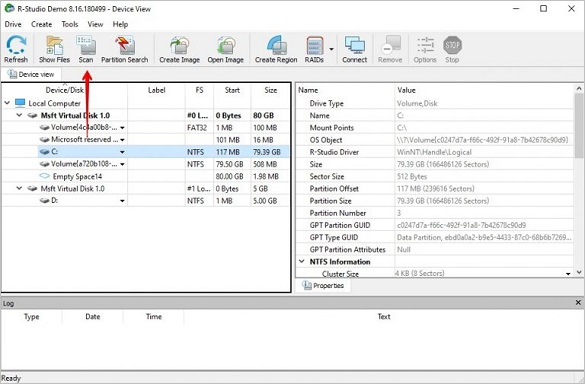
Step 1: Select the source disk or partition
Open R-Studio and locate the affected disk or partition in Device View. Confirm the model, capacity, file system, and partition before proceeding. Select the source and click Scan. Be careful not to select a healthy destination drive by mistake.
Step 2: Configure and start the scan
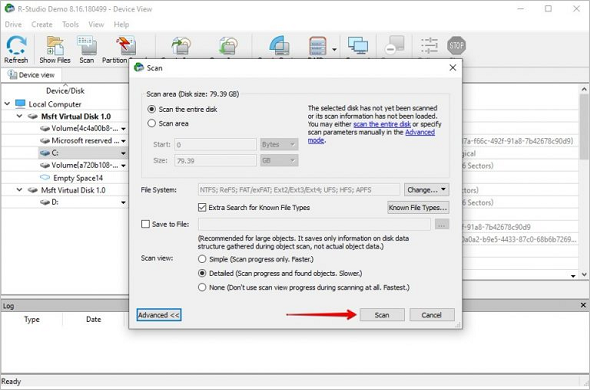
In the Scan dialog, choose whether to scan the entire disk or a defined area. Advanced users can adjust the file systems, known file types, scan view, and other parameters. For a normal recovery, scanning the entire affected partition with the relevant file systems selected is the safest starting point. Click Scan to begin.
Step 3: Open a recognized partition and show files
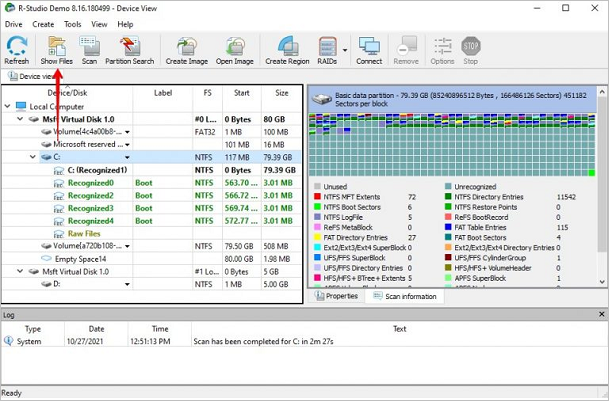
After the scan finishes, R-Studio may display one or more recognized partitions. Review their size, file system, starting position, and scan information. Select the most plausible recognized partition and click Show Files to inspect its directory tree. If the expected folders are missing, return to Device View and evaluate another recognized result.
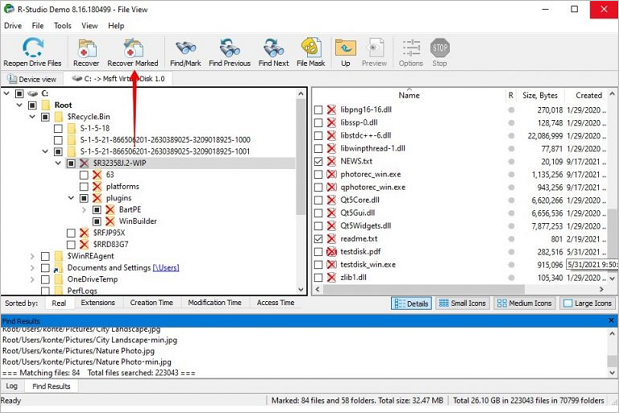
Step 4: Find, preview, and mark the files you need
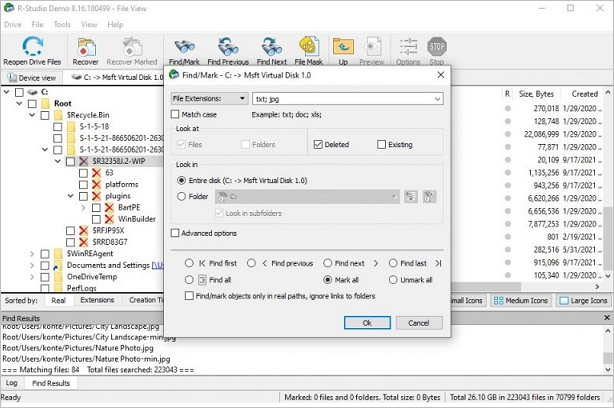
Browse the reconstructed folder tree or use Find/Mark to narrow the results by filename, extension, path, file state, or another available criterion. Preview important files when possible. Mark only the folders and files you need, which makes the recovery easier to verify and reduces unnecessary output.
Step 5: Choose Recover Marked
Check the marked-file count and estimated total size, then click Recover Marked. Do not start recovery until you have a separate healthy destination with enough free space. Recovering to the source disk can overwrite other lost files.
Step 6: Set a safe output folder and recover
Set the output folder on a different physical disk. Review restoration options such as folder structure and alternative data streams, then click OK. When recovery finishes, open a representative set of files and confirm that their contents are intact before modifying or reusing the original drive.
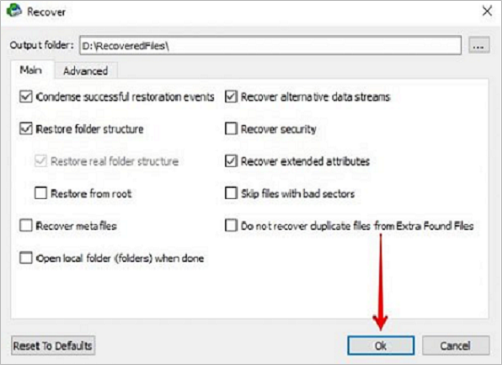
Workflow screenshots adapted from the R-Studio recovery section of the referenced EaseUS review. Interface details may differ in newer R-Studio releases.
Who Should Choose R-Studio?
- You regularly recover data from multiple file systems.
- You need to reconstruct a damaged or unknown RAID layout.
- You need network recovery, disk imaging, or a hexadecimal editor.
- You are comfortable interpreting partitions, sectors, and scan parameters.
- You want a toolkit suitable for a professional recovery workflow.
Who Should Choose Drecov?
- You use Windows and want a guided recovery process.
- You deleted files or formatted a common internal or external drive.
- You need to scan a USB flash drive, SD card, or memory card.
- You want to filter and preview files before saving them.
- You prefer fewer technical decisions during a typical recovery job.
How to Recover Files with Drecov
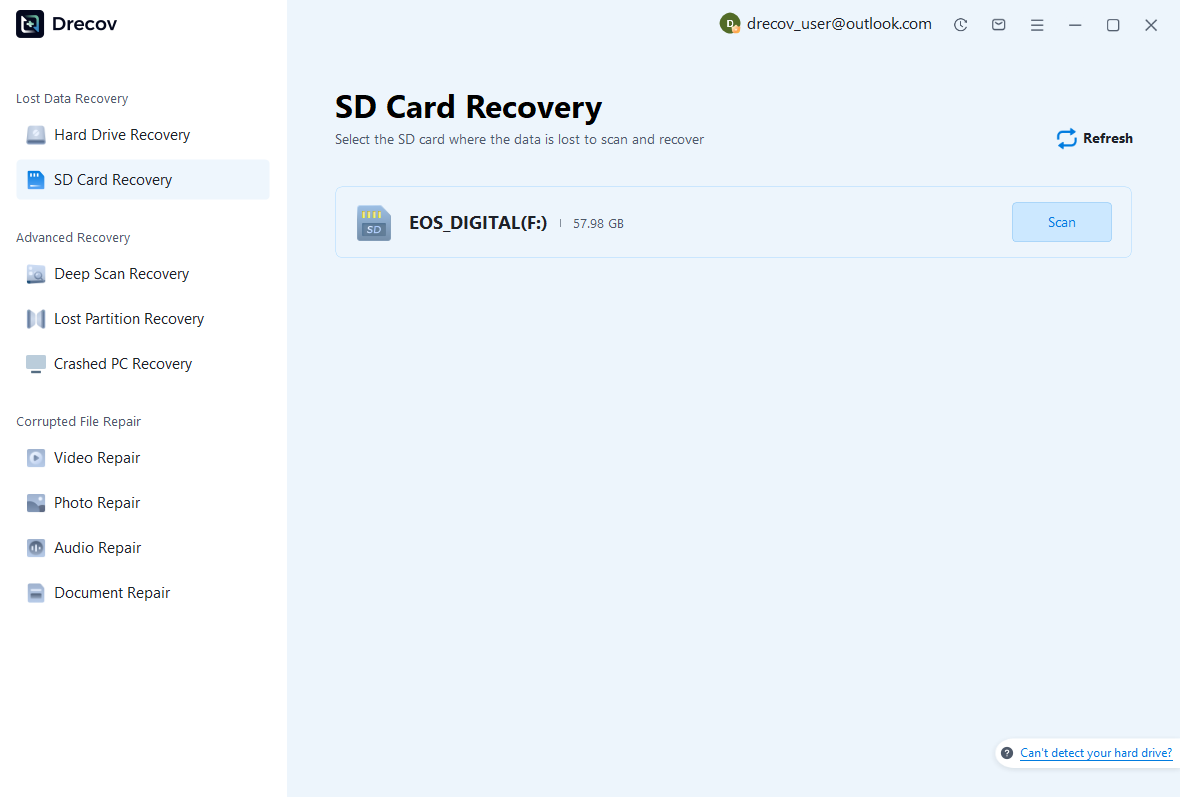
Step 1: Select the affected location
Install Drecov on a healthy drive, open it, and select the disk or partition where the files were lost. Do not install recovery software on the affected drive, because new data could overwrite recoverable content.
Step 2: Scan and review the results
Start the scan. Use file-type, path, and other available filters to narrow the results. Preview important documents, photos, or videos when the format is supported. If the quick result is incomplete, allow the deeper scan to finish.
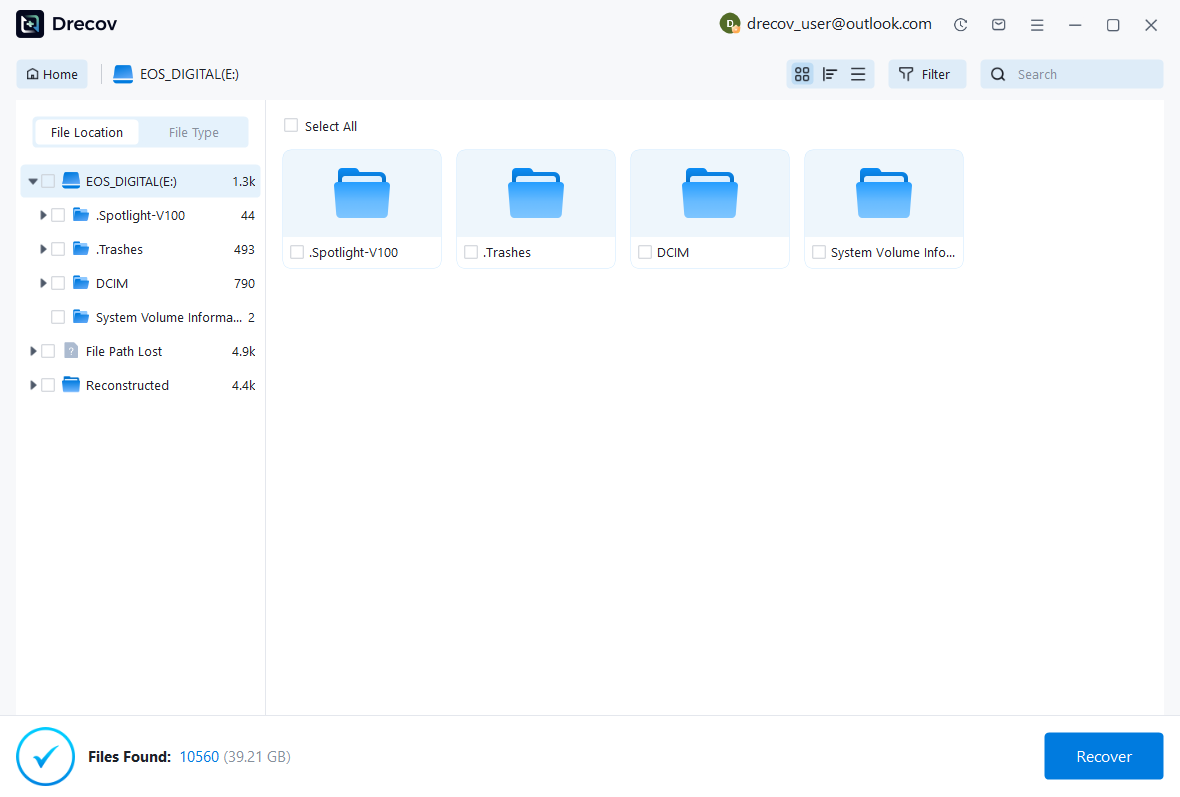
Step 3: Recover to another drive
Select the files you need and save them to a different physical drive. After recovery, open several files to verify that they are usable before you erase, reformat, or reuse the original device.
Safety Rules Before Any Recovery Attempt
- Stop writing to the source. New downloads, updates, and saved files may overwrite deleted data.
- Recover to a different device. Never save restored files back to the drive being scanned.
- Do not repeatedly power a failing drive. Clicking, disconnecting, overheating, or disappearing drives may have physical damage.
- Create an image when the device is unstable. Experienced users can work from an image instead of repeatedly stressing the original.
- Use a professional lab for critical physical damage. Software cannot repair broken heads, damaged platters, burned controllers, or severe flash-memory faults.
Pros and Cons
R-Studio Pros
- Extensive file-system and platform support
- Strong RAID, imaging, network, and low-level tools
- Detailed controls for difficult logical recovery cases
R-Studio Cons
- Steeper learning curve for first-time users
- Advanced options can be unnecessary for a simple deleted-file case
- Choosing the right edition and workflow requires more research
Drecov Pros
- Clear Windows-oriented recovery workflow
- Quick Scan, Deep Scan, filters, and preview
- Well suited to common internal and removable storage
Drecov Cons
- Windows-focused rather than cross-platform
- Not positioned as a specialist RAID or network recovery suite
- Physical device failures still require professional service
Final Verdict
In the R-Studio vs Drecov comparison, R-Studio is the better fit for advanced recovery work, especially RAID, multiple file systems, imaging, and remote systems. Drecov is the better fit for a Windows user who wants a more direct path through a common deletion, formatting, partition, or removable-media problem.
Choose based on the case rather than the length of the feature list. A straightforward interface can reduce mistakes in a normal recovery, while professional controls become essential when the storage layout is complex. Whatever tool you use, stop writing to the source and recover files to a separate device.
Frequently Asked Questions
Is R-Studio the same as the RStudio programming application?
No. R-Studio Data Recovery is storage recovery software from R-Tools Technology. RStudio, now associated with Posit, is an integrated development environment for the R programming language.
Which tool is easier for beginners?
Drecov is generally easier for a beginner because it centers the workflow on selecting a location, scanning, previewing, and recovering. R-Studio exposes more technical choices.
Which tool is better for RAID recovery?
R-Studio is the appropriate choice between these two when RAID reconstruction is required. Its documented feature set includes advanced tools for virtual RAID layouts and damaged arrays.
Can either program recover overwritten files?
No recovery program can restore original data after the relevant storage blocks have been overwritten. Stop using the affected drive as soon as loss is discovered.
Can software recover data from a physically damaged drive?
Software is intended for logical data loss. If a drive clicks, fails to spin, repeatedly disconnects, smells burned, or is not detected reliably, power it down and consult a professional recovery service.
Should recovered files be saved to the original drive?
No. Always select another physical drive as the recovery destination. Saving to the source may overwrite files that have not yet been recovered.
Product capabilities can change. Review the current official documentation and license terms before purchase. This comparison addresses logical data recovery, not physical drive repair.





