


Imagine this: You have spent the last three weeks perfecting a quarterly report. To clean up your digital workspace, you select a pile of “junk” folders and hit that satisfying “Empty Recycle Bin” button. Suddenly, a cold chill runs down your spine. You realize that the report was tucked inside one of those deleted folders. Your screen is clear, the bin icon is empty, and your hard work seems to have vanished into the digital void.
This scenario is a nightmare for students, professionals, and home users alike. However, before you resign yourself to starting from scratch, you need to understand one vital truth: in the world of computing, “deleted” does not mean “destroyed.” Mastering how to recover deleted data from recycle bin is a skill that can save your career and your memories. This article will demystify the science of data retrieval and provide you with a toolkit to bring your files back to life.
Part 1: The Library Analogy—Understanding Data Recovery Physics
To effectively learn how to recover deleted data from recycle bin, you must first understand what happens behind the scenes of your Operating System (OS).
Think of your computer’s hard drive as a massive Library. Every file you save is a Book, and the File System (like NTFS or FAT32) acts as the Library Catalog.
When you move a file to the Recycle Bin, the library simply moves the book to a “temporary holding room.” When you empty the bin, the computer does not burn the book. Instead, it simply takes a black marker and crosses out the entry in the Library Catalog. The computer then tells itself, “The shelf space where that book sits is now officially empty; I can put a new book there whenever I want.”
As long as the computer hasn’t placed a “new book” on that exact shelf space (a process known as overwriting), the old book—your data—is still physically there. Data recovery tools work by bypassing the “Catalog” and scanning the “Shelves” directly to find books that have lost their entries. This is the fundamental logic behind how to recover deleted data from recycle bin.
Part 2: Critical “Dos and Don’ts” Before You Start
Before we dive into the steps of how to recover deleted data from recycle bin, you must follow these rules to avoid permanent data loss:
- STOP WRITING DATA: Do not download new software, stream videos, or move other files to the drive where the data was lost. New data is the “new book” that will crush your old one.
- DO NOT REBOOT REPEATEDLY: Each boot cycle creates temporary files that might overwrite your targets.
- ACT FAST: The longer you wait, the higher the chance that background system processes will overwrite your deleted sectors.
Part 3: Step-by-Step Methods to Restore Your Files
Method 1: The “Ctrl + Z” and Basic Bin Check
It sounds simple, but many users overlook the most immediate fix. If you haven’t closed your folder window yet, Windows keeps a short-term memory of your actions.
- Step 1: Open the folder where the file was originally located.
- Step 2: Press Ctrl + Z on your keyboard simultaneously. This is the global “Undo” command.
- Step 3: If that fails, double-click the Recycle Bin icon. Type the file name in the search bar at the top right. If found, right-click and select Restore.
Method 2: Professional Rescue with PandaOffice Drecov
When the bin is truly empty, you need a professional engine to scan the “shelves” of your hard drive. PandaOffice Drecov is a premier tool designed for high-success rate retrieval. It is particularly effective for those wondering how to recover deleted data from recycle bin after a permanent “Shift + Delete” operation.
Why PandaOffice Drecov? It uses a proprietary “Deep Sector Analysis” that can reconstruct file fragments even if the file system is partially corrupted.This makes it an indispensable tool for a wide range of data loss scenarios, including:
- Accidental Desktop Deletions: Instantly retrieving files wiped from your local workspace.
- Disk Formatting Errors: Salvaging files from drives that have been completely wiped or reformatted.
- External Media Rescue: Recovering lost data from formatted or corrupted SD cards and USB flash drives.
- Sync Conflict Resolution: Reversing data loss caused by synchronization errors between your PC and the OneDrive cloud.
- Browser Metadata Recovery: Restoring lost Chrome bookmarks and other essential application data.”
Important: If your lost data was on the C: drive, install the software on a USB flash drive to prevent overwriting the lost sectors.
- Step 1: Select LocationLaunch the program. On the main dashboard, you will see various drive icons. Select the Recycle Bin shortcut or the specific partition (e.g., Local Disk C:) where your files resided.

- Step 2: Run the Deep ScanClick the “Scan” button. The software will perform a “Quick Scan” first, then automatically transition to a “Deep Scan.” This may take several minutes depending on your drive size.

- Step 3: Filter and PreviewPandaOffice Drecov organizes found items by file type (Photos, Documents, Videos). Use the Preview function to see if the file is intact. If you can see the image or read the text in the preview, the recovery will be 100% successful.

- Step 4: Execute RecoveryCheck the boxes next to your files and click Recover.
⚠️ CRITICAL WARNING: Never save the recovered files back to the same drive they were lost from. Save them to an external drive or a different partition.
Method 3: Leveraging Windows File History
If you had the foresight to enable “File History” in your Windows settings, you have a built-in time machine. This is a highly effective way to address how to recover deleted data from recycle bin without third-party software.
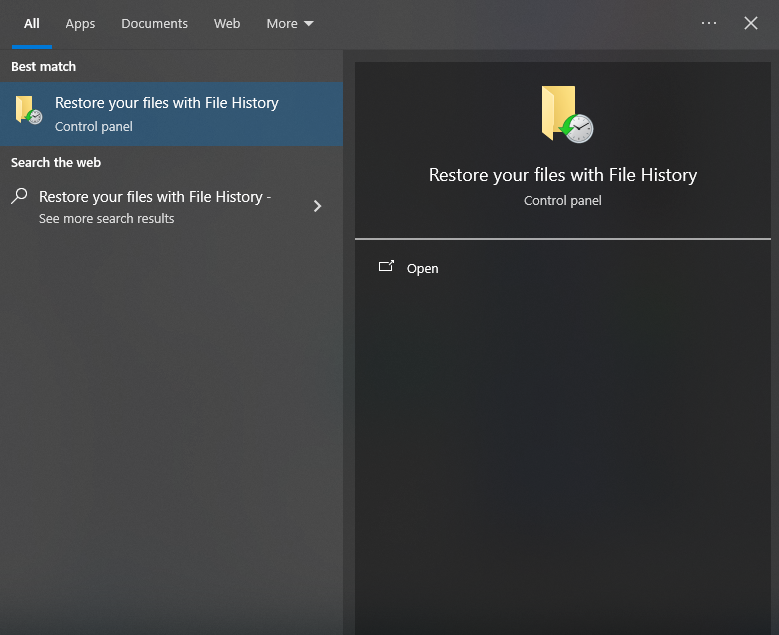
- Step 1: Click the Start menu and type “Restore your files with File History” and press Enter.
- Step 2: A window will appear showing different “versions” of your folders. Use the left and right arrows at the bottom to browse through different points in time.
- Step 3: Navigate to the folder that contained your file.
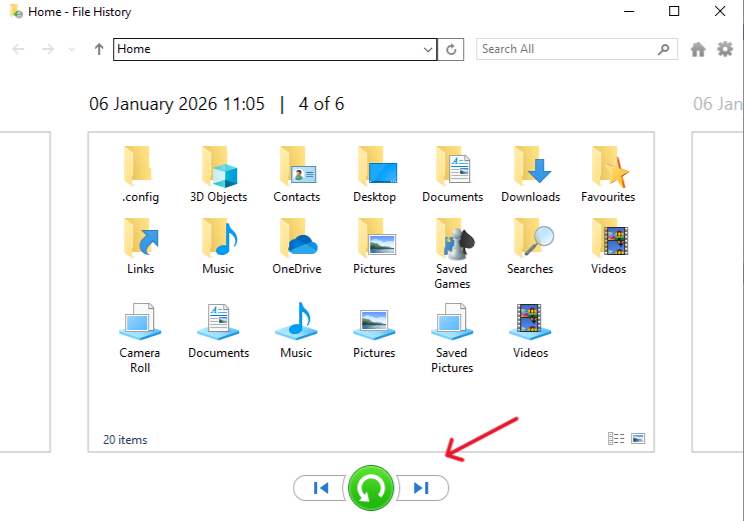
- Step 4: Select the file and click the green Restore icon. Windows will place it back in its original home.
Method 4: The Shadow Copies (Previous Versions)
Windows often creates “Restore Points” during system updates. These points sometimes contain “Shadow Copies” of your files.
- Step 1: Right-click the folder where your deleted file used to live.
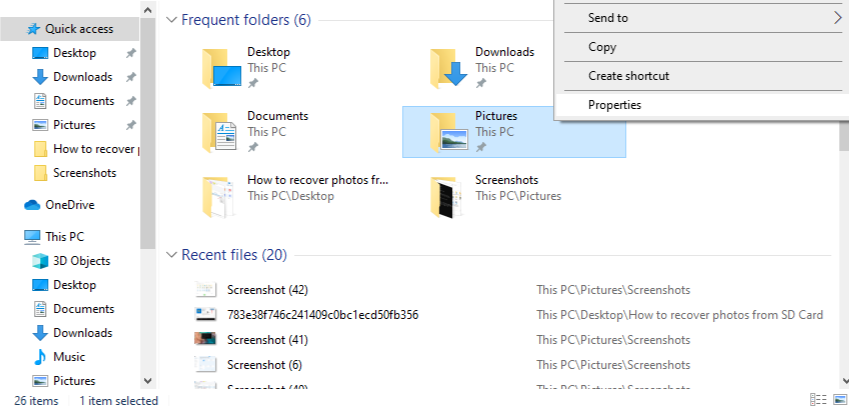
- Step 2: Select Properties and then click the Previous Versions tab.
- Step 3: If there are versions listed, select the one dated before the deletion.
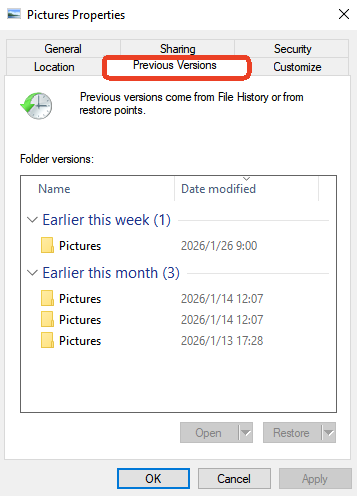
- Step 4: Click Open to verify the file is there, then click Restore.
Method 5: Windows File Recovery (The Command Line Method)
For tech-savvy users, Microsoft provides a free tool in the Microsoft Store called “Windows File Recovery.” This tool does not have a graphical interface and uses the command line.
- Step 1: Download Windows File Recovery from the Microsoft Store.
- Step 2: Open the app (it will open a Command Prompt).
- Step 3: Enter the following command:
winfr C: E: /regular /n \Users\<YourUsername>\Documents\(This command tells Windows to scan the C: drive and save found files to the E: drive). - Step 4: Press Y to start the scan.
Part 4: Comparing Recovery Methods
To help you decide how to recover deleted data from recycle bin based on your specific situation, refer to the table below:
| Recovery Method | Complexity | Success Rate | Best Use Case | Key Advantage |
| PandaOffice Drecov | Low | Very High | Empty Bin, Formatted Drive | Deep sector scan; file preview. |
| Ctrl + Z / Restore | Very Low | Low | Immediate accidental delete | No software needed. |
| File History | Medium | High | Pre-configured backup users | Built into Windows. |
| Previous Versions | Medium | Medium | System restore points exist | Restore entire folder states. |
| WinFR (CMD) | High | Medium | Tech-savvy users | Official Microsoft free tool. |
Part 5: Proactive Prevention—Never Lose Data Again
Learning how to recover deleted data from recycle bin is a reactive solution. To be proactive, follow these steps:
- Adjust Recycle Bin Settings: Right-click the Recycle Bin -> Properties. Increase the “Maximum Size” so larger files aren’t permanently deleted immediately.
- Enable File History: Go to Settings -> Update & Security -> Backup. Turn on “Automatically back up my files” using an external drive.
- Use Cloud Sync: Use OneDrive or Google Drive. These services have their own “Secondary Recycle Bins” that keep files for 30 days even if you empty your local bin.
- The 3-2-1 Rule: Keep 3 copies of your data, on 2 different devices, with 1 copy off-site (cloud).
How to recover deleted data from recycle bin FAQs
1.Can I recover files if the Recycle Bin icon is missing?
Yes. The files are still on the disk. Use PandaOffice Drecov to scan the entire partition. To bring the icon back, go to Settings > Personalization > Themes > Desktop icon settings.
2.Does “Shift + Delete” make files unrecoverable?
No. It simply bypasses the Recycle Bin. You can still use the professional methods described in how to recover deleted data from recycle bin to find the data on the drive sectors.
3.How much does PandaOffice Drecov cost?
It offers a free trial that allows you to scan and preview files. This ensures you only pay for a license if the software actually finds your data.
4.Can I recover data from a Solid State Drive (SSD)?
This is harder due to a feature called TRIM. If you have an SSD, you must act immediately and use a tool like PandaOffice Drecov before the TRIM command wipes the data blocks.
Conclusion
Understanding how to recover deleted data from recycle bin is like having a digital insurance policy. Whether you use the simple “Undo” command, the built-in Windows File History, or the powerful deep-scanning capabilities of PandaOffice Drecov, your files are rarely truly gone.
The most important takeaway is to stop using the drive immediately once you notice a loss. By following the structured steps in this guide—starting with basic checks and moving toward professional software—you can navigate even the most stressful data loss scenarios with confidence. Remember, the best recovery strategy is a strong backup habit, but when that fails, tools like PandaOffice Drecov are your ultimate safety net.


