







Treat SQLite recovery as a controlled data salvage
To recover a corrupt SQLite database, preserve a consistent copy of the database and its related journal files, then compare existing backups before using native salvage tools. Do not start by deleting a WAL file or running cleanup commands on the only source. The correct first step depends on whether the problem is corruption, missing committed transactions, a locked database, or an application that expects a different schema.
SQLite’s native tools can extract useful data, but a recovered database still needs structural and application checks. A file that opens can contain missing, duplicated, or altered records. Therefore, separate successful extraction from acceptance of the result. This guide focuses on working copies, existing backups, preserved WAL state, and native salvage rather than promising a perfect reconstruction from every damaged file.
Establish a consistent recovery source
Stop the application from writing to the affected database through its normal shutdown or maintenance process when appropriate. If the database must remain live, use a supported consistent backup method rather than copying an actively changing file piecemeal. Record the application, database path, SQLite environment, and exact error. Then preserve the source before opening it with tools that may change journal state.
Keep existing matching database sidecars with the source, especially a WAL file when present. Do not combine a database from one time with a WAL copied from another unrelated state. A consistent backup or storage snapshot is preferable to a casual live-file copy. Also preserve a separate untouched copy so that each recovery experiment starts from known evidence rather than the output of the previous attempt.
Free route 1: validate an existing consistent backup
- Locate an existing application-supported or SQLite-consistent backup from before the failure.
- Restore it into a separate test directory rather than over the production database.
- Open it with the appropriate application or SQLite environment and run structural checks.
- Compare important records and application behavior before selecting it as a recovery baseline.
An existing backup can be more reliable than salvaging damaged pages, but its age matters. Compare its latest expected records with the interruption time. Then identify which later transactions are missing. A clean database from yesterday may be useful without being current enough for the intended task. Keep the damaged source while evaluating whether newer valid data can be recovered separately.
Check the backup’s actual identity
Inspect the expected tables and a small set of known records. Also compare any application version or schema metadata that the software uses. A file with the right extension can belong to another profile or an older application release. Do not let the application migrate the only backup before you preserve it, since migration can change the structure you wanted to assess.
If several backup candidates exist, record their provenance and content milestones. For example, note whether a specific completed import or edited record appears. File modification times help sort candidates but do not establish transaction completeness. The database’s actual contents and the application’s expectations determine whether the backup is a suitable baseline.
Free route 2: preserve a matching WAL state
- Preserve a consistent set containing the database and its existing matching sidecar files.
- Keep an untouched source set and create a separate working set for inspection.
- Open the working set in an appropriate SQLite environment without deleting or substituting its WAL.
- Verify the expected committed records and create a new consistent backup of any usable result.
A WAL is part of the database’s persistent state when it contains relevant transactions. Separating it from the database can lose committed changes or produce an inconsistent result. However, finding a WAL does not automatically mean it contains the missing records. The database and WAL must belong together, and the result still requires validation. Do not attach an unrelated WAL simply because its basename looks similar.
Do not use journal cleanup as a first repair
Deleting sidecars, forcing a checkpoint, or changing journal mode can alter useful evidence. Preserve the original state before considering such operations, and use the application’s supported process when necessary. A lock or busy error also does not prove corruption. Determine whether another process still holds the database before trying to rebuild its contents.
Work on a separate directory where you can track which files SQLite changes during opening. Then compare the logical data with the expected state. If the working set becomes usable, create a proper consistent output rather than copying only a selected file while connections remain active. This preserves a clear boundary between source evidence and an accepted recovered database.
Free route 3: run SQLite’s native recovery on a copy
- Obtain an official SQLite command-line shell that provides the .recover capability.
- Open a working copy of the damaged database in the shell.
- Direct .recover output to a new SQL file, preserving the original database unchanged.
- Read that SQL into a new, separate database and record all reported errors.
For an interactive example, start sqlite3 with a copied database named working.db. Inside that shell, use .output recovered.sql, then .recover, then .output stdout, and finally .quit. These are separate commands entered one at a time. Next start sqlite3 with a new destination named recovered.db and use .read recovered.sql. Choose unused output names so that an earlier recovery attempt remains available for comparison.
Review the salvage output before acceptance
Native recovery tries to extract usable content from damaged structures. It can also revive previously deleted material or place uncertain records in a lost-and-found table. Therefore, review its output and errors rather than treating a completed command as proof of correctness. Keep the SQL output and notes alongside the recovered database so that you can trace what the salvage process supplied.
For confidential or application-sensitive data, do not import a salvage result directly into live service. Test it separately with representative records and relationships. Reappearing deleted rows or changed values can matter even when the database passes a structural check. The appropriate acceptance decision depends on the data’s meaning, not merely whether a query returns results.
Free route 4: export readable content selectively
- Open only a working copy with an appropriate SQLite tool.
- Identify tables or queries that remain readable without errors.
- Export the useful records with their column definitions and relevant relationships documented.
- Import them into a separate reconstruction database and validate the result.
Selective export can help when a complete salvage produces too much uncertainty or one damaged area prevents ordinary use. However, it may omit constraints, indexes, triggers, views, or unreadable rows. Keep that scope explicit. A CSV containing some records is useful data salvage, but it is not a complete restoration of the application’s original database.
Preserve types and relationships
Text export can change how values are represented, especially for nulls, binary fields, dates, and numeric identifiers. Record the original schema and inspect the import behavior. Also compare primary and foreign key relationships where relevant. A readable table can become misleading if its identifiers no longer connect to the associated records in another table.
For example, salvaged attachments may need metadata rows that identify their owning items. Recovering only the attachment filenames can leave a folder of unassigned files. Preserve the relationship evidence and compare it with known records. If you cannot establish a reliable connection, label those items as uncertain rather than inventing associations to make the application appear complete.
Run structural checks on the recovered copy
Use PRAGMA integrity_check; in the appropriate SQLite environment to assess the recovered database’s structural consistency. Then use PRAGMA foreign_key_check; when foreign-key relationships are relevant. Record the actual results and any errors. These checks answer different questions, and passing one does not establish that all business or application rules hold.
Add checks that match the data’s meaning
Compare expected table counts, important identifiers, and representative record values with reliable external evidence. Also test joins and application workflows that rely on relationships between tables. A database can be internally consistent while missing an entire recent import. Conversely, an unexpected row count can reflect revived deleted material rather than successful recovery of the intended current state.
Check text encoding, binary content, and required values in a sample that covers the application’s main data types. Then inspect the relevant boundary cases, such as the latest records before the failure. This makes acceptance more meaningful than running a single query against a convenient table and assuming the rest of the database behaves the same way.
Distinguish corruption from an incompatible environment
An application can reject a valid database because it expects another schema, a required extension, or an encrypted format. Record the exact environment and error before selecting a recovery tool. A generic SQLite shell cannot necessarily read a database that requires a specific encryption implementation. Changing the filename or repeatedly running salvage will not supply the missing key or extension.
Keep application migration separate
If a newer application proposes a migration, preserve the source first and test migration on a separate candidate. Then compare the resulting schema and important records. A migration can succeed while changing behavior, so it deserves its own acceptance check. Do not confuse a newly migrated file with an untouched recovered historical database.
Also investigate ordinary access problems such as permissions, unavailable storage, or another process holding a lock. These can prevent opening without implying page corruption. Resolve the specific access issue in the normal supported way. Rebuilding a valid database to address a path or permission problem adds unnecessary uncertainty to data that may already be intact.
A worked recovery for a damaged local catalog
Suppose a local catalog reports a database error after an interrupted write. Preserve a consistent source set and compare the latest supported backup first. Identify whether the backup contains the most recent important items. If it does not, run native salvage on a separate damaged-copy candidate and inspect the recovered records rather than replacing the catalog immediately.
Reconcile valid records carefully
The backup may supply a clean schema and stable older records, while salvage supplies some recent entries. Compare identifiers and related tables before any merge. Do not append every salvaged row blindly, since deleted or duplicated content may reappear. Build a separate test result and record which data came from the backup and which came from uncertain salvage.
Then open the result in a test application profile and exercise representative workflows. Check item display, search, attachment access, and editing as appropriate. Keep the source evidence and rejected candidates separate. A successful launch is only one part of acceptance; the application must also use the recovered relationships and content correctly.
Avoid destructive experiments on the only source
Do not begin with VACUUM, schema rewrites, or cleanup commands on the damaged original. Such operations can change pages or remove information that another recovery attempt might use. Preserve the original and use a fresh working copy for each distinct approach. Keep command output and candidate names so that a failed experiment does not become an unexplained new baseline.
Know the limits of page salvage
Missing or overwritten pages can make some information permanently unavailable. Native salvage may also recover values without enough context to identify their original table reliably. State those gaps instead of filling them with guesses. A smaller verified dataset can be more useful than a larger output whose records cannot be trusted or associated correctly.
If the database supports important operational decisions, have the responsible data owner review the acceptance criteria. The technical checks establish readability and consistency, while the owner can compare the content with the real-world records it represents. This is a practical division of verification work, not a reason to claim that a structurally clean database must be accurate.
Define record-level acceptance before merging salvage
Choose representative records that establish whether the recovered database contains the intended state. Include a known older record, a recent record, and a relationship involving another table. Then compare their values with reliable application evidence. This turns a vague claim of successful recovery into a concrete content check and helps identify a clean-looking database that still lacks important recent transactions.
Compare identifiers and values together
A familiar record identifier does not guarantee that its associated values survived correctly. Inspect important text, numeric fields, nulls, and binary references where relevant. Then check related rows. A parent record can survive while its child rows disappear, or a salvaged row can lose the relationship that gives it meaning. Keep uncertain associations separate rather than inventing links to make the application display look complete.
When reconciling a clean backup with salvaged recent rows, document the source of each imported group. Compare keys before insertion and inspect potential duplicates. Do not assume that all records absent from the backup are valid new records; salvage can revive previously deleted content. A controlled merge should preserve the clean baseline and create a separate test result that you can inspect before replacing any working database.
Review schema objects as well as table rows
A usable application database may rely on indexes, views, triggers, constraints, and metadata in addition to visible records. Inventory the expected schema in a known backup or supported application reference. Then compare the recovered candidate. Missing schema objects can cause errors or changed behavior even when a simple table query succeeds, so record the differences before testing the application.
Distinguish a missing index from missing logical data
Some damage can affect access structures without destroying every underlying record, while other damage removes content itself. Do not infer the scope from one error message. Inspect native check results and compare readable data on a working copy. Any rebuilding action should have a clear target and a preserved source, because a broad rewrite can change evidence without resolving the actual application problem.
Also inspect application metadata that identifies schema version or profile ownership. A technically valid database from another profile may be unsuitable even if its table names match. Keep the application’s expected context in the acceptance record. This avoids promoting a structurally clean but semantically wrong candidate simply because it opens in a generic SQLite browser.
Interpret lost-and-found content cautiously
Native salvage may extract records that it cannot confidently associate with their original table. Preserve that output, but do not immediately insert it into whichever table has a similar number of columns. Compare types, identifiers, and known content, and keep uncertain rows isolated. The missing structural context can be as important as the recovered values themselves.
Record uncertainty at the smallest useful scope
You may be able to verify one recovered item while leaving another unresolved. Keep those decisions separate. For example, a recognizable note body may be useful as text salvage even when its original folder relationship cannot be established. Label it accordingly rather than assigning it to an invented location. This preserves valuable information without turning uncertainty into misleading application state.
If the data owner can compare the salvage with authoritative records, provide a clear candidate list and the relevant source details. Keep the untouched SQL output and database copies as evidence. A later review may resolve an association that is unclear now, and preserving the raw salvage prevents an early reconstruction decision from becoming the only remaining interpretation.
Test the application in a separate profile or workspace
After structural checks, use a supported non-production environment to inspect the recovered database. Exercise representative read and edit workflows, then compare the resulting records. This catches expectations that a generic SQLite check cannot express, such as required metadata or relationships enforced by application logic. Keep the test environment’s changes separate from the accepted recovery candidate.
Inspect behavior after reopening
Close the test application normally and reopen the same candidate. Then inspect the important records again. Some problems appear only when the application saves state, rebuilds a cache, or reloads relationships. A single successful launch is therefore an incomplete acceptance test. Record any new warnings and compare the database state before deciding whether the candidate is ready for continued use.
Finally, create a supported consistent backup of the accepted result and test that backup independently. Retain the original damaged source, matching sidecars, salvage output, and acceptance notes separately. If the recovery remains partial, identify the missing or uncertain records plainly. This gives you a reliable operational baseline while preserving the evidence needed for any later reconstruction or specialist investigation.
Keep file recovery separate from transaction acceptance
A recovered database filename is an input to logical assessment, not a statement that every transaction survived. Compare the actual records and relationships that define the intended application state. Then record which tests passed and which gaps remain. This distinction is especially useful when a file scan supplies several candidates with plausible dates but different contents or incomplete sidecar context.
Preserve repeatable recovery steps
Use a new working copy for each distinct salvage approach and record the output names. Keep the tool version and relevant options with the results. Then compare the candidates using the same record-level checks. This makes the investigation reproducible and prevents an apparent improvement from depending on an undocumented change made during a previous failed attempt.
If you ultimately choose a clean older backup over a larger salvage result, state why. Verified relationships and known content can be more useful than additional uncertain rows. Preserve the salvage separately for later review rather than forcing every extracted value into the accepted database. This gives you a trustworthy baseline while retaining potentially valuable information that still needs interpretation.
When deleted-file recovery can help SQLite data
PandaOffice Drecov is relevant when a saved database, matching existing journal file, or consistent backup was deleted from accessible storage. It does not replace SQLite’s logical salvage tools or recreate overwritten transactions. Also reduce writes to the affected storage. If the device itself reports repeated read failures, assess that condition before running a routine deleted-file scan.
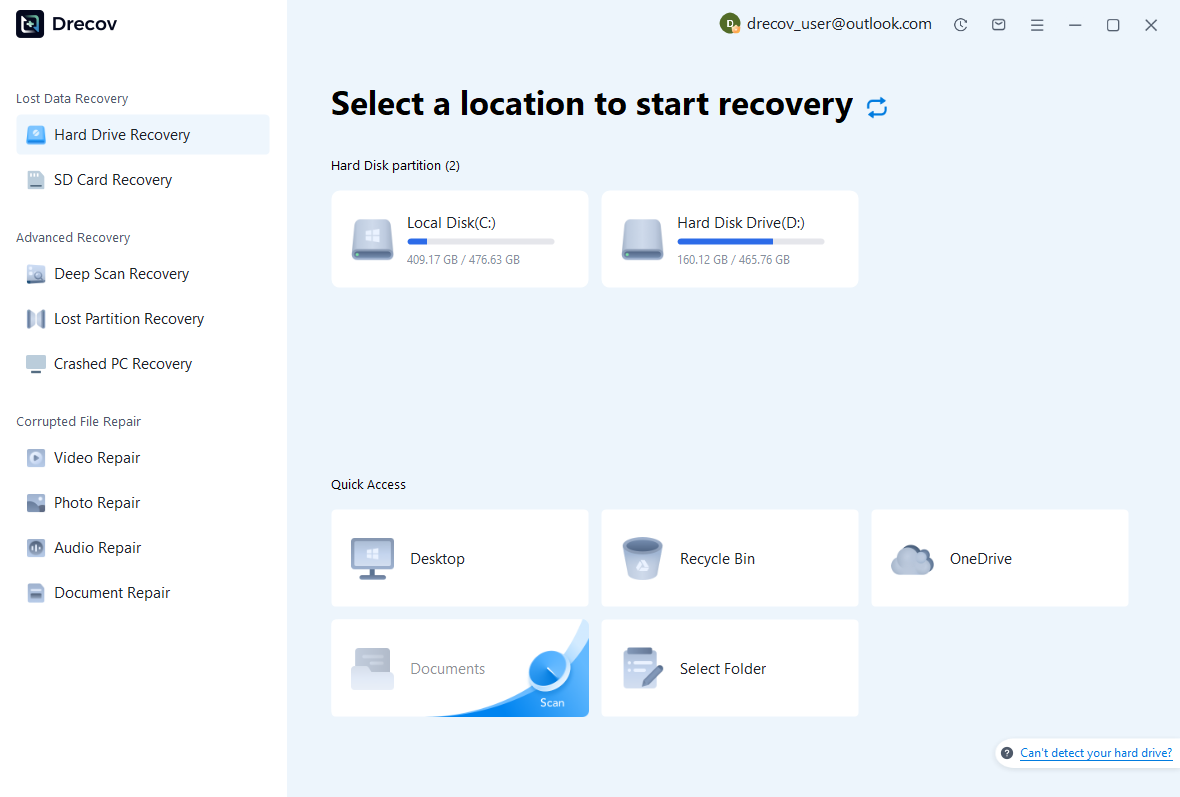
Step 1: identify the original database storage
Choose the drive or partition that held the application database and its actual backup location. Record the original basename and any sidecars that existed with it. Keep recovery output on other healthy storage. Avoid launching the application against the affected location merely to generate another error, since that may create new files or change surviving journal state.
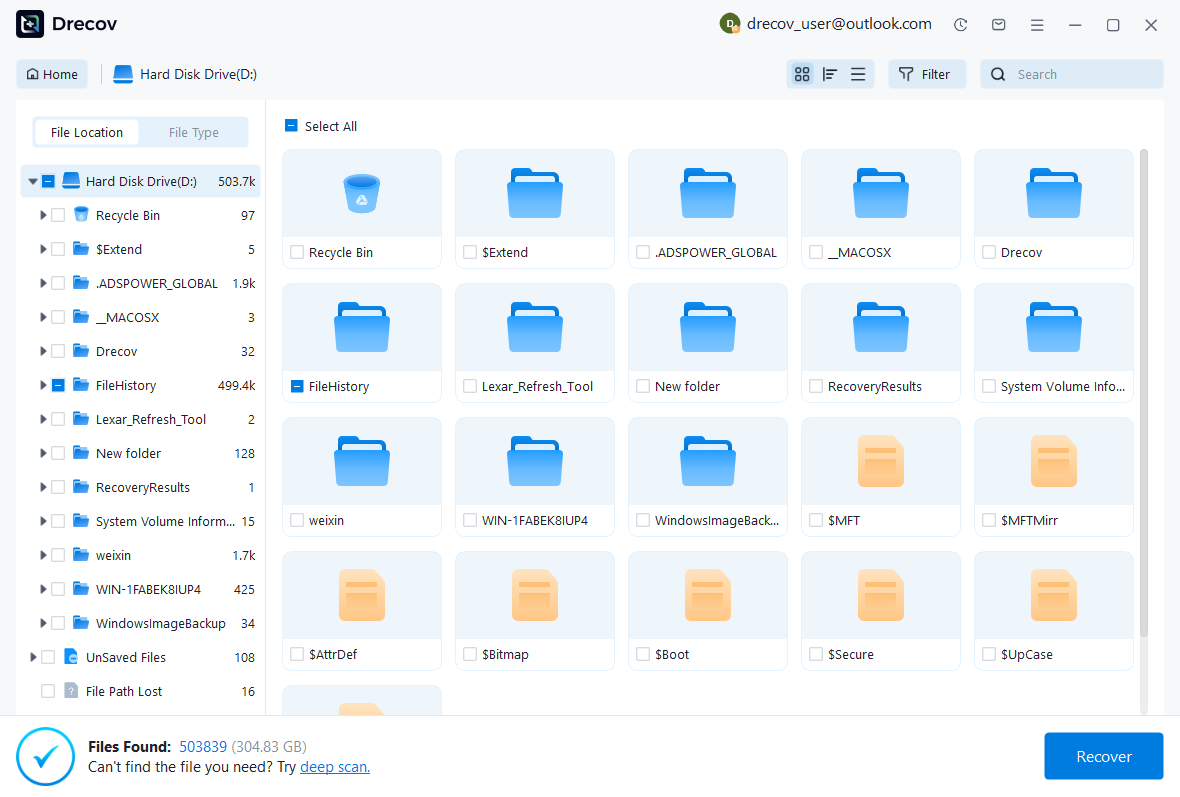
Step 2: collect coherent database candidates
Review available names, paths, sizes, and dates for the database and related files. Preserve several plausible candidates without combining unrelated versions. A scan cannot establish transactional consistency from a filename alone. Keep source details and treat recovered database-plus-sidecar sets as candidates that need SQLite and application validation afterward.
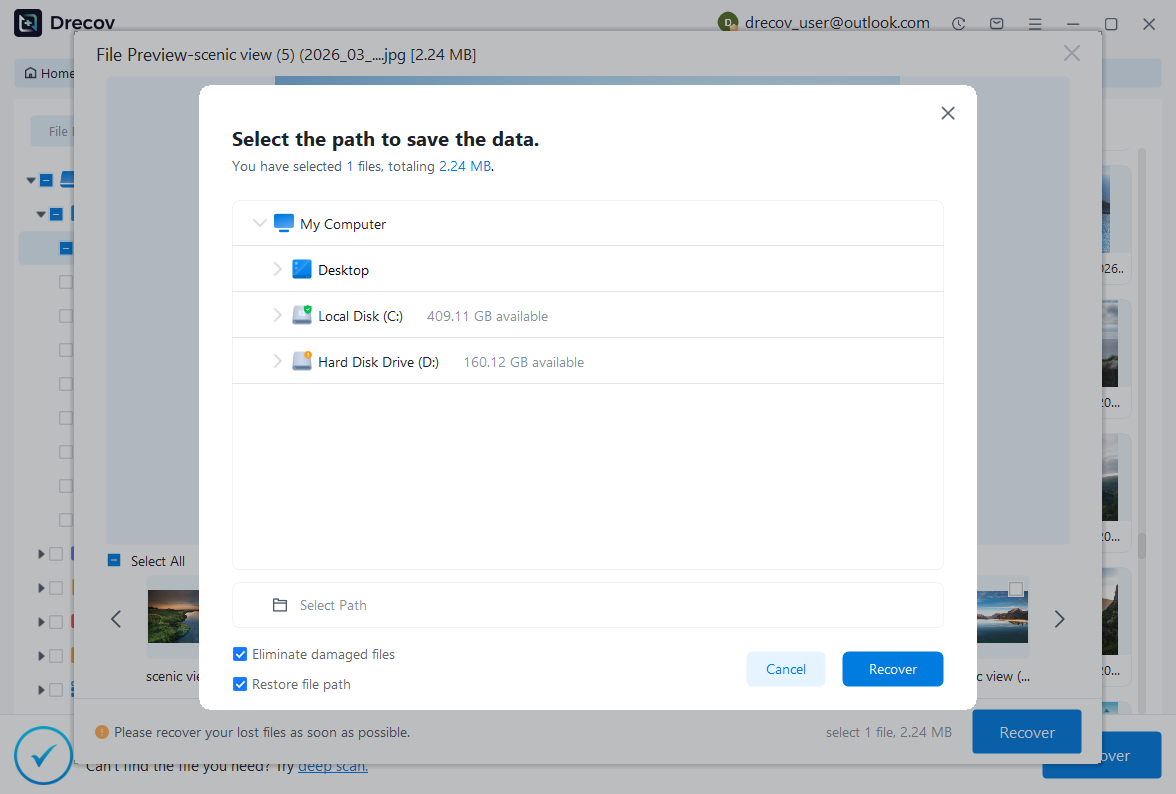
Step 3: recover elsewhere and validate logical content
Restore selected files to a separate destination, preserve an untouched recovered set, and inspect another working copy. Compare existing backups, run suitable native checks or salvage, and test important records and relationships. Do not return an unvalidated recovery directly to service. A complete filename and a successful file restore do not prove that the intended transactions survived.
Document the accepted database and remaining uncertainty
Record the source candidate, tools, commands, errors, checks, and application tests used for the accepted result. Keep the recovered database separate from SQL salvage output and original evidence. Then create a supported consistent backup of the verified state. This gives the next maintenance task a reliable baseline instead of a collection of ambiguous database copies.
Test future backups as actual restores
Use a non-production example to test the application’s backup and restore procedure. Verify that the output opens independently and contains the expected recent records. Also document how the application uses WAL and where its backup belongs. A practical restore test provides evidence that the protection works, while merely copying a visible database filename may overlook part of its persistent state.
If some records remain missing or uncertain, list them explicitly. A partial salvage can still recover valuable information, but it should not become an unqualified claim of complete restoration. Clear limits help you decide whether to reconstruct from other authoritative records, retain the result for reference, or continue a specialist investigation.
Related recovery resources
Explore the relevant recovery options: Hard drive recovery, External hard drive recovery.
For another recovery case and its practical checks, read the related recovery guide.
Check the vendor guidance for the installed version: official recovery documentation 1, official recovery documentation 2, official recovery documentation 3, official recovery documentation 4.





