







Recover the publication and its resources as separate parts
To recover Affinity Publisher files, preserve the native document and inspect its resource status before rebuilding pages. A missing linked image can remain visible as a preview while the source is unavailable. Conversely, an embedded image can survive inside the document without an external original. Therefore, identify the actual missing component before treating every warning as loss of the whole publication.
This guide uses the documented Publisher 2 workflow. Other releases may place controls differently, so inspect the installed version. Native recovery and packaging can help an existing eligible user without buying an additional recovery utility. They do not establish that the application or every required font and asset is free to use.
Record the intended publication revision
Write down the native path, page count, and a distinctive recent change such as a replaced photograph or corrected headline. Then preserve the document and its asset folders. These details help you compare candidates that look similar on the first page. A publication can open successfully while representing an older text or image revision.
If useful pages remain open, save a separate native copy before restarting solely to investigate. Also preserve any available recovery data and existing package. Keep the originals unchanged while repairing references in a working copy. This protects a useful preview, embedded asset, or historical document from being replaced during an uncontrolled update.
Native route 1: relink an existing missing resource
- Open a copied publication and inspect the Resource Manager.
- Identify the missing resource, its placement type, and the page where it is used.
- Locate the exact surviving source and use the appropriate Relink control.
- Compare every affected placement, crop, and output before accepting the repair.
Relinking restores access to an asset that still exists. It does not recreate a deleted original from the displayed preview. Also distinguish a missing file from a modified linked file. Updating a modified resource can replace the publication’s appearance with a newer external version, so preserve the current document and establish which asset revision you actually intend to use.
Check repeated placements of one source
The same resource can appear on several pages with different crops and scales. Inspect each important placement after relinking. A correct source can still reveal a crop or resolution issue in one use. Then compare a fresh PDF at the intended output size, because a small page preview can hide quality differences that matter for publication.
If an entire asset folder moved, repair a known exact source first and inspect any related automatic matches. Do not accept every similarly named image without checking content. A file from another edition can remove the warning while changing the publication. Keep uncertain matches separate until you establish their identity and revision.
Native route 2: reopen an existing package
- Locate a package created at the relevant publication milestone.
- Preserve it and open a working copy in a separate recovery location.
- Inspect the native document and the resources the package actually includes.
- Compare pages, text, images, fonts, and output before adopting the package as the baseline.
A package can preserve a useful portable checkpoint, but it may predate later corrections or omit a required dependency. Inspect its actual contents rather than assuming every package is complete. Also keep font availability and usage rights separate from image collection. Resource collection alone does not automatically supply the publication’s entire typography environment.
Compare the edition rather than the cover alone
Inspect a distinctive interior page, the final page, and the specific correction that motivated recovery. A familiar cover can appear in several editions with different text or pagination. Keep the package and current document separately until you decide whether to adopt the older baseline or transfer verified later content into a new recovery version.
If you combine sources, inspect text flow, image placement, and master-page relationships afterward. A copied frame can behave differently in another layout context. Save the result under a new native name and record which source supplied the content. This keeps reconstruction visible instead of presenting a merged publication as an untouched historical edition.
Native route 3: preserve surviving embedded assets
- Inspect the resource’s placement type in a copied native document.
- Determine whether the useful image or placed document is embedded and still readable.
- Use a supported resource workflow to preserve a separate copy where available.
- Compare the extracted or reused asset’s quality and content with the publication requirement.
An embedded asset can remain useful even when the original external file is gone. However, its role and quality need verification. A displayed preview of a missing linked file is not equivalent to a complete embedded original. Inspect the Resource Manager and actual output rather than assuming that anything visible on the page can supply full production-quality source data.
Keep source quality separate from page appearance
Inspect dimensions, placed resolution, transparency, and the part of the image used in the layout. A resource can look adequate on screen while being insufficient for the intended print size. Preserve useful salvage as a candidate, but record the quality limit. This prevents an emergency preview from silently becoming the replacement original for later large-format work.
For a placed document, inspect whether its content remains usable for the required revision. A flattened or limited representation may preserve appearance without the original editing controls. Keep the native publication and the recovered resource separately so that later work can choose the appropriate source rather than assuming complete editability.
Native route 4: inspect an available document recovery
- Preserve the native file, existing package, and available recovery candidates before cleanup.
- Reopen the relevant publication in an appropriate application version and inspect any recovery offer.
- Compare the candidate’s pages, text, and distinctive recent change.
- Save the useful result under a new native name and verify its external resources.
Crash recovery depends on usable data from the interrupted session. It is not a guarantee that every unsaved correction survives. Also inspect the recovered file’s resource references. A newer text state can still point to missing external images, so document recovery and asset recovery remain related but separate tasks.
Check story flow after recovery
Inspect linked text frames, overset text, section starts, and the final paragraph of important stories. A publication can preserve page objects while changing where the text flows. Compare a reliable PDF or editorial reference where available. The actual text and pagination provide stronger evidence than a correct-looking first page.
Then save, close, and reopen the native recovery. Inspect any remaining resource or font warnings before exporting. This confirms that the saved document supports continued work outside the previous session. Keep unresolved dependencies listed rather than treating a successful file-open result as complete publication recovery.
Use a PDF as a reference with explicit limits
An existing PDF can preserve page appearance, text, and images for review or reconstruction. It does not automatically restore the original frame links, styles, master-page relationships, or editable resource setup. Identify the PDF’s edition and the information it actually contains before using it to rebuild a native publication.
Compare text as well as visual layout
Inspect the corrected wording, captions, page numbers, and final paragraphs. A visually similar PDF may predate a late editorial change. If you reconstruct a text frame from its contents, review punctuation, line breaks, and reading order. Keep the PDF as evidence and save the rebuilt publication separately from any recovered native candidate.
For images recovered from a PDF, inspect their actual resolution and compression. They can be useful salvage while differing from the original placed sources. Do not assume that a clean page preview proves an extracted image will support a larger placement. Record the role and limit of each reused asset.
Diagnose blurred images without deleting useful placements
Inspect whether the resource is missing, modified, linked, embedded, or simply displayed at a lower preview quality. Then compare a fresh export at the intended output size. A blurred screen preview can coexist with a valid original, while a missing linked source can leave only a limited preview. Those cases need different actions.
Preserve crops while repairing the source
Use the supported relink workflow rather than deleting the image frame immediately. A frame can preserve useful crop and placement decisions even when its source moved. After repair, compare scale, rotation, crop, and any repeated use. Replacing the whole frame can discard those relationships and create unnecessary layout reconstruction.
If the exact source is unavailable, keep the existing placement as a reference and identify a deliberate replacement separately. A new image may be acceptable editorially, but it is a content change rather than recovery of the original asset. Record that distinction so the recovered publication’s revision history remains understandable.
Check typography and preflight after recovery
A missing font can change line endings, page count, and text flow without removing the words. Inspect the intended font environment and relevant font warnings. Then run the publication’s preflight checks and review their actual findings. A clean-looking page alone does not establish that every text story fits or every resource meets the output requirement.
Review the final pages and difficult layouts
Inspect dense tables, captions, footnotes, and the end of long text flows. These areas can expose changes that remain unobvious on simple pages. Also compare any page that received a reconstructed asset or text block. The recovery acceptance should target the publication’s actual complexity rather than a generic check of the cover and page count.
Generate a fresh PDF into a new output directory and inspect it independently. Keep that PDF associated with the accepted native milestone. Mixing an older proof with a newly recovered document can create confusion even when both files open normally. A clear edition label connects the visible output with the source you intend to continue editing.
A worked recovery for a moved magazine project
Suppose a publication opens with familiar pages after a folder move, but several linked photographs are missing. Preserve the native document and inspect one known resource. Relink the exact original, compare its placements, and then review related repairs. This restores source access while preserving useful crop and layout decisions.
Resolve later editorial differences separately
If an existing package contains the images but older text, keep it as an asset source while preserving the current document. Reconnect verified resources in a new recovery copy, then compare the corrected headline and final story paragraphs. This avoids discarding valid editorial work merely because an older portable package opens with fewer warnings.
Finally, inspect preflight, text flow, and a fresh PDF. Record any substituted image or typography change as a new revision decision. The result should preserve a useful publication baseline while making remaining content gaps visible to the next editor or designer.
Build a Publisher acceptance check around one editorial change
Identify the correction that distinguishes the intended edition, such as a revised headline, replaced photograph, or added paragraph. Then inspect that change in each native candidate and any reference proof. A correct-looking cover can appear in several editions with different interior content. This editorial comparison gives you a stronger basis for selecting the recovery than the file’s modification time or the number of pages it displays.
Inspect the changed story through its final frame
For a text correction, compare the beginning of the story, the edited passage, and its final paragraph. Then inspect linked frames and overset indicators. A recovered document can preserve the words while changing text flow, so a page count alone is insufficient. Keep a reliable proof beside the native candidate and identify whether differences are editorial changes, font substitutions, or layout relationships that still need repair.
Also compare captions and cross-references around a replaced image. A resource repair can restore the picture while leaving an older caption or reference in place. This is a content mismatch rather than a file-read error. Review the actual publication relationship before accepting the page, and record any newly corrected wording separately from direct recovery of the historical native source.
Repair resources while preserving their placement decisions
A missing linked resource can leave useful frames, crops, and scales in the native document. Preserve those relationships before replacing the entire placement. Start with the exact source where available and inspect each repeated use after relinking. This can restore production quality without rebuilding careful layout work, but only if you compare the actual image revision and the destination’s intended appearance.
Check resolution in the context of the placement
An image with adequate pixel dimensions for a small captioned use may be insufficient for a full-page placement. Inspect the actual source and placed resolution at the intended output size. Then compare crop and transparency. A familiar preview does not establish that the full-quality original survives. Keep any limited salvage explicitly identified so it cannot become the assumed master source for later larger use.
If the source has been modified externally, preserve the current publication before updating it. Compare the old appearance with the proposed source revision and decide which belongs to the intended edition. Accepting an update is a content decision, not an automatic recovery success. Record deliberate replacements so that the final publication does not silently mix a recovered layout with images from another editorial stage.
Inspect packages according to what they actually contain
An existing package can provide a portable milestone, but its contents and age need verification. Inspect the native document, linked resources, and relevant environment requirements. Then compare the distinctive editorial change. A package can open with fewer resource warnings while still containing older text. Preserve it as a strong source of assets without assuming that its native document must replace the current edition entirely.
Reconcile an older package with a newer document
If the package supplies the correct images while the current native file supplies later wording, keep both sources and repair resources in a new copy of the current document. Then inspect text flow and each important image placement. This targeted combination can preserve valid later work while recovering portable assets. Record its provenance so a later editor knows why the accepted edition differs from the historical package.
Also inspect the typography environment separately. Resource collection does not necessarily provide every font needed to reproduce line breaks and page count. Use the appropriate available fonts and respect their actual usage conditions. If a substitution is necessary, treat its layout effect as a new revision and review the resulting pages rather than claiming that a warning-free image package restores the entire publication environment.
Use embedded assets without confusing them with previews
Inspect placement type and source status before extracting or reusing content. A complete embedded image can remain useful after the external original disappears, while a missing linked resource can leave only a limited displayed representation. Those cases need different acceptance checks. Preserve the native document and inspect the actual recovered asset’s dimensions and quality before choosing it as a replacement source.
Compare a placed document’s editability
A placed PDF or other document can preserve appearance without exposing its original text frames or design controls inside the publication. Identify what the next task requires and inspect the actual available controls. If you need to change wording or reconstruct an upstream graphic, preserve the best native source candidate separately. A visually complete placement is valuable but should not be described as recovery of the original editable design automatically.
If only a low-resolution representation survives, retain it as a reference and identify the missing original. It can guide crop or layout reconstruction while you seek an appropriate source. Do not upscale or repaint it and then present the result as historical recovery. New image work may be useful, but keeping it separate protects the publication’s source record and helps another designer judge remaining quality limits.
Review the final output beyond automated preflight
Preflight can identify important technical issues, but it cannot decide every editorial and visual question. Inspect the corrected passage, difficult tables, captions, and the final pages in a fresh PDF. Then compare the complete set of resources and typography relevant to the actual publication. A clean report is useful evidence, while the intended content still needs direct review.
Check a difficult page as a representative sample
Choose a page containing linked images, dense text, and a special layout feature where relevant. Compare crop, line endings, text fit, and page navigation against the intended proof. Then inspect any page affected by reconstruction. This targeted visual review is more informative than checking only a simple opening page and assuming all other pages behave similarly.
Keep the exported proof associated with the native recovery revision that produced it. An old approved PDF and a newly repaired publication can each be readable while containing different content. Record the edition and export date clearly so another reviewer knows what they are comparing. This avoids practical publication errors caused by distributing a mismatched proof alongside a different editable source.
Establish a portable publication milestone
After acceptance, save the native edition and prepare an appropriate package or collected copy. Test it from another directory where practical and inspect resources, fonts, text flow, and the distinctive editorial correction again. This checks the files the next designer will receive rather than the convenience of your original workstation, where an unrecorded asset path may still resolve accidentally.
Keep unresolved dependencies concrete
List any missing original, substituted font, reconstructed graphic, or limited preview used in the accepted edition. This makes partial recovery useful and guides the next production step. A publication may be ready for internal review while still requiring one full-quality image for print. Clear scope prevents an attractive PDF from becoming unsupported evidence that every upstream editable resource and original asset survived.
Compare the final proof with the accepted native edition
Inspect the distinctive correction, difficult interior page, and final page in a fresh PDF. Then reopen the native publication and confirm the relevant text and resource relationships. This paired check connects the visible deliverable with the editable source rather than relying on a familiar cover or an older approved proof.
Keep production limits visible
If one image remains a preview-quality salvage or a font substitution changed line endings, record the specific page and remaining requirement. The publication may be suitable for internal review while still needing a source before print. Clear limits prevent a polished output from implying that every upstream asset recovered at full quality.
For a handover, provide the accepted edition and its appropriate resource package together. Test the copy another designer will receive and inspect its warnings and text flow. This verifies the actual deliverable instead of the convenience of a workstation where an unrecorded external asset still happens to resolve.
When storage recovery can help Publisher work
PandaOffice Drecov may help retrieve deleted native publications, existing packages, or original linked resources from readable storage. It cannot regenerate an unsaved editorial change or turn every low-resolution preview into a full-quality original. Use resource repair and existing candidates first, and reduce writes to the affected location while investigating deleted files.
Step 1: identify native and asset locations
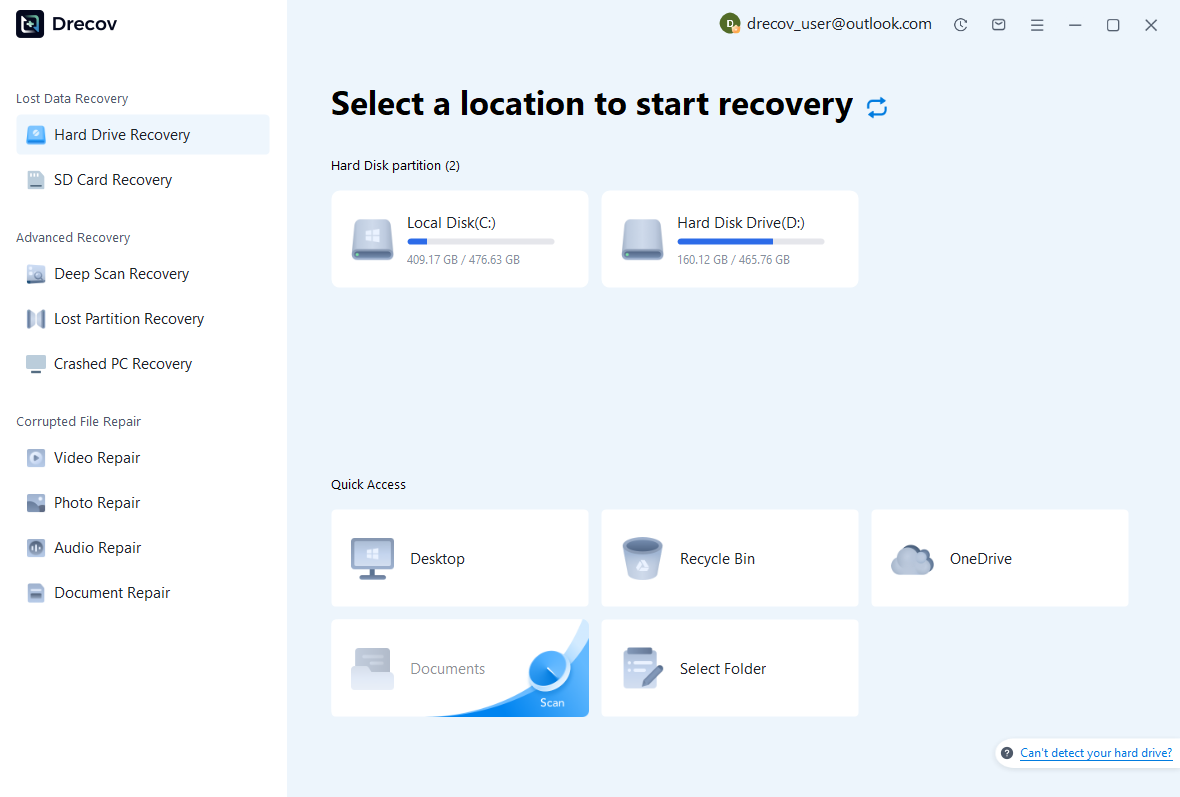
Choose the drive or partition that held the publication, package, or missing sources. Record which component each scan targets, since linked assets can live elsewhere. Keep recovery output on other healthy storage. Repeated disconnections or hardware read failures need assessment before you proceed with a routine software recovery search.
Step 2: compare publications and resources
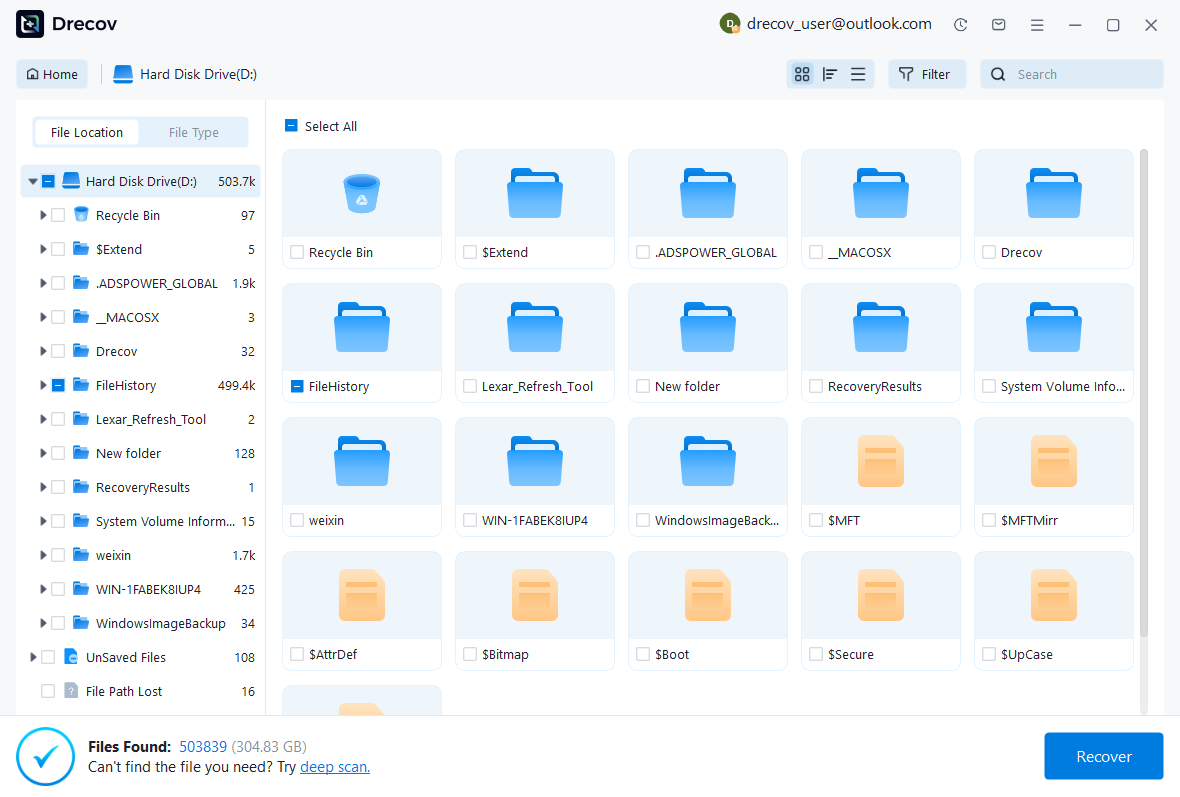
Review available paths, names, dates, sizes, and supported previews. Preserve plausible native editions and associated assets together where possible. A recognizable page or image does not establish that every story and original resource survived. Keep several useful candidates and compare their actual layout and content after recovery.
Step 3: restore elsewhere and validate the edition
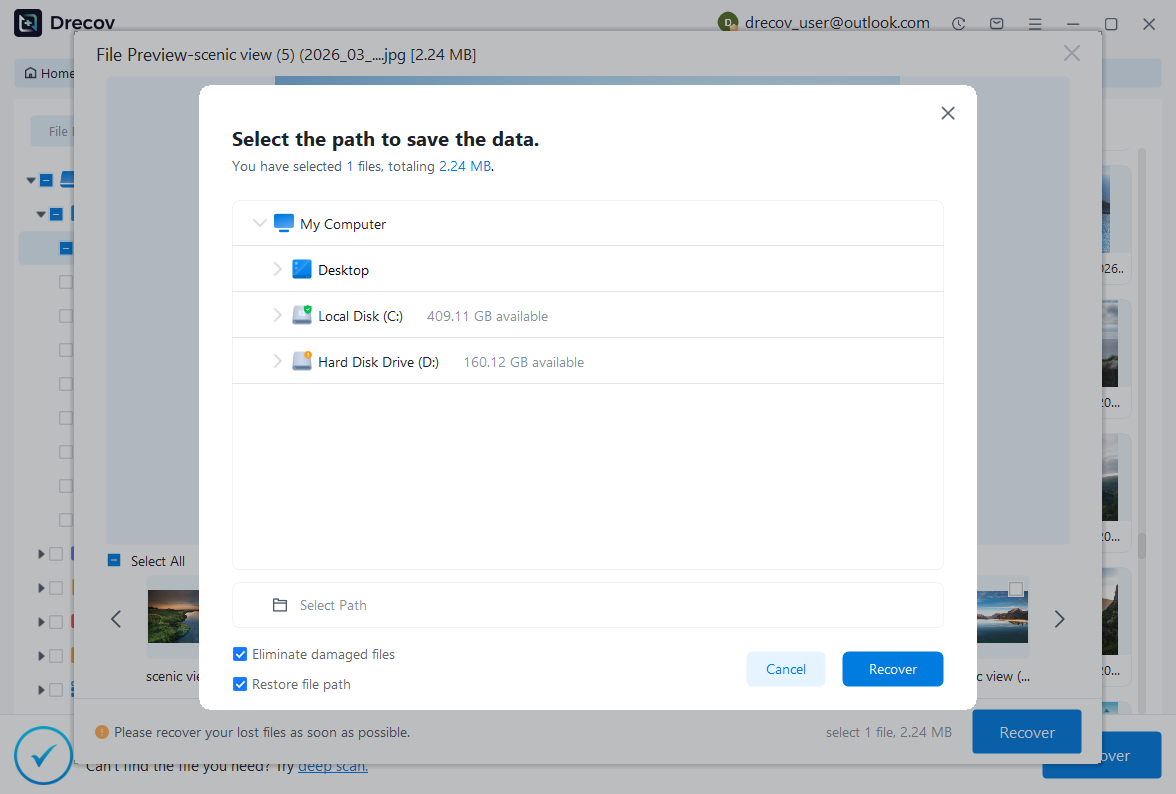
Recover selected files to a separate destination and preserve an untouched set. Open a working publication, reconnect verified assets, and inspect text, fonts, crops, preflight, and a fresh PDF. Save the accepted native milestone separately. Keep incomplete candidates away from the edition you have already verified.
Preserve the accepted publication package
Record the native source, recovered assets, reconstructed content, and remaining dependencies. Then reopen the accepted edition and compare the important correction again. Keep the corresponding proof and an appropriate package together. This gives the next revision a reliable baseline rather than a collection of similarly named editions with uncertain resource links.
Test portability with a small publication
Use a disposable document to verify what resource collection and packaging include in your installed version. Open a copied package from another directory and inspect its fonts and images. This practical test shows which dependencies need separate preservation and prevents a locally working publication from being mistaken for a complete portable archive.
Related recovery resources
Explore the relevant recovery options: Hard drive recovery, External hard drive recovery.
For another recovery case and its practical checks, read the related recovery guide.
Check the vendor guidance for the installed version: official recovery documentation 1, official recovery documentation 2, official recovery documentation 3.





