








Recover the Audition session without losing the original audio
To recover Adobe Audition sessions, preserve the SESX, available backups, and original audio before making new saves. A multitrack session describes arrangement and processing, while its recordings can live in separate files. Therefore, distinguish a missing session from deleted source audio and from a destructive waveform edit that changed the recording itself.
Audition is commercial software. The native routes below can help an existing eligible user without buying a separate recovery utility. They do not make the application or third-party effects free. Also inspect the actual Auto Save settings and existing files, because recovery data and multitrack session backups serve different purposes and depend on prior configuration.
Identify the missing production decision
Record the session path, application version, and a distinctive recent change such as a dialogue cut, fade, or noise-reduction step. Then identify whether that change happened in Multitrack or Waveform editing. This matters because a multitrack edit can leave the source untouched, while a saved waveform operation can alter the underlying audio file.
Copy the session directory and relevant source recordings into a separate recovery workspace. Preserve existing backups and any available recovery data before cleanup. If useful audio or history remains in a live session, preserve it before restarting solely to investigate. A stable source set lets you compare candidates without overwriting the only useful version of a recording.
Native route 1: inspect offered recovery data
- Preserve available session and recovery files before clearing temporary application data.
- Start the relevant Audition environment and inspect any resume or recovery offer.
- Recover the useful candidate and compare the specific missing work.
- Save the result separately, including any restored audio that still needs a deliberate file save.
A recovery offer depends on surviving data from the interrupted session. It does not guarantee every recent action or a complete recording. Inspect the actual clip and waveform content rather than accepting a familiar session title as proof. Also retain the older manual save, because it may preserve stable material missing from the newest recovery candidate.
Compare the affected passage in context
Play from before the changed section through its ending. Check the words or performance, clip boundaries, fades, and any processing that matters. A restored clip can appear in the correct position while referencing an older source file. The audible passage and its source identity provide stronger evidence than the presence of a waveform display alone.
Then save, close, and reopen the accepted candidate. This confirms that the recovered state exists on disk and that its media references still resolve outside the previous session. Keep any remaining missing source or approximate processing replacement in a note rather than treating a successful launch as complete production recovery.
Native route 2: compare existing multitrack backups
- Inspect the actual automatic session-backup location configured before the interruption.
- Preserve plausible SESX candidates before new saves rotate retained versions.
- Open working copies individually and compare the intended arrangement change.
- Save the best verified session under a new name with its source references documented.
A session backup can restore tracks, clip placement, and related decisions without containing every audio file. Therefore, check both the arrangement and the media it expects. Also compare content rather than assuming the newest backup is best. A later candidate can preserve an unwanted edit, while an earlier one may contain the correct dialogue assembly.
Identify the right session revision
Use a distinctive cut, marker, and processing change as revision landmarks. Then compare the track routing and source files around those points. A session can contain all familiar track names while predating the actual editorial decision you need. Keep useful candidates separately until you establish which one provides the best baseline for further work.
If you reconcile material from two backups, inspect clip timing, fades, envelopes, and track effects afterward. A transferred clip can sound different in another processing context. Save the combined result as a new recovery version and record its sources. This makes deliberate reconstruction visible instead of presenting it as a single untouched historical session.
Native route 3: restore access to surviving source recordings
- Inspect the session’s missing-media references and record the expected files.
- Locate exact originals in the recording directory or an existing project copy.
- Repair the source references in a working session through the normal interface.
- Compare duration, channel layout, clip offsets, and the actual recorded content.
Relinking helps when a source file moved. It does not retrieve deleted audio from the SESX itself. Also avoid accepting a similarly named take without listening. Different edits of the same recording can begin with the same sound but diverge later. Inspect the full affected range and its relationship to neighboring clips before accepting the match.
Distinguish peak information from audio samples
A waveform display or related cache can help the application present media, but it is not a complete recording source. Open the actual WAV or other supported audio file and inspect its content. A familiar waveform picture cannot establish that the original samples remain available. Keep a cached preview only as supporting evidence when the source itself is missing.
For a stereo or multichannel recording, inspect the relevant channels rather than judging from one audible side. Also compare sample rate and duration as clues. A candidate can be playable while representing a reduced or differently processed copy. Preserve useful alternatives, but label their roles so the recovered session does not silently substitute a limited export for the original source.
Native route 4: preserve useful live Waveform history
- If the recording remains open, preserve the current audio and inspect the available History panel.
- Identify the specific unwanted operation without executing a long uncontrolled undo sequence.
- Compare a useful earlier state in a working context and save a separate audio copy.
- Reconnect that verified copy to a separate recovery session where appropriate.
This route depends on history that still exists in the live editing environment. It is not an unlimited archive of every recording after the application closes. Also keep Waveform and Multitrack recovery separate. An older SESX does not automatically reverse a destructive change already saved into its referenced audio file.
Preserve a clean source before reprocessing
If an earlier state supplies the untreated recording, save it separately before applying new restoration effects. Then compare the original and processed versions over a representative passage. This retains the option to revisit noise reduction or repair decisions. Repeatedly saving over the only recovered source can remove useful information and make later comparison impossible.
If the desired waveform history no longer survives, compare an existing original recording or earlier audio copy. A reference mix can help reconstruct a result, but it cannot automatically restore the precise underlying samples or effect parameters. State that limitation before rebuilding the processing chain.
Use stems and mixdowns as limited reconstruction sources
An existing stem can preserve one group of tracks, while a full mixdown preserves the combined output. Inspect their revision, range, channels, and quality before deciding what they can supply. They may satisfy an immediate listening need or support a new assembly, but they do not automatically recreate the original editable clip and effect structure.
Check whether the output includes the required ending
Listen to the beginning, changed passage, and ending, including fades and effect tails. A render can be valid yet cover only a selected range or an older edit. Compare a distinctive editorial detail rather than trusting a filename such as final. Keep the native session candidates alongside the outputs so a later recovery can restore more detailed controls.
If you build a replacement session from stems, record which tracks are flattened and which remain editable. A producer may be able to adjust overall balance while lacking the original individual dialogue cuts or effect automation. Clear scope makes the reconstructed project useful without overstating how much of the original session returned.
Diagnose a silent or apparently empty session
Confirm the actual SESX path, source availability, track state, routing, and audio-device configuration. A silent session can contain intact arrangement data. Conversely, an item with a familiar filename may point to missing audio. Test a known source and record the exact symptom before deleting clips or replacing the whole project.
Separate environment problems from missing content
A device or plugin issue can change playback while the session survives. Preserve the original configuration and any existing reference output before testing substitutions. Then change one relevant item at a time in a recovery copy. This makes it easier to identify whether the repair restored access or introduced a new processing difference.
After a plugin substitution, inspect envelopes and automated parameters. A recovered curve may no longer produce the intended result in another device version. Compare the affected passage with a reliable reference and document any approximation. A warning-free session is useful, but its audible behavior still needs verification.
A worked recovery for a podcast edit
Suppose Audition crashes after several dialogue cuts and a cleanup pass. Preserve the session, backups, and source recordings. Compare native candidates for the exact cut points, then inspect whether the cleanup affected the waveform source or only session processing. This identifies which part of the work needs a session candidate and which needs an earlier audio source.
Combine verified arrangement and source material
If an older backup preserves the correct assembly while a separate original supplies untreated audio, reconnect copies in a new recovery session. Then inspect clip offsets, fades, and the cleaned passage. Record any recreated processing separately from the recovered arrangement. This keeps the final project’s provenance clear and preserves the original evidence for later comparison.
Export a short test covering a cut, a pause, and the end of a spoken phrase. Listen independently for timing, noise changes, and clipped words. Then reopen the saved session and check the sources again. This paired native-and-output check establishes a practical milestone for continued production.
Define the Audition recovery target by editing mode
Identify whether the missing change belonged to the Multitrack arrangement or to a recording edited in Waveform view. Then compare the sources that can actually supply that change. A session backup can preserve clip placement while continuing to reference an audio file that was altered later. Conversely, a clean original recording can survive while the session loses the cuts and fades that made it usable. Keeping these roles separate prevents one successful file opening from standing in for complete audio-production recovery.
Compare a destructive edit with its underlying source
If the problem followed a saved waveform operation, inspect an earlier recording copy or useful live history before changing the session. Open a working audio candidate and listen to the affected passage, including its start and end. Then compare channel content and duration. A session from yesterday does not automatically reverse a change saved into the WAV today. The actual recording revision is the relevant source for that part of the recovery.
For a non-destructive session edit, compare clip boundaries, envelopes, and effects in native candidates. The original recording may already be intact. Preserve it and focus on the arrangement decision that disappeared. This can save unnecessary audio reconstruction and helps you retain the flexibility of the source rather than replacing it with a flattened render merely because the render sounds familiar.
Inspect recovery data and session backups as different evidence
An offered recovery candidate and an existing SESX backup can represent different stages and preserve different information. Keep both before choosing a baseline. Then inspect the exact dialogue cut or processing step you recorded as the target. A newer candidate can be less useful if it contains the unwanted edit, while an older session may provide stable structure that you can combine with surviving later recordings.
Build a short session comparison around a spoken phrase
Choose a phrase with an obvious edit and compare the words, pause length, fade, and following transition. Then inspect its source reference. This reveals whether the candidate contains the intended assembly rather than simply a recognizable waveform. Record the useful feature of each candidate, such as correct cut but older cleanup, so you can reconcile them deliberately instead of repeatedly replacing the working session.
Also inspect track effects and clip effects separately where relevant. The same recording can sound different because processing lives at another level. A transferred clip may preserve its own settings while losing the track context that produced the reference sound. Compare the full passage after transfer and retain the original candidate as evidence of the intended relationship.
Verify original recordings beyond peak displays
Open the actual recovered audio and inspect its full useful range. Then compare the expected sample rate, duration, and channels as supporting clues. A peak file or visible waveform can identify where sound belonged without containing the original samples. Likewise, a file with the right name can be a reduced export or a different take. The performance itself is the decisive content check.
Review stereo and multichannel assumptions
Listen to the channels used by the session and compare their intended role. A candidate might preserve one channel while another contains different material or damage. Then inspect any channel selection or mapping in the session. A playable file is not necessarily an equivalent replacement for the source, especially when the production depends on separate microphone or dialogue channels.
If only a processed copy survives, preserve it as useful audio and state what flexibility it lacks. You may retain an approved cleaned phrase while losing the untreated recording needed for another restoration approach. Keep that limitation visible rather than describing the processed output as recovery of the original. This lets the next editor choose suitable tasks and avoid expecting controls that the surviving file cannot provide.
Rebuild cleanup processing without overwriting the recovered source
Once you locate a clean original or useful earlier state, save it separately before applying new noise reduction or repair. Then test processing on a working copy and compare representative quiet and loud passages. A setting that improves one section can affect another differently. Preserving the source gives you room to revise the reconstruction without losing the best available recording.
Compare artifacts as well as overall noise level
Listen for clipped syllables, altered breaths, pumping, and abrupt changes around edit boundaries. Then compare the result with a reliable reference where available. A quieter waveform is not by itself evidence that the intended sound returned. If you recreate processing from listening evidence, record it as a new approximation and keep the original device or effect state separately if it survives in another session candidate.
Test a short export outside Audition and compare its beginning and ending. This helps expose a range-selection error or missing effect tail. Keep the output tied to the exact native recovery milestone. A good old mixdown and a newly repaired session can represent different revisions, so do not use one as unqualified proof that the other reproduces the intended production.
Evaluate stems and mixdowns according to the next task
A full mix can support immediate listening, while separate stems can allow a limited balance or arrangement rebuild. Neither automatically restores every clip, fade, or effect control. Inspect the actual output range and identify the revision through a distinctive passage. Then choose whether the surviving material is enough for the task or whether you still need a native session or original recording candidate.
Keep flattened and editable sections identifiable
If you build a recovery from both native tracks and rendered stems, label those roles clearly in the working project or accompanying note. Another editor should know which section supports detailed dialogue edits and which only supports overall timing or level changes. This practical distinction is more useful than a broad claim that the session is recovered when its flexibility differs across tracks.
Also compare source ownership and provenance when replacing missing recordings. Use verified production copies or authorized originals rather than assuming every available file belongs to the intended project. A similar performance can be useful reference material without being the actual take. Keeping the source details with the recovery helps prevent an accidental creative substitution from becoming an unexplained part of the accepted session.
Accept a saved session only after independent playback checks
Close and reopen the accepted SESX, inspect remaining media warnings, and play the selected acceptance passage. Then compare a fresh output outside the editing session. This checks both native structure and practical delivery. Keep the original recordings, accepted project, and reference render associated with the same revision so later work does not mix a new session with an older proof.
Record specific limits for the next production step
List missing takes, reconstructed cleanup, unavailable effects, and any stem-based sections. Keep the list concrete enough to guide work. You may have a fully usable podcast edit while still lacking an untreated source for one phrase. That is a valuable result when its limit is clear. Preserving the evidence and accepted milestone separately leaves room for a later native recovery to improve the reconstruction without losing current useful work.
Verify the words as well as the waveform
For spoken material, listen to complete phrases and compare the actual words across a recovered cut. A plausible waveform and smooth fade can still conceal a clipped syllable or an older take. Then inspect the surrounding pause and the next speaker’s entry. These editorial checks establish whether the restored audio supports the intended story, not merely whether sound plays.
Preserve untreated material where it survives
Keep a verified clean recording separate from new cleanup experiments. A processed copy can preserve an approved result while reducing flexibility for later restoration. Record which source is untreated and which contains reconstructed processing so another editor can choose the appropriate baseline.
Before delivery, compare a fresh output with the accepted session and inspect its full range, including the ending. Keep the output and native source identified as the same revision. This prevents an old good-sounding render from being mistaken for evidence that a newly repaired session contains every intended cut and source recording.
When storage recovery can help Audition work
PandaOffice Drecov may help retrieve deleted SESX files, existing session backups, or original recordings from readable storage. It cannot recreate an unsaved operation that never reached disk or reverse every destructive overwrite. Use native recovery and surviving originals first, and avoid writing new recordings or renders to the affected location while investigating.
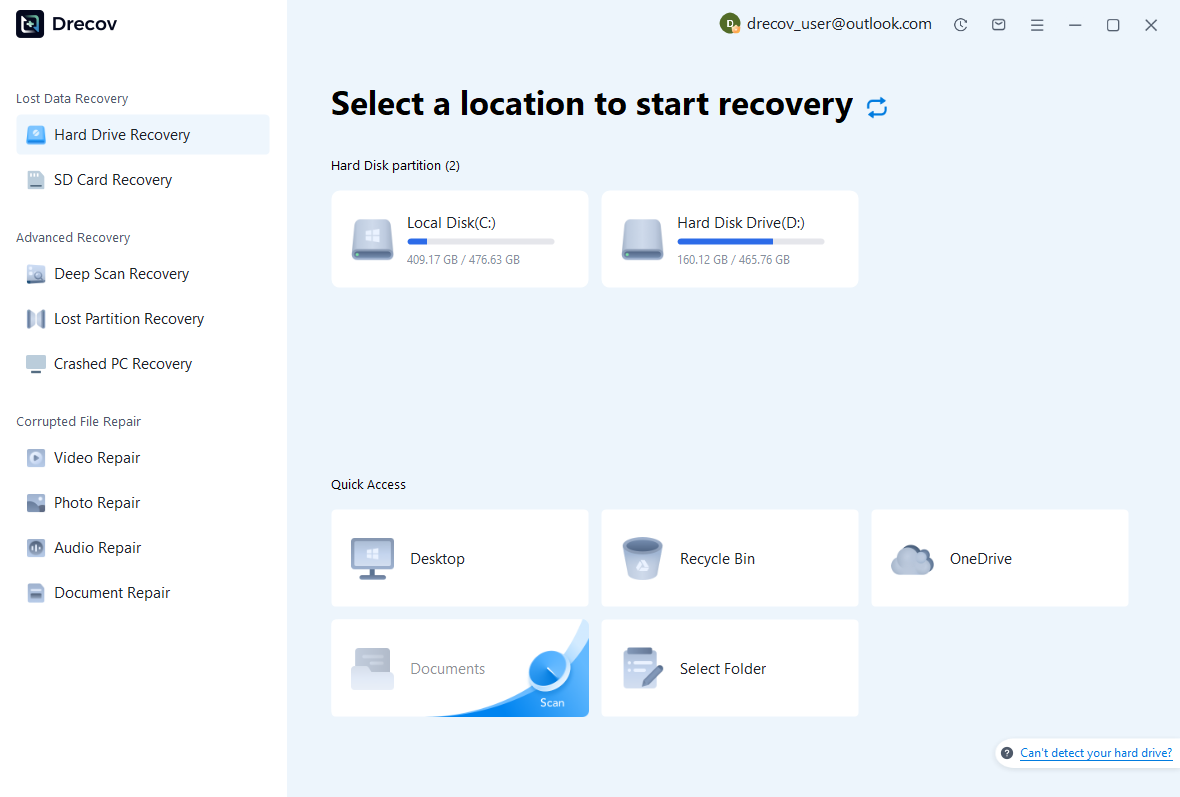
Step 1: identify session and audio locations
Choose the drive or partition that held the SESX, actual backup directory, or missing sources. Record which component each scan targets, since they may be separate. Keep recovery output elsewhere. If the source repeatedly disconnects or reports hardware read failures, assess that condition before treating it as a routine software recovery search.
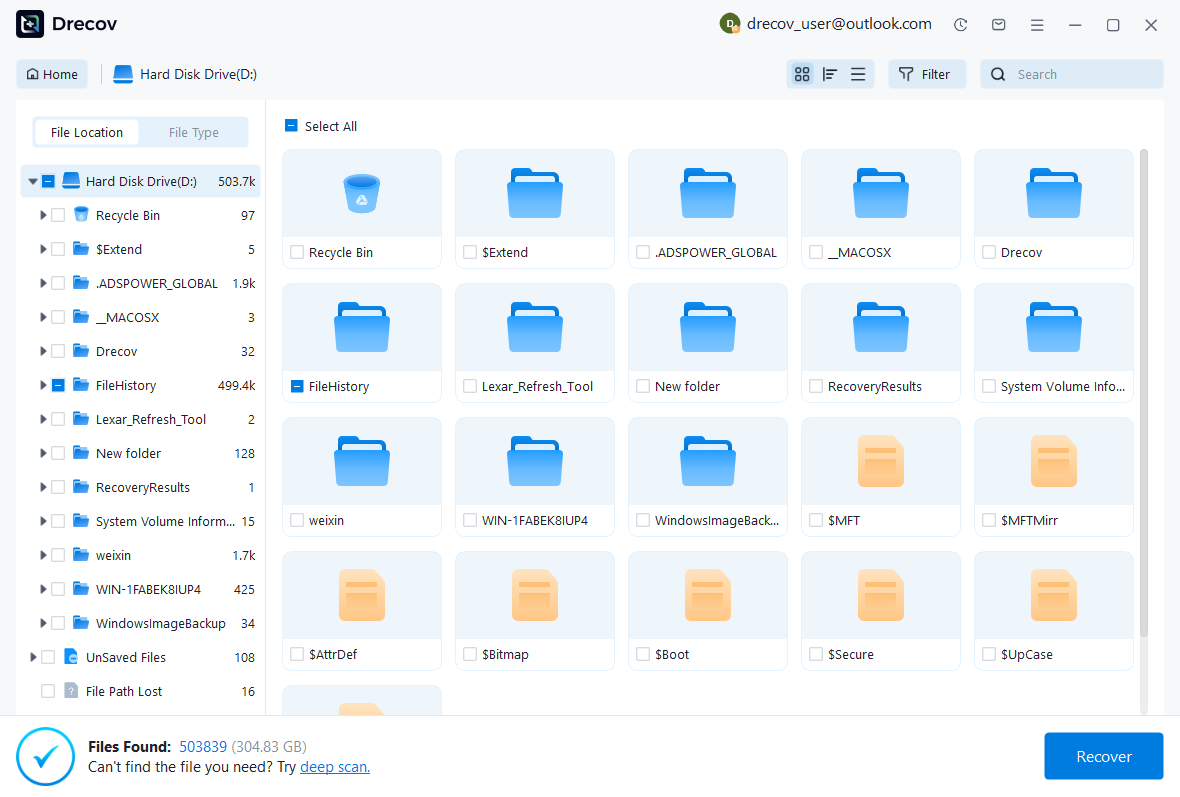
Step 2: compare complete session and audio candidates
Review available filenames, paths, sizes, dates, and supported previews. Preserve plausible session revisions and original audio together where possible. A recognizable audio preview does not establish that every clip relationship survived. Keep useful alternatives and inspect their arrangement and source content in Audition after recovery.
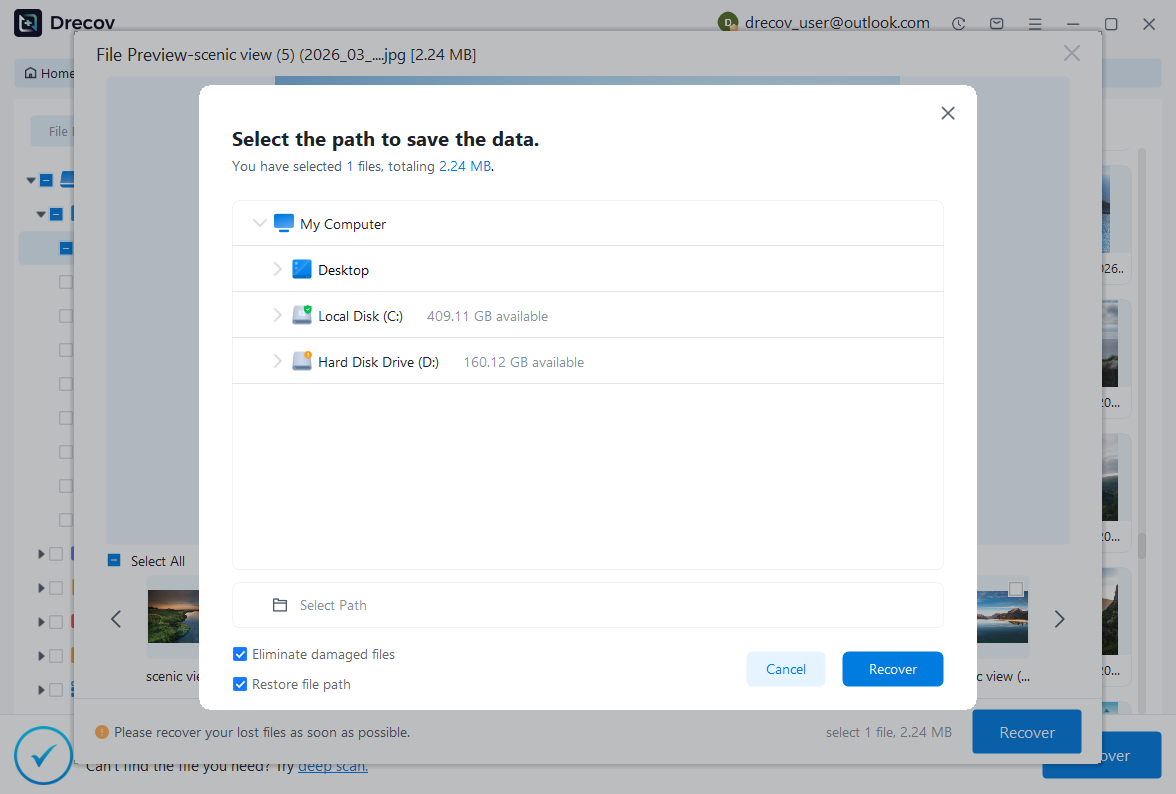
Step 3: restore elsewhere and validate the production
Recover selected files to another healthy destination and preserve an untouched set. Open a working session, reconnect verified recordings, and inspect clips, fades, processing, routing, and the actual passage. Save a new SESX and render a test. Keep incomplete candidates separate from the accepted session so they cannot replace useful recovered work.
Preserve a clear audio-production baseline
Record the source backup, recovered recordings, reconstructed processing, and any remaining gaps. Then reopen the accepted session and compare its important landmarks. Keep a reference output from that exact revision. This helps the next editor understand which material remains flexible and which sections depend on flattened salvage or newly recreated effects.
Test both backup and source preservation
Use a disposable session to verify the actual Auto Save and multitrack backup settings. Open a copied session candidate and inspect whether its audio sources travel with the test package. This practical check shows the difference between preserving session decisions and preserving recordings, and helps prevent a session-only backup from becoming an assumed complete recovery plan.
Related recovery resources
Explore the relevant recovery options: Hard drive recovery, External hard drive recovery.
For another recovery case and its practical checks, read the related recovery guide.
Check the vendor guidance for the installed version: official recovery documentation 1, official recovery documentation 2.





