







Recover the FLP before replacing samples or plugins
To recover FL Studio projects, preserve the surviving FLP and check existing project backups before changing the installation. A missing sample, a plugin-loading failure, and a deleted project are different problems. Therefore, identify which part of the session is missing before reinstalling instruments or repeatedly saving the old project over its only useful historical copy.
FL Studio is commercial software. The native routes below can avoid buying an additional recovery utility for someone who already has an appropriate installation and license. They do not make the application or paid plugins free. Also check the limitations of the edition you are using; an available backup is useful only if your installation can actually open and assess it.
Preserve the session’s supporting files
Copy the FLP, existing backup files, project data, and original samples into a separate recovery workspace. Also note the tempo, a distinctive pattern name, and the last arrangement change you remember. These details help distinguish a useful candidate from another project or an older version with a similar filename. Keep the original files unchanged while comparing candidates.
If FL Studio is still running with useful material visible, preserve that material before forcing a restart. Inspect whether the problem affects one plugin, one sample, or the whole project. An application crash can leave backups on disk, but repeatedly relaunching and saving may rotate older candidates. Therefore, copy the available backup directory before experimenting with several project versions.
Native route 1: compare existing Browser backups
- Find the Backup area in FL Studio’s Browser and inspect the actual backup location.
- Copy the relevant FLP backup candidates to another folder before opening them.
- Open candidates individually and compare the missing pattern or arrangement section.
- Save the best verified version under a new project name without replacing the preserved original.
The backup location depends on the User data folder, project configuration, and installed version. Some installations use a global backup location, while others can keep backups with project data. Inspect the current settings and existing files instead of assuming a single path. A backup feature that was disabled or had not yet run cannot supply the missing session retrospectively.
Compare arrangement and pattern content
Start with the specific change you need. For example, inspect the new chorus pattern, the edited automation clip, or the recently recorded audio take. Then check the surrounding arrangement. A candidate might contain the new pattern but place an earlier version in the Playlist. Confirm both the source material and its actual use in the song before accepting the project.
Also inspect muted clips, alternate arrangements, and mixer routing where relevant. A backup can appear to have lost a part when it is merely muted or located in another arrangement. Conversely, hearing a familiar chorus does not prove that the newer automation or routing survived. Use a concrete comparison rather than choosing a candidate solely by the first few seconds of playback.
Native route 2: inspect existing manual project versions
- Search the project directory for previously saved versions and existing project packages.
- Copy plausible FLP or ZIP candidates into separate recovery folders.
- Open each candidate with its associated samples available.
- Compare the intended revision and save a clearly named recovery baseline.
A manual version created before a risky edit can provide a cleaner checkpoint than the newest automatic backup. However, it may omit later work, so identify precisely what it preserves. Keep several useful versions while deciding how to rebuild the session. Do not assume that adding a numeric suffix during recovery establishes which version is newest or most complete.
Inspect an existing packaged project
A previously created project ZIP can contain useful sample assets alongside the FLP. Extract a copy into a new folder rather than over the current project. Then inspect its contents and the song itself. A package sent before the final vocal take cannot contain that later recording, even if it opens with no missing-file warning.
Compare file names and audio content for important recordings. Two vocal takes can share similar names while containing different performances. Listen to the relevant passage and inspect the timing before substituting one for another. This prevents an apparently successful path repair from silently changing the creative content of the recovered project.
- Preserve the affected FLP and confirm that the problem is not simply a missing file path.
- Compare an existing backup made before the suspected plugin change.
- If appropriate for your licensed installation, use the official built-in Diagnostics guidance on a working copy.
- Save any recovered project separately and document removed or bypassed plugin content.
A misbehaving plugin can prevent an otherwise useful project from loading. Removing that plugin through an appropriate diagnostic route may salvage the arrangement, but it can also remove its sound or processing state. Follow the official instructions for the installed version and edition. The trial does not provide every project-loading and diagnostic capability, so do not promise this route to every installation.
Preserve the musical effect of the missing device
Before replacing a plugin, inspect any existing renders, stems, presets, or notes from the session. They may preserve a reference for the intended sound even when the device state is unavailable. Keep those references distinct from a full plugin-state recovery. An audio stem can preserve the audible result without retaining editable synthesis settings or every automation relationship.
If a different plugin version loads the project, compare the sound and parameter behavior carefully. A successful load does not guarantee identical presets or processing. Render a short representative section and compare it with an existing approved mix if available. Also inspect automation targets, since a restored arrangement can still point at parameters that no longer behave as expected.
Native route 4: reconnect original samples
- Record the missing sample names and the paths or search locations the project expects.
- Locate the exact originals in the preserved project assets or an existing package.
- Correct the relevant search path or sample reference in a copied project.
- Play the affected sections and compare timing, pitch, trimming, and channel settings.
Relinking addresses samples that still exist but no longer resolve. It does not recover a recording that was deleted and has no surviving copy. Also avoid replacing an original with a different file just because the filename matches. A shorter edit, different sample rate, or alternate take can change the song even when the missing-file warning disappears.
Check audio-clip assumptions
Inspect start offsets, stretching, pitch changes, and any edits that depend on the original file length. A replacement that sounds correct at the beginning may drift later or reveal the wrong ending. Therefore, test the full affected passage rather than only auditioning the sample in isolation. The arrangement context determines whether the relinked audio is actually usable.
If the project references files outside its folder, record those locations before making the recovery portable. Then create an appropriate new package after verification and test it from another directory. This checks that the accepted project no longer depends on an accidental path on your workstation. Keep the original recordings separately for future editing and revision comparisons.
Distinguish a project file from the audio it references
An FLP stores project information but does not automatically contain every external sample and recording. Consequently, recovering the project alone can leave silent or missing sections. Inventory the important audio sources and identify which are original recordings, library samples, or rendered stems. Each category has a different possible replacement source and a different effect on editability.
Use renders as a limited fallback
An existing full mix can preserve the song’s sound for reference, while stems can preserve separate groups for a limited rebuild. Neither reconstructs the original patterns, automation, or plugin controls automatically. If you assemble a new session from stems, label it as reconstruction and preserve the original FLP candidates for any later native recovery attempt.
For a time-sensitive review, a verified render may satisfy an immediate listening need while you continue investigating the editable project. Check that the render represents the intended revision and contains the full ending. A file named final can still predate the last approved changes. Listen to the distinctive sections that establish its identity rather than trusting its label.
A worked recovery after a mixer-plugin crash
Suppose the project crashes after adding an effect to the vocal bus. Preserve the FLP and backup directory, then compare a candidate saved before that addition with one saved afterward. If the earlier candidate opens, inspect the arrangement and vocal recording. This gives you a stable baseline and a focused hypothesis about the loading failure.
Rebuild only the unresolved part
If an appropriate diagnostic operation removes the failing device and allows a newer candidate to open, compare its remaining mixer chain and automation with the stable baseline. Document the removed effect and use an existing render as a sound reference. Recreate that processing only in the new recovery project, leaving the preserved source unchanged for future investigation.
Then play the song from the beginning through the ending. Check transitions, sidechain behavior, and automation at the section where the crash occurred. A project that opens and plays one pattern can still contain missing material elsewhere. Save, close, reopen, and render a short test before treating the project as ready for further production.
Check the recovered session’s musical structure
Inspect tempo changes, time markers, automation, pattern lengths, and mixer routing. Then compare the arrangement with a reliable reference mix or production note. These checks target the actual creative state rather than just the file format. A syntactically valid FLP can still represent the wrong song revision or omit a late arrangement decision.
Verify recorded audio independently
Open or audition important recordings and inspect their duration and content. Then check their placement in the Playlist. A recovered audio filename can survive while the recording itself is incomplete. Conversely, the recording may be intact while the project points to an older path. Keeping these checks separate helps you avoid discarding a useful take because the first project candidate cannot find it.
Also inspect clips that use destructive external edits or replacements. Determine which actual source file the accepted project needs, and preserve that version beside the recovery record. Otherwise, a later cleanup can remove the very take that made the recovered arrangement work. A clear asset inventory makes the final session easier to move and review.
Use the song structure to identify the right FLP revision
Choose several musical landmarks before comparing backups: the tempo, a distinctive pattern, a transition, and the final arrangement length. Then inspect those landmarks in each candidate. This gives you a consistent comparison method even when backup filenames are generic. A candidate can contain the correct instruments while still representing an earlier arrangement, so compare the actual musical decisions rather than the track list alone.
Inspect the relationship between a pattern and the Playlist
A recovered pattern may exist in the project but not appear where you expect in the arrangement. Find the pattern itself, inspect its notes or events, and then locate its Playlist instances. Compare lengths, repetitions, and any muted sections. This separates a missing pattern from an arrangement-placement problem and avoids recreating notes that already survive elsewhere in the candidate.
For a recorded part, identify the exact take and the clip’s use of it. Compare the source audio with the intended phrase, then inspect trimming and placement. A similarly named recording can be an alternate take with different timing. Keep both until you establish which performance belongs to the accepted song revision, and record any manual placement you reconstruct from a reference mix.
Recover automation as musical behavior
Automation can survive while targeting a changed device or parameter. Inspect the automation clip and the control it affects, then play the relevant passage. Compare the audible behavior and parameter range with a reliable reference. A visible curve is not enough when the recovered plugin version interprets the control differently or the project no longer points to the intended destination.
Check transitions at their actual song position
Test a filter sweep, volume ride, or effect change in the full arrangement rather than only auditioning the automation clip. Nearby clips, mixer routing, and the starting control value can affect the result. Then inspect the transition into and out of the automated section. This catches a recovered curve that works in isolation but produces a jump or silence in the song context.
If the original device state remains unavailable, preserve the automation evidence and reconstruct the effect in a separate recovery copy. Use a prior render as a reference where available. Document the replacement and any approximation. This gives you a practical path forward while keeping the distinction between restored project data and a newly recreated sound clear.
Rebuild a sample search deliberately
When several samples are missing, start with a known original rather than adding broad search locations indiscriminately. Identify the project folder or package that contains the intended revision. Then repair the relevant references and test the result. Broad searches can return files with the same name from other songs, which may remove warnings while changing the arrangement’s actual sound.
Compare sample content and processing assumptions
Inspect a candidate sample’s duration, leading silence, channel content, and distinctive sound. Then compare any project settings that depend on it, such as start offset, looping, or stretching. A file that sounds similar when played alone can behave differently in the recovered session. Testing the affected phrase in context provides stronger evidence than a filename match.
If a library sample no longer exists locally, check an authorized original library or existing project package before substituting another sound. Record whether you recovered the exact source or chose a replacement. A creative substitution may be acceptable, but it should not be described as recovery of the original sample. This distinction matters when comparing the reconstructed mix with an approved reference.
Preserve plugin presets and renders as separate evidence
An existing preset can help restore a device’s sound, while a rendered stem can preserve its audible output. Neither necessarily contains every project automation link or mixer relationship. Keep these sources alongside the FLP and identify what each can supply. This gives you options when a recovered project loads but a third-party device remains unavailable or incompatible.
Test one device change at a time
In a separate working copy, restore or replace one unresolved device and play a representative section. Compare the sound, level, and automation before moving to the next change. Save a checkpoint when the result is useful. This controlled sequence makes it easier to identify which recovery action altered the mix, instead of accumulating several substitutions and losing track of their effects.
Also inspect mixer sends and sidechain relationships after a device repair. A recovered instrument can sound correct in isolation while responding differently to the rest of the session. Compare the full mix and a relevant soloed passage. These checks connect technical loading success with the actual production result you need to preserve.
Recover recorded material without assuming it is inside the FLP
Inventory the important original recordings and identify where they were stored. A saved project can reference a take outside its own folder, so recovering the FLP alone may not recover the performance. Preserve each useful recording with its original name and source details. Then connect it to the intended clip only after comparing the content and timing.
Keep raw takes alongside edited results
A rendered vocal edit may preserve the approved phrase while a raw take preserves additional material needed for revisions. Keep both when available. If the edited result is missing, the raw take can support reconstruction, but the recovered project may not contain the original edit boundaries. Record any newly rebuilt cuts or timing adjustments rather than treating them as untouched recovered session data.
End by testing a packaged recovery from a different directory and rendering the intended song range. Check the opening, important transitions, and ending, including any tails. Record unresolved plugins or approximate sound replacements beside the accepted FLP. This makes the result usable for the next production session and prevents a warning-free load from being mistaken for proof that every creative detail survived.
Compare the recovered mix with a known reference
Use an existing approved render to compare the sections most affected by recovery. Check timing, level changes, transitions, and the ending rather than expecting every difference to reveal itself in the first chorus. A device substitution can change the sound while leaving the arrangement intact. Identify those differences explicitly so that the accepted project reflects a deliberate production decision rather than an unnoticed recovery side effect.
Keep a recovery version before further creative edits
Save a stable recovered milestone before starting new arrangement or mix changes. Then preserve a reference render from that exact project. This creates a useful boundary: later differences belong to continued production, while the recovery note describes what survived and what you rebuilt. Without that boundary, it becomes harder to assess a newly found backup against the version you are now editing.
For a collaboration handover, include the accepted project package and a short list of unresolved devices or replacement sounds. Test the package from a separate directory, then compare the important musical landmarks again. This verifies the files the next producer will receive and prevents a locally working session from depending on an unrecorded sample folder on your workstation.
When deleted-file recovery can help FL Studio
PandaOffice Drecov may help retrieve deleted saved FLP files, existing backups, or original recordings from readable storage. It cannot recreate an unsaved pattern that never reached disk or restore a paid plugin license. Try the available native candidates first, and avoid writing new recordings or renders to the affected drive while evaluating deleted-file recovery.
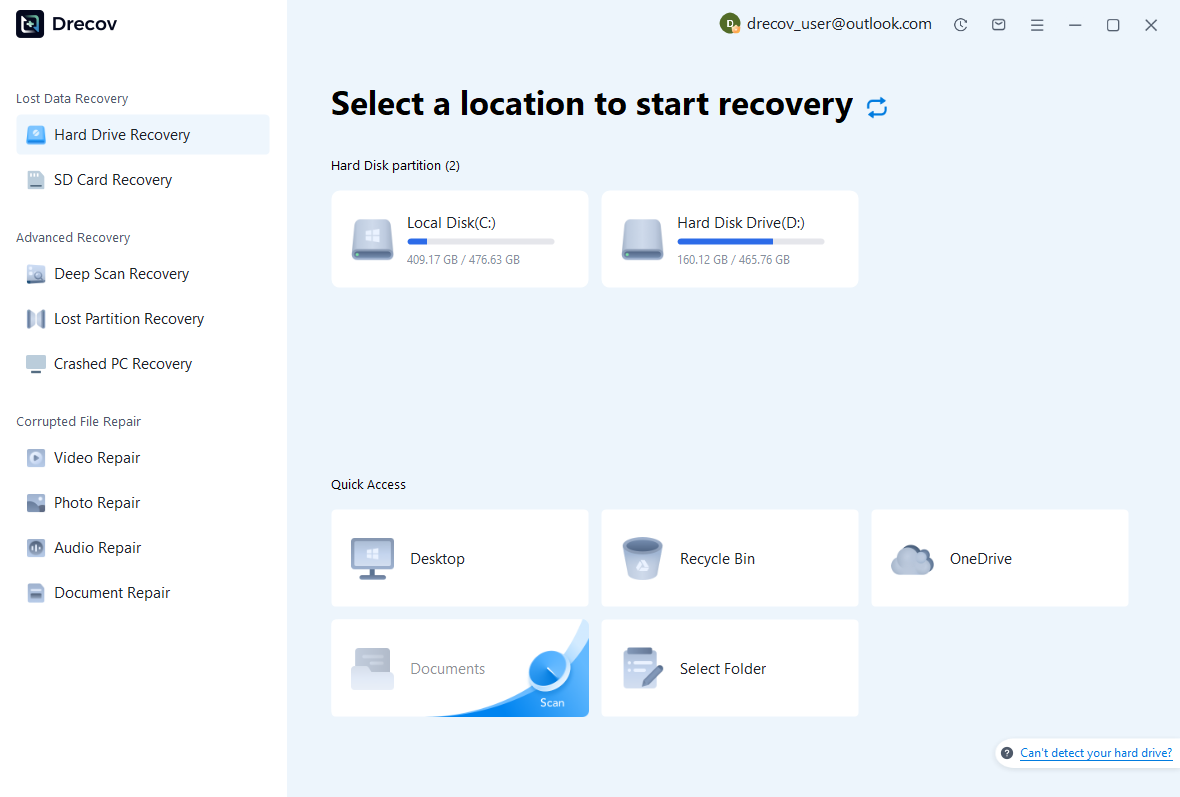
Step 1: identify the missing session’s storage
Choose the drive or partition that held the FLP, actual backup folder, or missing recording. These may be separate locations, so note what each scan is intended to find. Use other healthy storage for recovered output. Repeated disconnections or read failures need assessment before you treat the drive as a routine software recovery source.
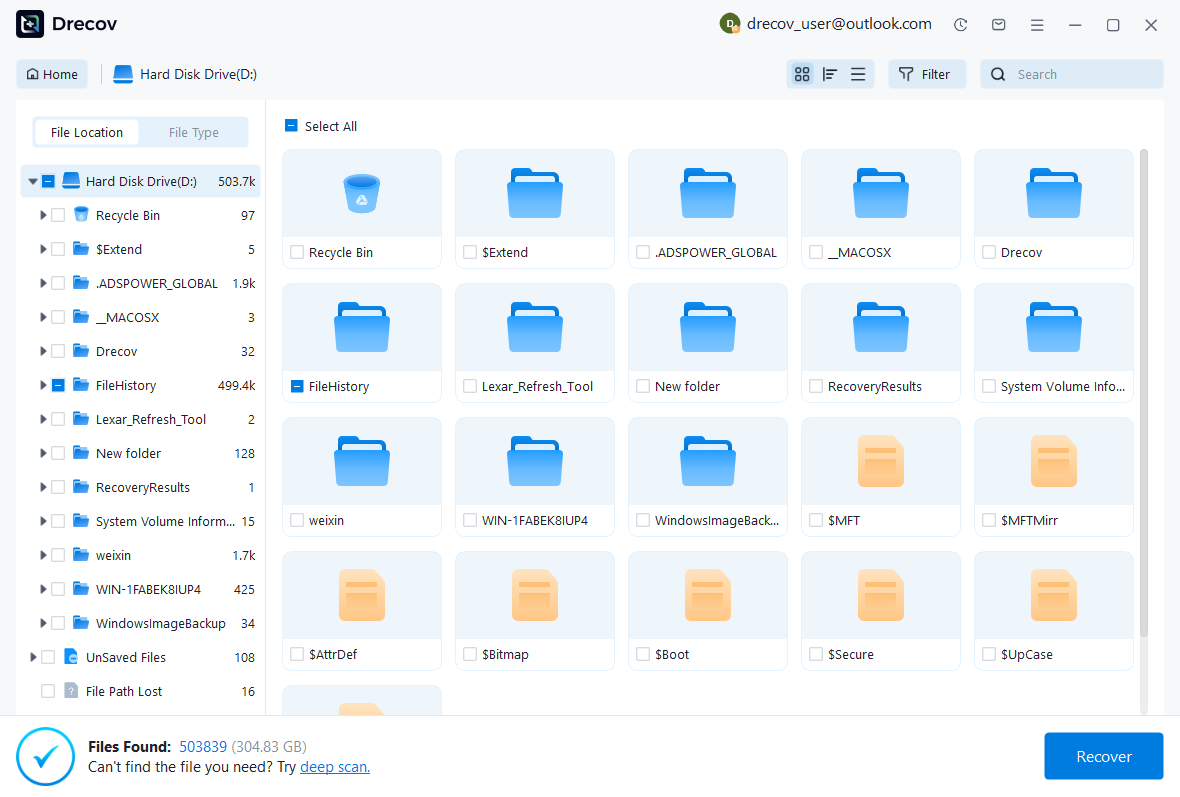
Step 2: compare project and audio candidates
Review names, paths, dates, sizes, and supported previews. Preserve useful FLP revisions together with their associated audio when possible. An audio preview can help identify a take, but it cannot establish that the entire project arrangement survived. Keep candidate details so you can compare the recovered files inside FL Studio afterward.
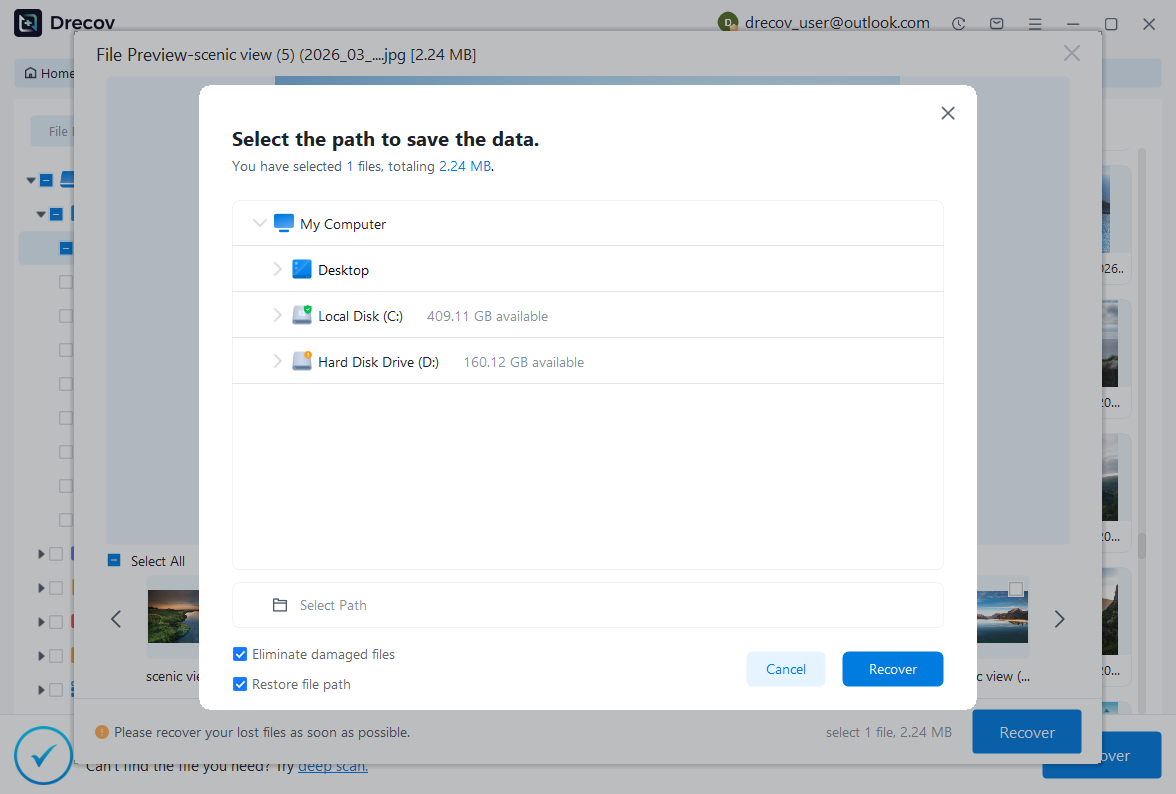
Step 3: recover elsewhere and reopen a working copy
Restore selected files to another destination and rebuild the project structure in a working folder. Then inspect patterns, arrangements, samples, plugins, and mixer routing. Save the verified session under a new name and render a test passage. Keep incomplete candidates separate from the accepted project so they cannot overwrite a useful recovery.
Preserve a clear recovered production milestone
Reopen the final project and test the important song sections again. Then create an appropriate package and a reference render from that accepted revision. Record which backup supplied the project, which audio files you relinked, and which effects you reconstructed. This gives you a useful production baseline instead of several unexplained FLP files with nearly identical names.
Test backup settings on a disposable song
Use a small test project to confirm the configured backup location and retention behavior. Make a harmless change and check that you can locate and open the resulting candidate. Also inspect the User data folder setting after any migration. A practical test shows where future recovery material will actually go and helps expose a path that points to an old installation.
If only a mix or stems survive, state that the audible material is available while the editable project remains incomplete. You can still rebuild a useful session, but that is a different outcome from recovering the original FLP and plugin state. Keeping the distinction explicit protects both the creative intent and the next revision workflow.
Related recovery resources
Explore the relevant recovery options: Hard drive recovery, External hard drive recovery.
For another recovery case and its practical checks, read the related recovery guide.
Check the vendor guidance for the installed version: official recovery documentation 1, official recovery documentation 2, official recovery documentation 3.





