







Video data recovery software should help you find a usable recording, not merely a familiar filename or a thumbnail. Choose a method that can examine the original storage safely, locate plausible clips and save them to another device. After recovery, compare duration, important scenes and sound. Several results with the same name can represent different exports, smaller working copies or incomplete footage.
Before choosing software, check the camera, original transfer folder and any independent backup. A complete source copy is usually more useful than trying to recover an older compressed export. Stop recording or copying new material onto the device that held the missing footage while you decide what to do.
Define what a successful video recovery would contain
The required scene matters more than the file count
Write down the event, approximate recording date and part you must preserve. An hour-long interview is not interchangeable with a two-minute review clip. Your project may also use separate microphone audio or a group of camera files. Knowing these details makes it easier to recognize a useful result even if its original name is missing.
Separate a lost file from a damaged recording
When a clip still exists but will not play, preserve it and investigate its condition before treating it as deleted. File recovery can look for another surviving copy; it does not automatically rebuild missing frames in the existing clip. The video recovery page explains the wider distinction between lost footage and a playback problem.
Repeated device disconnects or severe read errors mean you need source protection before another scanner. Stop direct attempts and seek imaging or professional recovery advice. A powerful computer or a longer scan cannot make an unstable source reliable. Keep any footage you have already saved on a separate healthy device.
Drecov‘s role in retrieving lost footage
Drecov offers Windows data recovery with a read-only recovery mode, Quick Scan and Deep Scan. You can narrow results through available filters and location information, inspect supported previews, then save selected clips elsewhere. For video work, the useful outcome is a set of recordings you can play and reconnect to the project—not a promise about every listed item.
Lost Partition Recovery is available when the original partition disappeared. The software does not repair a camera, rebuild unsaved editing choices or guarantee recovery of overwritten footage. A working preview can help identify the ceremony or interview, but it cannot confirm every frame and audio passage. Full playback checks still belong after saving.
⚠ Warning: Install it on a drive different from the one where your data was lost to prevent overwriting.
Match video data recovery software to your starting point
A guided Windows search: Drecov
Consider Drecov when the original storage is stable and Windows can access it for recovery. A graphical workflow can make it easier to identify folders, narrow results and choose representative clips before recovering a large collection. Check the specific formats and preview behavior you need rather than assuming every camera format works identically.
A command-line local recovery route: Windows File Recovery
Microsoft provides Windows File Recovery for users comfortable with command-line source selection and filtering. Read its current instructions and choose the appropriate mode for the file system and loss. Prepare a separate destination before running a command. A command copied from another person’s computer can refer to entirely different drives.
A file-content search with different organization limits: PhotoRec
PhotoRec’s official documentation describes signature-based recovery and its limitations with original names and directory structure. That can matter when the file system no longer supplies useful records. Expect to identify results by content rather than relying on the old project folders. Its documentation also explains that recovered-size handling varies with the file format.
No method can promise that a large result contains every original frame. File layout, later writes and the surviving data all matter. Avoid selecting video data recovery software on an unexplained speed claim or recovery percentage. Check whether the workflow gives you a practical way to locate, save and verify your particular recording.
Retrieve test clips before recovering an entire shoot
Prepare the devices and protect the originals
Check backups and assess source stability first. Install Drecov outside the partition containing the missing videos, then prepare another healthy physical device for output. Allow enough space for several versions, not just the finished export. If the source becomes unstable, stop direct scanning and obtain advice about imaging or specialist recovery.
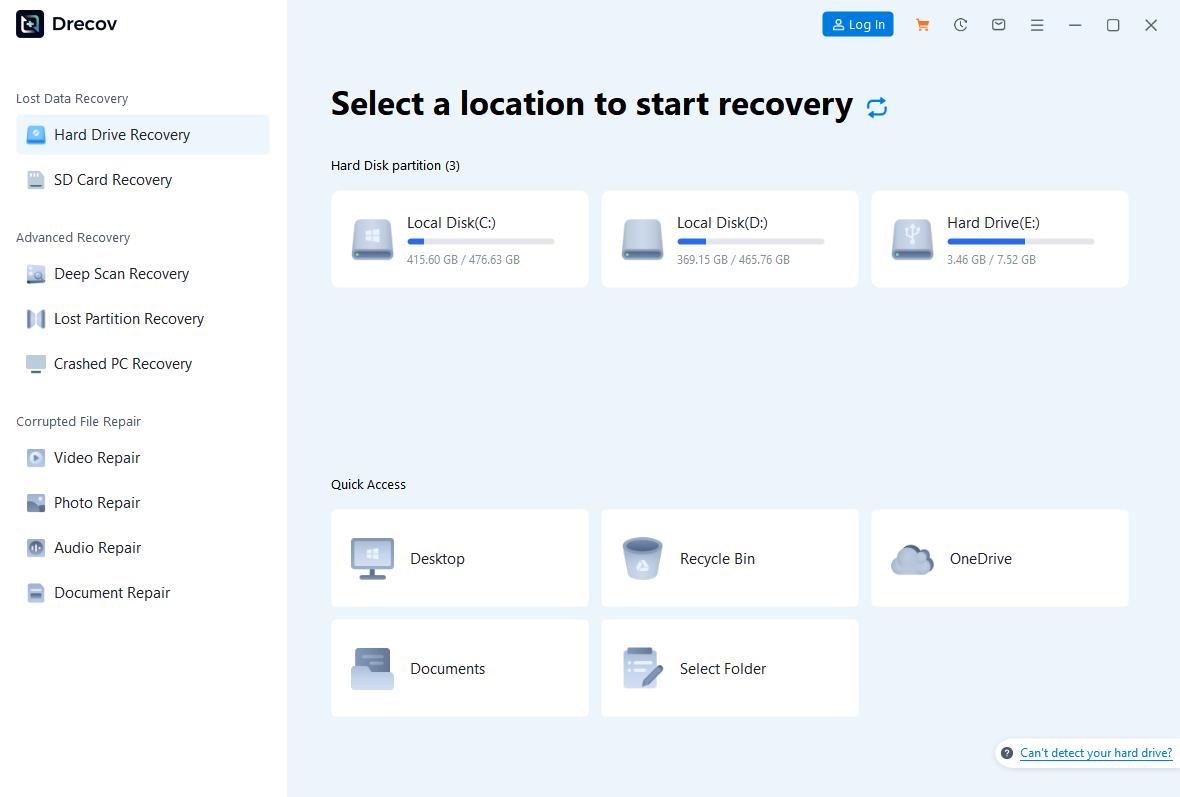
Step 1: Open Drecov and choose the original recording location
Select the device or volume that held the actual media. A project file on C: may point to clips stored elsewhere, so identify the original source before scanning. Use Lost Partition Recovery when appropriate for a missing partition. For footage lost from removable storage, follow the relevant USB recovery precautions rather than recreating the storage layout.
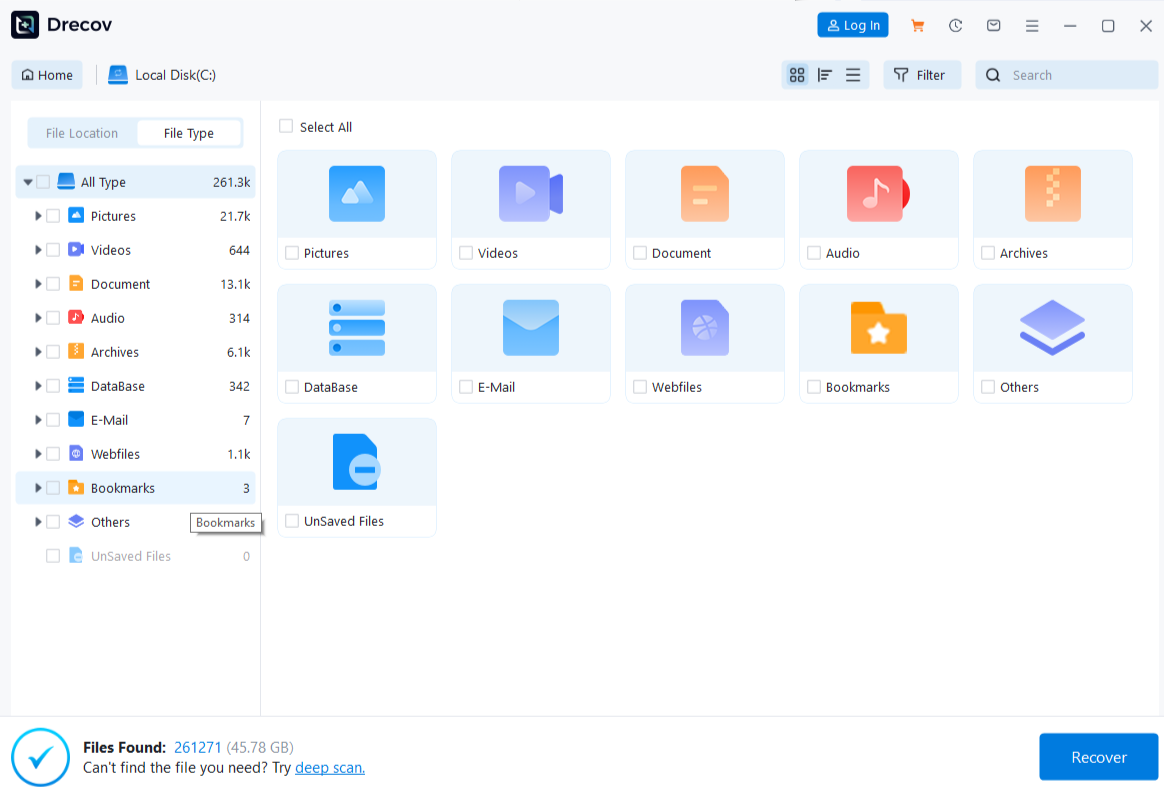
Step 2: Start Quick Scan and inspect the likely recordings
Look for recognizable folders, recording dates and names. Select an important short clip and a longer recording from the same job. This gives you examples to evaluate without immediately saving every old export. Include associated audio when your project relied on an external recorder.
Step 3: Continue with Deep Scan if needed
Use Deep Scan only when Quick Scan has not located the needed footage and the source remains stable. Stop at worsening reads or repeated disconnections. A deeper search may find additional candidates, but it cannot recreate completely overwritten material. Do not format the source or run repair commands between scans.
Step 4: Locate the clips and examine supported previews
Use available type, date, path and filename information to narrow results. Preview supported clips for recognizable scenes, keeping several plausible versions if necessary. A small opening image may belong to an old export or cached preview. Preserve that uncertainty until you can test the saved recording in a suitable player.
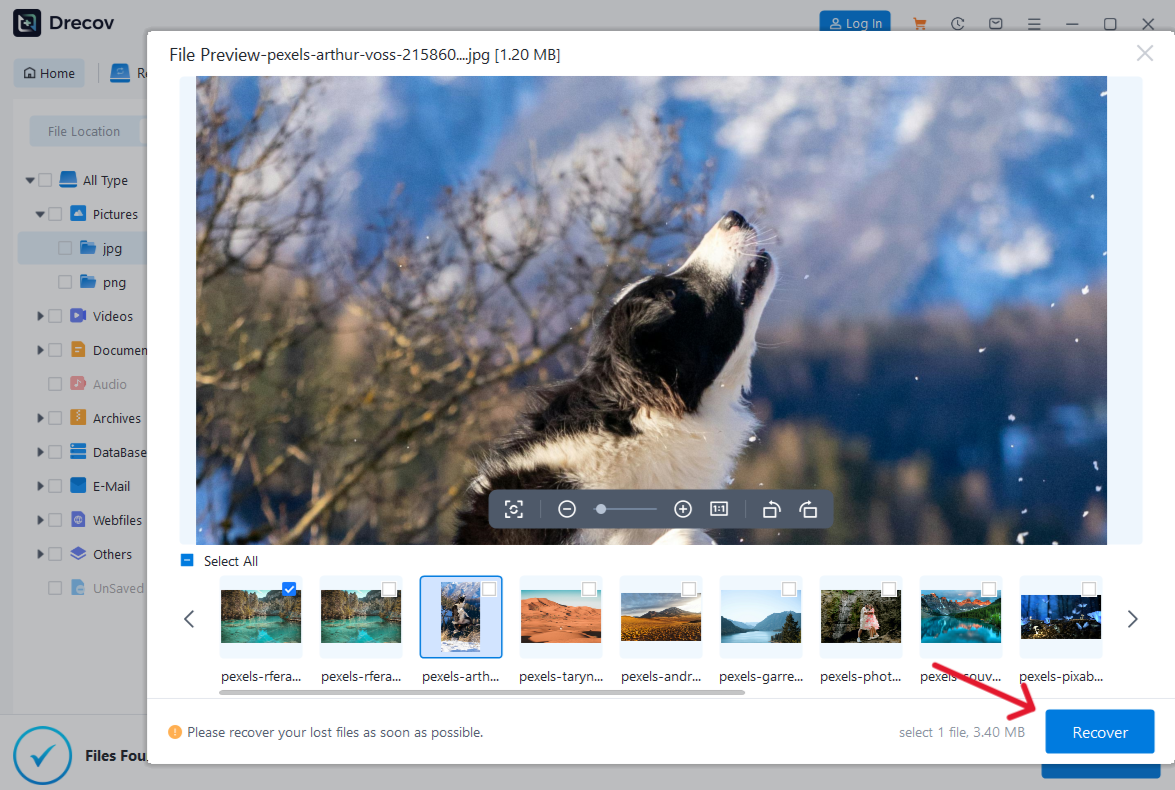
Step 5: Recover elsewhere and verify the saved footage
Save to the other healthy device, never the source. Check Drecov Folder or Recovery Folder if you cannot find the output. Play required scenes and compare duration, picture and audio before rebuilding an editing project. Related missing documents, artwork or audio belong to the broader file recovery task. Complete verification before source repair, initialization, formatting or reuse.
⚠ Warning: Install it on a drive different from the one where your data was lost to prevent overwriting.
Compare duplicate video names without guessing
Keep recovered output untouched
Preserve the original saved results and compare working copies in another folder. Give each candidate a temporary identifying label rather than replacing files that share a name. Record its recovered filename, size and location. That small reference list helps you return to the same candidate if an editing application later reports a problem.
Check duration and the actual event
Open each version in a suitable player and inspect its duration. Play the opening, a distinctive middle moment and the ending. A clip with a normal reported duration can still fail later, so do not stop after reading Properties. Compare what happens in the scene, especially if several takes show the same people in the same room.
Use dimensions and sound to distinguish working copies
An editor may use a smaller proxy for smoother editing while retaining a separate camera original. By contrast, a finished export can include titles or mixed sound that the source lacks. Compare picture dimensions, visible detail and the audio you actually need. The largest file is not automatically the highest-quality or most complete recording.
Keep separate microphone tracks when they belong to the project. A silent camera clip may be legitimate rather than damaged, but confirm the intended workflow before accepting it. Likewise, an export with music may not preserve the original dialogue. Choose according to the job you need to finish, not simply which version sounds busiest.
Do not delete uncertain clips during the first review
Move questionable working copies into a review folder while retaining the untouched results. A short fragment could contain the only surviving view of an important event. Once you identify a complete recording, make an independent backup and test it again before clearing alternatives. Recovery cleanup should not become another irreversible deletion.
FAQs
Can video data recovery software repair a clip that stops halfway?
File recovery may locate another copy, but it does not automatically repair missing frames in the existing file. Preserve the partial result and look for alternatives before modifying it.
Different exports, repeated camera numbering or lost naming information can produce confusing results. Compare duration, scene content, dimensions and audio rather than choosing by name alone.
Is a larger recovered file always better?
No. Size depends on duration, encoding and what the file contains. An oversized result can also include unusable content. Playback and the required scene provide stronger evidence.
Can I save recovered movies back onto the original USB?
Do not do that while recovery matters. New output can overwrite other missing clips. Use another healthy physical device and verify the results there.
Does a project file contain all its video?
Not necessarily. Many projects reference separate source media. Keep the project and its related recordings, then test a working copy after reconnecting the correct files.
Conclusion
Choose video data recovery software for the footage you need to verify, not the largest results list. Drecov can help locate and recover lost recordings from stable accessible storage, with preview and filtering to guide selection. Save elsewhere, compare competing versions and test the important scenes. Keep the original recovery output until the project works with the recordings you have actually checked.
⚠ Warning: Install it on a drive different from the one where your data was lost to prevent overwriting.






