







Recover the Shotcut edit before rebuilding the timeline
To recover Shotcut projects, preserve the saved MLT file, available recovery candidates, and original media before opening several versions. A project describes editing decisions but does not automatically contain all source video and audio. Therefore, distinguish a missing timeline from moved footage, an interrupted save, or a project that simply opened from the wrong directory.
Start with the specific change you need, such as a new cut, title, transition, or audio adjustment. Then compare that change in native candidates before using a rendered video as a fallback. A finished export can preserve appearance, but it cannot usually recreate every original clip boundary, filter setting, and track relationship in the editable project.
Preserve the interrupted session’s context
Record the Shotcut version, original project path, and last useful edit. Copy the project and associated media structure into a separate recovery workspace. Also preserve available autosave or backup candidates before clearing application data. A stable source makes comparison easier and protects an older valid timeline from being replaced during repeated saves.
If the project remains open with useful content, save a separate copy before restarting solely to investigate. Inspect whether the problem affects one clip or the entire edit. A black preview can come from a missing source or display state without proving that the timeline disappeared. Record the exact symptom and any missing-file message before choosing the next route.
Free route 1: inspect an offered crash autosave
- Preserve existing project and recovery candidates before cleanup where possible.
- Reopen the relevant project in the appropriate Shotcut version and inspect any recovery offer.
- Load the useful autosave candidate and compare the missing edit.
- Save the recovered project under a new MLT name in a separate working folder.
Crash autosave is different from a regular save of the main project. It depends on recovery data that survived the interruption. Therefore, do not assume that an autosave always contains the last visible operation. Inspect the timeline and the exact title, transition, or cut you need. Also retain the older manual save, which may preserve useful material missing from the recovery candidate.
Check source paths after accepting recovery
A recovered MLT can still reference media outside its recovery location. Inspect missing-file messages and identify the expected source directories. Then reconnect verified originals in a working copy. A timeline that opens with placeholder clips is a useful partial result, but it is not a complete restoration of the footage or sound needed for the edit.
Play the affected section from before the change through its ending. Check clip boundaries, transitions, titles, and audio continuity. A recognizable first frame can hide a missing later section. Save and reopen the new MLT after this inspection so that you know the recovered edit exists as a stable file rather than only in the current session.
Free route 2: compare existing backup versions
- Inspect the project directory and any configured backup location for existing native candidates.
- Preserve the available files before making new saves that can rotate history.
- Use the version-appropriate backup or Other Versions controls when available, or open copied candidates directly.
- Compare the intended timeline change and save the best candidate separately.
Shotcut’s available backup controls vary with release. Use the installed version’s interface and actual surviving files instead of assuming one universal filename. An earlier Backup and Save milestone can be more useful than a newer state after an accidental deletion. Compare actual editing content rather than treating the newest timestamp as the automatic winner.
Identify a revision with several timeline landmarks
Check a distinctive title, a recently trimmed clip, and the final sequence length. Then inspect the audio around the edited passage. One candidate may contain the new title while another preserves a later sound correction. Keep both until you decide how to reconcile them. This is more reliable than choosing a project because it opens without an error.
If you transfer verified work between candidates, compare track placement, filter settings, and transitions afterward. A copied element can behave differently in another timeline context. Save the combined edit as a new recovery version and record its sources. That keeps deliberate reconstruction visible rather than presenting a merged project as an untouched historical state.
Free route 3: reconnect existing media
- Inspect the missing media’s expected path and identity in the project.
- Locate the exact original in the preserved footage or audio folders.
- Use the missing-file repair workflow to select the correct source in a copied project.
- Play the affected clips and verify timing, duration, audio, and image content.
Relinking helps when footage still exists but moved. It does not retrieve a deleted recording or replace original camera quality with a thumbnail. Also avoid selecting a similarly named file from another shoot. Camera basenames can repeat, so compare scene content and duration before accepting the match. Removing a missing-file warning is only the beginning of validation.
Inspect edits that depend on the original duration
Check in and out points, speed changes, and any filters tied to clip timing. A replacement can show the correct opening scene while using a different take or edit length. Play the full affected passage in context. Then compare neighboring transitions and audio synchronization, because those relationships can expose a mismatch that a source preview alone misses.
For footage stored outside the project folder, record the accepted paths before creating a portable recovery copy. Keep the original media separately and test the new copy from another directory where practical. This helps identify accidental dependencies on a temporary location or a folder that another editor will not receive.
Free route 4: reconstruct a limited edit from surviving outputs
- Locate a verified rendered video, audio stem, title image, or other existing output.
- Identify its revision and the content it actually preserves.
- Build a new project using copies of those outputs only where native candidates cannot supply the work.
- Label the result as reconstruction and record which editing controls remain unavailable.
A rendered video can preserve a complete visible sequence while flattening its original tracks and effects. It may serve an immediate viewing need or provide a reference for rebuilding cuts. However, it does not automatically restore the original editable title, transition, or filter chain. Keep that distinction clear when deciding whether the result supports your next production task.
Compare output quality before reuse
Inspect resolution, frame rate, compression, color, and audio channels. Then check the beginning, changed passage, and ending. A file named final can still predate a late revision or omit an export range. Keep the best native candidates alongside the render so that later recovery can restore editability without losing the useful emergency output.
If you rebuild a title or transition from the render, preserve it as a new decision in the recovery project. Compare the timing and appearance at the intended output size. A close visual match can be useful, but it should not become a claim that the original parameter settings survived.
Diagnose a black preview or apparently empty timeline
Confirm the actual project path, timeline state, track visibility, and source availability. Then inspect whether the expected clips exist in the project. An unavailable source can produce black frames while the editing decisions remain intact. Conversely, an MLT that lacks the intended timeline objects needs a historical candidate rather than repeated display changes.
Separate disabled content from absent content
Check the relevant track and clip controls in a working copy. If content exists but does not display, investigate its visibility and placement. If the object is absent, compare native history. Avoid rebuilding a sequence before checking these distinctions, because new edits can complicate comparison while leaving a simple source or track-state problem unresolved.
Also inspect whether you opened an exported media file instead of the native project. The video can look familiar while offering none of the original timeline structure. Keep the roles of native MLT, source media, and rendered output clear in your folder and notes. Each preserves different information and supports a different kind of recovery.
Inspect MLT structure cautiously on a copy
An MLT project contains structured editing information, but text readability does not establish that every reference and timeline relationship is valid. Preserve the source before any manual inspection. Use Shotcut’s normal repair controls for ordinary missing paths. An experienced investigation may compare copied files, but deleting unfamiliar entries can discard useful editing data.
Do not treat renaming as content repair
A genuine temporary project candidate may become easier to open with the proper extension. However, renaming an empty or unrelated file cannot create the missing sequence. Check the actual file and its content before treating it as recovered. If the candidate opens, inspect the specific edit and save a new working project rather than overwriting the only source.
If one candidate repeatedly fails on a particular effect or clip, preserve it and compare an earlier stable project. Test narrow changes only in another copy. A stable partial edit can be valuable, but record any removed effect or unresolved clip so that it does not silently become the accepted complete production.
A worked recovery after losing an interview cut
Suppose the project crashes after you shorten an interview and add a lower-third title. Preserve the MLT and available autosaves, then compare the relevant title and cut point. Choose a candidate that contains the actual revision, not merely the longest timeline. An older project may preserve useful audio processing even if it lacks the latest title.
Reconcile picture and sound deliberately
If the best picture edit and sound correction come from different candidates, preserve both and rebuild their verified combination in a new project. Compare clip alignment, audio fades, and transitions around the join. Then play the passage with both picture and sound. This checks the production relationship that a successful object transfer alone cannot verify.
Export a short test around the changed section and inspect it independently. Then reopen the saved project and repeat the source-path check. This establishes both an editable milestone and a usable output. Keep any reconstructed title or sound adjustment identified in the recovery note for future revisions.
Identify the Shotcut revision through editorial decisions
Choose three landmarks before opening many backups: a distinctive cut, a title, and the end of the sequence. Compare those landmarks in each MLT candidate and record what survives. This provides a repeatable basis for selection when filenames and timestamps are ambiguous. A project with the longest timeline can still be an older assembly, while a shorter candidate may contain the exact revision you need to preserve.
Inspect the cut on both sides of the join
Play from before the edit into the following shot. Check the selected source frames, transition, and audio around the boundary. A candidate can preserve one side of a cut while using an older in point on the next clip. The relationship between the shots matters more than whether both clips appear somewhere in the project. Keep the comparison tied to the intended story or instructional sequence rather than only the presence of familiar media.
Also inspect a title’s wording, duration, and placement. A title image or rendered overlay can preserve appearance without retaining the original editable text or filter controls. Record that distinction if you use it for reconstruction. A visually faithful emergency title may support delivery while making future wording changes harder, so preserve any native candidate that still contains useful editable settings.
Reconnect media with the original editing assumptions in view
A recovered project can reference footage from several directories, including recordings, graphics, music, and external audio. Inventory the important sources before broad path repair. Then start with one exact known clip and compare its scene and duration. This prevents a folder-level repair from substituting a similarly named file from another shoot and makes the remaining missing assets easier to identify.
Review timing-sensitive filters after relinking
Inspect speed changes, fades, and filters whose behavior depends on the clip’s duration or selected range. A source that looks correct at the opening frame can diverge later. Play the complete affected passage and compare it with a reliable render where available. Then inspect any transition into neighboring clips. These checks connect the recovered source with the actual timeline decisions rather than treating a resolved filename as proof that the edit is correct.
If the source changed outside Shotcut, preserve both versions before deciding which one belongs in the recovery. A newly edited file can have the expected name but different timing or content. Choosing it may be a valid production update, yet it is not historical recovery of the original source. Record that decision and keep the accepted media version beside the recovered project so later reopening does not silently select another revision.
Compare audio continuity independently from picture
A video project can look complete while losing a sound correction, channel choice, or fade. Inspect the actual audio sources and play representative joins. Then compare any track-level processing and clip-level changes. A familiar waveform display does not establish that the intended take or channel survives. Listen for complete words, intended pauses, and consistent transitions, especially around the part of the timeline that motivated recovery.
Use a short export to expose practical output problems
Render a limited test covering the difficult edit and inspect it outside the editing session. Compare picture, sound, title timing, and the transition ending. This can reveal a problem that remains unobvious during preview playback. Keep the test output associated with the exact native candidate that produced it. An older good-looking render and a newly recovered MLT can each be valid while representing different editorial states.
If only a mixed audio render survives, identify what it allows you to change. You may be able to adjust the overall level or timing while losing individual dialogue and music controls. Keep that scope explicit in a reconstructed project. A stem or mix can save useful content without restoring every original audio decision, and another editor needs to know that before planning detailed revisions.
Inspect a partial native candidate without discarding useful work
An MLT that fails during one operation may still contain valuable timeline information. Preserve it and compare an earlier stable version before making repairs. If a specific clip or effect appears responsible, test a narrow change in another copy and record what you remove. This approach can yield a useful partial project while keeping the original source available for a more complete investigation.
Keep manual structure edits reviewable
Experienced inspection of a copied project can help identify a broken path or a truncated section. However, editing structured data without understanding its relationships can create a new incomplete project. Prefer the application’s normal controls where they address the problem. If manual work is necessary, retain the original and compare the resulting timeline object by object around the affected region. A successful load after deletion does not prove that the intended sequence survived.
When a repair removes a filter or title, use an existing render as a reference and recreate only the unresolved element in a new recovery version. Record that distinction. The native candidate supplies recovered structure, while the replacement element is new work. Clear provenance makes the result easier to continue and avoids suggesting that every original parameter returned simply because the project now opens reliably.
Evaluate a rendered video as an emergency source
Inspect the render’s resolution, frame rate, selected range, compression, and audio channels. Then compare its distinctive title and ending with the intended revision. A complete-looking video can predate a late correction or contain a reduced-quality delivery version. Decide what the next task actually needs before choosing it as a replacement source. An internal viewing copy may be enough for review while being unsuitable as the editable production master.
Rebuild editable elements only where needed
If you must reconstruct from the render, identify which parts require future changes. A static passage may remain usable as flattened media, while a title that needs translation or a cut that needs adjustment requires new editing work. Keep the source render untouched and save the reconstruction separately. This preserves useful appearance without pretending that the original timeline and controls exist inside the output file.
Also preserve any isolated graphics, music, or recordings that survive outside the native project. They can improve a reconstruction’s flexibility even when the main sequence is missing. Compare their revision and placement against the render rather than importing them indiscriminately. A deliberate inventory turns scattered surviving assets into a practical recovery plan and reduces the chance of rebuilding with the wrong take or title version.
Test the final project as a portable editing milestone
After accepting the native recovery, prepare the project and required sources in a clearly identified structure. Test a copied version from another directory where practical and compare the same editorial landmarks. This exposes accidental references to a temporary download or original workstation folder. Keep the preserved evidence separate from the portable copy so a test or cleanup cannot become the only remaining version of the recovered material.
Give the next editor a concrete acceptance record
Record the source MLT candidate, media versions, reconstructed titles or effects, and any flattened salvage. Then identify the test passage and output checked. The record should describe practical limits rather than a long troubleshooting diary. It lets another editor resume useful work without assuming that a warning-free launch means every original clip, effect, and source recording survived unchanged.
Preserve the accepted sequence before new editorial changes
Once the recovered MLT passes its checks, save a stable milestone and a reference render from it. Then begin new editing in another version. This boundary lets you distinguish recovery differences from later creative decisions and makes a newly discovered backup easier to compare. Keep the original candidates and their source details separate from active production.
Describe the remaining editability limit
If one section uses a rendered replacement while another retains native clips, state that explicitly. The next editor may be able to change overall timing without revising an original transition or title parameter. A useful reconstruction should make those controls and limits clear instead of hiding them behind a complete-looking timeline.
Before handover, inspect the actual project copy and source structure that another person will receive. Test the distinctive cut and title again from that copy. This verifies the deliverable rather than the original workstation, where a missing external source can remain available accidentally and conceal an incomplete package.
When storage recovery may help Shotcut work
PandaOffice Drecov can be considered for deleted saved MLT files, existing recovery candidates, or original media on readable storage. It cannot recreate an unsaved cut that never reached disk or infer all timeline controls from a flattened video. Use native candidates first, and avoid writing new renders to the affected storage while investigating deleted files.
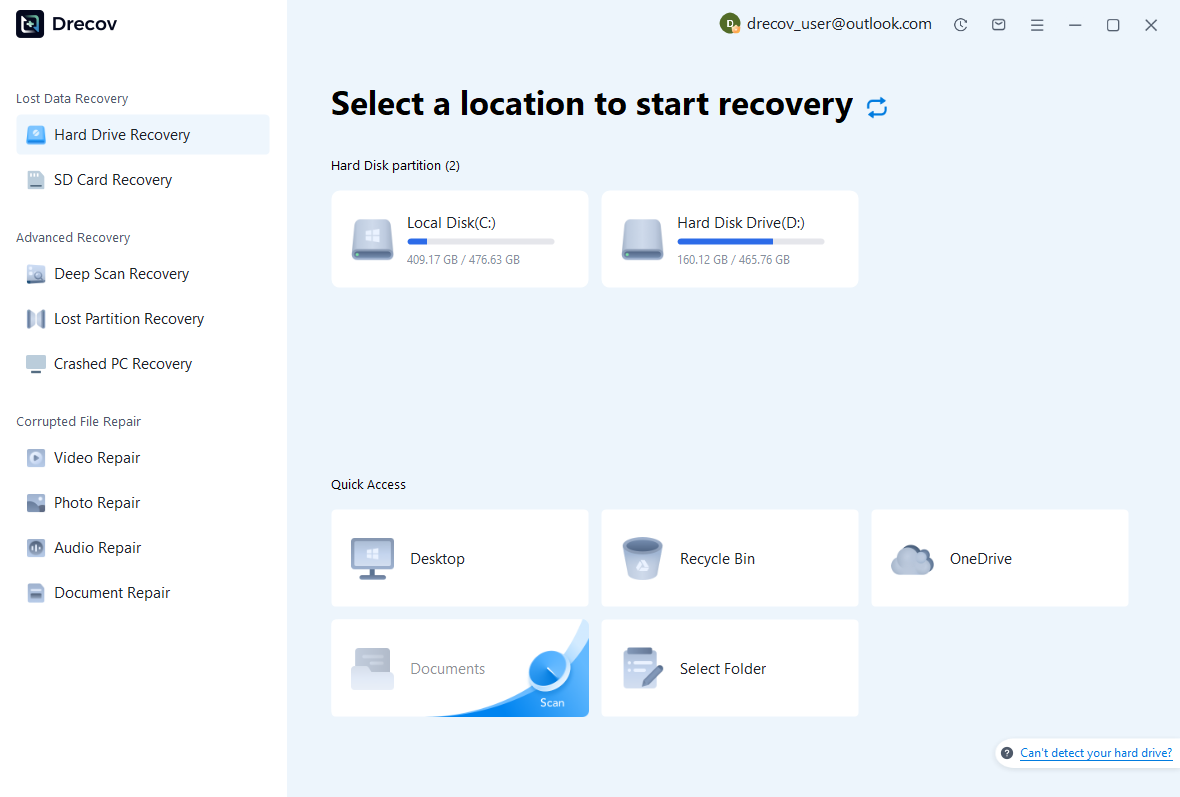
Step 1: identify the project or footage source
Choose the drive or partition that held the MLT, actual backup location, or missing recordings. Note which component each scan targets. Use other healthy storage for recovered output. If the source repeatedly disconnects or reports hardware read failures, assess that condition before treating it as a routine software recovery search.
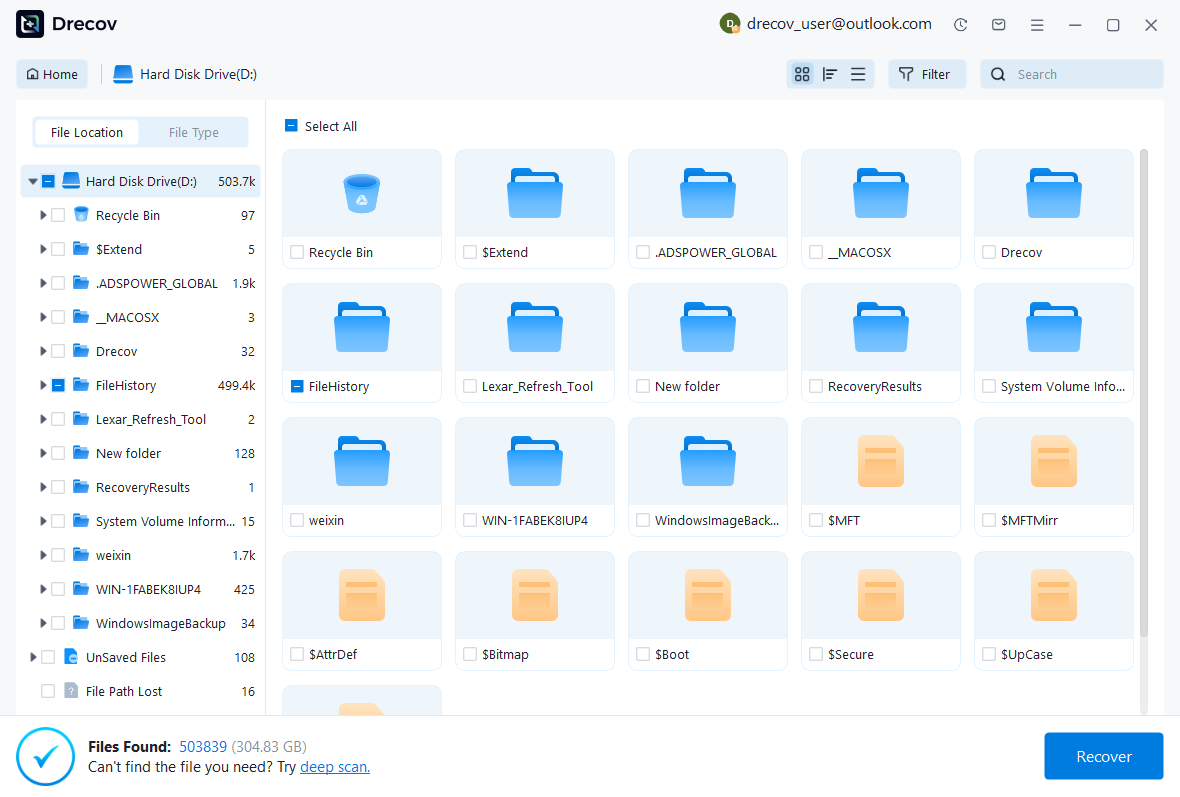
Step 2: compare native projects and original media
Review available paths, names, dates, sizes, and supported previews. Preserve plausible project revisions and associated media together where possible. A video preview can identify a scene but cannot establish that the corresponding timeline survived. Keep several useful candidates when necessary and compare their editing content in Shotcut after recovery.
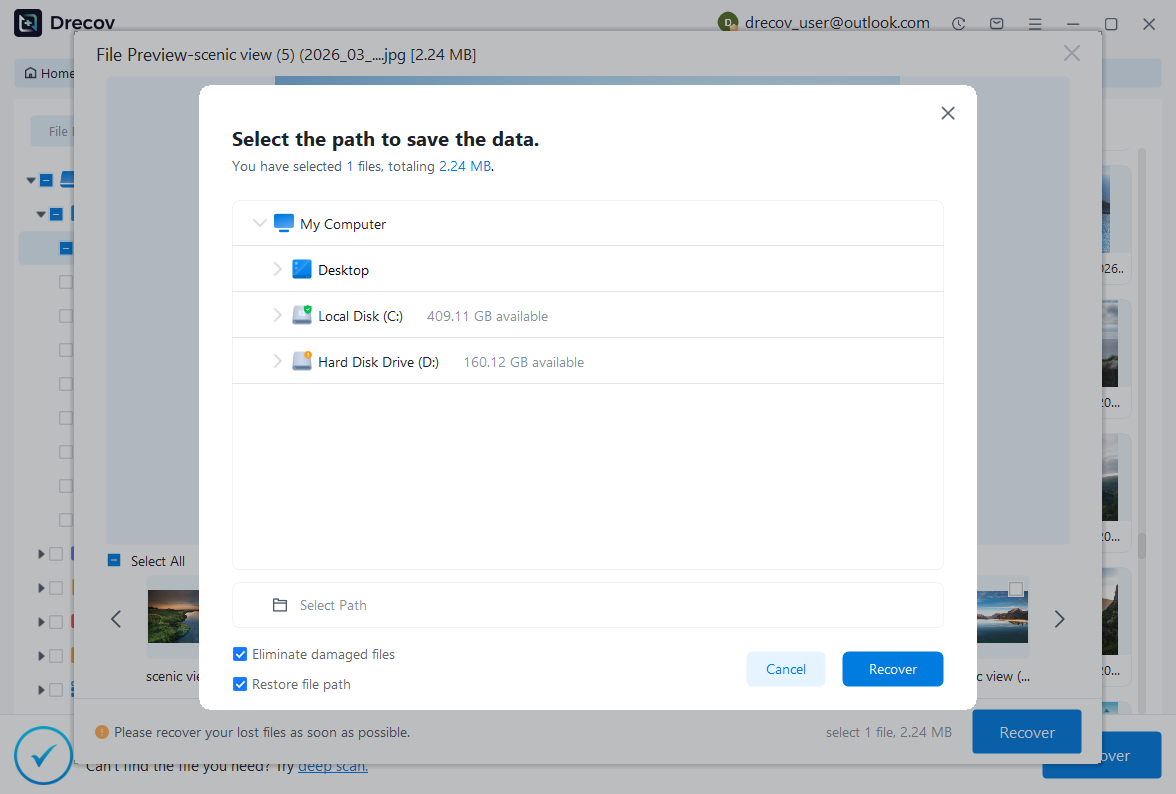
Step 3: restore elsewhere and test the saved edit
Recover selected files to a separate destination and preserve an untouched set. Open a working project, reconnect verified sources, and inspect timeline structure, filters, titles, transitions, and sound. Save a new MLT and export a representative test. Keep uncertain candidates separate from the edit you have already accepted.
Preserve the recovered edit as a clear milestone
Record the source project, media locations, rebuilt elements, and remaining limitations. Then close and reopen the accepted MLT and compare its important landmarks. Keep a reference render from that exact revision. This gives the next editing task a stable baseline instead of several similarly named files whose creative differences remain unclear.
Test backups with a disposable project
Create a small test edit and verify the backup controls available in your installed release. Make a harmless change, preserve the resulting candidate, and open a copy. Also test how a moved source is repaired. These practical checks show what your protection actually supplies without experimenting on the newly recovered production.
Related recovery resources
Explore the relevant recovery options: Hard drive recovery, External hard drive recovery.
For another recovery case and its practical checks, read the related recovery guide.
Check the vendor guidance for the installed version: official recovery documentation 1, official recovery documentation 2, official recovery documentation 3.





