








Recover the Krita painting at the right level
To recover Krita paintings, preserve the original KRA and inspect existing autosaves or backup copies before trying to repair the archive. A native painting can contain layers, masks, and other editing information that a PNG export lacks. Therefore, decide whether you need the complete editable work or an emergency image salvage, and keep those outcomes separate throughout the recovery.
A crash, a normal close without saving, and a damaged file do not leave the same evidence. Krita can remove autosave data during normal closing or saving behavior. Consequently, an autosave is not an unlimited version archive. Start with the actual surviving files and session state rather than assuming that every missing brushstroke must exist in a hidden directory.
Preserve the current painting and recovery clues
Copy the saved KRA, nearby backup files, and any plausible autosave candidates to another folder. If Krita still displays the painting, preserve that live content before closing the application to investigate. Also note the document name, canvas size, and a distinctive recent change. These details help identify the right candidate among several paintings with generic recovery filenames.
Avoid temporary-file cleanup while investigating an unsaved document. On Windows, the relevant autosave may be in the user’s temporary location, while saved documents can have candidates beside the original file. Inspect the configured settings and actual files rather than assuming one location covers every case. Keep the original candidates unchanged even after you find one that opens.
Free route 1: restore an offered crash autosave
- Preserve available candidates before accepting or rejecting a recovery choice when possible.
- Start Krita and inspect the recovery dialog for the affected painting.
- Restore the relevant candidate and compare its canvas with the missing work.
- Use Save As to create a new KRA in a separate working location.
Do not reject a recovery offer merely because you intend to investigate later. The choice can affect the remaining autosave data. Also remember that a recovered document still needs a deliberate save. Inspect the candidate first, then preserve it as a named native file. Closing the recovered painting without saving can discard the useful work you just recovered.
Inspect layers rather than only the composite
Check the layer list, group structure, masks, and visibility. Then select a layer containing a recent stroke or adjustment and verify that it exists as editable content. A familiar canvas appearance is encouraging, but it does not show whether the original layer structure survived. This distinction matters when your next task requires changing a mask or adjusting one part of the painting independently.
Compare the canvas dimensions and color settings too. A candidate from another export or earlier milestone can look similar at a small scale while using different resolution or color assumptions. Also inspect the edges of the canvas and important detail areas. A quick thumbnail comparison can miss a partially damaged region or an absent group outside the central subject.
Free route 2: open a saved document’s existing autosave
- Show hidden files and full extensions in the original painting folder.
- Look for an existing autosave associated with the saved KRA and copy it elsewhere.
- Open the copied candidate in Krita or use the original file’s recovery offer as appropriate.
- Save the verified recovery under a new KRA name and retain the original saved painting.
A named autosave may contain work newer than the last manual save, but only if Krita wrote it before the interruption. Do not assume that a hidden file is useful merely because it contains the painting’s name. Check the canvas content and the specific recent change you need. Also retain the older manual save, because an autosave can preserve an unwanted edit or the state that preceded a crash.
Recover an unsaved document cautiously
For a painting that never received a manual filename, inspect the startup recovery offer and relevant temporary storage. Generic autosave names can represent several documents from the interrupted session. Copy plausible candidates before opening them, then identify them by canvas size, subject, and recent content. A filename alone may offer little help when the document was still untitled.
If no surviving candidate contains the work, changing autosave settings now cannot reconstruct it. Also avoid claiming that a normal close without saving always leaves a recoverable file. The actual cleanup behavior matters. A disk search can only retrieve content that reached storage and remains recoverable; it cannot recreate brushstrokes that existed solely in memory.
Free route 3: compare an existing KRA backup
- Inspect the painting folder and configured backup location for an existing ordinary backup.
- Copy the candidate, preserving its original filename in your notes.
- If necessary, remove the backup suffix from only the working copy so its extension ends in .kra.
- Open it in Krita and compare the layers and relevant painting details.
An ordinary backup commonly represents a previous saved state, not the newest unsaved canvas. That can make it especially useful after a mistaken overwrite. However, later saves can rotate or replace that backup. Preserve the existing file before repeatedly saving the original. Renaming a copy helps the application recognize a genuine KRA candidate; it does not repair an unrelated or empty file.
Check incremental backups and versions separately
If you previously used incremental backup or version commands, inspect those numbered files as additional candidates. Their numbering and contents reflect how they were created, so compare actual painting content rather than assuming the highest number contains every desired change. One candidate may preserve the correct composition while another has the later detail pass.
Retain the useful candidates and transfer verified content into a new painting when necessary. Check layer positions, blending modes, masks, and color behavior after any transfer. Copying a layer successfully does not establish that it produces the same appearance in a different document context. Export a review image and compare it with the intended composition before accepting a combined recovery.
Free route 4: salvage the merged image from a readable KRA
- Make another copy of the damaged KRA and keep the original untouched.
- Open the copy as a ZIP archive with a suitable archive tool.
- If the entry exists and reads successfully, extract mergedimage.png to a separate folder.
- Inspect the extracted image and label it as a flattened visual salvage.
The merged image can preserve the visible canvas when the native document no longer opens. However, it does not restore the original editable layer stack, masks, or painting operations. Also distinguish KRA from other formats whose contents differ. If the archive cannot read the relevant entry, simply changing the extension will not create a complete composite image.
Assess whether the image is useful
Open the extracted PNG in an image viewer and inspect it at full resolution. Check the dimensions, transparency, edges, and key detail areas. A small preview can hide missing tiles or corruption. Then compare it with any existing export. The older export may be visually complete even if the archive’s merged image reflects a later but damaged state.
Keep the recovered composite as a reference or emergency output according to its actual quality. If you paint over it to rebuild missing layers, describe that work as reconstruction. A flattened image can provide a strong visual starting point, but it cannot reveal how hidden layers, masks, or adjustments originally produced the appearance.
Diagnose a painting that opens with missing content
Inspect layer visibility, group visibility, opacity, masks, and the active document before assuming the KRA lost data. A hidden group can make a large section of a painting disappear. Work in a copy while testing display and layer settings. If the expected layer is absent altogether, compare historical candidates instead of repeatedly toggling unrelated options.
Separate selection problems from lost strokes
A brushstroke may appear to do nothing because you are painting outside a selection or on an unexpected layer. This is a different problem from losing previously saved content. Inspect the active layer and selection state before repainting large areas. Otherwise, new strokes can complicate the comparison with a recovery candidate while leaving the original cause unresolved.
Also compare the displayed canvas with an existing export. If the native file contains the right layers but the appearance differs, inspect blending, masks, and color settings. If the export contains content absent from every native candidate, it may become a reconstruction reference. Keep those observations specific so that you know which part of the painting still requires work.
A worked recovery for a layered illustration
Imagine a crash after you finish a lighting pass. The manually saved painting contains the base colors, while an autosave appears to contain the newer light. Preserve both and inspect the layer stack. Identify the actual lighting layer and its blend mode rather than judging only the bright appearance of the thumbnail. Then save the recovered candidate under a new native filename.
Reconcile an older composition with newer detail
Suppose the newest candidate also contains an unwanted crop. The older KRA may preserve the full composition while the autosave supplies the lighting layer. Transfer the verified layer into a new copy of the older composition and inspect alignment at full resolution. Also compare masks and group relationships. The final result should preserve the intended canvas, not merely the newest file’s timestamp.
After saving, close and reopen the combined KRA. Then toggle the transferred layer and export a review image. This checks both editability and appearance. Record that the base came from the earlier save and the lighting came from the autosave. That short note makes later troubleshooting easier if another layer or detail still differs from the intended revision.
Handle archive damage without destroying evidence
If a KRA fails to open, preserve it before testing archive inspection or any repair utility. Keep each repaired output separate from its input. A repair that makes the container readable may still lose painting data, so assess the extracted contents and the canvas afterward. Do not describe a successful archive operation as proof that the original layer information survived intact.
Know when a candidate is incomplete
A zero-byte file cannot contain the painting, and a truncated archive may lack entries needed for a complete document. Compare file size with known saves only as a clue, not a guarantee. Large files can be damaged, and small files can be valid for simple artwork. The decisive checks remain successful reading, expected layer content, and a verified visual result.
If a candidate repeatedly crashes Krita, retain it and compare a safer older version before attempting extensive manual changes. A particular filter or object may trigger the problem, but indiscriminately deleting content can sacrifice useful artwork. An unstable partial candidate can still provide limited salvage, provided you keep a clear record of what you extracted and what remains uncertain.
Identify whether the missing Krita content is paint or structure
A painting can preserve its visible composite while losing a layer relationship that you need for further editing. Start with a list of the missing work: brushstrokes, a mask, a transformed group, an animation frame, or a color adjustment. Then inspect each candidate for those specific elements. This makes the recovery target practical and helps you decide whether a native backup, autosave, or flattened image can satisfy it.
Use a detail area to compare painting revisions
Choose a distinctive area containing the recent work, such as a corrected eye, a changed background edge, or a new highlight. Inspect it at full resolution in each candidate. Then toggle the relevant layers to determine where the content actually lives. A similar-looking composite can come from a different combination of layers, and that difference matters when you need to revise the same detail again.
Also inspect the borders of transformed or cropped content. A candidate can preserve the central subject while omitting material outside a later canvas boundary. Compare the intended dimensions and any older full-composition reference. If you recover the missing border from another source, record that combination and check alignment carefully. The new document should preserve the intended composition rather than simply inherit whichever crop appears in the newest candidate.
Recover masks with their intended layer relationships
A mask can hold important editing information even when it is not visible as ordinary paint. Inspect the affected layer and its attached masks in the native candidate. Compare what happens when the mask is enabled and disabled in a working copy. This separates absent paint from paint that survives but is hidden or altered by a recovered mask state.
Transfer a verified group as a controlled test
When an older candidate supplies a useful group, preserve its structure during transfer where appropriate. Then inspect the result in the new document with surrounding layers visible. Blend modes and masks can interact with neighboring content, so an isolated preview is not enough. Compare the combined appearance at the intended scale and retain the original source group in case the transfer needs adjustment.
If you must rebuild a mask from a flattened reference, document that as reconstruction. The reference can show the desired edge but may not preserve the original soft transitions or hidden content. Keep the best native candidate alongside the reconstructed result. This lets you continue useful work without pretending that the newly created mask is a direct restoration of the original editing data.
Check animation work at the frame level
For an animated painting, inspect the relevant timeline and frame content rather than judging recovery from the currently displayed frame. Identify the changed pose, timing, or layer that matters. Then compare a small sequence around that point. A candidate can contain the expected still image while lacking later keyframes or using different timing, so the animation needs its own content check.
Distinguish a rendered sequence from editable frames
An existing image sequence or video can preserve the visible motion while omitting the native layer and frame organization. Keep it as a reference or limited output salvage. If you reconstruct an animation from those frames, identify which timing and editing controls you rebuilt. A playable render is valuable, but it does not automatically recreate the original editable animation project.
Also inspect whether exported frames represent the latest revision and complete range. Compare the opening, changed passage, and ending. A folder of numbered images can appear complete while missing a short section or containing frames from an older export. Keep those output checks separate from verification of the native KRA so that you know exactly what each source preserves.
Compare color behavior after native recovery
A painting can open with the expected layers while looking different because of document color settings or the viewing environment. Inspect the native document’s relevant settings and compare a reliable existing export. Avoid applying broad color corrections merely to compensate for a display difference before you understand it. Such edits can change valid recovered pixels and make later comparison harder.
Test a fresh export in the intended workflow
Export a review image from the accepted native copy using the settings appropriate to the actual deliverable. Then inspect it in the normal destination workflow. Compare neutral areas, important colors, transparency, and fine gradients. This tests the output you will use, while preserving the native painting for further investigation if the appearance differs from the reference.
Keep the export settings and source revision identified together. A recovered KRA and an old PNG may both be valid while representing different painting stages. Do not alter the native file simply to force a match to an export whose revision you have not established. First identify which source reflects the intended creative decision, then make any reconstruction edits deliberately in a new copy.
Evaluate a partial composite as an emergency deliverable
If only mergedimage.png or an older export survives, inspect whether it meets the immediate need without inventing editability. A complete high-resolution composite may be suitable for a temporary review, while a small thumbnail is only an identification clue. Check dimensions and detail before deciding. The fact that an image is visible does not establish that it can support the intended print or revision task.
Preserve room for later native recovery
Keep the original KRA candidates and their source details even after you begin painting over a flattened salvage. A later native candidate might restore layers that reduce reconstruction work. Save the rebuilt painting under a distinct name and record which content came from the composite. This prevents a useful emergency reconstruction from obscuring the evidence needed for a more complete recovery.
Finish with a short acceptance note covering canvas content, editable layers, masks, animation where relevant, and the final export. List any remaining limitations explicitly. You may have a visually complete illustration with incomplete editability, or an editable older painting that still lacks one detail pass. Both are useful outcomes when their scope is clear and the next creative task can begin from a reliable baseline.
Compare the recovered canvas with the intended output size
A painting can look complete in a small window while containing damage that becomes visible at delivery resolution. Inspect important edges and texture areas at full size, then review a fresh export at the dimensions you actually need. Also compare transparency and cropped boundaries. This connects the native recovery check with the practical image task and helps identify a composite that is useful only as a lower-resolution reference.
Preserve source and reconstruction boundaries
If you repaint a missing area over flattened salvage, keep that new work on clearly identified layers in a new document. Retain the original composite and any native candidates separately. Then record which regions came directly from recovery and which you reconstructed. This makes later correction easier and leaves room for a more complete native candidate to replace the approximate rebuilt area if one becomes available.
Before finishing, reopen the accepted painting and toggle the layers needed for the next revision. Then export the review image again. A successful first save can still leave uncertainty about the actual stored content, while this reopening check verifies a stable milestone. Keep any remaining missing masks or frames listed beside the document rather than burying them in an informal memory of the recovery process.
When storage recovery can help a missing KRA
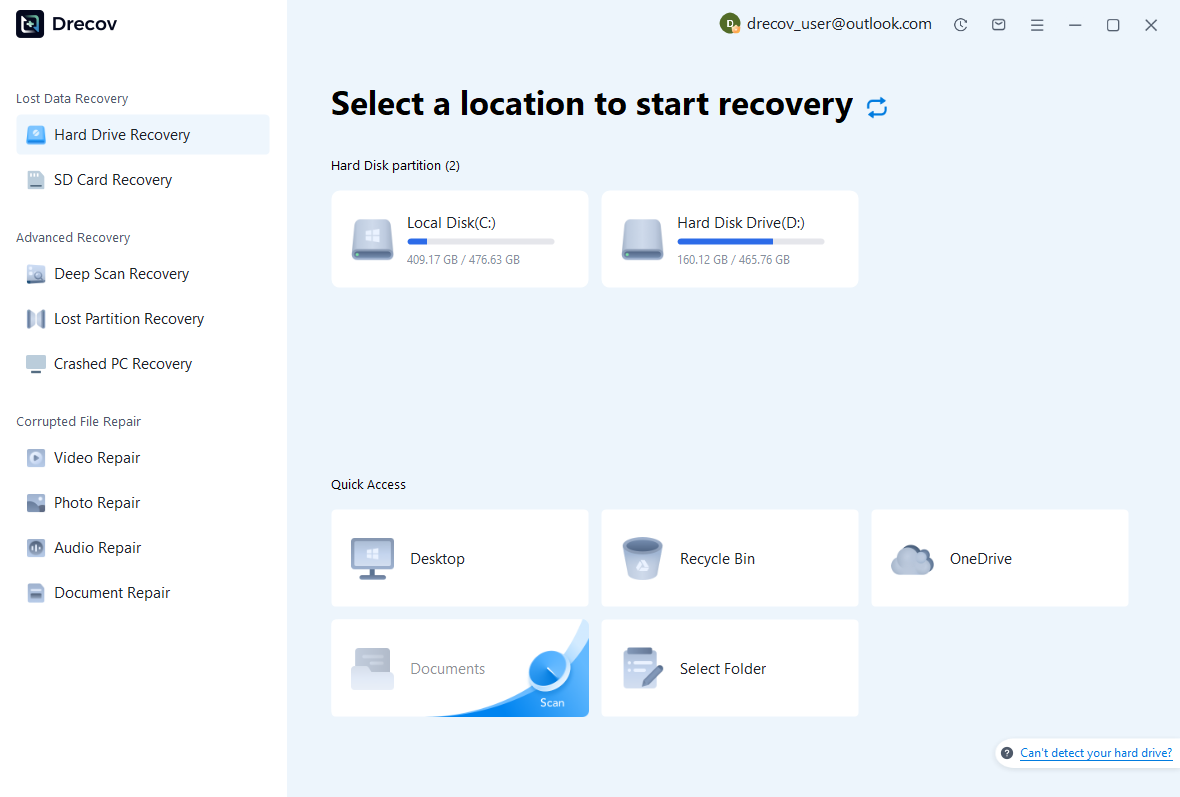
PandaOffice Drecov may be useful when a saved painting, existing backup, or autosave was deleted from readable storage and no native route supplies it. It cannot regenerate an unsaved canvas that never reached disk. Also reduce activity on the affected location, especially when the missing candidate lived in temporary storage that ongoing applications continue to use.
Step 1: identify the painting’s storage source
Select the drive or partition that held the KRA or its actual autosave and backup location. Record whether you are searching for a named painting or an untitled-session candidate. Keep the recovery destination elsewhere. Repeated hardware read failures or disconnections require assessment before you proceed with an ordinary file-recovery scan.
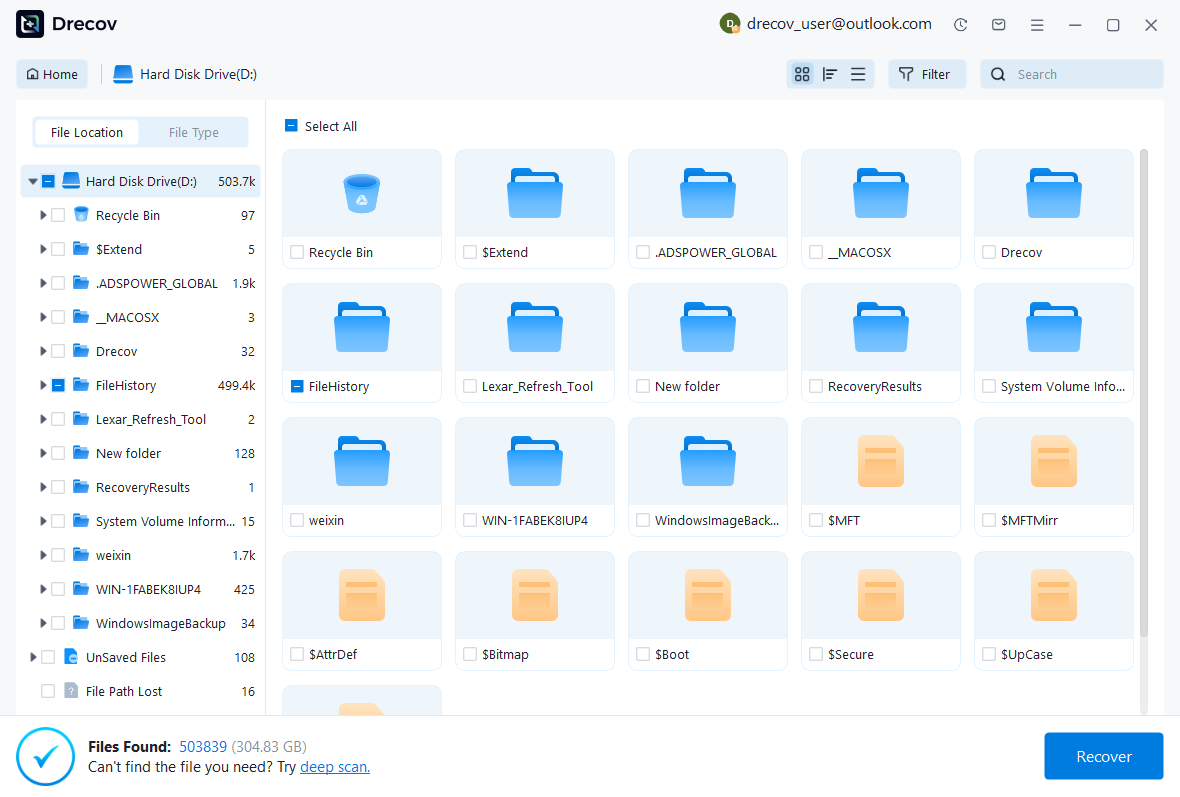
Step 2: compare native and visual candidates
Review available names, paths, sizes, dates, and supported previews. Save plausible KRA candidates and useful image exports, keeping their roles separate. A PNG can preserve appearance while a KRA may preserve editability. Neither a recognizable preview nor a complete filename proves that every layer or canvas region survived the deletion.
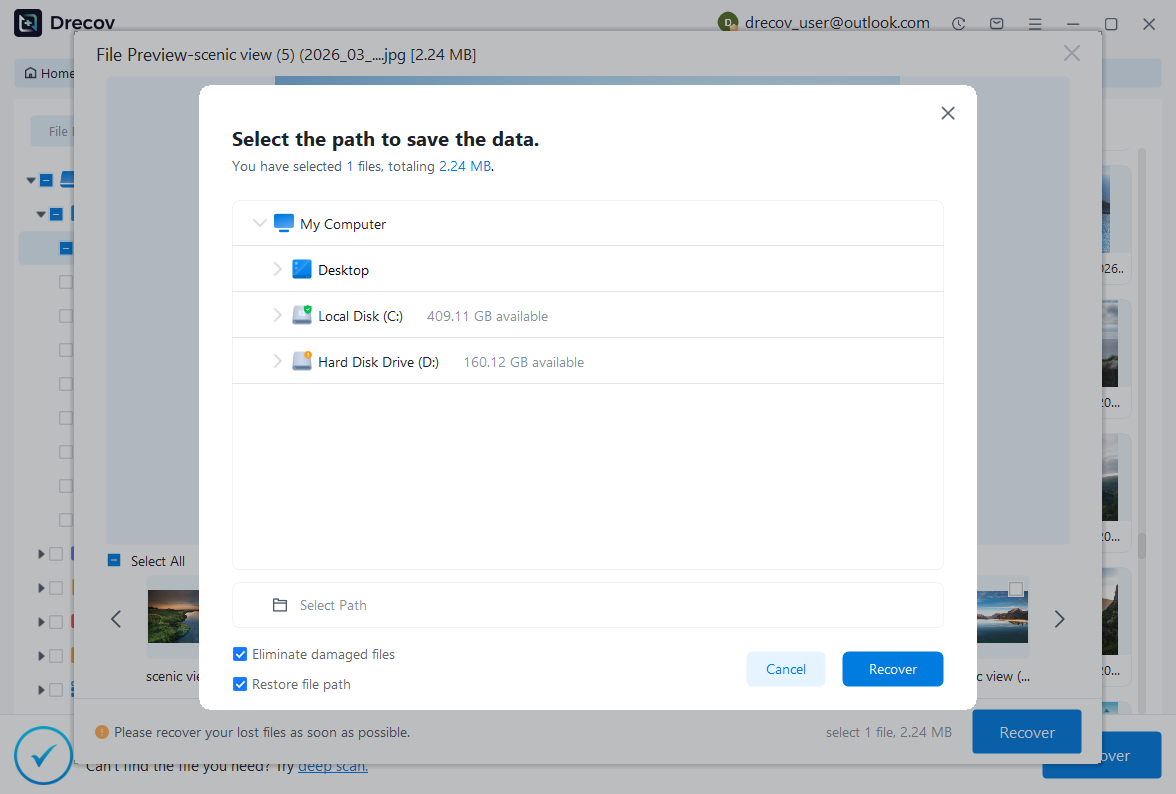
Step 3: restore elsewhere and inspect the painting
Recover selected files to another healthy destination and open working copies in Krita. Inspect the full canvas, layers, masks, blending, dimensions, and relevant recent changes. Then save a new native copy and export a review image. Keep uncertain or damaged candidates separate so they do not overwrite the painting you have already verified.
Confirm the result and test future protection
Reopen the accepted KRA and verify that the key layers remain editable. Then inspect a fresh export at the intended output size. This checks that the recovered painting supports both continued work and the immediate deliverable. Also preserve the original candidates and a short note explaining which parts came from autosave, backup, or flattened salvage.
Use a disposable canvas for a backup test
Create a small test painting, save it, make a harmless change, and verify the configured backup behavior. Inspect the actual autosave and backup locations and confirm that you can open a copied candidate. This practical check is more useful than relying on a remembered default interval or folder that may differ between versions and installations.
If no surviving native source contains the missing layers, document that gap and choose a reconstruction plan based on the best visual reference. A recovered composite can still save substantial work. However, keeping the distinction between editable recovery and flattened salvage clear prevents an emergency image from silently replacing the layered master.
Related recovery resources
Explore the relevant recovery options: Hard drive recovery, External hard drive recovery.
For another recovery case and its practical checks, read the related recovery guide.
Check the vendor guidance for the installed version: official recovery documentation 1, official recovery documentation 2.





