








Recover the QGIS project and its data separately
To recover QGIS projects, first decide whether the missing item is the project document, a referenced dataset, or an unsaved layer edit. These are different problems. A QGZ file can preserve your map configuration while its external data remains elsewhere. Therefore, start by preserving the project and identifying its data sources before deleting unavailable layers or rebuilding the map.
A familiar map can disappear after a folder move even when every feature still exists. Conversely, an intact project cannot restore a deleted dataset merely by remembering its path. This guide covers existing project backups, QGZ inspection, data-source repair, and limited reconstruction. Each route includes checks that help you distinguish a recovered map setup from recovered geographic data.
Record the missing map state
Write down the project path, the affected layer names, and the last operation you remember. Also note whether the failure followed a save, a folder move, an interrupted edit, or a change to a database connection. Then preserve the project folder and its local datasets. Include related files that share a dataset name, because some geographic formats consist of several companion files.
Inspect the source information for each unavailable layer. A local path, database connection, and web service require different recovery decisions. For example, repairing a moved GeoPackage path may restore access immediately, while an unavailable server requires the correct connection and permissions. Searching your computer for a deleted file cannot solve a service outage or an expired login.
Free route 1: compare an existing project backup
- Preserve the current QGS or QGZ file and the surrounding project directory.
- Inspect the same directory for existing project backup files created by your QGIS version.
- Copy a suitable candidate elsewhere and give the working copy the appropriate project extension.
- Open it in QGIS and compare layer settings, layouts, and the missing change.
For an uncompressed QGS project, an existing QGS backup may have a trailing tilde. Backup names can vary with the project format and version, so inspect actual files rather than relying on a single filename rule. Renaming a copied candidate only helps QGIS recognize it. It does not rebuild a damaged dataset or create a historical version that never existed.
Compare settings rather than just the map image
Inspect layer order, styles, labels, filters, joins, and print layouts. A backup that draws the correct roads may still lack a later attribute filter or layout annotation. Choose several distinctive details from the intended revision and check them in each candidate. This gives you a practical basis for choosing a baseline instead of assuming that the largest or newest file is best.
Keep the current project as well as the older backup. You may need a layout from one candidate and a later style from another. Make those transfers into a new recovery project and record their source. Do not repeatedly replace the original document while comparing versions, because that makes it harder to distinguish recovered settings from changes made during the investigation.
Free route 2: inspect a copied QGZ archive
- Make a separate copy of the QGZ file and preserve the original unchanged.
- Open the copy with an archive tool, or rename that copy to ZIP for inspection.
- If the archive reads successfully, extract its QGS and any associated auxiliary data together.
- Open the extracted project copy and inspect the map settings and data-source messages.
A QGZ is a compressed project container. Inspecting it can help separate a container problem from a project-definition problem, but successful extraction does not establish that all geographic data is inside. Many layers still reference external files or services. Also preserve auxiliary data alongside the project when present, since label positions or other project-specific details may depend on it.
Avoid casual edits to project XML
The extracted QGS is readable XML, but deleting an unfamiliar element can remove a useful configuration or relationship. Prefer QGIS’s own project and source-repair tools for ordinary recovery. If an experienced user investigates XML, work on another copy and keep a record of every edit. A file that parses afterward may still have lost settings needed for the intended map.
Compare the extracted project against a known backup before making structural changes. For example, a missing print layout may be absent from the document rather than merely hidden in the interface. A container inspection can help identify that distinction. It cannot infer the content of a layout or expression that no surviving project recorded.
Free route 3: repair moved data sources
- Open a copy of the project and retain unavailable layers when QGIS offers that choice.
- Inspect the original data-source path for one affected layer.
- Use the unavailable-layer dialog or Repair Data Source to select the correct existing dataset.
- Apply the repair and verify the layer’s features, attributes, style, and coordinate reference system.
This is often the best route after moving a project directory or changing a drive location. Repair the source to the exact dataset, not merely a file with a similar name. A different GeoPackage or shapefile can load successfully while representing an older survey. Therefore, compare a distinctive feature and an attribute value before accepting the relinked layer as correct.
Repair one known layer before bulk changes
Start with a source whose location and revision you can identify confidently. After it loads correctly, inspect any automatic repair of related paths. This saves time while giving you a clear reference for what changed. If the application proposes several matches, do not accept them all solely because the filenames align. Verify that each match belongs to the intended geographic dataset.
Keep the original unavailable layer configuration while testing. Removing the layer and adding a new one may lose useful style, joins, labels, or form settings. Repairing its source can preserve those settings when the schema remains compatible. If the source schema changed, inspect expressions and field references separately, because a visible map alone does not prove that every dependent setting still works.
Free route 4: reopen an existing stored project
- Identify whether the project was previously saved in a GeoPackage or supported database storage.
- Connect to that existing storage with the correct account and permissions.
- Open the relevant stored project through QGIS’s project storage interface or Browser panel.
- Save a separate working copy and compare its revision and external dependencies.
An existing stored project can supply a map configuration when a local project file is missing. However, the storage must actually contain that project. A GeoPackage holding feature tables does not automatically contain your QGIS layer styles and layouts. Also keep project storage separate from layer storage in your notes, since they can share a container while serving different purposes.
Confirm access before assuming corruption
A connection failure can arise from a service problem, changed credentials, or unavailable permissions. Record the exact message and test the expected connection through the normal interface. Do not create a replacement database with the same name during diagnosis. That can obscure which source the project expects while providing none of the missing data.
If another authorized workstation still opens the intended stored project, save a separate copy there and document its revision. Also identify any local-only dependencies on that workstation. A project that works on one machine may rely on a local raster or custom style file that was never placed in shared storage. Recovering the project definition alone will not transfer those dependencies automatically.
Distinguish project saves from layer edit commits
Saving a QGIS project and committing edits to a dataset are separate operations. A restored project can therefore show an older data state even when its styles and layouts are current. Inspect whether the missing work consisted of geometry edits, attribute edits, or map settings. Then look for the corresponding saved dataset or project candidate rather than assuming one file contains both.
Preserve a surviving editable session
If the layer still contains unsaved changes in a live session, avoid closing it merely to test whether the project reopens. First inspect the pending edits and choose an appropriate way to preserve them in a separate dataset. Verify the output’s feature count, fields, and coordinate system. A screenshot of the map is useful evidence, but it does not preserve editable geographic features.
For a temporary or memory layer, determine whether you ever wrote its features to persistent storage. An old project file may remember a layer’s existence without retaining the actual transient data. If no surviving session or exported dataset contains the features, recovery may require redoing the processing step from its original inputs. State that limitation clearly rather than promising that a disk scan will recreate unsaved memory content.
Check companion files and container contents
A dataset can fail even when one familiar filename survives. Inspect the expected companion files for the actual format, and keep them together during recovery. For a GeoPackage, inspect the layer list inside the container. Several tables may exist under one filename, so pointing a project at the container does not by itself confirm that the intended layer and schema are present.
Validate attributes as well as geometry
Open the attribute table and compare a few known records. Then check feature counts, field names, and field types against the expected dataset. A map can look plausible while a join key or numeric field changed. That difference can break labels, filters, and calculations even though the geographic shapes still draw in approximately the right place.
Check the coordinate reference system and the project display settings independently. A layer that appears shifted may contain valid data interpreted with the wrong reference information. Do not move features manually to make them align before investigating the source definition. A visual adjustment can introduce a new geographic error while hiding the actual cause of the display problem.
A worked recovery after moving a mapping project
Suppose a land-use project opens with unavailable layers after you move its folder. Preserve the project first, then inspect one missing raster and one vector layer. If the datasets exist in the new folder, repair their sources and compare known landmarks. This addresses a path problem without discarding the project’s carefully configured styles or print layouts.
Check the less visible dependencies
Next inspect joins, expressions, external images, and layout items. A north arrow or report image may refer to another path, while a joined table may remain unavailable despite a correct-looking map. Export a review PDF to a new folder and inspect each page. This tests the intended output rather than assuming that a populated map canvas means the entire project works.
If one layer genuinely no longer exists, keep its configuration while investigating a historical dataset or authoritative source copy. You can then reconnect it without rebuilding all its presentation settings. If you must reconstruct the layer from original inputs, document the processing choices and compare the result with the last available output. Reconstruction can be useful, but it is a different result from recovering the original edited dataset.
Recover a map layout without losing its data assumptions
A print layout combines geographic content with presentation decisions. After recovering the project, inspect the map item’s layer set, extent, rotation, scale, and any atlas settings that the intended output uses. Then compare the legend and annotations with the visible layers. A project can load all datasets while the layout still points to an older map state, so the output needs its own acceptance check.
Compare one known feature across the canvas and layout
Choose a distinctive feature near a label or boundary that changed in the intended revision. Locate it in the map canvas, inspect its attributes, and then inspect the same area in the print layout. This connects the data check with the output check. If the feature appears correctly in the canvas but not in the layout, investigate the layout’s layer and extent settings before changing the dataset itself.
Also inspect layout items that reference external images or text sources. A logo, photograph, or linked text can remain unavailable even after geographic layers reconnect. Preserve the original item and repair its source in a working copy. Rebuilding the whole layout may be unnecessary and can discard careful spacing or expressions. Test a fresh export to confirm the repaired item appears in the actual deliverable.
Reconstruct a missing derived layer from preserved inputs
If the missing layer was generated through a reproducible processing step, identify its original inputs and parameters before rerunning anything. Preserve the inputs and write the new output to a different location. Then compare the reconstructed layer with any surviving reference, including feature counts, field definitions, and known spatial relationships. This can produce a useful replacement when no original output survives, but it is reconstruction rather than retrieval of the deleted edited file.
Separate repeatable processing from manual corrections
A buffer or join may be straightforward to rerun when the exact inputs and parameters survive. A later manual geometry correction may not be reproducible from those inputs alone. Record that distinction before accepting the regenerated layer. Otherwise, a clean processing run can silently remove the hand-edited details that made the original dataset appropriate for the map.
Review the processing environment and source revisions as well. A different input dataset can change the result even when you reuse the same settings. Compare a few representative features and the boundaries most relevant to the map’s purpose. A successful processing message confirms that the tool finished; it does not establish that the reconstructed layer matches the intended historical output.
Check joins and expressions after source repair
A relinked layer can draw correctly while its joins, filters, or expressions fail. Inspect the fields those settings reference and compare their names and types with the expected schema. Then test a representative label, calculated value, and joined record. This catches a common recovery gap: the geographic shapes survive, but the information attached to them no longer supports the map’s intended explanation.
Verify a join with known identifiers
Select a few features whose joined values you can verify independently. Check the key on both sides of the relationship and inspect unmatched records. A schema-compatible table with older identifiers can produce a plausible but incomplete join. Do not fill the gaps with guessed values merely to make labels appear. Preserve the uncertainty and locate the correct source revision or rebuild the relationship from authoritative data.
For expression-driven labels or symbology, inspect both the expression and the values it consumes. A missing field can produce an obvious error, while a changed numeric range may simply alter colors or categories. Compare the recovered map’s legend and a few known features with the intended interpretation. This gives you evidence about meaning, not just whether QGIS can render something on the screen.
Recover geographic files as complete format-specific sets
When inspecting recovered files, determine the actual data format before deciding which pieces belong together. A shapefile-based dataset relies on companion files, while a GeoPackage can contain multiple tables in one container. Keep matching files and their source details together. Avoid combining similarly named companions from different candidates, because that can create an inconsistent dataset that appears to load but behaves unpredictably.
Inspect the intended table inside a GeoPackage
Open the container through the normal QGIS interface and inspect the layer names, geometry types, and attributes. Then choose the table the project originally referenced. A container with the correct filename can still hold an older or different table set. Compare a known record and spatial extent before accepting it, especially when several exports or intermediate outputs share similar names.
Keep the source coordinate information alongside any reconstructed geographic file. If a companion definition is missing, establish the correct reference system from reliable project evidence rather than guessing from the display. Assigning the wrong system can make features appear in a misleading location. A repair that removes an error message should still preserve the geographic meaning of the data.
Evaluate temporary-layer recovery honestly
If a temporary layer survives in an open session, export it deliberately to persistent storage and inspect the resulting dataset. Compare feature count, field types, and geometry after reopening the export in a separate project. This confirms that the useful content moved from session memory to a file you can retain. Saving the project alone is not an adequate substitute when the layer’s features remain transient.
Use outputs as clues when the session is gone
A screenshot, PDF, or rendered map may show where a temporary layer appeared, but it does not generally contain the complete editable attributes and geometry. Use it to guide reconstruction only within its actual information limits. For example, a visible buffer boundary can help check a regenerated result, while hidden attributes and exact processing choices may remain unknown.
End the recovery with a list of accepted datasets and unresolved gaps. State whether the project settings, geographic features, manual edits, and final layout all passed their relevant checks. This makes partial success useful: you can preserve a working map configuration while still identifying one dataset that requires authoritative replacement. It also prevents a visually complete export from being mistaken for a fully recovered geographic analysis.
Verify scale-sensitive labels and symbology
A recovered map can look correct at one zoom while behaving differently at its intended output scale. Inspect scale-dependent visibility, label placement, and symbol sizing in the accepted project. Then compare the actual print layout or exported map at the target scale. This catches settings that a quick canvas inspection may miss, especially when an older project candidate supplied the styles while a newer dataset supplied the features.
Record the geographic acceptance scope
State whether you verified geometry, attributes, joins, coordinate systems, and layouts. Then identify any dataset whose revision remains uncertain. A clear inventory makes the result easier to use: someone can retain the recovered map configuration while replacing one unresolved source with authoritative data. It also prevents a polished output from implying that every underlying geographic edit survived.
If a colleague will continue the work, provide the accepted project and its source inventory together. Include the actual paths or connection descriptions needed for the intended environment, without embedding passwords. Test the handover package from a separate directory when practical. That final check confirms that the recovered project depends on identified sources rather than accidental access to your old working folders.
When storage recovery can help QGIS files
PandaOffice Drecov may help retrieve deleted saved projects, geographic datasets, or existing backup files from accessible storage. It cannot restore an unavailable web service or recreate transient features that never reached disk. Use native project backups and source repairs first. Also reduce writes to the affected storage so that a deleted file has a better chance of surviving intact.
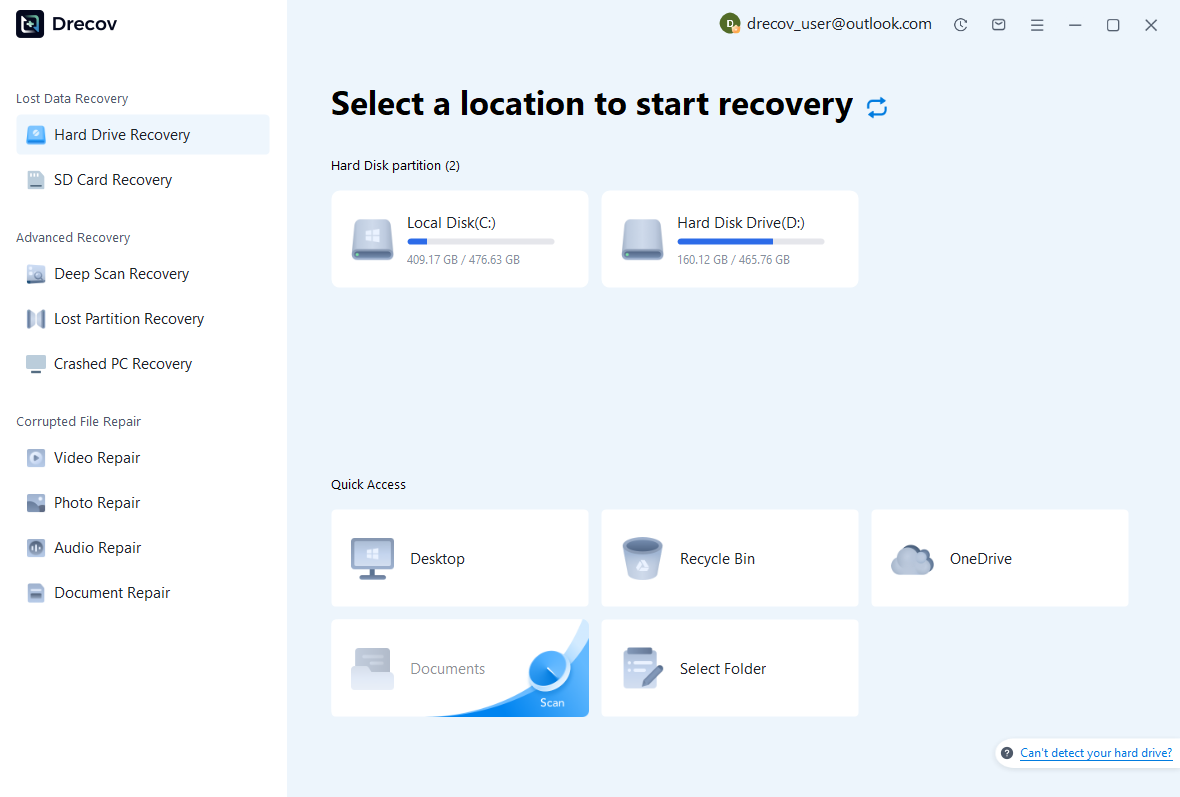
Step 1: choose the project or dataset source
Select the drive or partition that held the missing QGS, QGZ, or local geographic data. Record whether the project and datasets lived in different locations, because they may need separate searches. Keep the recovery destination on other healthy storage. Repeated read errors or disconnections require assessment before you proceed with an ordinary software scan.
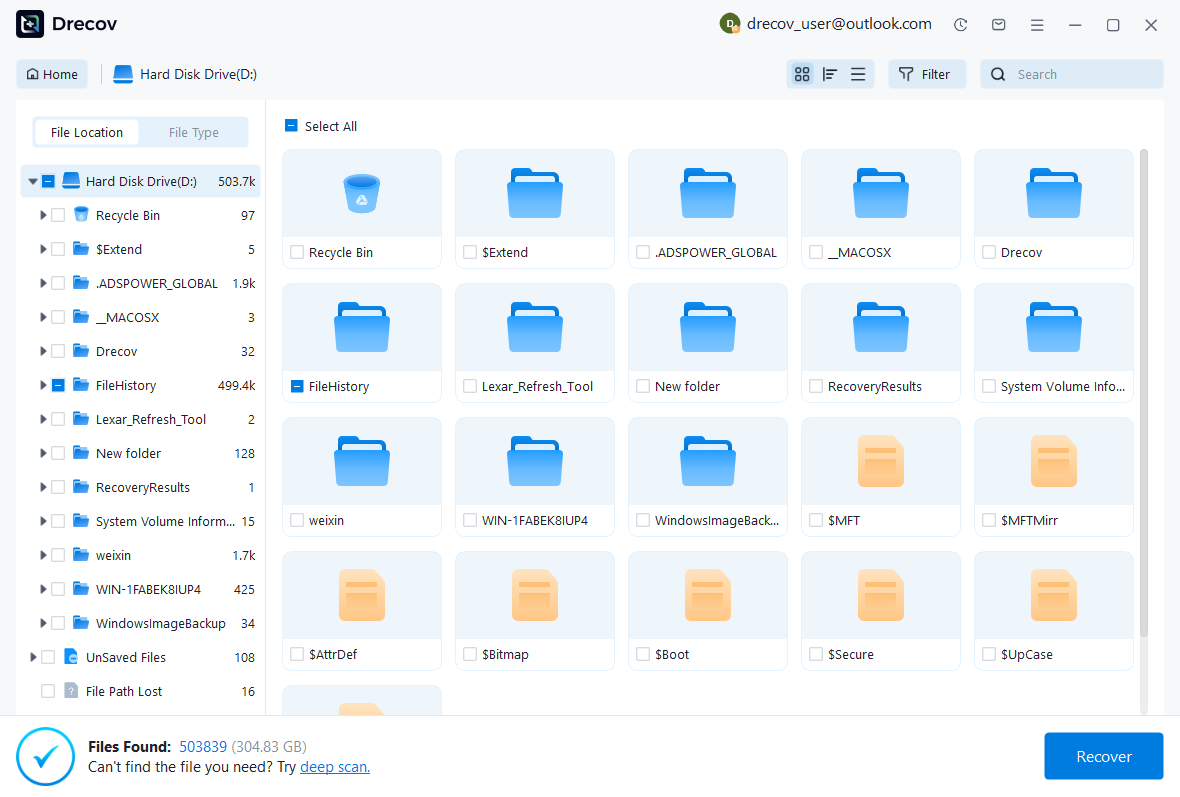
Step 2: compare complete geographic candidates
Review available paths, names, sizes, and dates, and collect related dataset files together. For a container such as a GeoPackage, preserve several plausible candidates when revision differences matter. A preview or filename cannot validate its internal tables and map relationships. Those checks must follow in QGIS or the appropriate database tools after recovery.
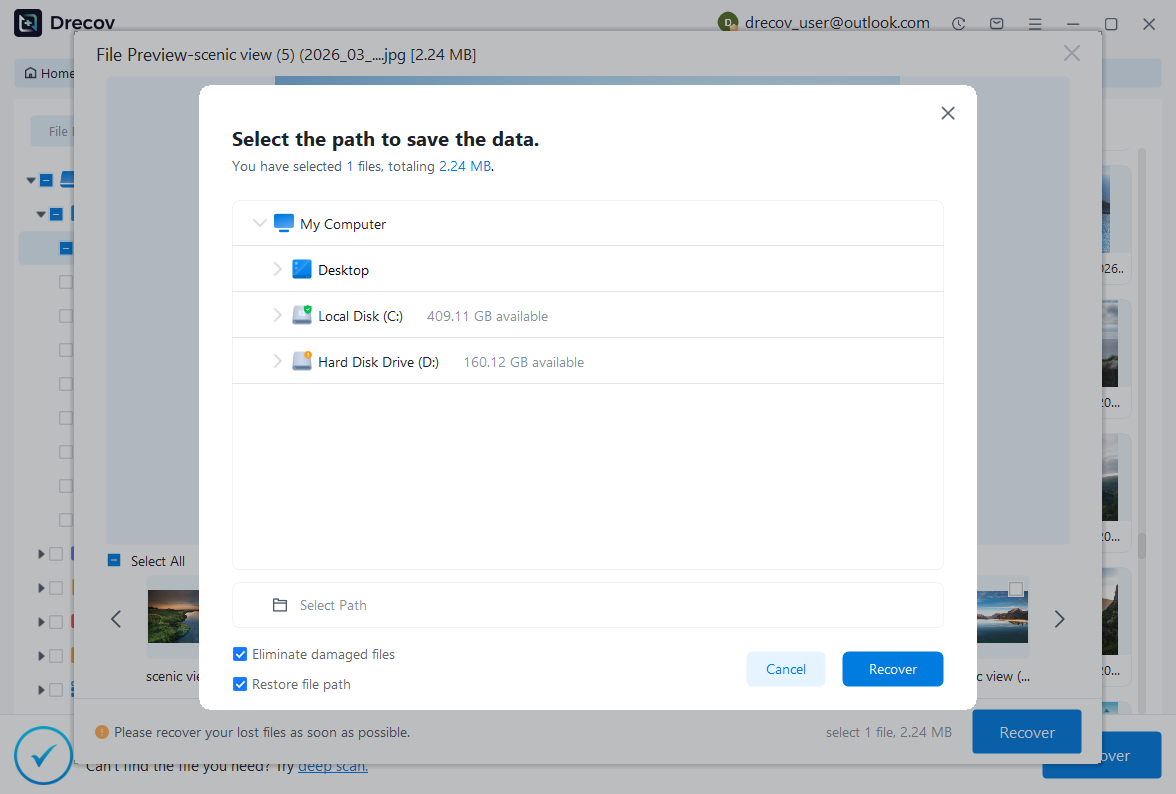
Step 3: restore elsewhere and reconnect carefully
Recover the selected files to a separate destination and rebuild their directory relationships in a working copy. Then open the project, repair the intended sources, and inspect feature counts, attributes, coordinate systems, and layouts. Keep uncertain datasets separate from accepted ones. The recovered files must support the actual map task before you treat the recovery as complete.
Verify the final map and its reproducibility
Save the recovery project under a clear new name, close it, and reopen that copy. Then inspect every required layer and export the intended deliverable again. This catches dependencies that remained available only through the previous session. Also check that the output includes the intended extent, labels, legend, and scale rather than merely resembling an older screenshot.
Make future project transfers testable
Keep a short inventory of data sources, project storage, and external assets beside the accepted project. For portable work, test a copied package from a different directory before relying on it. Also preserve original inputs and processing notes for derived layers. These practical checks make a future path failure easier to solve and clarify which content requires a separate data backup.
If a dataset or edit remains missing, record the specific gap. For instance, you may recover all layouts while losing a late manual boundary correction. That is a useful partial result, but it needs further data work before publication. Clear acceptance notes prevent a visually convincing recovered map from silently becoming an inaccurate geographic source.
Related recovery resources
Explore the relevant recovery options: Hard drive recovery, External hard drive recovery.
For another recovery case and its practical checks, read the related recovery guide.
Check the vendor guidance for the installed version: official recovery documentation 1, official recovery documentation 2.





