







Recover the Kdenlive project and its source clips together
To recover Kdenlive projects, preserve the native project, available backups, and source-media folders before upgrading or replacing files. A missing sequence, an unavailable original, and a failed proxy are different problems. Therefore, identify what disappeared before creating new proxies or assuming that a readable project contains every recording needed for the edit.
The native project stores editing decisions and references. It is not automatically a complete archive of your video and audio. An existing backup can restore the timeline while the original footage still needs reconnection. This guide separates project history, pre-upgrade copies, archived packages, and media repair so that you can judge what each candidate actually supplies.
Capture the intended editing milestone
Record the Kdenlive version, project path, sequence name, and last meaningful change. A distinctive guide, title, or cut can identify the intended revision better than its timestamp. Also note whether the problem followed an upgrade or folder move. Those triggers help you choose between a historical project and a path repair without changing useful surviving content.
Copy the project and relevant media structure into a recovery workspace. Preserve existing backups and any upgrade-generated copy separately. Then keep an untouched source while opening working candidates. Repeatedly saving the original can rotate history or replace useful evidence, so establish a stable source before testing several versions.
Free route 1: open an existing automatic backup
- Preserve the current project and available backup files before new saves.
- Use the installed version’s Open Backup File command to inspect the relevant restore points.
- Open a suitable candidate and compare the missing sequence or timeline change.
- Save the recovered project under a new name in a separate working location.
The command’s menu location can differ between releases, so follow the interface and documentation for your installation. Also compare actual backup content rather than assuming the most recent restore point is best. A candidate created after an accidental deletion can preserve the same unwanted state. Keep several plausible points while identifying the revision you need.
Inspect more than the active sequence
If the project uses several sequences or nested timelines, check their names and contents. A missing passage may remain in another sequence while the active one shows an older arrangement. Then inspect any nested use of that sequence in the main edit. Recovering the source sequence alone does not establish that the intended main-timeline placement survived.
Compare a distinctive title, guide, and sound edit in the candidate. These landmarks reveal whether it contains the intended milestone. Save the useful version separately, then close and reopen it. This confirms that the recovered project exists as a stable native file rather than only as a temporary state in the current session.
Free route 2: inspect a preserved pre-upgrade project
- Identify whether Kdenlive created a backup when converting the project to a newer document format.
- Preserve that older native copy and the upgraded file separately.
- Open a working candidate in an appropriate compatible Kdenlive release.
- Compare sequences, effects, and source references before choosing a baseline.
A newer document format may not open correctly in an older application release. Do not force compatibility by casually editing the format version inside the file. The preserved pre-upgrade candidate can provide a safer comparison when an upgrade introduced problems. However, it may lack work completed afterward, so identify those missing later edits explicitly.
Keep environment differences visible
Record the application versions used to inspect each candidate and any missing effects or transitions. A valid project can behave differently when its environment changes. Compare the affected section in a working copy before replacing an effect. If you recreate processing to accommodate the new environment, document that reconstruction separately from direct recovery of the timeline.
Also preserve the original source media and relevant title assets during version testing. A source-path failure can look like an upgrade problem even when the editing structure remains valid. Resolve the specific missing reference before concluding that the whole project needs a downgrade or rebuild.
Free route 3: reopen an existing archived project package
- Locate an archive or collected project package created at the relevant milestone.
- Preserve the package and extract a copy into a new directory.
- Open its native project and inspect the included original media and dependencies.
- Compare the intended revision and document anything the package omitted.
An existing archive can preserve a portable editing checkpoint, but its actual contents matter. It may contain proxies, selected media, or a historical edit that predates later recordings. Inspect what the package supplies instead of assuming that every archive is complete. Keep the original package unchanged while you repair paths or add verified later material in a working copy.
Check titles and externally generated assets
Inspect title graphics, images, audio, and other dependencies used by the edit. A timeline can load while an external asset remains missing. Compare a representative title and the affected section in a fresh test render. This checks the visible deliverable rather than relying solely on a populated project bin.
If a colleague’s authorized package contains a useful revision, preserve its source details and compare the actual sequence. Similar project names can represent different editorial decisions. Keep any later local changes separately so that adopting the package does not discard valid work you can still reconcile into the recovery project.
Free route 4: reconnect originals and assess proxies
- Inspect missing-clip messages and identify the expected original media.
- Locate the exact source files in the preserved recording folders.
- Repair the paths in a copied project using the normal missing-media workflow.
- Compare full-resolution playback and a test export before regenerating proxies if needed.
A proxy is a working substitute for editing and may differ in resolution or encoding from the original. It is not automatically a full-quality recovery source. If only a proxy survives, preserve it as limited salvage and record the quality limit. If the original still exists, reconnect it before treating a broken proxy as a lost-recording problem.
Verify the correct take and stream
Compare scene content, duration, frame rate, and audio channels. A similarly named clip can be a different take or camera source. Then inspect the timeline’s in and out points and any speed changes. A file can appear correct at the first frame while producing wrong content later in the selected range.
After relinking, play through transitions and important sound joins. Then export a representative passage from the accepted project. This tests the relationship between native editing decisions and the recovered originals. A warning-free project bin alone does not establish that the final sequence uses the intended footage and audio throughout.
Diagnose a project that opens with an unexpected sequence
Confirm the actual file path and inspect the project’s sequences before making new edits. An older main sequence can coexist with useful later material elsewhere in the project. Compare names, lengths, guides, and distinctive edits. This separates a navigation or selection problem from genuine loss of timeline content.
Preserve nested relationships during reconstruction
If you recover a sequence from another candidate, inspect how the main edit uses it. Compare timing, audio routing, effects, and transitions around the nested section. A sequence can be correct in isolation while appearing at the wrong point or duration in the main timeline. Save a checkpoint before reconciling those relationships.
Record which source supplied each reconstructed section. A combined recovery may use the current main edit and an older valid nested sequence. That can be useful, but it is not a single untouched historical project. Clear source notes make later editorial comparison easier if another backup contains a more complete version.
Assess generated files without mistaking them for originals
Thumbnail, waveform, render-cache, and proxy data can support the editing environment, but they do not all preserve the original footage or project decisions. Identify the actual role of each surviving file. Rebuilding a cache may solve a display problem while doing nothing for a deleted camera recording or missing native sequence.
Keep a low-quality salvage in its proper role
If a proxy or preview is the only surviving visual source, inspect its resolution and content before reuse. It may provide a temporary review or reconstruction reference. However, do not present it as restored original camera quality. Keep the unresolved original-file gap visible in the recovery record and the accepted project’s asset inventory.
Likewise, an existing final render can preserve appearance while flattening tracks, titles, and effects. Use it to compare timing or rebuild a limited sequence when necessary. Retain the native candidates separately, because a later project recovery may restore controls that a rendered reference cannot supply.
A worked recovery after a project upgrade
Suppose an older project opens in a new release but a nested sequence or effect behaves unexpectedly. Preserve the upgraded file and any pre-upgrade copy. Compare the relevant sequence in compatible environments, then identify whether the discrepancy comes from document conversion, an unavailable effect, or missing source media.
Recover the useful baseline before adding later work
If the older copy provides a stable baseline, preserve it and identify changes made after the upgrade. Reconcile only verified later work in a new project. Compare title timing, transitions, and sound around the changed sequence. This gives you a controlled editing path while keeping the upgrade investigation separate from the recovered content.
Then save, reopen, and export a short representative section. Inspect the actual picture and sound independently. The result should support continued editing and produce the intended output. Keep any approximate effect replacement or missing original listed beside the native recovery milestone.
Compare Kdenlive candidates at the sequence level
For a project with several sequences, create a short list of the sequence names and the purpose of each. Then inspect the distinctive edit in its actual sequence and in any main timeline that uses it. A candidate can preserve the source sequence while losing its intended placement or duration elsewhere. This sequence-level comparison provides stronger evidence than the overall project length or a familiar bin of clips.
Inspect the boundaries of a nested sequence
Play from the preceding main-timeline clip into the nested sequence and through its exit. Compare timing, audio, transitions, and any effects applied at the nested level. A sequence that plays correctly alone can behave differently when used inside another edit. Keep both contexts in the acceptance check, especially when the missing work involved a nested section rather than an ordinary clip.
Also compare guides and markers associated with the intended revision. They can help identify a candidate and explain the editorial structure, but they do not replace inspection of the actual cuts. A marker can survive while the clip beneath it changed. Use the marker as a clue, then inspect the source content and timing it was meant to describe. This keeps revision selection grounded in the edit rather than only in labels.
Use a pre-upgrade copy as a controlled compatibility source
When an upgrade changes document format, preserve the original conversion backup and the newer project separately. Record which application release created each state and which release you use to inspect it. Then compare the affected sequence in an appropriate environment. This avoids adding uncertainty through casual format edits or repeated conversions while you are still identifying which native candidate contains useful work.
Separate conversion changes from later editing
A newer project can include valid work completed after conversion, even if another part now behaves unexpectedly. Identify those later changes before adopting the older baseline. Preserve them as candidates and reconcile only verified content in a new recovery version. This keeps a compatibility investigation from discarding useful editorial work simply because the older project opens more comfortably in a familiar release.
If an effect is unavailable or behaves differently, record the exact affected clip and compare an existing output. Test a narrow replacement only in the recovery copy. The replacement may be suitable for continued work without reproducing the original parameter behavior exactly. Keep that creative and technical change visible so another editor can distinguish recovered timeline structure from new processing added to accommodate the environment.
Check archive contents against the production requirement
An existing archive can be a strong recovery source when it includes the native project and required media. Inspect what it actually contains before choosing it as the baseline. Compare the original footage, audio, titles, and any proxies. A package created for lightweight editing can remain useful while lacking the full-quality sources needed for final output. State that limitation before investing effort in a detailed native repair.
Identify the strongest source for each missing clip
For a missing camera original, compare any raw recording archive, previous collected project, and authorized production copy. Check scene identity, duration, frame rate, and audio streams. A proxy can preserve useful visual evidence while being a poor replacement for the original. Keep it as limited salvage rather than silently treating it as equivalent camera quality. The next task determines whether that limited source is sufficient.
Also inspect generated titles and externally prepared graphics. An archive may contain a rendered title image while the editable design remains elsewhere. That can preserve appearance without supporting a wording or language change. Record the distinction in the asset inventory and preserve any native graphic candidate that remains available. A successful video project opening does not establish that all its upstream editable sources returned.
Validate source and proxy relationships after repair
Once the original media resolves, inspect how the project uses proxies in the working environment. A missing proxy may be regenerable from a valid original, while a missing original is a different recovery gap. Keep those roles explicit during diagnosis. Rebuilding convenience files can restore editing performance, but it cannot supply camera information that no longer survives in the source or another verified copy.
Compare a representative final-quality output
Export a short passage using the intended source and project settings, then inspect it independently. Compare detail, framing, speed changes, color, and sound. A preview that looks correct through a proxy can hide a source mismatch or output-quality limitation. Keep the test associated with the exact recovered native revision so that later comparisons do not mix an older good render with a newer incomplete project.
For clips with speed changes or selected ranges, inspect the complete affected span. A replacement can match the opening frame while diverging later in the take. Then check the transition into adjacent clips. These timing relationships help establish that the repaired source belongs to the intended edit rather than merely satisfying a filename reference. Preserve rejected same-name candidates separately with a short reason to avoid reintroducing them later.
Recover sound and titles beyond the visible picture edit
Inspect track routing, clip fades, channel choices, and processing around the recovered sequence. Then compare titles and graphic placement at the intended output size. A populated timeline can still lack a late sound correction or use an older text overlay. These content checks should target the actual production complexity, especially when you combined a stable older project with a newer sequence candidate.
Use a difficult passage as the acceptance test
Choose a passage containing a nested sequence, a title, and a meaningful audio transition where relevant. Play it in the editor, save the project, reopen it, and export a short test. Compare both the editable controls and the visible result. This provides a stronger milestone than a quick check of the first frame and helps expose dependencies that remained available only in the previous session.
If you reconstruct an effect or title from a render, keep the original native candidate and the render unchanged. Save the reconstruction as a new version and identify the approximate element. A useful visual match can support delivery without recovering the original controls. Clear scope prevents a later editor from planning a detailed parameter revision that the surviving source cannot actually support.
Preserve the accepted edit as a coherent source set
Keep the accepted native project with an inventory of verified originals, limited proxies, reconstructed graphics, and unresolved dependencies. Then prepare a separate portable copy where appropriate and test it from another directory. This checks the actual deliverable rather than the convenience of your original workstation, where external sources may still be available accidentally.
Keep recovery evidence separate from active production
Retain the original backups, upgrade copy, rejected candidates, and short comparison notes in a separate location. Begin new creative work from a clearly named accepted milestone. This boundary makes later investigation easier if another candidate appears or a missing sequence detail becomes important. It also prevents ordinary production changes from obscuring which parts of the project came directly from recovery and which you rebuilt.
Finish by listing specific remaining limits, such as one unavailable full-quality clip or one recreated effect. A partial recovery can still be valuable when it supports the next task and its uncertainty is visible. Do not let a clean project bin or a completed export stand in for proof that every original recording, sequence relationship, and editing decision survived.
Review the accepted sequence after saving and reopening
Use the sequence that contains the recovered change as a final test. Inspect its internal edits and its placement in the main timeline, then compare a fresh short output. This checks saved native relationships and practical rendering together. A project that works before closing can still rely on temporary source access or an unsaved repair.
Keep compatibility notes with the native milestone
Record the release used to accept the project and any effect or sequence behavior you reconstructed. Then preserve the pre-upgrade source separately. This lets another editor choose an appropriate environment without assuming that every project-format generation opens identically in older software.
If only a proxy survives for one shot, keep that quality limit visible in the asset inventory. The project may remain useful for review while requiring an original before final delivery. A clear limited recovery is more actionable than a warning-free bin that silently substitutes reduced media for the camera source.
When storage recovery can help Kdenlive work
PandaOffice Drecov may help retrieve deleted native projects, existing backup copies, or original media from readable storage. It cannot recreate a sequence that never reached disk or restore full-quality footage from an absent original. Try native history and archive candidates first, and reduce writes to the affected storage while investigating deleted files.
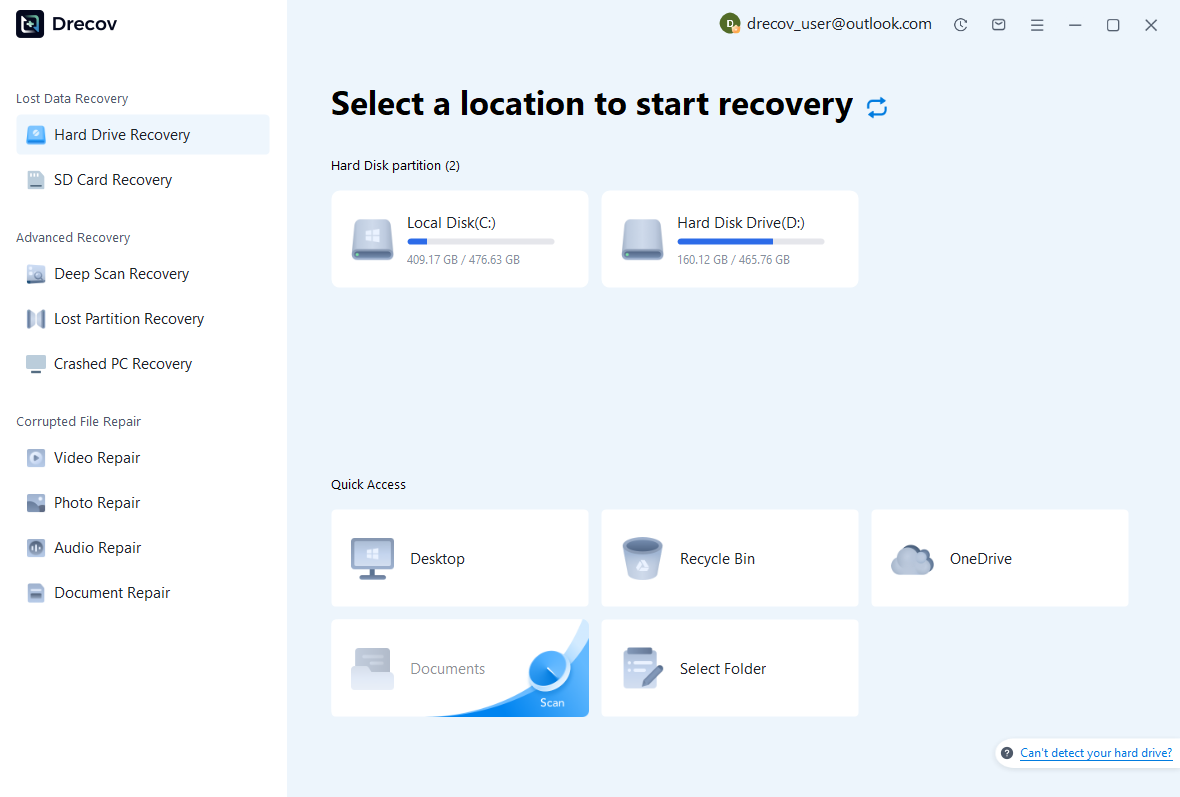
Step 1: locate project and media storage
Select the drive or partition that held the native project, actual backup directory, or missing recordings. Record which source component each search targets. Keep recovery output on other healthy storage. Repeated disconnections or hardware read errors call for storage assessment before a routine software scan.
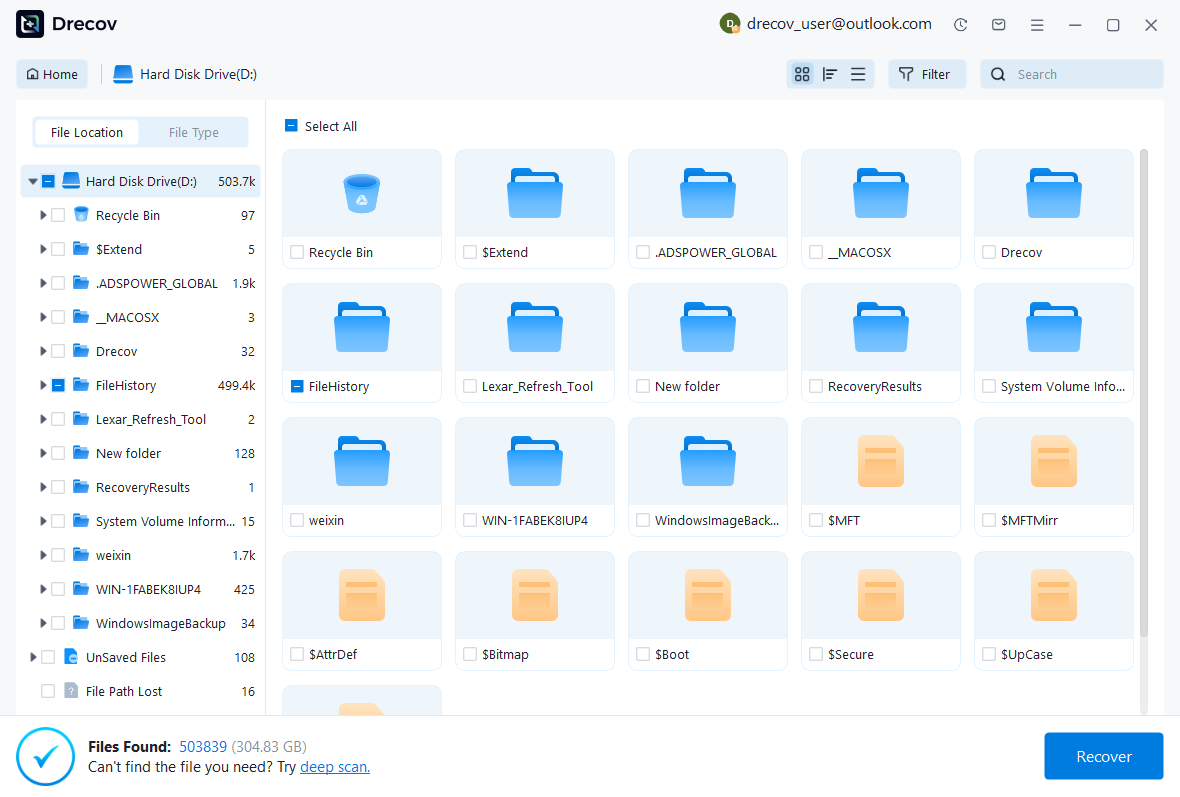
Step 2: compare coherent project candidates
Review available paths, names, dates, sizes, and supported previews. Preserve plausible native versions with their associated media where possible. A recovered filename does not establish document compatibility or timeline completeness. Keep the original candidate details so that you can compare sequences and sources in Kdenlive afterward.
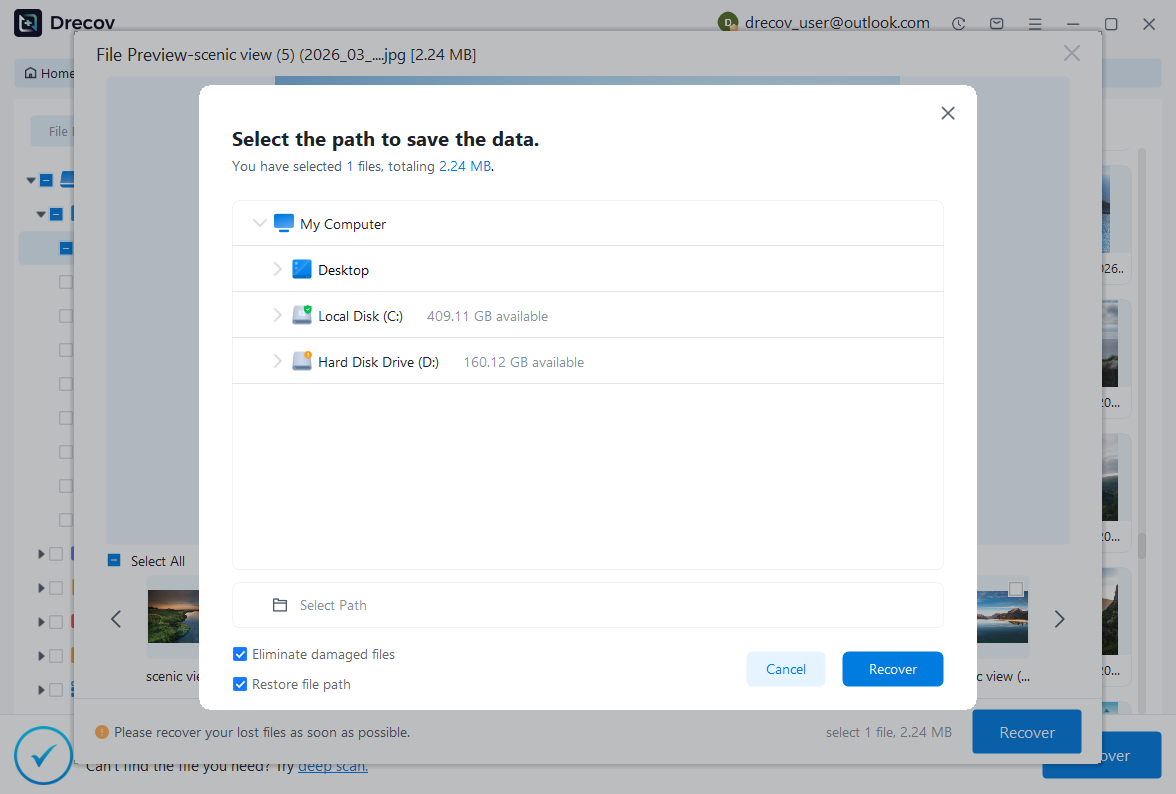
Step 3: restore elsewhere and validate the edit
Recover selected files to a separate destination and retain an untouched set. Open a working project in an appropriate version, reconnect verified originals, and inspect sequences, titles, transitions, and sound. Save a new native milestone and export a test passage. Keep incomplete candidates separate from the accepted recovery.
Keep the accepted project and output aligned
Record the source version, relevant backup, media locations, and any reconstructed work. Then reopen the accepted native project and compare its important landmarks again. Generate review output from that exact milestone so another editor can connect the visible result with the editable source that produced it.
Test the archive and restore workflow
Use a disposable edit to verify where your installed release keeps backups and what its archive contains. Open a copied candidate and test a moved-source repair. This practical exercise identifies the actual files needed for restoration without experimenting on the production project you have just recovered.
Related recovery resources
Explore the relevant recovery options: Hard drive recovery, External hard drive recovery.
For another recovery case and its practical checks, read the related recovery guide.
Check the vendor guidance for the installed version: official recovery documentation 1, official recovery documentation 2, official recovery documentation 3.





