


Have you ever looked at your desktop and thought, “Why is the Recycle Bin always there?” Maybe you prefer a clean, minimalist screen, or perhaps you are designing a high-productivity workspace where every pixel counts. Conversely, you might have accidentally removed it and are now frantically wondering how to get it back. If you are searching for how to delete recycle bin from desktop, you are in the right place. In this comprehensive guide, I will walk you through everything—from basic removal methods to advanced system-level techniques. More importantly, I will show you what to do if something goes wrong and how to recover lost data safely.
Think of the Recycle Bin like a safety net under a tightrope walker. It catches your deleted files before they disappear forever. Removing its icon does not remove the safety net—but emptying it does. Therefore, we must explore this process carefully to ensure your data remains protected even when your desktop is clutter-free.
Introduction to Recycle Bin and Its Purpose
The Recycle Bin in Windows acts as a vital temporary storage area for deleted files. Instead of immediately erasing files from your magnetic or solid-state disk, Windows moves them to a hidden system folder. This design allows users a “second chance” to restore items they may have deleted by mistake.
Microsoft officially explains its function and basic management here:
👉 https://support.microsoft.com/windows
When you learn how to delete recycle bin from desktop, it is crucial to understand that you are only removing the visual shortcut (the icon). You are not disabling the background file recovery architecture. Files will still accumulate in the background until the bin is emptied, either manually or through storage sense settings.
Basic Method: How to Delete Recycle Bin from Desktop (Windows Settings)
This is the easiest and safest way to achieve a clean look. Because this method uses the built-in GUI, it carries the lowest risk of system instability.
Step 1: Open Desktop Icon Settings
To begin, you need to access the personalization menu.
- Right-click on any empty space on your desktop.
- Click on Personalize at the bottom of the context menu.
- On the left sidebar (or main menu in Windows 11), navigate to Themes.
- Scroll down until you see the link for Desktop icon settings.
Shortcut path:
Settings > Personalization > Themes > Desktop icon settings
Step 2: Uncheck Recycle Bin
Once the small “Desktop Icon Settings” window pops up:
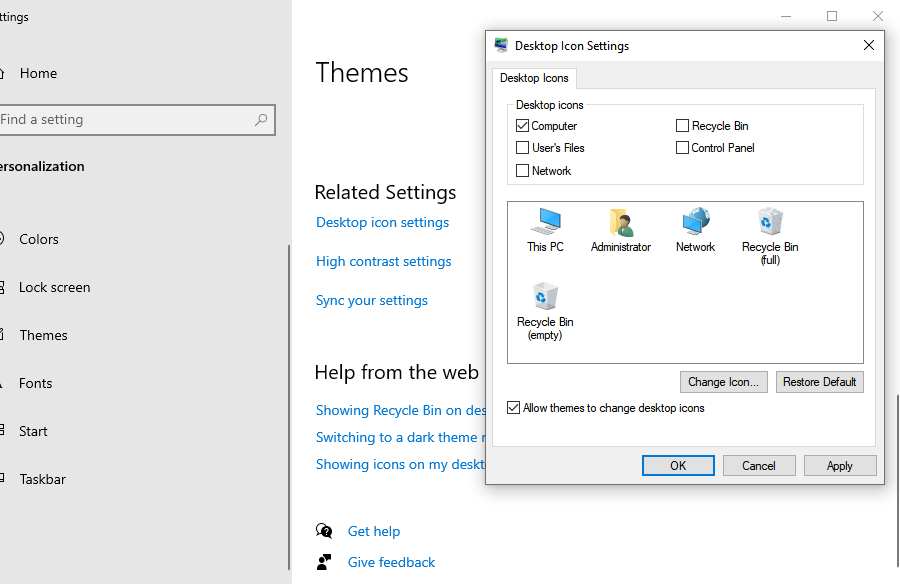
- Locate the Recycle Bin checkbox under the “Desktop Icons” section.
- Uncheck the box next to Recycle Bin.
- Click Apply, then click OK.
✔ Result: The icon disappears from your desktop instantly.
⚠ Warning: Even though the icon is gone, files you delete using the “Delete” key will still go to the hidden Recycle Bin folder. You must remember to empty it occasionally to save disk space.
How to Delete Recycle Bin on Desktop Using Group Policy
If you are managing multiple computers or simply want a more “permanent” solution that prevents other users from easily toggling the icon back on, the Local Group Policy Editor is the way to go. This method is specifically for Windows Pro, Enterprise, and Education users.
Step 1: Open Local Group Policy Editor
- Press the Windows Key + R on your keyboard to open the Run dialog.
- Type gpedit.msc into the box.
- Press Enter or click OK.
In the left-hand pane, follow this specific folder path:
User Configuration > Administrative Templates > Desktop
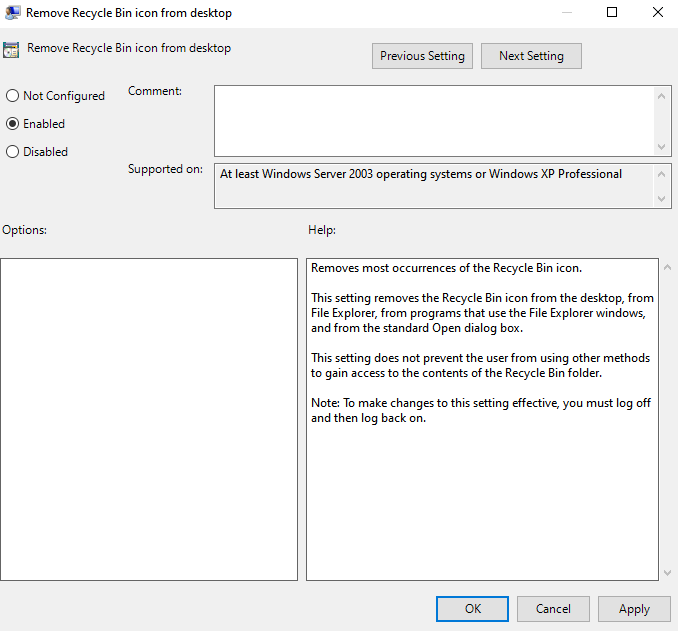
Step 3: Enable the Removal Policy
- In the right-hand list, find the setting titled Remove Recycle Bin icon from desktop.
- Double-click on this entry to open its configuration window.
- Select the Enabled radio button.
- Click Apply and then OK.
After you perform these steps, you may need to Restart your PC or refresh your desktop for the changes to take effect. This method is powerful because it removes the checkbox option from the standard Settings menu we discussed in the previous section.
Advanced Method: Delete Recycle Bin from Desktop via Registry Editor
This is the “expert level” approach. The Windows Registry is the central database for all system settings.
⚠ Warning: Incorrect registry edits can cause serious system errors or prevent Windows from booting. Always back up your registry before making changes.
Step 1: Open Registry Editor
- Press Windows Key + R.
- Type regedit and hit Enter.
- Grant administrative permission if prompted.
Copy and paste the following path into the address bar at the top of the Registry Editor:
HKEY_LOCAL_MACHINE\SOFTWARE\Microsoft\Windows\CurrentVersion\Explorer\Desktop\NameSpace
Step 3: Delete the Unique Identifier
In the folder list on the left, you will see several folders with long strings of characters (GUIDs).
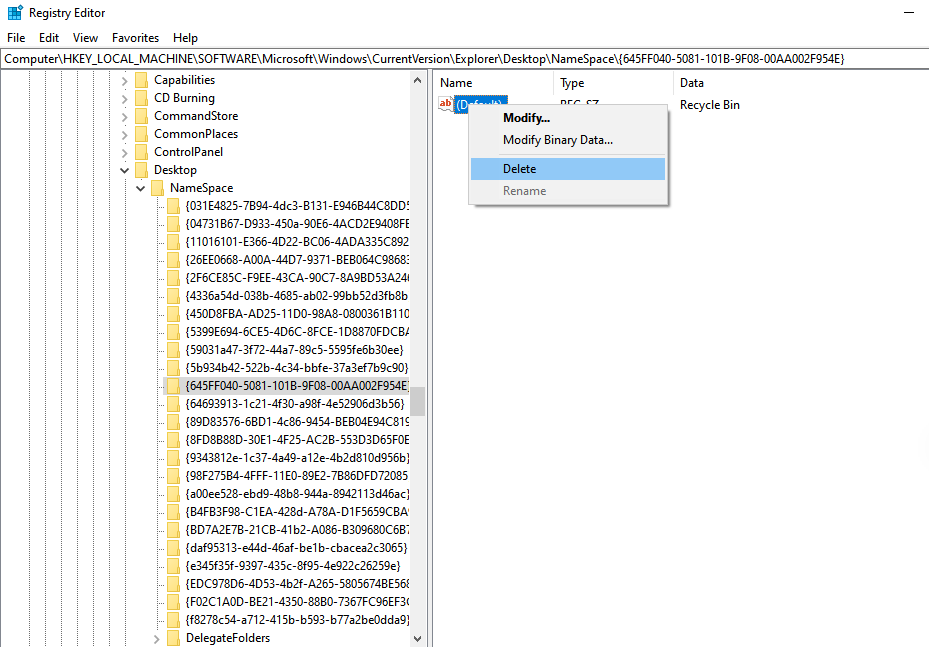
- Find the folder named exactly:
{645FF040-5081-101B-9F08-00AA002F954E}. - Right-click this folder and select Delete.
- Confirm the deletion and Restart your system.
✔ Result: This action removes the registration of the Recycle Bin from the desktop rendering engine. To restore it later, you would need to manually recreate this registry key.
Differences Between Removing Icon and Deleting Files
Many users confuse hiding the interface with deleting the underlying data. It is vital to distinguish between these actions to avoid accidental data loss.
| Action | Result on System | Recovery Potential |
| Remove Icon | Only hides the desktop shortcut. | 100% (Files remain in storage). |
| Empty Recycle Bin | Marks file space as “available” for overwriting. | Moderate to High (Requires specialized tools). |
| Shift + Delete | Bypasses the Recycle Bin entirely. | Time-sensitive (Requires professional software). |
6. What Happens After You Delete Recycle Bin from Desktop?
When you delete recycle bin from desktop, your computer does not stop protecting you from accidental deletions. The background service remains active.
- File Storage: Files still move to the hidden
$Recycle.Binfolder located at the root of your C: drive (or other partitions). - Accessing Files: You can still open the bin by typing
shell:RecycleBinFolderinto the File Explorer address bar. - Restoration: You can restore the icon at any time using the methods described in this guide.
The primary change is aesthetic. Your desktop looks cleaner, but your responsibility to manage your storage remains the same.
7. How to Undelete Recycle Bin
If you have hidden the icon and realized you actually need it for quick access, don’t worry. Here is how to undelete recycle bin and bring it back to your workspace.
Method 1: Using Desktop Icon Settings (Standard)
This is the reverse of our first method. Navigate to Settings > Personalization > Themes > Desktop icon settings and simply re-check the Recycle Bin box.
Method 2: Registry Restoration
If you deleted the registry key in Section 4, you must recreate it.
- Navigate back to the
NameSpacekey inregedit. - Right-click
NameSpace> New > Key. - Name it
{645FF040-5081-101B-9F08-00AA002F954E}. - Set the “(Default)” value inside to
Recycle Bin.
8. Recovering Files After Emptying Recycle Bin
This is the most critical part of data management. Once you click “Empty Recycle Bin,” the operating system tells the hard drive that the space occupied by those files is now “Free.” However, the binary data often remains on the disk platters or flash cells until a new file is written over that exact spot.
Time is your greatest enemy here. The more you use your computer after emptying the bin, the higher the chance that Windows will overwrite your “deleted” wedding photos or work documents with temporary system logs or browser cache.
9. Step-by-Step Data Recovery Using PandaOffice Drecov
If you have realized too late that you needed a file and the bin is already empty, you need a professional-grade recovery tool. PandaOffice Drecov is a industry-leading data recovery product designed specifically for these high-stress situations.
Why Choose PandaOffice Drecov?
- Deep Scanning Algorithm: It looks beyond the file table to reconstruct data from raw bits.
- User-Friendly Interface: You don’t need to be an IT pro to use it.
- High Recovery Success Rate: Optimized for NTFS, FAT32, and exFAT file systems.
⚠ Critical Warning: Do NOT install the software on the same drive where the lost files were located. If you deleted files from your C: drive, install Drecov on a USB flash drive or a secondary D: drive. This prevents the installation process from overwriting your lost data.
Step 1: Launch the Program and Select Location
Open the tool. On the main dashboard, you will see a list of available drives and common locations.
- Select the specific drive (usually C:) where the Recycle Bin was located.
- Click the Scan button to begin the analysis.

Step 2: Wait for the Deep Scan to Complete
Drecov will perform a “Quick Scan” followed by a “Deep Scan.” The Deep Scan meticulously checks every sector of your drive.
- Do not interrupt the process.
- Close other heavy applications (like games or video editors) to speed up the process.

Step 3: Filter and Preview Files
Once the scan finishes, you will see thousands of files. Use the Preview function.
- Use the search bar to look for specific file extensions (e.g.,
.docxor.jpg). - Click on a file to see a thumbnail or text preview. If you can see the preview, the file is 100% recoverable!

Step 4: Recover Files Safely
- Select the checkboxes for the files you wish to save.
- Click the Recover button.
- Choose a safe destination: Always save recovered files to an external hard drive or a different partition. Saving them back to the original drive can corrupt other files still waiting to be recovered.
✔ Result: Your data is back, and your peace of mind is restored.
10. Advanced Data Recovery Techniques
If software recovery is not your first choice, you can try these built-in Windows features.
Method 1: File History
Windows has a built-in backup system called File History.
Path: Control Panel > System and Security > File History
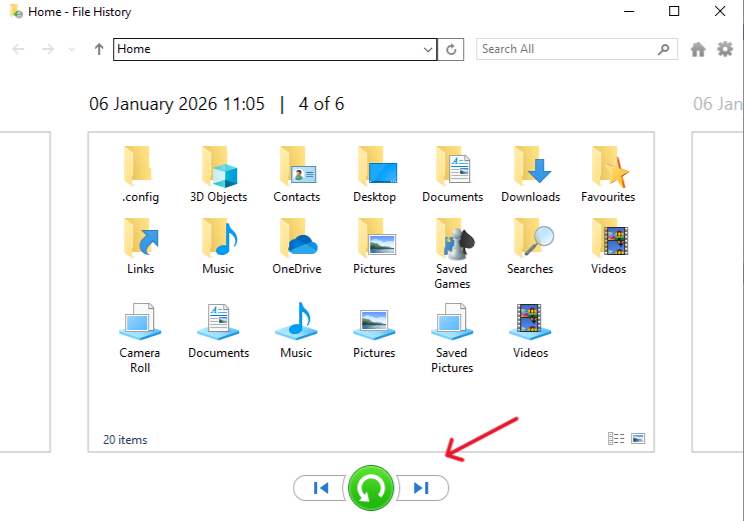
If you had this turned on previously, you can “Restore personal files” to a point in time before the deletion occurred.
Method 2: Windows Backup (System Image)
If you perform regular system backups, you can restore a previous “Image” of your entire drive. This is a “nuclear option” as it reverts all your settings and files to an older state, but it is highly effective for massive data loss.
Method 3: Using Command Prompt (Attrib)
Sometimes files aren’t deleted but are simply hidden by malware or system errors.
- Open CMD as Administrator.
- Type
attrib -h -r -s /s /d X:\*.*(Replace X with your drive letter).This command removes “Hidden,” “Read-only,” and “System” attributes from files.
11. Common Mistakes and Warning Signs
When users attempt to delete recycle bin from desktop or recover files, they often fall into these traps:
- Continuing to use the PC: Every minute of web browsing or video streaming writes new data to the disk, potentially destroying deleted files forever.
- Installing recovery software on the target drive: As mentioned, this is the #1 cause of recovery failure.
- Ignoring the “Health” status in recovery tools: Tools like PandaOffice Drecov often indicate if a file is “Poor” or “Excellent” condition. Don’t waste time trying to recover “Poor” files if “Excellent” versions are available in other fragments.
12. Preventing Permanent Data Loss
Prevention is always better than recovery. To ensure you never have to worry about the Recycle Bin again, follow these steps:
- Enable File History: Keep an external drive plugged in for real-time backups.
- Use Cloud Storage: Services like OneDrive or Dropbox keep a secondary “Cloud Recycle Bin” for 30 days.
- Avoid Shift + Delete: Only use this shortcut if you are 100% certain you will never need the file again.
- Regular External Backups: Use the 3-2-1 rule: 3 copies of your data, 2 different media types, 1 copy off-site.
13. Additional Recovery Resources
For deeper technical guidance and specialized scenarios, I highly recommend reading the following professional resources provided by the PandaOffice team:
- Read This Before You Give Up: How to Recover Data Deleted from Recycle Bin
- 5 Proven Ways for Free Data Recovery from Recycle Bin
- How to Windows Recover Emptied Recycle Bin in 3 Easy Steps
These articles explain additional professional strategies, including how to handle SSD-specific recovery (TRIM command) and partition restoration.
How to Delete Recycle Bin from Desktop FAQs
1. Does deleting Recycle Bin from desktop delete my files?
Absolutely not. Removing the icon via “Desktop Icon Settings” or “Group Policy” only hides the visual shortcut. Your files remain safely stored in the hidden system folder until you manually empty the bin.
2. How do I restore the Recycle Bin icon if it’s missing?
The most common solution is to go to Settings > Personalization > Themes > Desktop icon settings and check the “Recycle Bin” box. If that doesn’t work, you may need to check your Group Policy settings.
3. Can I recover files after emptying the Recycle Bin?
Yes, in many cases. When you empty the bin, Windows only deletes the “pointer” to the file. The actual data remains on the hardware until it is overwritten by new information. Using PandaOffice Drecov as soon as possible is your best chance for success.
4. Is PandaOffice Drecov safe to use?
Yes, it is a non-destructive recovery tool. It reads the data without modifying the original drive structure. Just remember the golden rule: Install it on a separate drive to avoid overwriting the very data you are trying to save.
5. What is the safest way to delete files permanently?
If you want to ensure a file is gone forever, use a “File Shredder” tool or the Shift + Delete command followed by a disk “Wipe Free Space” operation. However, always ensure you have a verified backup of important data before performing these actions.
Conclusion
Learning how to delete recycle bin from desktop gives you more control over your visual environment and can lead to a more focused working experience. However, understanding the mechanics of data recovery gives you ultimate control over your digital life.
The Recycle Bin may look like a small, simple icon, but it represents the threshold between “temporary” and “permanent” in the digital world. Whether you choose to hide it for aesthetic reasons or keep it front-and-center for safety, always ensure you have a recovery plan in place.
When data disappears, remember: Act quickly, stop writing new data, and use professional tools. Software like PandaOffice Drecov can make the difference between a minor inconvenience and a permanent digital catastrophe.


