


We have all been there. You are cleaning up your desktop, dragging folders into the trash with a sense of productive satisfaction. You right-click that little icon, select “Empty Recycle Bin,” and click “Yes” with total confidence. Then, a cold shiver runs down your spine. You realize that the “Old Projects” folder you just vaporized actually contained the only copy of your tax returns.Panic usually sets in immediately. However, before you resign yourself to digital heartbreak, you should know that achieving free data recovery from recycle bin is not just a tech-support pipe dream—it is a scientific reality.
In this guide, we will walk through the mechanics of how Windows manages your data and provide a definitive roadmap for free data recovery from recycle bin using native tools and professional-grade software like PandaOffice Drecov. Whether you are a casual user or a tech enthusiast, understanding these layers of recovery can save your digital life.
Part I: Where Do Files Actually Go?
To master free data recovery from recycle bin, one must first understand the “illusion” of deletion. In modern file systems like NTFS (New Technology File System) used by Windows, a file consists of two parts: a pointer (which tells the system where the file starts and ends) and the actual data (the bits and bytes stored on the hard drive sectors).
The Role of the Master File Table (MFT)
Think of your hard drive as a massive library. The Master File Table (MFT) is the librarian’s index card. When you move a file to the Recycle Bin, the system simply updates the index to say the file is now in a “hidden” folder located at C:\$Recycle.Bin.
What Happens During “Empty Recycle Bin”?
When you empty the bin, Windows does not go through the tedious process of overwriting every sector of that file with zeros. Instead, it performs a much faster operation: it deletes the pointer in the MFT and marks that specific space on the disk as “available.”
As far as the operating system is concerned, that space is now a blank canvas. However, the original data—your photos, documents, and videos—remains physically etched on the disk until a new file comes along and overwrites it. This “grace period” between the deletion of the pointer and the overwriting of the data is the window of opportunity for free data recovery from recycle bin.
The SSD “TRIM” Complication
It is important to note a modern hurdle: Solid State Drives (SSDs). Unlike traditional Hard Disk Drives (HDDs), many SSDs use a command called TRIM. When you delete a file, the TRIM command tells the SSD to proactively wipe the data cells to maintain high write speeds later. If TRIM is active, free data recovery from recycle bin becomes significantly more difficult, making immediate action even more critical.
Part II: Proven Methods for Free Data Recovery from Recycle Bin
If you have just emptied your bin, stop writing any new data to that drive immediately. Don’t download large files, don’t install new games, and try to keep your web browsing to a minimum, as even browser cache can overwrite your lost data.
Method 1: The Native Restore (Before the Bin is Emptied)
It might seem obvious, but many users overlook the simplest path to free data recovery from recycle bin. If you haven’t clicked “Empty” yet, your files are sitting in a system-protected folder.
- Step 1: Double-click the Recycle Bin icon on your desktop.

- Step 2: Locate the files or folders you deleted. You can use the search bar in the top right or sort by “Date Deleted.”
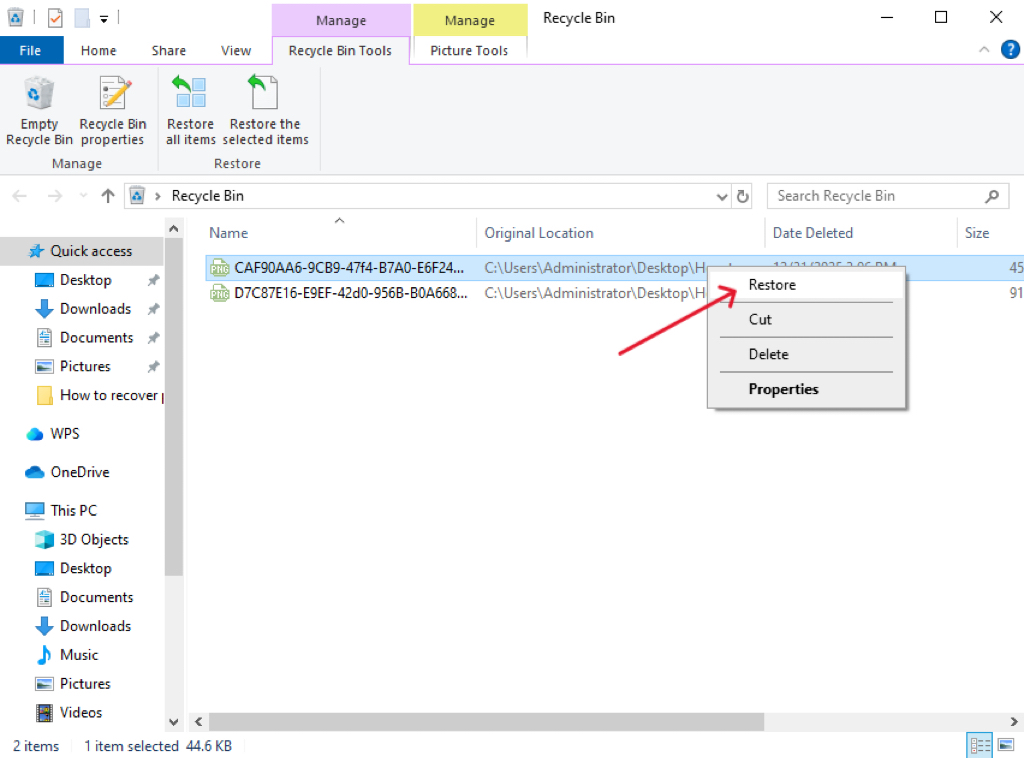
- Step 3: Select the items, right-click them, and choose Restore.
- Step 4: The files will instantly jump back to their original locations.
Method 2: Professional Restoration with PandaOffice Drecov
When the bin is empty and the stakes are high, you need a specialized tool designed to scavenge the “available” space on your disk. PandaOffice Drecov is a premier solution for free data recovery from recycle bin because it utilizes advanced deep-scanning algorithms that bypass the MFT to find “orphaned” data.
Why choose PandaOffice Drecov?
Unlike many “freemium” tools that limit your recovery to a few megabytes, PandaOffice Drecov offers a robust scanning engine that can identify over 1,000 file types, including complex RAW images and database files.
Crucial Tip: Install the software on a different drive (e.g., a USB flash drive) than the one where the lost files were located to prevent overwriting.
Step-by-Step Guide to Using PandaOffice Drecov:
- Step 1: Select the Location. Open the application. On the main dashboard, you will see a list of drives. Select the drive where your Recycle Bin resides (usually the
C:drive) and click Start Scan.

- Step 3: Choose Scan Type. For recent deletions, a “Quick Scan” might suffice. However, for a thorough free data recovery from recycle bin after an emptying event, select Deep Scan. This will analyze the disk sector-by-sector.

- Step 4: Filter and Preview. Once the scan completes, use the filter sidebar to sort by “File Type” (e.g., .jpg, .docx, .pdf). PandaOffice Drecov allows you to Preview files before recovery, ensuring the data is intact and not corrupted.

- Step 5: Execute Recovery. Check the boxes next to the files you want to save. Click the Recover button and choose a destination path—ideally an external hard drive or a cloud storage folder—to finalize your free data recovery from recycle bin.
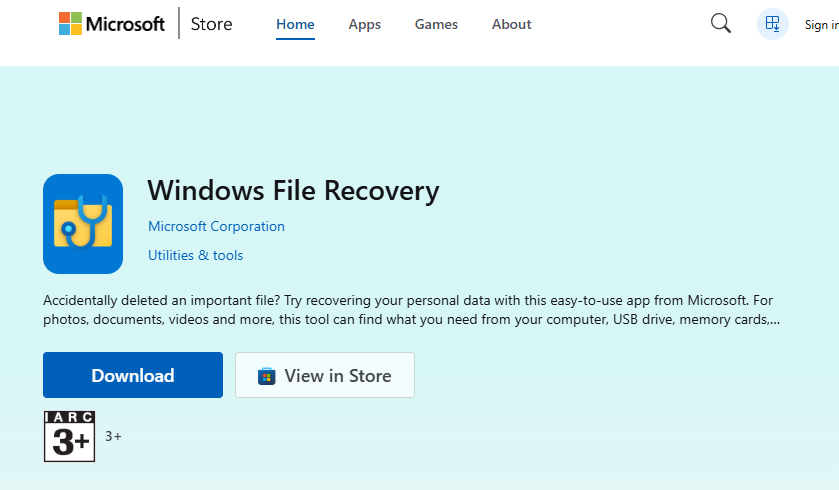
Method 3: Windows File Recovery (The Command Line Approach)
For users comfortable with a syntax-based interface, Microsoft provides its own utility for free data recovery. It lacks a graphical interface but is powerful for NTFS drives.
- Step 1: Download Windows File Recovery from the Microsoft Store.
- Step 2: Open the app, which launches a Command Prompt window.
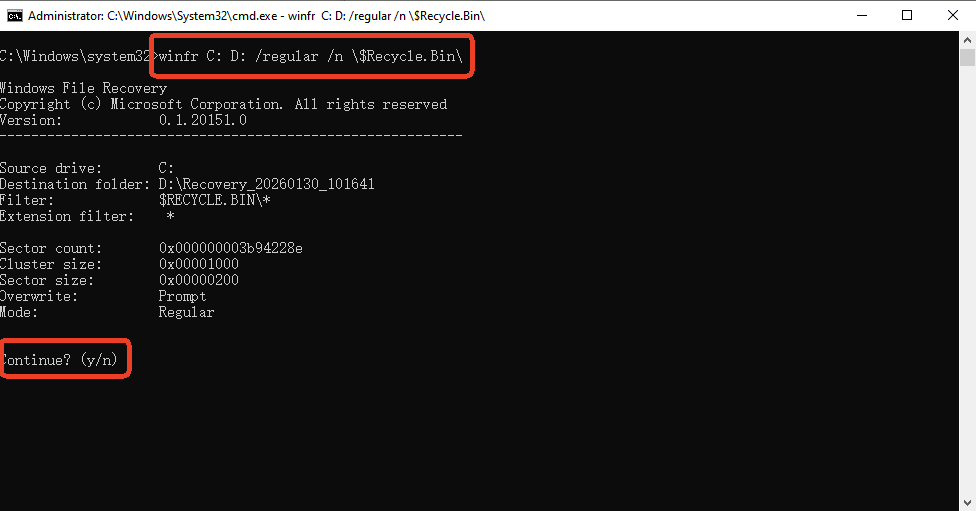
- Step 3: Use the following syntax to attempt recovery from the
C:drive to an externalD:drive:winfr C: D: /regular /n \$Recycle.Bin\ - Step 4: Press Y to start the scan. The tool will create a folder named “Recovery_[Date]” on your destination drive.
Method 4: Utilizing “Previous Versions” and Shadow Copies
Windows often creates “Shadow Copies” as part of a restore point. This is a “hidden” way to achieve free data recovery from recycle bin without third-party software.
- Step 1: Navigate to the folder that originally contained the deleted files.
- Step 2: Right-click the folder and select Restore previous versions.
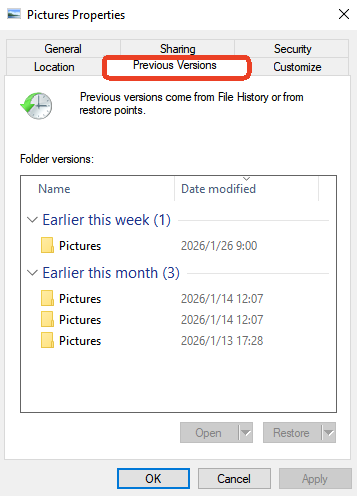
- Step 3: A list of folder states at different dates will appear. Select a version from before the deletion.
- Step 4: Click Open to verify the files are there, then click Restore to bring the folder back to that state.
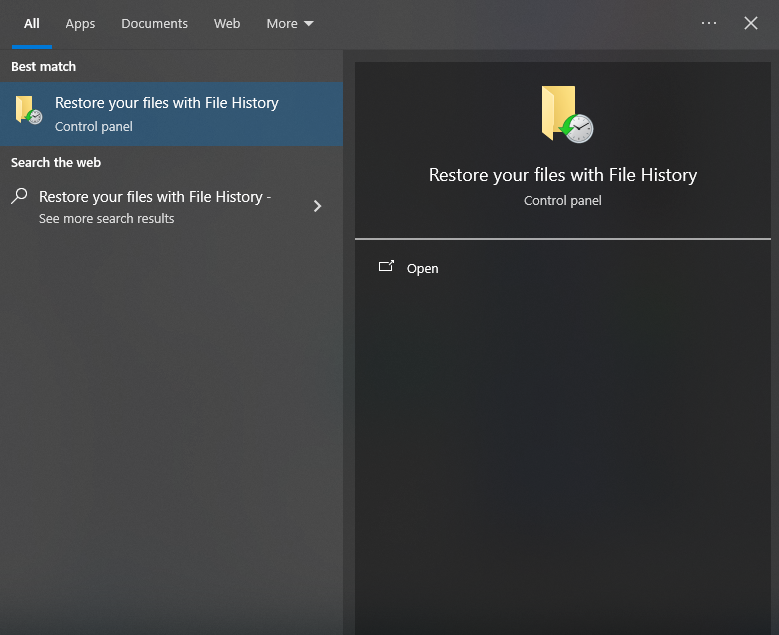
Method 5: Recovering via Windows File History
If you had the foresight to enable File History, you have a built-in safety net for free data recovery from recycle bin.
- Step 1: In the Windows search bar, type “Restore your files with File History” and hit Enter.
- Step 2: Look through the library of backups using the left and right arrows at the bottom.
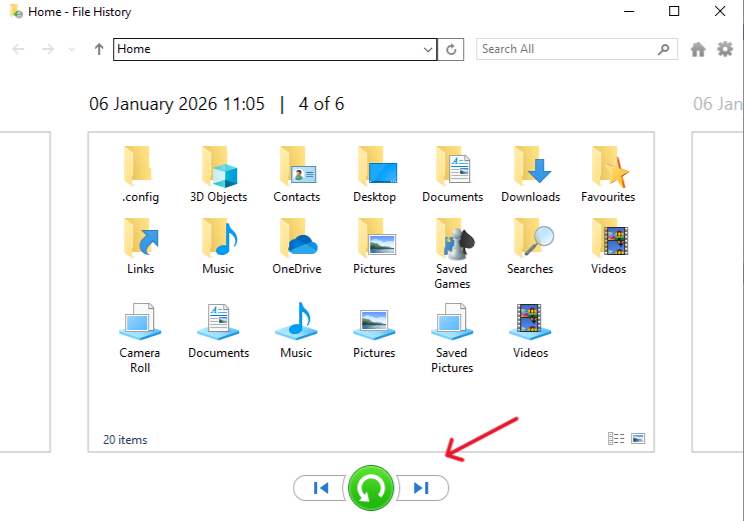
- Step 3: Locate the specific file you deleted from the bin.
- Step 4: Click the green Restore (circular arrow) button to return the file to its original home.
Part III: Comparison of Methods
To help you choose the best path for your free data recovery from recycle bin efforts, refer to the table below. Note how PandaOffice Drecov balances ease of use with deep technical capability.
| Method | Success Rate | Difficulty | Best For… |
| Native Restore | 100% | Very Easy | Files not yet “emptied” from the bin. |
| PandaOffice Drecov | High | Easy | Emptied bins, formatted drives, and complex file types. |
| Windows File Recovery | Moderate | Hard | Technical users who prefer command-line tools. |
| Previous Versions | Variable | Medium | When System Protection/Restore Points are active. |
| File History | 100% | Easy | Users who maintain active external backups. |
Part IV: Common Scenarios and Preventive Measures
Understanding how data is lost is the first step toward preventing the need for free data recovery from recycle bin in the future.
Scenario A: The “Shift + Delete” Habit
Many power users use Shift + Delete to bypass the Recycle Bin entirely. While this saves time, it removes the safety buffer.
- Prevention: Disable the “Don’t move files to the Recycle Bin” option in the Bin’s properties. Go to Recycle Bin Properties -> Custom size and ensure “Display delete confirmation dialog” is checked.
Scenario B: Storage Sense Auto-Emptying
Windows 10 and 11 have a feature called “Storage Sense” that can automatically empty your bin every 30 days.
- Prevention: * Step 1: Go to Settings > System > Storage.
- Step 2: Click on Storage Sense.
- Step 3: Change the setting for “Delete files in my recycle bin if they have been there for over…” to Never.
Scenario C: Registry Mishaps
Sometimes the Recycle Bin icon disappears or the path becomes corrupted.
- Prevention: Regularly check your Desktop Icon Settings. If the Bin is missing, you can often find it via the Registry path:
HKEY_LOCAL_MACHINE\SOFTWARE\Microsoft\Windows\CurrentVersion\Explorer\Desktop\NameSpace. Warning: Do not edit the Registry unless you have a full system backup.
The Ultimate Prevention: The 3-2-1 Rule
To avoid the stress of free data recovery from recycle bin, follow the 3-2-1 backup strategy:
- 3 copies of your data (Original + 2 backups).
- 2 different media types (Local Drive + Cloud/External Drive).
- 1 copy off-site (Cloud storage like OneDrive, Google Drive, or Dropbox).
Frequently Asked Questions About Data Recovery
1.Is it really possible to perform a free data recovery from recycle bin after it has been emptied?
Yes. As long as the physical sectors on the hard drive have not been overwritten by new data, software like PandaOffice Drecov can reconstruct the files.
2.How long do I have to recover a file after emptying the bin?
There is no set time. It depends on how much you use your computer. On a busy system, a file could be overwritten in minutes. On an idle system, it might stay recoverable for weeks. This is why free data recovery from recycle bin should be attempted immediately.
3.Can I recover files from a USB drive’s recycle bin?
Most USB flash drives do not have a Recycle Bin. When you delete a file from a USB drive, Windows usually deletes it permanently. In this case, using a tool like PandaOffice Drecov is your only option for recovery.
4.Does “Free Data Recovery” mean it’s always successful?
Not necessarily. If the file was fragmented or if the drive is an SSD with TRIM enabled, the chances decrease. However, professional tools significantly improve the odds compared to manual attempts.
Conclusion
Losing data is a stressful experience, but it doesn’t have to be a permanent one. By understanding that “deleted” often just means “hidden,” you can approach free data recovery from recycle bin with a calm, methodical mindset.
Start with the basics: check your backups and native Windows versions. If those fail, turn to a specialized powerhouse like PandaOffice Drecov to perform the heavy lifting. Remember, the golden rule of data recovery is speed—the faster you act, the higher your chances of a successful restoration.


