


Imagine this: You’ve spent weeks perfecting a presentation or organizing years of family photos on your portable drive. You plug it into a computer at a local print shop or a friend’s laptop, and suddenly, everything vanishes. Your folders have turned into strange shortcuts, or worse, the drive appears completely empty despite the properties showing it’s full. This is a nightmare scenario shared by thousands of users across tech forums daily. The culprit is almost always a usb virus, a resilient piece of malicious code designed to hitchhike on your hardware and wreak havoc on your data.
In this comprehensive guide, we will dive deep into the mechanics of these digital infections, explore why they target your thumb drives, and provide a step-by-step roadmap to cleaning your device and recovering your precious files.
Part 1: Decoding the Mystery – What is a USB Virus?
At its core, a usb virus is a type of malware that spreads via Removable Storage Devices. Unlike a standard computer virus that might stay confined to a single hard drive, these are “nomadic.” They leverage the “AutoRun” or “AutoPlay” features of operating systems to execute themselves the moment you plug the device in.
Why Do These Infections Happen?
Understanding the “why” helps in preventing the “how.” Most infections stem from:
- Cross-Contamination: Plugging your clean drive into an already infected public terminal (libraries, schools, or print shops).
- Malicious Scripts: Some variants, like the “Shortcut Virus,” don’t actually delete your data. Instead, they hide your original files and create .lnk files that look like your folders. When you click them, you unknowingly run the virus script.
- Outdated Firmware: Security loopholes in older USB controllers can sometimes allow unauthorized code execution.
Essentially, the usb virus treats your flash drive like a biological vector, waiting for the next host to infect.
Part 2: Strategic Solutions – Eradicating the Infection and Restoring Data
When dealing with a usb virus, the goal is twofold: kill the malware and rescue the data. Below are three distinct methods ranging from manual system commands to professional recovery software.
Method 1: Using Command Prompt (The Manual Rescue)
This method is highly effective for the common “Hidden File” or “Shortcut” usb virus variants. It uses the Windows attrib command to strip away the hidden and system attributes the virus applied to your files.
- Step 1: Plug your USB drive into your PC. Note the drive letter (e.g., Drive G:).
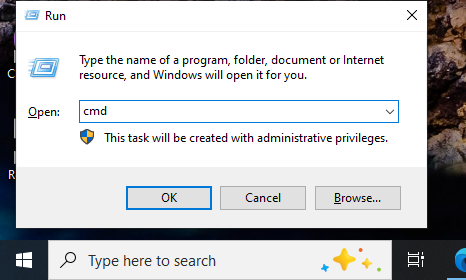
- Step 2: Press
Win + S, type cmd, right-click it, and select Run as Administrator.
- Step 3: Type your drive letter followed by a colon (e.g.,
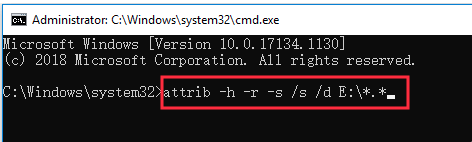
E:) and hit Enter. - Step 4: Input the following command:
attrib -s -h -r /s /d *.*and press Enter.-s: Removes the “System” attribute.-h: Removes the “Hidden” attribute./sand/d: Ensures the command processes all files and folders.
- Step 5: Check your USB drive. Your original folders should reappear, often inside a nameless folder.
Method 2: The Professional Choice – PandaOffice Drecov
If the usb virus has deleted your files or formatted the drive, manual commands won’t suffice. This is where PandaOffice Drecov becomes indispensable. It is specifically engineered to bypass the structural damage caused by malware.
- Step 1: Select Location. On the main interface, locate the “External Devices” section. Select your infected USB drive.

- Step 2: Deep Scan. Click the Scan button. The software will perform a sector-by-sector analysis to find data fragments that the usb virus tried to erase or hide.

- Step 3: Preview and Filter. Once the scan completes, use the file type filter (Photos, Documents, Videos) to find your data. You can double-click files to preview them before recovery.

- Step 4: Secure Recovery. Select the files you need and click Recover.
Crucial Tip: Save the recovered files to your local hard drive (C: or D:), not back onto the infected USB, to prevent overwriting.
Method 3: Registry Cleaning (System Level Protection)
Sometimes the usb virus leaves a “startup” entry in your Windows Registry, re-infecting any new drive you plug in.
- Step 1: Press
Win + R, typeregedit, and hit Enter. - Step 2: Navigate to the following path:
HKEY_CURRENT_USER\Software\Microsoft\Windows\CurrentVersion\Run - Step 3: Look for suspicious entries pointing to your USB drive or random
.vbsor.exefiles in theTempfolder. Right-click and Delete them. - Step 4: Restart your computer to clear the memory of the active usb virus script.
Part 3: Other Common USB Failures
While a usb virus is a software-based attack, your drive might face other hurdles. Understanding these ensures you don’t misdiagnose a hardware fault as a virus:
- USB Driver Error: This occurs when Windows fails to recognize the hardware. You can fix this by navigating to Device Manager -> Universal Serial Bus controllers, right-clicking your device, and selecting Update driver.
- The file or directory is corrupted and unreadable: This often happens if you pull the drive out without “Safely Removing” it.
- Hidden Files in USB: Sometimes files are hidden by the user or system settings rather than a usb virus. You can toggle this in File Explorer Options -> View -> Show hidden files, folders, and drives.
Part 4: Choosing Your Recovery Weapon
| Feature | CMD (Attrib) | PandaOffice Drecov | Windows Registry Edit |
| Best For | Restoring hidden files | Recovering deleted/formatted data | Preventing re-infection |
| Difficulty | Medium (Requires syntax) | Easy (User-friendly UI) | High (Risk of system damage) |
| Success Rate | Moderate | High (Advanced Algorithms) | Low (Cleanup only) |
| Time Cost | Fast | Depends on drive size | Fast |
| Cost | Free | Professional | Free |
Why choose PandaOffice Drecov? Unlike manual methods that only “reveal” what is already there, Drecov can reconstruct files that the usb virus has actively attempted to destroy, making it the safest bet for critical data.
Proactive Defense: How Do I Prevent a USB Virus in the Future?
While knowing how to eradicate a usb virus is essential, the ultimate goal is to ensure your drive never becomes a carrier in the first place. Digital hygiene is much easier to maintain than performing an emergency data rescue. By implementing the following multi-layered security strategies, you can create a “sterile” environment for your portable data.
1. Disable the Windows AutoRun/AutoPlay Feature
The most common way a usb virus enters a system is by exploiting the AutoPlay feature. When this is enabled, Windows automatically executes the autorun.inf file on the drive the moment it is plugged in.
- Step 1: Click the Start menu and select Settings (the gear icon).
- Step 2: Navigate to Bluetooth & devices (or Devices on older versions).
- Step 3: Click on AutoPlay in the sidebar.
- Step 4: Toggle “Use AutoPlay for all media and devices” to Off.Alternatively, you can set the “Removable drive” dropdown menu to Take no action. This forces you to manually open the drive, preventing the usb virus from launching its script automatically.
2. The “Write-Protect” Hardware Shield
If you frequently use public computers (such as those in print shops or universities), consider purchasing a USB drive that features a physical write-protect switch.
- How it works: When the switch is set to “Lock,” the computer can read the files, but it cannot write any new data to the drive. Since a usb virus needs to write its code onto your device to infect it, this physical barrier makes it impossible for malware to hop onto your drive.
3. Create a “Vaccinated” Folder (The Dummy File Trick)
A classic “low-tech” hack to prevent a usb virus from creating its own autorun.inf file is to create a folder with that exact name yourself.
- Step 1: Open your USB drive’s root directory.
- Step 2: Create a new folder and name it
autorun.inf. - Step 3: Right-click the folder, go to Properties, and check the Read-only and Hidden boxes.Because most basic malware scripts are not programmed to delete an existing folder to create a file of the same name, this simple placeholder can block many automated usb virus variants from installing themselves.
4. Use a Dedicated USB “Sandbox” or Linux Environment
If you suspect a computer is crawling with malware, avoid plugging your primary drive into it. If you must transfer files, use a “sacrificial” low-capacity drive or use a Live Linux USB.
- Most usb virus strains are designed specifically for Windows environments (
.exe,.vbs,.lnk). - By opening the drive in a Linux environment (like Ubuntu), the virus cannot execute, allowing you to see and delete the malicious files safely before they ever touch your Windows OS.
5. Deploy Real-Time USB Scanning Software
Standard antivirus programs are great, but specialized USB security tools offer an extra layer of protection. Ensure your security suite has “Removable Drive Scanning” enabled.
- When a drive is inserted, the software will intercept the connection and perform a lightning-fast scan for any usb virus signatures before the file explorer even opens.
- If you have already used PandaOffice Drecov to recover your files, maintaining a clean environment with real-time monitoring is the best way to ensure you don’t have to repeat the recovery process.
6. Regular Formatting and Backups
Treat your USB drive as a temporary transport vessel, not a permanent storage unit.
- Regular Formatting: Once a month, after backing up your data, perform a Full Format (not “Quick Format”) to wipe the file system clean. This removes any deep-seated usb virus remnants that might be hiding in the unallocated space.
- Cloud Redundancy: Always keep a copy of your USB’s critical contents on a cloud service. If a usb virus strikes, you can simply format the drive without the stress of data loss.
How to scan usb drive for virus FAQs
Q1: Can a usb virus damage my computer’s hardware?
Typically, no. A usb virus targets your data and operating system files. However, it can slow down your CPU by running background processes or filling up your RAM.
Q2: Will formatting my drive remove the usb virus?
Yes, formatting usually wipes the malware. However, it also wipes all your data. We recommend using PandaOffice Drecov to get your files off first before you perform a full format to ensure the drive is clean.
Q3: Is the “Shortcut Virus” the same as a usb virus?
Yes, the shortcut virus is the most prevalent sub-type of usb virus encountered today.
Conclusion
Dealing with a usb virus is a frustrating experience, but it doesn’t have to be a permanent loss. By understanding that these “infections” are often just clever tricks to hide your data, you can stay calm and take action. Whether you use the manual power of the Command Prompt or the specialized recovery capabilities of PandaOffice Drecov, the key is to stop using the drive the moment you suspect an infection.
By following the steps outlined above—cleaning the registry, unhiding files, and performing deep scans—you can ensure your digital life remains intact and secure from future portable threats.


