


Imagine this: You’ve just returned from a once-in-a-lifetime vacation with hundreds of irreplaceable photos. You plug your thumb drive into your laptop, expecting to see your files, but instead, a cold, clinical pop-up appears: “You need to format the disk in drive G: before you can use it.” You check the disk properties, and where there used to be a “FAT32” or “NTFS” label, it now simply says “RAW.” It is a moment of pure panic, and your first thought is likely a frantic search for how to recover data from raw usb drives before those memories are lost forever.
Your heart sinks as the computer treats your drive like a blank slate, even though you know your files are still trapped inside. This is a common digital nightmare, but the most important rule is: don’t hit that “Format” button just yet! Mastering the techniques to restore your files is a skill that can save your digital life. In this guide, we will explore why this corruption happens and, more importantly, provide the exact steps you need to get your data back safely.
Decoding the Mystery: What Exactly is a RAW USB?
To understand how to recover data from raw usb storage, we first need to understand what “RAW” actually means. Think of your USB drive as a massive, high-tech library.
In a healthy library, there is a Librarian (the File System) and a Card Catalog (the Partition Table). When you want a file, the Librarian looks at the Card Catalog, sees that “Project_Final.docx” is on Shelf 5, Row 3, and goes to grab it for you.
When a USB becomes RAW, it’s as if the Librarian has suddenly lost their glasses and the Card Catalog has been tossed into a shredder. The books (your data) are all still sitting on the shelves, but the operating system no longer understands how the library is organized. Because it can’t find the “index,” it assumes the drive is unreadable or unformatted.
The data hasn’t vanished; the “map” to find it is just broken. This is the fundamental principle behind how to recover data from raw usb devices: we need tools that can look past the broken index and scan the “shelves” directly.
Critical Warnings: Read This Before You Start
Before we dive into the “how-to,” we must establish two golden rules for anyone wondering how to recover data from raw usb safely:
- Do NOT Format: Windows will practically beg you to format the drive. Formatting creates a new, empty index. While it makes the drive “usable” again, it risks overwriting the very data you are trying to save.
- Stop Writing New Data: If you manage to force a file onto the drive, you might overwrite the “books” still sitting on the “shelves.”
Professional Methods: How to Recover Data from RAW USB
There are several ways to tackle this issue, ranging from built-in system repairs to specialized professional software.
Method 1: CHKDSK Command
Sometimes, the “Librarian” just needs a quick nudge to find their glasses. The CHKDSK command is a built-in Windows utility that can occasionally fix minor directory errors.
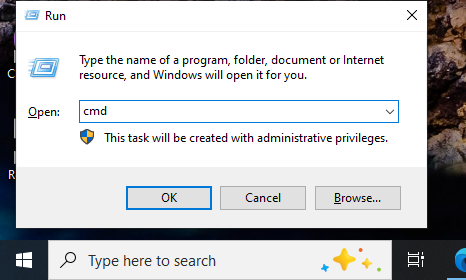
- Step 1: Plug your USB into the computer.
- Step 2: Press the Windows Key + S and type
cmd. Right-click Command Prompt and select Run as Administrator.
- Step 3: Type the command
chkdsk D: /f(Replace D: with the actual letter of your USB drive).
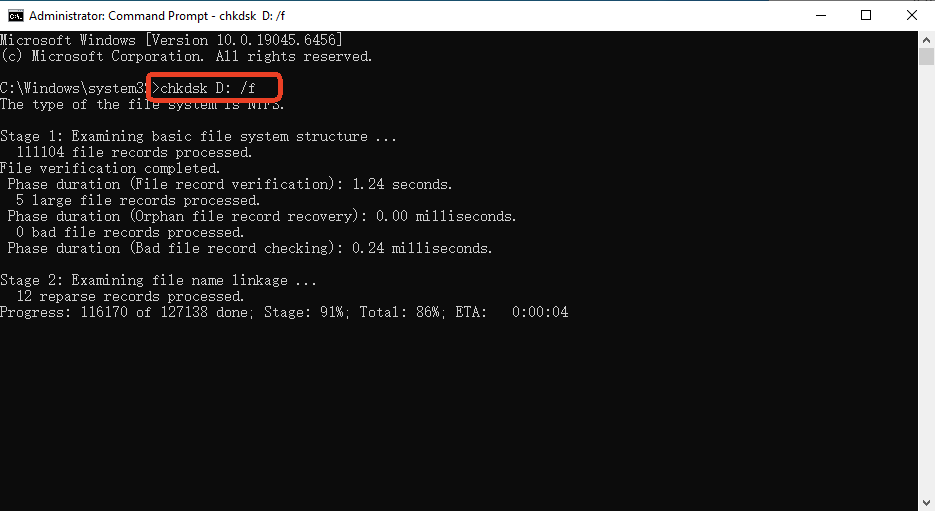
- Step 4: Press Enter.
Note: If the drive is severely RAW, you might see an error saying “CHKDSK is not available for RAW drives.” If that happens, move immediately to Method 2.
Method 2: Using PandaOffice Drecov
When system tools fail, you need a specialist. PandaOffice Drecov is widely considered one of the most effective solutions for users researching how to recover data from raw usb because it bypasses the Windows file system entirely to “see” the raw binary data.
Why choose PandaOffice Drecov? Unlike standard recovery tools, Drecov uses a proprietary deep-scanning algorithm specifically tuned for RAW partitions. It can reconstruct file headers even when the partition table is completely destroyed.This makes it an indispensable tool for a wide range of data loss scenarios, including:
- Browser Metadata Recovery: Restoring lost Chrome bookmarks and other essential application data.
- Accidental Desktop Deletions: Instantly retrieving files wiped from your local workspace.
- Disk Formatting Errors: Salvaging files from drives that have been completely wiped or reformatted.
- External Media Rescue: Recovering lost data from formatted or corrupted SD cards and USB flash drives.
- Sync Conflict Resolution: Reversing data loss caused by synchronization errors between your PC and the OneDrive cloud.
Tips: Ensure you install it on your main hard drive, never on the USB drive itself.
Step-by-Step Recovery with PandaOffice Drecov:
- Step 1: Connect and Select. Insert your RAW USB. Open the software. On the main interface, you will see a list of drives. Look for the one marked “Unallocated” or “RAW.” Select it.

- Step 2: Deep Scan Initiation. Click the “Scan” button. PandaOffice Drecov will begin a two-stage process. First, it searches for the old “Card Catalog” (Quick Scan). If that’s gone, it automatically triggers a “Deep Scan” to identify files by their unique signatures (like identifying a book by its cover design).

- Step 3: Previewing Files. One of the best features here is the preview pane. Before you commit to recovery, you can click on photos or documents to see if they are intact.

- Step 4: Secure Recovery. Select the files you need and click “Recover.”
Warning: Always save the recovered files to your computer’s Desktop or an external HDD, not back onto the RAW USB.
Method 3: Using Disk Management to Update Drivers
Sometimes the RAW status isn’t a corruption issue but a communication breakdown between the hardware and the OS.
- Step 1: Right-click the Start button and select Disk Management.
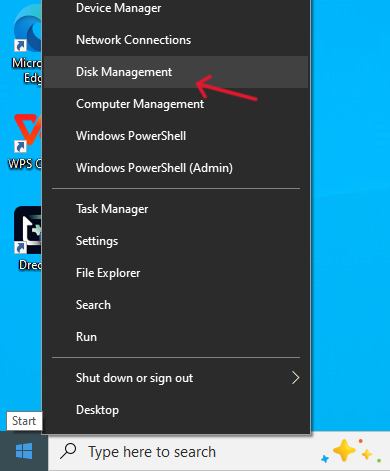
- Step 2: Locate your USB drive in the list. It will likely show a bar with “RAW” or “Unallocated.”
- Step 3: Right-click the USB name on the left side and select Update Driver.
- Step 4: Choose “Search automatically for drivers.”
If a driver update doesn’t work, the issue is definitely within the file structure of the drive, necessitating the use of the recovery software mentioned in Method 2.
Method 4: Advanced Partition Recovery
For tech-savvy users, TestDisk is a powerful open-source tool. It doesn’t have a flashy interface—it’s command-line only—but it is excellent for repairing partition tables.
- Step 1: Launch TestDisk and select “Create” to start a new log file.

- Step 2: Select your USB drive from the list.
- Step 3: Select the partition table type (usually Intel or EFI GPT).
- Step 4: Select “Analyse” and then “Quick Search.”
- Step 5: If it finds your lost partition, highlight it and press “Write” to save the partition structure back to the disk.
Comparing the Best Ways to Recover Your Files
To help you decide how to recover data from raw usb most efficiently, we’ve summarized the methods below:
| Method | Success Rate | Difficulty | Best For | PandaOffice Drecov Advantage |
| CHKDSK | Low | Medium | Minor file system glitches | Often fails on true RAW drives. |
| PandaOffice Drecov | Extremely High | Easy | Any RAW scenario, deleted files, formatted drives | Intuitive UI, deep signature scanning, and file preview. |
| Update Drivers | Low | Easy | Driver incompatibility | Won’t fix data corruption. |
| TestDisk | High | Hard | Partition table repair | No GUI; high risk of user error. |
Proactive Defense: Preventing the RAW State
Learning how to recover data from raw usb is vital, but preventing the problem is even better. Follow these steps to keep your data safe:
- Always “Eject” Safely: This isn’t just a suggestion. If you pull a USB out while it’s writing data, the “Librarian” gets interrupted mid-sentence, leading to a RAW state. Always click the “Safely Remove Hardware” icon in the taskbar.
- Avoid Cheap Flash Drives: High-quality NAND flash memory is less prone to sudden corruption.
- Use the 3-2-1 Backup Rule: Keep 3 copies of your data, on 2 different media types, with 1 copy off-site (Cloud).
- Keep the Registry Clean: Ensure your Windows USB polling registry entries are not corrupted by running occasional system file checks (
sfc /scannow).
FAQ: Common Questions on RAW USB Recovery
1. Can I recover data from a RAW USB for free?
You can try using CHKDSK or TestDisk. However, for a high success rate and a user-friendly experience, professional tools like PandaOffice Drecov are recommended, especially for large volumes of data.
2. Why did my USB suddenly become RAW?
Common causes include “Unsafe Removal,” virus attacks, physical damage to the controller chip, or the drive reaching the end of its life cycle.
3. How long does it take to recover a 64GB RAW USB?
Using PandaOffice Drecov, a Quick Scan takes seconds. A Deep Scan for a 64GB drive usually takes 10 to 30 minutes, depending on the USB’s read speed (USB 2.0 vs 3.0).
Conclusion
Finding out your drive is RAW is stressful, but it isn’t a death sentence for your files. By understanding that a RAW drive is simply a library that has lost its index, you can approach the problem calmly. Whether you use the system’s command prompt or the powerful, specialized scanning of PandaOffice Drecov, the key is to act quickly and avoid writing new data to the device.


