







Recover the Live Set and its media as separate parts
To recover Ableton Live Sets, preserve the project and crash-related files, then compare native recovery and existing Backup Sets before changing the installation. A Set that cannot locate samples needs a different response from a deleted ALS file. Therefore, first identify whether you lost arrangement data, recorded audio, device state, or simply the link to an existing media folder.
Ableton Live is commercial software. Its built-in recovery and backup features can help an existing eligible user without buying a separate recovery utility. They do not make Live or third-party devices free. Also use the version appropriate to the saved material, especially for crash recovery, where the version that produced the recovery state matters.
Preserve the interrupted session’s evidence
Copy the project folder and any relevant crash or temporary candidates before cleanup or repeated troubleshooting. Include the original recordings and externally referenced samples when available. Then record the last musical change you remember, such as a new scene, a revised transition, or a recorded take. These details help you identify which candidate actually contains the missing work.
If a useful Set remains open, preserve its content before restarting solely to test recovery. Also record the Live version involved in the interruption. A different installation can produce new device or compatibility messages that obscure the original problem. Keep the preserved sources separate from the folder where you will open candidates, relink media, or rebuild processing.
Native route 1: accept a relevant automatic recovery offer
- Preserve the project and relevant recovery data when available.
- Start the Live version involved in the crash and inspect the restore-document offer.
- Recover the affected Set and compare the missing musical content.
- Save the result under a new ALS name in a separate working project.
An automatic recovery depends on usable state from the interrupted session. It is not a guarantee that every edit or recording survived. After the Set opens, inspect the actual arrangement and important clips rather than accepting the familiar track list as proof. Also save deliberately, because a recovered session still needs a stable named project for continued work.
Inspect both Arrangement and Session content
Check the relevant Arrangement sections, Session clips, scenes, and clip properties. A recent idea may exist in one view without appearing in the other. Then inspect automation and device chains on the affected tracks. Hearing a recognizable loop does not establish that the latest transition or parameter change survived in the intended location.
For recorded audio, inspect the source file as well as the clip reference. A clip can exist while its audio is missing or incomplete. Compare duration, waveform, and the performance itself. If a useful recording survives separately, preserve it even when the first recovered Set cannot locate it. That file may support a later media repair or a limited reconstruction.
Native route 2: use matching-version crash state
- Close Live and preserve the relevant version’s preferences and Crash data before changing anything.
- Identify the matching crash-time group containing BaseFiles, CrashRecoveryInfo.cfg, and Undo material.
- Follow Ableton’s official manual-recovery instructions for renaming and placing that matched group.
- Restart the same Live version, attempt recovery, and save a separate recovered Set.
This is an advanced native route for the specific crash state described by Ableton. Do not mix files from different crashes or Live versions. Also preserve the existing preferences before following instructions that replace items. A matched group matters because the undo material and base state belong together. Combining unrelated timestamps can make recovery fail or produce an uncertain result.
Keep version and crash timing explicit
Write down the version number and crash timestamp for each group before moving or renaming working copies. If several interruptions occurred, choose the event that corresponds to the missing session. Then assess the recovered content against the musical milestone you recorded. A successful restart does not prove that you selected the right session from several plausible crash records.
If the required group is absent or incomplete, stop treating this route as a guaranteed solution. Compare Backup Sets or temporary ALS candidates instead. Also retain the original crash material for a support investigation if appropriate. Repeating manual rearrangements without preserving the source can remove clues while leaving you no clearer about which state you attempted to recover.
Native route 3: compare existing Backup Sets
- Preserve the project folder and inspect its existing Backup directory.
- Copy plausible ALS candidates into separate working locations.
- Open them individually and compare the missing clips, automation, and arrangement changes.
- Save the best verified candidate as a new project baseline.
Backup Sets represent saved historical versions, not a continuous recording of everything you did. Their availability depends on the project having reached the relevant save stage and on retained candidates. Therefore, compare the actual folder rather than assuming every new Set has a full history. Preserve the useful backups before making repeated saves that can rotate older versions.
Compare musical milestones rather than filenames
Use a distinctive scene name, a recently edited passage, and a known device setting to distinguish candidates. One backup may contain a revised bass line while another contains the newer vocal arrangement. Keep both until you decide how to combine the verified work. The newest timestamp can follow an unwanted edit and may therefore be a poor baseline for recovery.
When transferring material between candidates, inspect track routing, sends, automation, and device dependencies afterward. A copied clip can play differently in another track context. Save the combined recovery separately and compare it with an existing reference render when available. This keeps deliberate reconstruction visible instead of presenting the merged Set as an untouched historical version.
Native route 4: inspect an existing temporary ALS candidate
- Preserve the temporary and crash-related locations identified in Ableton’s documentation for your version.
- Copy plausible ALS files to a separate recovery folder.
- Open each candidate and identify it by musical content rather than a generic temporary name.
- Save a useful candidate in a new project and reconnect its verified media.
Temporary candidates can preserve an older usable state when the main Set is damaged. However, they may be incomplete or refer to media outside their temporary location. Keep the damaged original and the candidate separately. Do not assume that moving a generic ALS into the project automatically supplies all required samples or restores the most recent device settings.
Keep corruption and missing media distinct
If an ALS reports structural corruption, record the exact message and preserve it for comparison or support. If it opens but reports missing media, inspect the expected source locations. Those symptoms point to different next steps. Replacing samples cannot repair every damaged Set structure, while a file-repair attempt is unnecessary when the only problem is a moved recording folder.
Also inspect whether a cloud placeholder has fully downloaded before concluding that the local file is damaged. Work with a complete local copy in a separate recovery folder. A filename visible in a synchronized directory does not always mean that its full content is available offline. Confirm the actual file and its provenance before choosing a more invasive recovery route.
Reconnect missing media without changing the performance
Use Live’s file-management interface to inspect missing references and search the relevant project or original sample locations. Start with an exact source you can identify confidently, then verify the proposed matches. A file with the same name can contain a different take or edit. Therefore, listen to the affected passage and compare its duration before accepting a replacement.
Check warping and clip boundaries
Inspect warp markers, start offsets, loop boundaries, transposition, and clip envelopes. The correct source audio can still sound wrong if the recovered clip settings differ. Conversely, a similar-looking waveform may belong to an alternate performance. Test the complete affected section in the Set, because a sample audition alone does not reveal every timing or arrangement problem.
After relinking, create an appropriate collected copy of the accepted project and test it from another directory. This helps expose media references that still depend on the old workstation path. Keep original recordings separately as well. A portable project is useful, but it should not become the only remaining copy of an important take or recovered source candidate.
Use frozen tracks and renders as limited salvage
An existing render or stem can preserve musical output when the editable device chain is unavailable. A frozen or flattened result may also provide useful audio depending on what actually survives. However, these sources do not automatically restore MIDI notes, synthesis parameters, or the original automation. Identify exactly which editable information remains before deciding how to continue the production.
Separate immediate delivery from editable recovery
For a listening review, a verified render may meet the immediate need while you continue recovering the Set. Compare its distinctive sections and ending with the intended revision. For continued arrangement work, stems may offer a more flexible reconstruction source. Label the resulting session accordingly, since rebuilding from audio is different from recovering the original ALS and device state.
If a device is unavailable, preserve its existing settings and any reference audio before substituting another instrument or effect. A replacement can help the song play, but it can also change the sound substantially. Keep those creative decisions in the new recovery copy, and retain the original candidate for a later compatible-environment assessment.
A worked recovery after an interrupted recording session
Suppose Live crashes after recording a vocal and editing a transition. Preserve the project, recording folder, and matching crash state. First attempt native recovery in the same version. Then inspect whether the vocal file exists independently and whether the transition automation appears in the recovered Set. These checks identify which parts survived instead of treating the session as one indivisible success or failure.
Combine surviving audio with a stable Set
If the crash recovery fails but an earlier Backup Set opens, use it as a baseline. Locate the verified vocal take and place a copy in the recovery project’s media structure. Then restore its intended timing and compare it against any reference playback. Record that this step reconstructs the clip placement rather than recovering the exact last ALS state.
Next rebuild only the missing transition controls in the new Set. Compare automation values and section timing with the surviving notes or render. Save a checkpoint before each substantial change. This gives you a usable production path while preserving the distinction between recovered material, inferred placement, and newly recreated processing.
Identify the intended Set through musical landmarks
Before comparing ALS candidates, choose a distinctive clip, scene, transition, and final song length. Inspect those landmarks in each candidate and record what survives. This makes a large backup folder manageable and prevents an older but familiar arrangement from becoming the baseline by accident. Also compare the exact version of a recorded performance, since track names alone may remain unchanged across several creative revisions.
Check clip content and placement independently
A MIDI clip can survive in Session View while the intended Arrangement passage is missing. An audio take can survive on disk while its clip placement disappears. Inspect the content first, then its use in the Set. This separates a missing musical source from a missing arrangement decision and helps you choose whether to recover another ALS candidate or reconstruct placement from a reliable reference.
If you transfer a useful clip between Sets, inspect its loop boundaries, envelopes, and destination track context. A clip that plays correctly in the source may sound different through another device chain or routing setup. Save the transfer in a new recovery copy and compare the affected passage in the full arrangement. Record any adjustments you make after transfer so the final result remains reviewable.
Recover automation with its target context
Automation describes changes to a particular parameter in a particular session context. A curve can survive while the target device or parameter mapping differs. Inspect the affected control and play the passage where the automation matters. Compare the audible result and control range with an existing reference. This checks whether the recovered data still produces the intended musical behavior.
Inspect the boundaries around a transition
For a tempo change, filter movement, or level ride, play from before the transition through its ending. Check the starting state, the curve, and what happens afterward. A candidate can preserve the visible movement while using a different initial value or device setting. These boundary checks reveal discontinuities that a quick audition from the middle of the section may miss.
If the original device cannot be restored, preserve the curve and any existing render as evidence. Recreate the processing in a separate copy and document the approximation. A sound replacement can be musically useful while differing from the original device state. Keeping that distinction explicit makes later revisions easier when the original plugin or a better native candidate becomes available.
Compare media candidates by performance rather than basename
A recording directory can contain several takes with similar names. Identify the intended take through its actual content, duration, and timing. Then compare the recovered clip’s offsets and edits. A filename match can remove a missing-media warning while introducing a different performance, so listen to the relevant phrase in context before accepting the repair.
Inspect warp assumptions after relinking
Check the clip’s warp markers, tempo assumptions, transposition, and loop settings where relevant. The source audio may be correct while the recovered interpretation differs. Play the full affected passage and compare its alignment with surrounding tracks. If you reconstruct timing from a render, record that work rather than implying that the exact original warp state survived.
Keep raw recordings alongside useful edited or rendered versions. The edited audio may preserve an approved result, while the raw take provides material for future revisions. These sources solve different problems. A project rebuilt around a rendered stem can be a good emergency production copy without retaining every original edit and control, so label its role clearly.
Use a recovered track as a partial session source
If one ALS candidate opens while another contains useful but unstable content, investigate whether a verified track or clip can be recovered through the application’s supported workflow. Preserve both candidates first and test the transfer in a new Set. Then inspect devices, routing, sends, and automation. A partial transfer can save substantial work, but its dependencies need explicit review.
Verify routing beyond the visible track list
Check where the recovered track receives audio or MIDI and where its output goes. Then inspect sends, return processing, and any sidechain relationships that affect the sound. A track can appear complete and play in solo while behaving differently in the full mix. This routing check connects the recovered objects with the session behavior you actually need.
If a dependency remains unavailable, retain a note and a reference render where possible. Do not silently replace the routing with a convenient default merely to make the Set play. A deliberate substitute may be acceptable, but it is a new production choice. Keeping it separate from direct recovery helps another producer understand which parts of the original session remain unresolved.
Check collection and portability after recovery
Once the musical content is accepted, create an appropriate collected project copy and inspect which media it includes. Then test that copy from a different directory with the old source path unavailable where practical. This exposes accidental references to temporary folders or another workstation’s recording location. Keep the original evidence separately so the portability test cannot become the only remaining copy of the recovered material.
Compare the packaged Set with the accepted baseline
Reopen the collected copy and check the same musical landmarks used during candidate selection. Play the distinctive clip, transition, and ending, then inspect any missing-media messages. A packaging operation that completes does not prove that every creative dependency moved successfully. The actual session check establishes whether the portable copy supports continued production.
Finish with a short record covering the ALS source, Live version, recovered recordings, relinked media, and reconstructed device behavior. Also identify whether the accepted result is a fully editable session or a limited reconstruction using stems. This gives you a reliable next milestone and prevents an emergency audio-based copy from being mistaken for a complete restoration of the original production controls.
Preserve the accepted session before new production work
Once the recovered Set passes its checks, save a stable milestone and render a reference from it. Then start new creative work in another version. This boundary makes later comparisons meaningful: you can distinguish differences introduced by recovery from changes made afterward. Also keep the native candidate and any crash source separately, so a new edit cannot become the only remaining interpretation of the interrupted session.
Test a collaborative handover
If another producer will continue the song, identify the Live version, required devices, and included media. Then test the collected copy from a different directory and inspect the relevant clips and transitions. A local session may work because an external sample happens to remain available, while the handed-over package lacks it. The portability check verifies the actual deliverable rather than the original workstation’s convenience.
Keep an explicit list of approximate replacements and unresolved controls. A Set built partly from stems can still support useful arrangement work, but it may not permit the same instrument or automation revisions as the original. Clear limits help the next producer choose suitable tasks and preserve the recovered material without assuming that every original production control remains available.
When storage recovery is relevant to Ableton projects
PandaOffice Drecov can be considered for deleted saved ALS files, existing backups, or original audio on readable storage. It cannot recreate an unsaved MIDI idea that never reached disk or supply an unavailable device license. Use native recovery and backups first, and avoid writing new recordings or exports to the affected storage while you investigate deleted files.
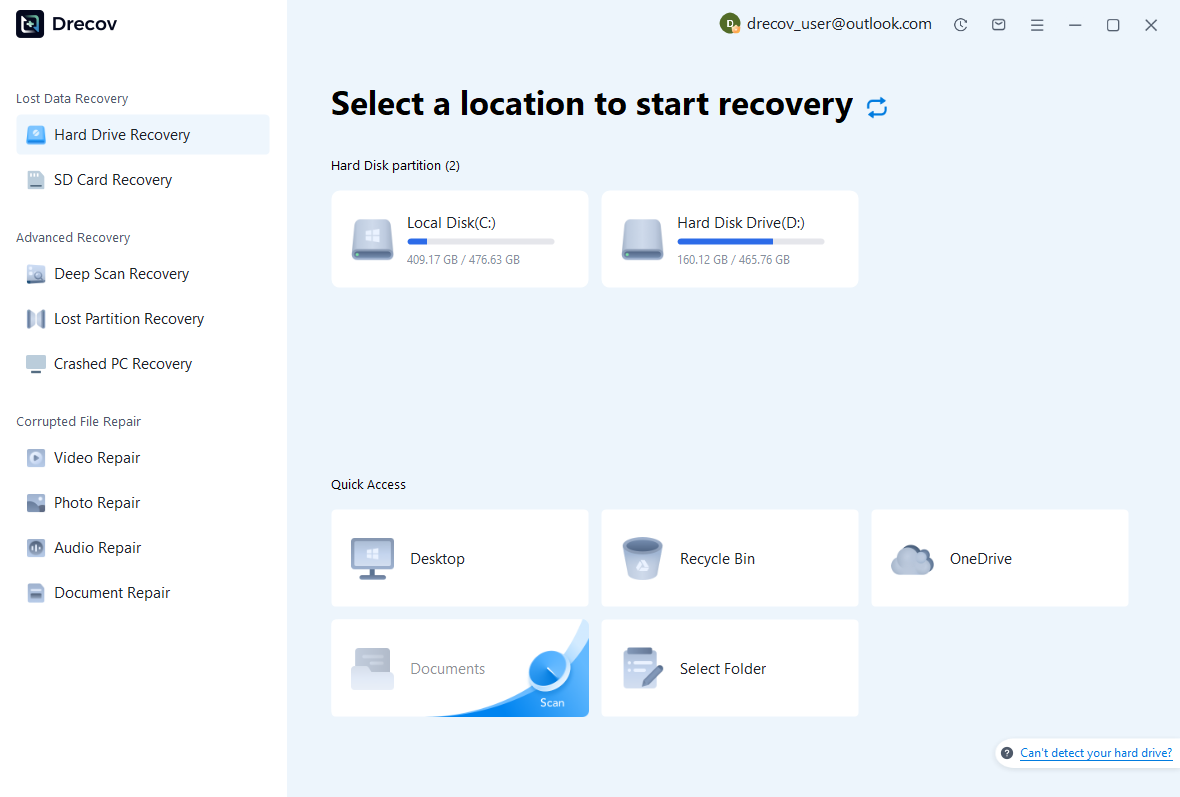
Step 1: identify the missing Set or recording location
Choose the drive or partition that held the project, actual backup directory, or original recording. Record whether the missing media lived outside the project folder. Use another healthy destination for recovery output. If the source repeatedly disconnects or reports hardware read errors, assess that condition before treating it as a routine software recovery task.
Step 2: compare ALS and audio candidates
Review available file details and preserve plausible Set revisions alongside useful recordings. Keep candidate dates and original paths in your notes. A scan preview can help identify audio, but it cannot validate every clip relationship and device setting in an ALS. Those checks require opening the recovered candidate in a suitable Live environment.
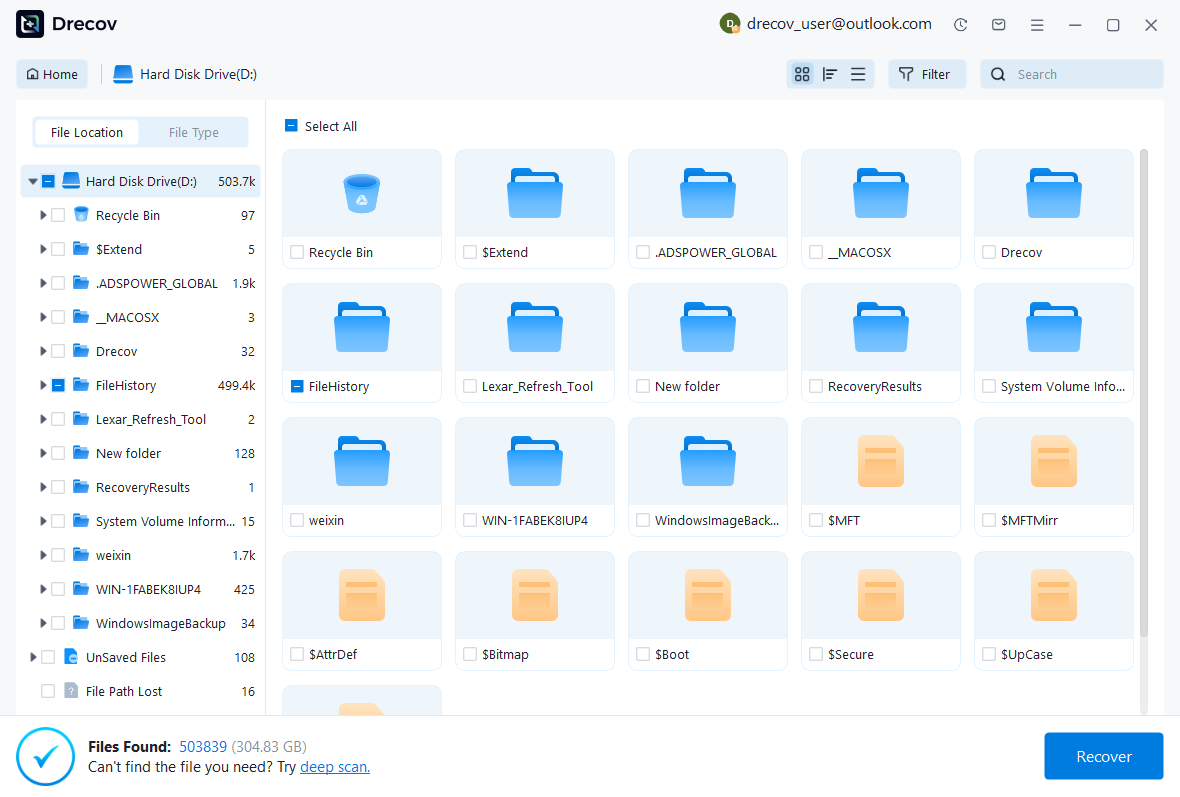
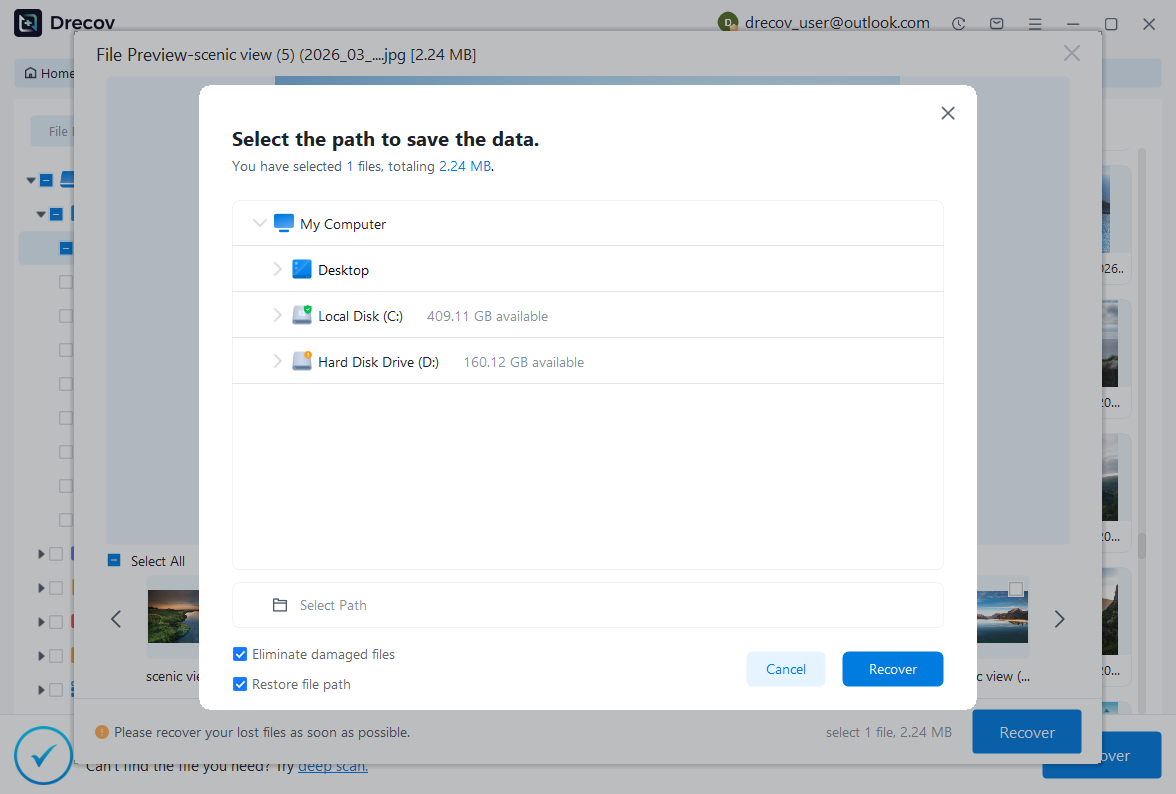
Step 3: restore elsewhere and test the whole session
Recover selected files to a separate location, then open a working Set and reconnect the verified media. Inspect Arrangement and Session content, automation, routing, and device behavior. Save a new project and render a representative test. Keep uncertain files separate so an incomplete candidate cannot replace a Set that already works.
Accept a recovered Set only after reopening it
Close and reopen the accepted project from its new location. Play the important sections and inspect any remaining missing-media messages. Then compare a fresh render with the intended musical milestone. This catches dependencies that remained available only through the previous session and confirms that the saved recovery supports the next production task.
Preserve a practical recovery record
Record the Live version, source Backup Set or crash group, relinked recordings, and reconstructed processing. Then retain a native milestone and a reference render together. Test the backup and collection workflow on a disposable Set when you change machines or storage paths. This gives you evidence of where future recovery material will actually live.
If only audio survives, preserve it and state the editable limitations plainly. A stem-based reconstruction can still save a production, but it does not restore every original clip and device control. A clear account of that result helps the next session begin with realistic expectations and a reliable set of files.
Related recovery resources
Explore the relevant recovery options: Hard drive recovery, External hard drive recovery.
For another recovery case and its practical checks, read the related recovery guide.
Check the vendor guidance for the installed version: official recovery documentation 1, official recovery documentation 2, official recovery documentation 3.





