


Let’s be honest. Not everyone loves cloud storage. And while Microsoft OneDrive is deeply integrated into Windows 11, you may not want it running in the background, syncing files, or taking up precious system resources. Whether you are a privacy enthusiast or simply prefer a local-only workflow, knowing how to remove OneDrive from Windows 11 is a skill that puts you back in the driver’s seat of your operating system.
Good news — you have options. Whether you want to disable it, unlink it, or permanently uninstall it, this guide walks you through everything step by step. We will also explore essential data recovery techniques to ensure that your files remain safe during the transition.
What Is OneDrive in Windows 11?
OneDrive is Microsoft’s built-in cloud storage solution. It functions as a virtual bridge between your local hardware and Microsoft’s servers. By default, it automatically syncs your Desktop, Documents, and Pictures folders to the cloud, allowing you to access them from any device.
How OneDrive Integrates with the System
When you install Windows 11, OneDrive comes preinstalled. It isn’t just an app; it’s a system component. It integrates deeply with:
- File Explorer: It appears as a primary node in the navigation pane.
- Microsoft Account login: It uses your Windows credentials to log in automatically.
- System startup: It triggers as soon as you reach the desktop.
- Background sync services: It constantly monitors file changes to push updates to the cloud.
It’s like a roommate you didn’t invite — always there, always watching your files.
Why It Starts Automatically
By default, OneDrive launches at startup because Microsoft wants to ensure your files are “always protected.” The executable file is located at C:\Program Files\Microsoft OneDrive\OneDrive.exe and is registered in the system’s startup registry to run the moment you log in.
Why Remove OneDrive from Windows 11?
There are several compelling reasons why a user might choose to remove OneDrive from Windows 11.
Privacy Concerns
Some users prefer keeping files local instead of syncing them to the cloud. When your data lives on a server, it is subject to the terms of service of a third party. For sensitive work documents or personal photos, local storage is often the preferred choice.
Storage Limitations
The free OneDrive plan only gives you 5GB of space. In the age of 4K video and high-resolution photography, that fills up incredibly fast. Once full, Windows will nag you with constant notifications to “Buy more storage.”
Performance Reasons
On lower-end systems or gaming rigs, background sync can consume valuable RAM and CPU cycles. Furthermore, if you have a slow internet connection, OneDrive’s constant uploading can cause “ping spikes” during online gaming or lag during video calls.
You Prefer Another Cloud Service
Maybe you are a loyal user of Google Drive, Dropbox, or iCloud. There is no need for duplicate services running simultaneously. Having multiple sync clients can lead to file version conflicts and unnecessary system bloat.
Things to Do Before Removing OneDrive
Before you decide to remove OneDrive from Windows 11, you must pause for a second. If you rush the process, you might find that your files have “disappeared” because they were stored in the cloud but not on your hard drive.
Back Up Your Files
This is the most critical step. Open File Explorer and navigate to:
C:\Users\YourUsername\OneDrive
Copy every important file from here to a different location, such as a secondary internal drive or an external USB stick.
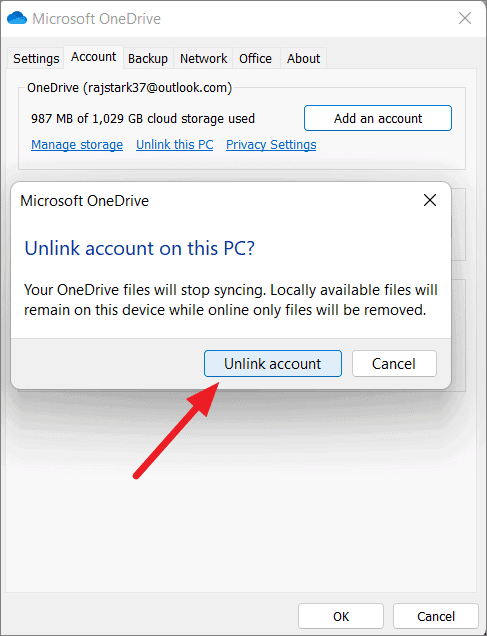
Unlink Your Account
Unlinking is a “soft” way to stop the service.
- Click the OneDrive cloud icon in the system tray.
- Select the gear icon (Settings).
- Go to the Account tab.
- Click Unlink this PC.
Check Sync Status
Before you pull the plug, look at the icons next to your files. A “Blue Cloud” icon means the file is only in the cloud. A “Green Checkmark” means it is stored locally. Ensure all files you need are downloaded locally before removal.
Data Recovery with PandaOffice Drecov
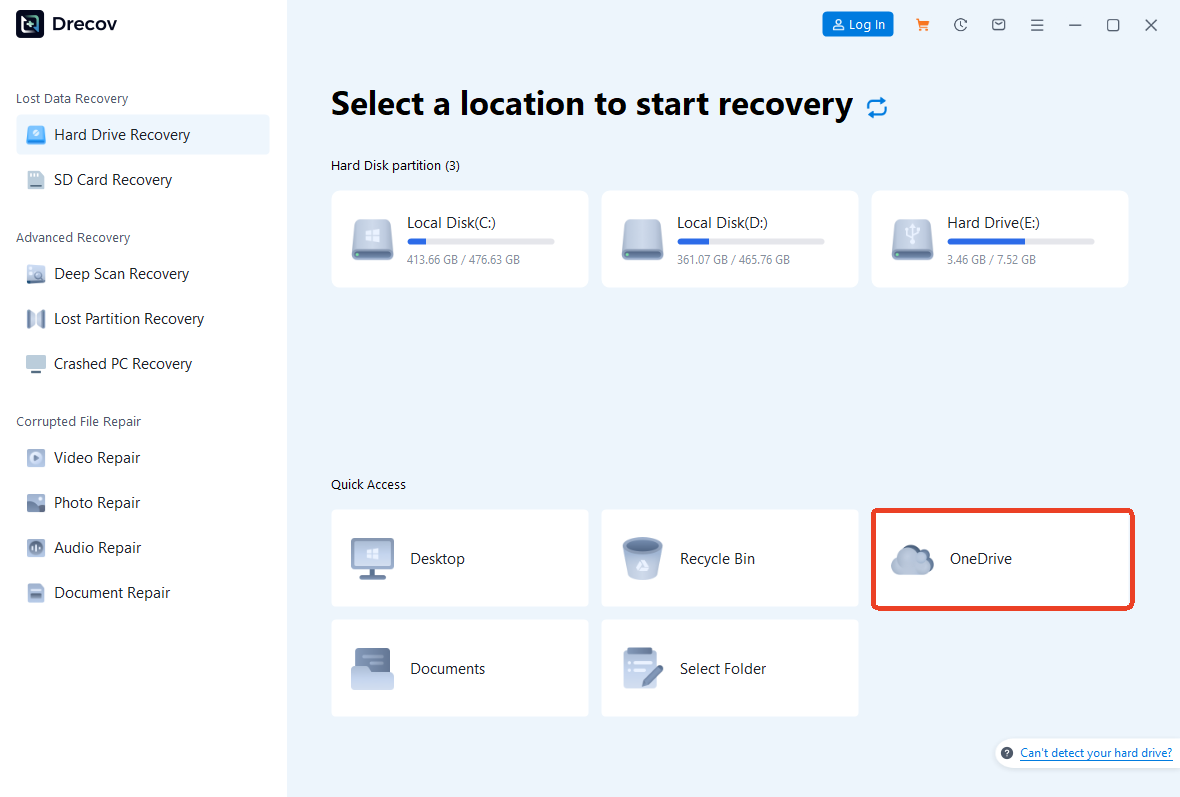
Sometimes, despite our best efforts, files go missing during a software uninstallation or a botched registry edit. If you find that you accidentally deleted your OneDrive folder or lost files while trying to remove OneDrive from Windows 11, don’t panic. This is where professional tools like PandaOffice Drecov come into play.
PandaOffice Drecov is a robust data recovery product designed to retrieve lost, deleted, or formatted data from Windows systems. It is particularly effective for recovering files that were “synced” but accidentally wiped during a cloud disconnection.
⚠ Warning: Install it on a drive different from the one where your data was lost to prevent overwriting.
How to Recover Lost Files Using PandaOffice Drecov
If you realized you deleted files while trying to remove OneDrive from Windows 11, follow these steps immediately:
- Step 1: Select the Location. Open the software and select the “C:” drive or the specific “OneDrive” folder location where the files were last seen.
- Step 2: Scan for Data. Click the Scan button. The tool will perform a Quick Scan followed by a Deep Scan to find fragmented files.
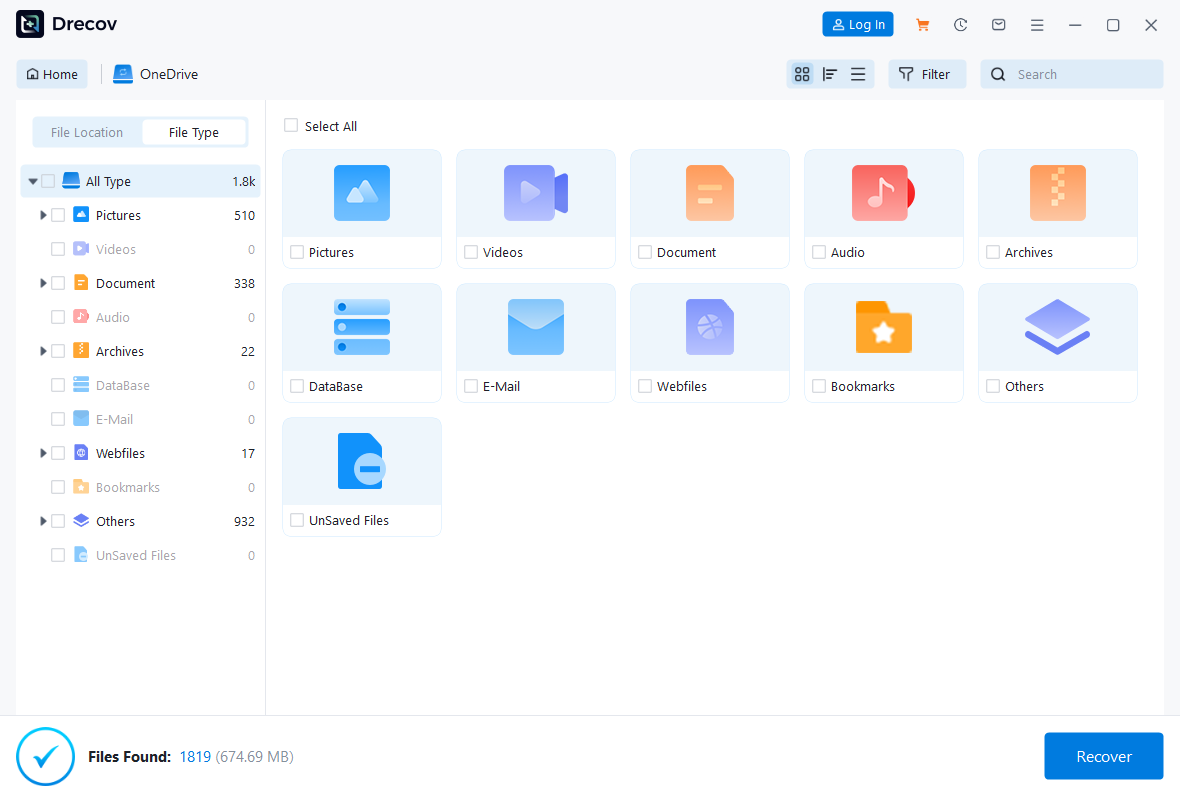
- Step 3: Preview and Filter. Once the scan is complete, use the search bar to look for specific file extensions like
.docxor.jpg. You can preview the files to ensure they are intact.
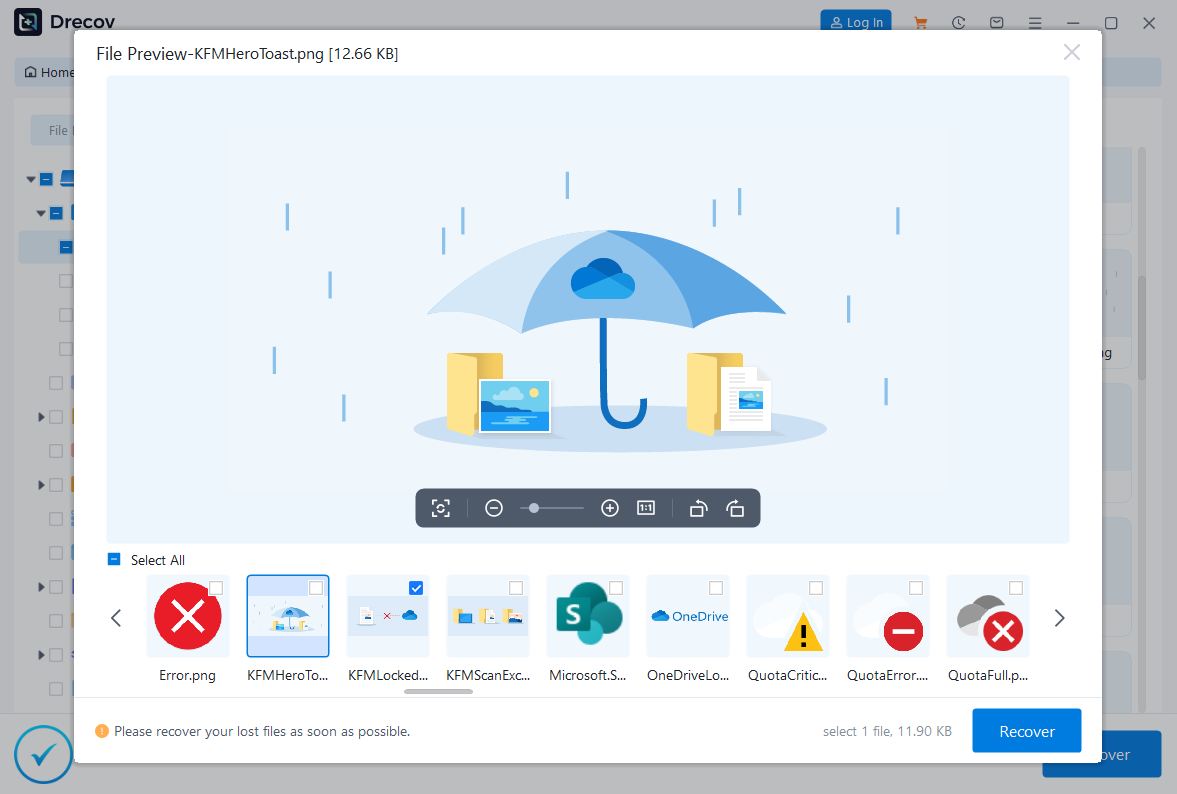
- Step 4: Recover. Select the files you need and click Recover.
Warning: Always save the recovered files to an external drive or a different partition to ensure data integrity.
Pro Tip: If you are dealing with a faulty hardware issue while trying to recover data, check out this guide on how to fix unrecognized USB drive without losing data.
Method 1 – Unlink OneDrive from Your PC
This is the least invasive method. It keeps the app installed but effectively kills the connection between your computer and Microsoft’s servers. It is the best “first step” for anyone wondering how to remove OneDrive from Windows 11 without committing to a full uninstallation.
Step-by-Step Instructions
- Click the system tray cloud icon (bottom right of your taskbar).
- Open Settings.
- Navigate to the Account tab.
- Select Unlink this PC.
- A confirmation box will appear; click Unlink Account.
Sync stops immediately, and the OneDrive folder will remain on your PC, but it will no longer update.
Method 2 – Disable OneDrive Startup
If you don’t want to uninstall it but want to stop it from eating your RAM every time you turn on your PC, disabling the startup entry is the way to go.
Using Task Manager
- Press Ctrl + Shift + Esc to open the Task Manager.
- Click the Startup apps tab (icon looks like a speedometer).
- Locate Microsoft OneDrive in the list.
- Right-click it and select Disable.
The next time you reboot, OneDrive will stay dormant until you manually open it.
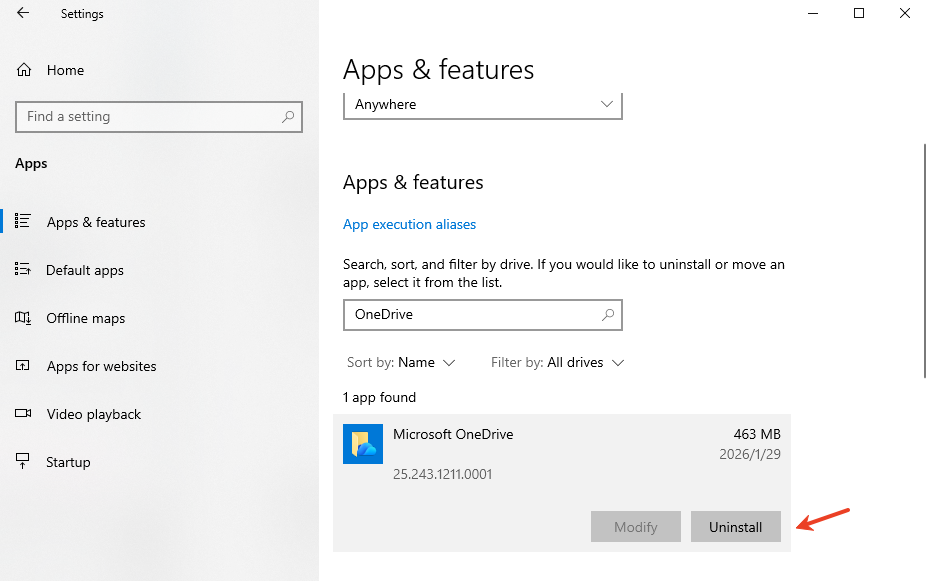
Method 3 – Uninstall OneDrive from Windows 11 Settings
For most users, this is the standard way to remove OneDrive from Windows 11. It treats OneDrive like any other app.
Step-by-Step Removal via Settings
- Press Windows + I to open the Settings app.
- Go to Apps on the left sidebar, then click Installed Apps.
- In the search bar at the top, type Microsoft OneDrive.
- Click the three dots (…) next to the OneDrive entry.
- Select Uninstall and confirm the choice.
- Follow the on-screen prompts provided by the Windows Uninstaller.
Method 4 – Remove OneDrive Using Command Prompt
Sometimes the Settings menu fails or the “Uninstall” button is greyed out. In these cases, we use the power of the Command Line.
Uninstall via Command Line
- Press Windows + R, type
cmd, and press Ctrl + Shift + Enter to run as Administrator. - Enter the following command to kill the process:
taskkill /f /im OneDrive.exe - Then, use the following command to run the uninstaller directly:
- For 64-bit Windows 11:
%SystemRoot%\System32\OneDriveSetup.exe /uninstall - For 32-bit Windows 11:
%SystemRoot%\SysWOW64\OneDriveSetup.exe /uninstall
- For 64-bit Windows 11:
Remove Remaining Folders
The uninstaller often leaves behind “ghost” folders. To clean up completely, delete these paths manually:
C:\Users\YourUsername\OneDriveC:\ProgramData\Microsoft OneDriveC:\Program Files\Microsoft OneDrive
Method 5 – Remove OneDrive Using PowerShell
PowerShell is the modern successor to the Command Prompt and is often more effective at removing “stubborn” Windows packages.
- Press Windows + X and select Terminal (Admin).
- Ensure you are in the PowerShell tab.
- Run the following command:
Get-AppxPackage *OneDrive* | Remove-AppxPackage
This command searches for the OneDrive application package and strips it from your user profile immediately.
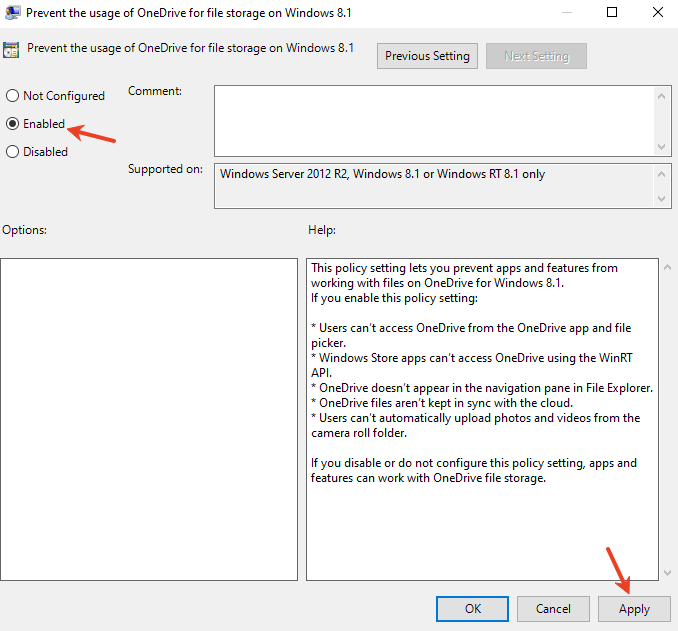
Method 6 – Remove OneDrive Using Group Policy Editor (Pro Edition)
If you are using Windows 11 Pro, Enterprise, or Education, you can use the Group Policy Editor. This is a powerful method because it disables OneDrive at the system level, preventing it from even attempting to run.
Disable OneDrive via gpedit.msc
- Press Windows + R, type
gpedit.msc, and hit Enter. - Navigate to: Computer Configuration → Administrative Templates → Windows Components → OneDrive.
- On the right pane, find Prevent the usage of OneDrive for file storage.
- Double-click it and set it to Enabled.
- Click Apply and OK, then restart your PC.
Method 7 – Remove OneDrive via Registry Editor
For Windows Home users who don’t have access to Group Policy, the Registry Editor is the “nuclear option.” Warning: Back up your registry before making changes.
- Press Windows + R, type
regedit, and hit Enter. - Navigate to the following path:
HKEY_LOCAL_MACHINE\SOFTWARE\Policies\Microsoft\Windows\OneDrive(If the OneDrive key doesn’t exist, right-click ‘Windows’, select New > Key, and name it OneDrive). - Right-click in the right pane, select New > DWORD (32-bit) Value.
- Name it
DisableFileSyncNGSC. - Double-click it and set the Value data to 1.
- Restart the system.
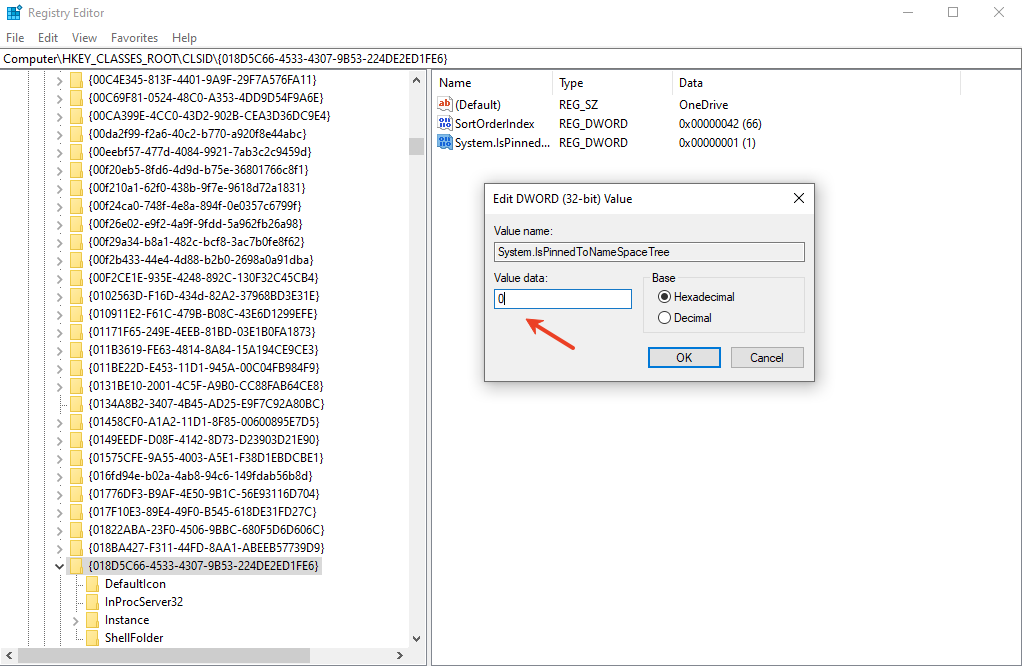
How to Remove OneDrive Icon from File Explorer
Even after you remove OneDrive from Windows 11, a “ghost” icon might still haunt your File Explorer sidebars.
Registry Fix
- In the Registry Editor, go to:
HKEY_CLASSES_ROOT\CLSID\{018D5C66-4533-4307-9B53-224DE2ED1FE6} - Find the entry System.IsPinnedToNameSpaceTree.
- Double-click it and change the Value data to 0.
- Close the Registry and reboot. The icon will now be gone.
How to Stop OneDrive from Reinstalling
One of the most annoying aspects of Windows 11 is its tendency to “self-heal” by reinstalling apps you’ve deleted during major updates. To stop this:
- Windows Updates: Check your Windows Update settings and disable “Optional updates” that might bundle OneDrive.
- Setup Files: Ensure you have deleted the
OneDriveSetup.exefrom theSystem32orSysWOW64folders as mentioned in the Command Prompt method. - Microsoft Account: If you log in with a local account instead of a Microsoft account, Windows is less likely to force cloud services on you.
How to Reinstall OneDrive If Needed
If you ever change your mind and want the cloud back, it’s easy to return.
- Official Source: Download it directly from the official Microsoft OneDrive website.
- System Source: Run the built-in installer located at:
%SystemRoot%\System32\OneDriveSetup.exe
Common Problems When Removing OneDrive
When you remove OneDrive from Windows 11, you might encounter a few hiccups:
- Files disappear: Usually, this happens because the files were “Online-only.” You must recover them from the OneDrive recycle bin online or use PandaOffice Drecov.
- Folder redirection issues: Windows might still think your “Documents” folder is inside the OneDrive path. You may need to right-click your Documents folder, go to Properties > Location, and click Restore Default.
- Sync errors remain: This is usually due to leftover registry keys.
If you are struggling with missing files after a sync disruption, learn how to recover OneDrive deleted files to protect your digital life.
Is It Safe to Remove OneDrive?
Yes. Deciding to remove OneDrive from Windows 11 does not harm the core operating system. Windows 11 does not require OneDrive to boot, run apps, or perform system updates. It is a secondary service. Think of it like uninstalling a media player — the computer keeps running just fine; you just lose that specific functionality.
Regardless of the scenario, always maintain a “3-2-1” backup strategy: 3 copies of your data, 2 different media types, and 1 copy off-site.
Remove OneDrive from windows 11 FAQs
1. Does removing OneDrive delete my files?
No. Local files (those with the green checkmark) remain on your hard drive. However, “Online-only” files (blue cloud icon) will vanish from your local view until you log back into OneDrive online.
2. Can I reinstall OneDrive later?
Absolutely. You can download the installer from Microsoft or use the OneDriveSetup.exe file already tucked away in your Windows System32 folder.
3. Is OneDrive required for Windows 11?
No. While Microsoft pushes it heavily, Windows 11 is fully functional without it.
4. Why does OneDrive keep reinstalling?
Major Windows “Feature Updates” (like moving from 23H2 to 24H2) often reset system defaults. If this happens, you will need to run the uninstall command again.
5. What’s the safest way to remove OneDrive?
The safest way is to Unlink the account first, ensure your files are moved to a local folder, and then Uninstall via the Settings menu.
Conclusion
Knowing how to remove OneDrive from Windows 11 is all about taking back control. Whether you simply disable it, unlink your account, or uninstall it entirely using the Registry or PowerShell, you’re in control. No more background syncing. No more unwanted cloud prompts. Just your PC — your way. Technology should serve you, not the other way around.


