


The Moment of Dread: Where Did My Files Go?
It happens to the best of us. You reach for your trusty USB flash disk—that tiny storage device holding your important presentations, cherished photos, or crucial backup files—and suddenly, it’s empty. Maybe you accidentally deleted a folder, formatted the drive, or the device itself shows an error. Your immediate thought is: Is my data lost forever? This common and stressful scenario highlights the urgent need to understand USB Flash Disk Recovery and find a clear, actionable path to get your data back.
Stop and Recover: Essential First Steps
Before you try anything, the most critical step is to IMMEDIATELY stop using the USB flash disk. When you delete a file, the data isn’t instantly erased; instead, the space it occupies is simply marked as available for new data. If you continue using the drive, you risk writing new information over the old files, which makes USB flash disk recovery significantly more difficult, or even impossible.
- Action 1: Unplug Safely: Eject the USB flash disk from your computer immediately.
- Action 2: Avoid Writing: Do not save any new files to the drive.
- Action 3: Check Connections: Ensure the problem isn’t just a faulty USB port or cable. Try the drive on a different port or computer first.
The Underlying Principle: Understanding Data Loss
To truly appreciate the process of USB flash disk recovery, it helps to know how flash memory works. When you save a file, the computer maps its location in the file system table (like a library’s index card). When you delete the file, the computer simply deletes the entry in the index, telling the system that the space is now free. The actual data (the pages in the book) remains on the flash chip until a new file (a new book) is written over that exact location.
The Recovery Toolkit: Your Options for Data Retrieval
Once the drive is secure, you can explore various methods for data retrieval. These are organized from the simplest built-in solution to more powerful, dedicated software.
1. Checking for Hidden Files (The Quick Fix)
Sometimes, files aren’t deleted—they are just hidden due to a system setting or a virus. This simple method may save you time and effort.
- Step 1: Connect the USB flash disk to your computer.
- Step 2: Open File Explorer .
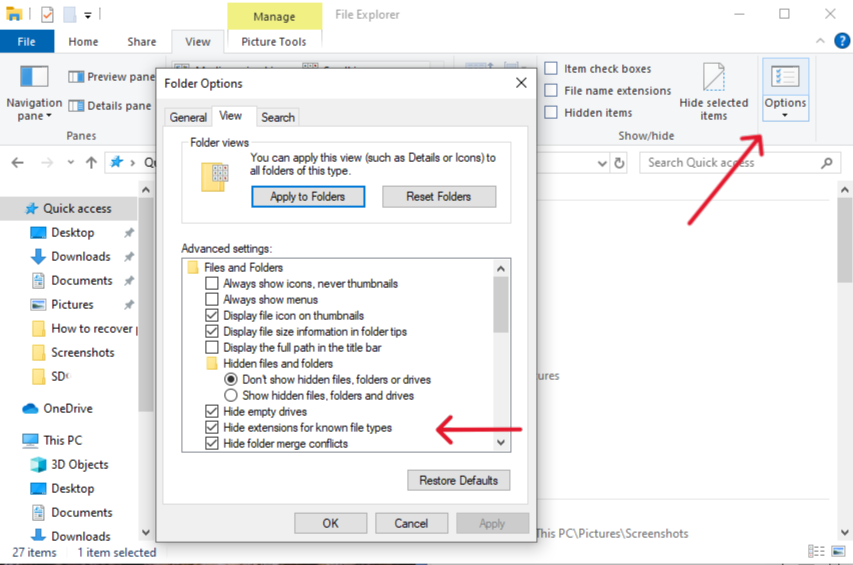
- Step 3: Go to the View tab in File Explorer, click Options, navigate to the View tab in the pop-up window, and under “Hidden files and folders,” select Show hidden files, folders, and drives. Click Apply and check the drive again.
2. Using Professional Recovery Software: PandaOffice Drecov
For accidental deletion, formatting, or even corrupt drives, a specialized tool is often the most reliable path to USB flash disk recovery. PandaOffice Drecov due to its ultra-high success rate and user-friendly design, making it simple for anyone, even non-experts, to recover data without needing any code.
Why Choose PandaOffice Drecov?
This powerful tool boasts an extremely high data recovery success rate. It’s designed to retrieve data from a wide range of loss scenarios, including:
- Accidental deletion from your computer desktop.
- Files lost after emptying the Recycle Bin.
- Data loss from disk formatting.
- Accidental deletion or formatting of SD cards/U disks.
It supports the recovery of hundreds of common file formats, such as images, videos, audio, compressed files, and EXE files. Furthermore, it can even quickly repair content in corrupted or unopenable files (like files with garbled characters).
Your recovery is performed locally, so you don’t have to worry about data leaks. PandaOffice Drecov is also trusted by major platforms, collaborating with names like Trustpilot, Microsoft Store, TechBullion, and Sourceforge.
Three-Step Recovery Process:
- Step 1: Select Where to Recover & File Types:
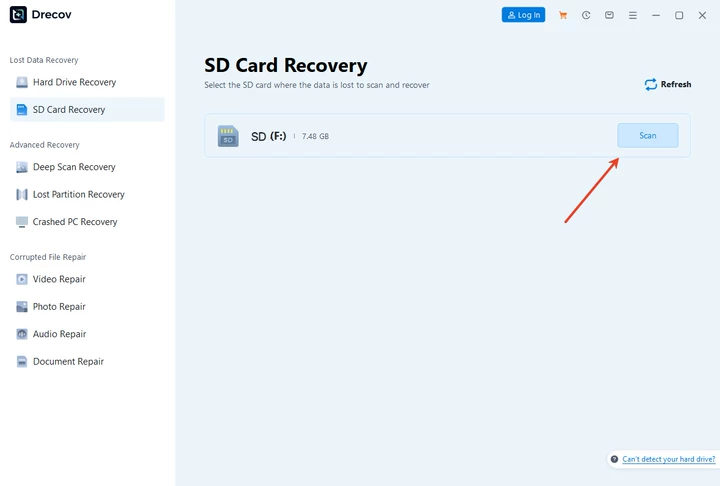
- Launch the PandaOffice Drecov software.
- Select the location for recovery, which in this case is your connected USB flash disk.
- Choose the specific file types you want to recover (e.g., Photos, Videos, Documents) to speed up the scan. Crucially, ensure you check the “Recycle Bin” option if your files were recently deleted from your desktop and bypassed the bin.
- Step 2: Scan and Review:
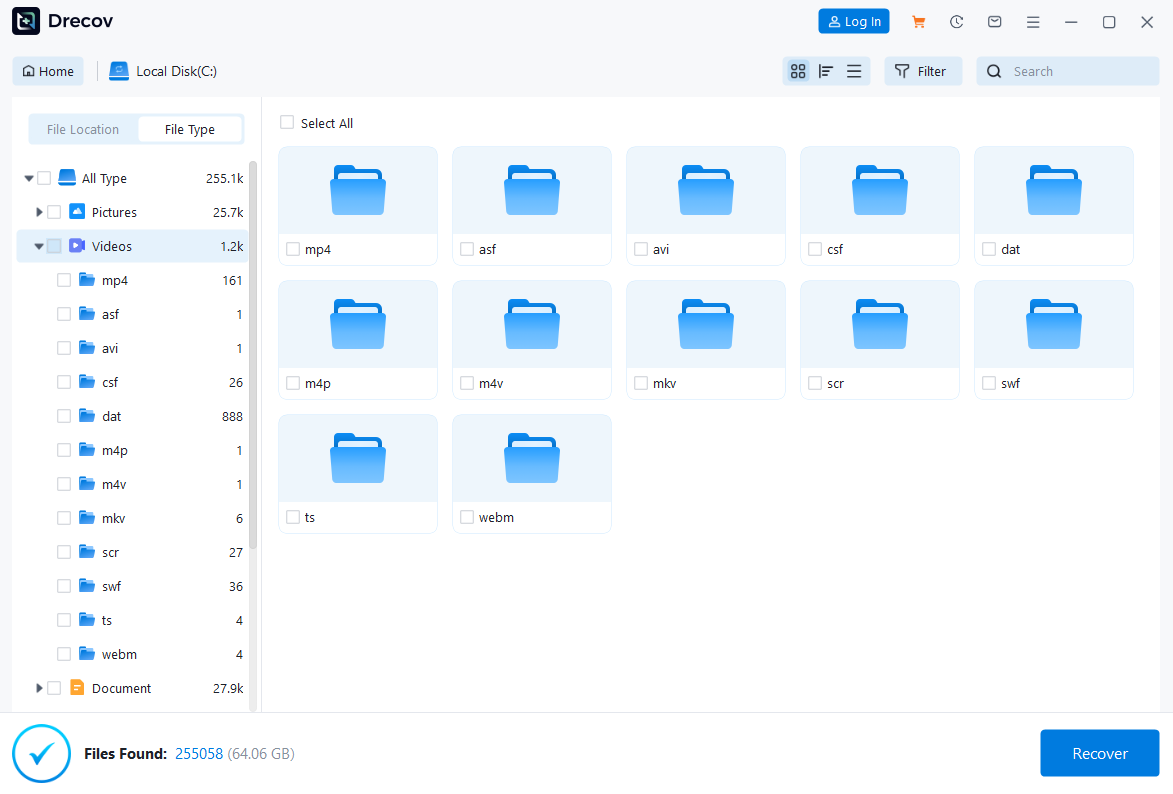
- Click the Scan button. The software will perform a deep scan of the USB flash disk.
- Once the scan is complete, you will see a list of recoverable files. You can view the files (often with a preview function) to verify their integrity.
- Step 3: Recover and Save:

- Select the files you want to retrieve by checking the corresponding boxes.
- Click the Recover button and select a new, safe location on your computer’s main hard drive (NOT the USB drive) to save the recovered data.
3. Using Command Prompt (CMD) for Corrupt Drives
If the drive is showing as a RAW format or is inaccessible, the Windows Command Prompt (CMD) utility chkdsk (check disk) can sometimes fix minor logical errors and bring the files back into view.
- Step 1: Press Windows Key + R to open the Run dialog.
- Step 2: Type and press Enter
cmdto open the Command Prompt.
- Step 3: Type the command and press Enter
chkdsk X: /fchkdsk E: /f, replacing X with the letter assigned to your USB flash disk (e.g., ).
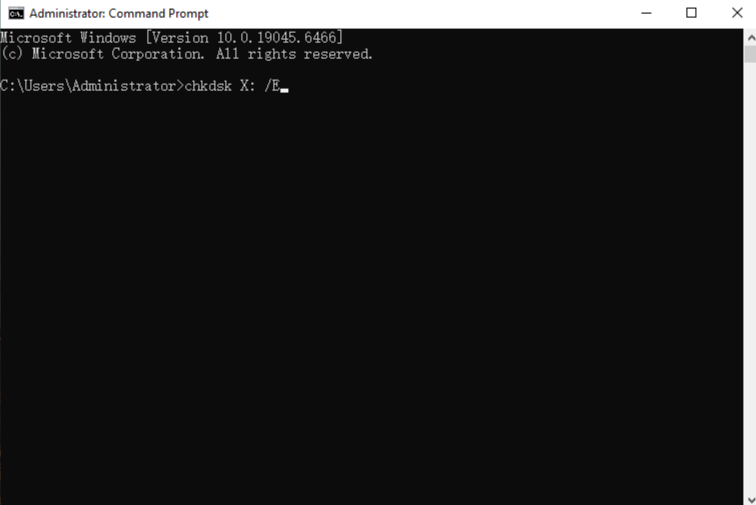
- Step 4: Follow the on-screen prompts. This process attempts to fix file system errors. After it finishes, check if the drive is accessible.
Additional Frequently Asked Questions
❓ What is the specific principle of “File Carving”? What are its limitations?
File carving is an advanced recovery technique. Its principle is simple: it bypasses the damaged or missing file system and directly scans the raw sector data of the storage medium. It identifies and reconstructs files by searching for a file’s signature—the unique byte sequence at the beginning and end of a specific file type (like JPEG or PDF). The limitations are significant: carved files often lose their original filename, timestamp, and folder structure. Furthermore, success rates drop significantly for highly fragmented files.
❓ Why is my USB drive not recognized (no drive letter) on my computer? Is this a sign of data loss?
Several reasons may cause a USB drive not to be recognized:
- Driver Issue: Your computer’s USB drivers or ports are faulty.
- Insufficient Power: The computer’s USB port does not provide enough power to run the drive.
- Firmware/Controller Damage: The drive’s internal microcontroller has failed. This does not necessarily mean data is lost, but it does mean the operating system cannot access the file system. You should first try switching computers or USB ports. If that fails, you need to use recovery software to attempt a low-level data read.
❓ Can I continue using the USB drive after data recovery?
We recommend cautious use. If the data loss resulted from file system corruption, accidental deletion, or formatting, you can reformat the drive and continue using it. However, if the loss occurred due to sudden power loss, frequent read/write errors, or signs of physical damage, the drive likely has a hardware fault (like bad blocks). For safety, do not store critical data on it again.
❓ What is Wear Leveling? How does it affect recovery success?
Wear Leveling is a technology NAND flash memory uses to extend its lifespan. It works by ensuring data is written evenly across all storage blocks, instead of repeatedly writing to the same blocks. The impact on recovery is this: when you modify a file, the flash controller might write the new version to an entirely new block and mark the old block as “invalid.” Consequently, this makes the physical location of data harder to predict, potentially increasing file fragmentation and challenging the integrity of file carving recovery.
❓ How do I distinguish between logical damage (recoverable) and physical damage (needs repair)?
- Logical Damage (Software Fixable): The computer recognizes the USB drive, the light is on, but the system shows “Not Formatted,” “0 Bytes,” or the drive letter is missing.
- Physical Damage (Needs Repair): The drive shows no reaction when plugged in (after excluding driver issues), is not recognized by the system, or has obvious physical damage like a broken casing or a burnt smell. If the computer cannot detect the firmware controller, software recovery is impossible.
❓ If I try to use Windows’ chkdsk command, will that help with recovery?
We advise against arbitrary use. The chkdsk (Check Disk) tool aims to fix file system errors, but in certain cases, it might mistakenly isolate or delete data fragments it deems “corrupt,” thereby making the original file data harder to retrieve. Therefore, the primary rule of data recovery is to attempt a read-only scan first, not a write or repair operation.
❓ For important lost files, should I choose “Quick Scan” or “Deep Scan”?
Always prioritize “Deep Scan” or “File Carving” mode. A “Quick Scan” only checks records in the file system index; this works well for recently deleted files on an intact system. However, for formatting or file system damage (the most common cause of USB loss), only a “Deep Scan” performs a comprehensive sector check and file reconstruction, despite taking longer.
❓ Why are my recovered video or image files unopenable?
This usually happens because partial overwriting or severe fragmentation occurred before recovery. Video and image files demand high data integrity; consequently, if even one critical data block is missing, the file may fail to decode or display. Nevertheless, some advanced recovery software includes dedicated video/image repair features.
❓ Can the data on a USB drive be “permanently deleted” (i.e., unrecoverable)?
Yes, you can achieve this with security erasing tools. Professional secure erasure software (like DBAN) uses multiple write algorithms (such as the DoD 5220.22-M standard) to overwrite all sectors on the drive with random data or zeros, thus completely eliminating traces of the original data. Ordinary deletion and formatting are insufficient for “permanent deletion.”
❓ If I use Linux (e.g., Ubuntu), is the data recovery principle the same?
The core principle is identical. Data recovery relies on the NAND flash characteristics, regardless of the operating system. The difference is this: you must use recovery tools compatible with Linux file systems (like Ext4), such as TestDisk or PhotoRec (which also function based on the file carving principle).
Conclusion
The key to successful USB Flash Disk Recovery is immediate action and the use of the right tools. When disaster strikes, STOP using the drive to prevent data overwriting. Most deleted files are still physically present and recoverable, leveraging the principle that the system only removes the file’s index. While simple methods like checking for hidden files and using the chkdsk command may resolve minor issues, professional software like PandaOffice Drecov offers the highest success rate for complex loss scenarios, performing crucial “Deep Scans” and File Carving. Always prioritize a read-only recovery process and save recovered files to a new, secure location to maximize your chances of a complete USB Flash Disk Recovery.


