


Losing critical files from a thumb drive can be an incredibly stressful experience. Whether it is an accidental deletion, a sudden format, or a file system corruption error, the panic of losing important work or irreplaceable photos is universal. However, before you assume your data is gone forever, it is important to know that the right tools can safely retrieve your files. This is where advanced usb flash memory recovery programs become essential.
When your computer fails to read a drive or displays an error, the data often remains intact beneath the surface. To recover these hidden files, you need a reliable, professional tool designed specifically for deep storage media scanning. PandaOffice Drecov data recovery software is built precisely for these scenarios, offering a powerful, secure, and user-friendly solution to bring your files back from the brink.
Understanding the Basics of USB Flash Memory Recovery Programs
What are USB Flash Memory Recovery Programs?
At their core, usb flash memory recovery programs are specialized software applications designed to scan NAND flash storage devices for traces of lost, deleted, or corrupted files. Unlike traditional magnetic hard drives, flash memory manages data using electronic blocks. When you delete a file, the operating system simply marks that block’s space as “available” rather than instantly destroying the data. A dedicated usb data recovery utility bypasses the operating system’s standard file directory to reconstruct these marked files before they are permanently overwritten by new data.
Common Challenges in USB Data Recovery
Recovering data from flash storage comes with unique hurdles. For instance, file fragmentation can make it difficult for standard utilities to piece a document back together. Furthermore, sudden drive disconnection during a file transfer often results in logical file system corruption, making the drive appear as “RAW” or unreadable. Meanwhile, the constant threat of data overwriting means that any continued use of the flash drive drastically reduces the chances of a successful retrieval.
Introducing PandaOffice Drecov Data Recovery Software
To address these complex physical and logical architecture challenges, PandaOffice Drecov data recovery software provides an enterprise-grade recovery engine tailored for everyday users. Operating on an advanced read-only algorithmic structure, it ensures that your damaged storage media is never modified or compromised during the recovery process.
⚠ Warning: Install it on a drive different from the one where your data was lost to prevent overwriting.
Key Technical Innovations
- Deep Flash Architecture Parsing (DFAP): This proprietary technology decodes the layout of fragmented NAND blocks, allowing the software to rebuild files even when the file allocation table is completely missing.
- Intelligent File Signature Matching: Drecov cross-references raw data streams against an expansive internal library of over 1,000 distinct file extensions (including RAW images, database files, and encrypted archives).
- Virtual Drive Simulation: To protect volatile drives that are progressively failing, Drecov can create a bit-stream image file of the storage media, allowing you to perform your recovery safely from the virtual copy.
Complete Guide to USB Data Recovery Software Solutions
Beginner Level: Recovering Accidentally Deleted Files
If you accidentally deleted a folder or formatted your drive, this method provides the fastest way to retrieve your files using PandaOffice Drecov data recovery software.
⚠ Warning: Install it on a drive different from the one where your data was lost to prevent overwriting.
Step 1: Launch the Software
Launch the application with administrator privileges by right-clicking the icon and selecting Run as administrator.

Step 2: Connect and Select Your USB Drive
Plug your flash drive into a functioning USB port. On the home screen of the usb data recovery software, you will see a list of available storage drives. Locate your external drive under the “Removable Devices” section, select it, and click the Scan button in the bottom right corner.

Step 3: Preview and Save Your Recovered Files
The software will immediately execute a Quick Scan, followed automatically by a Deep Scan to piece together fragmented files. Once the scan completes, browse through the categorized file tree. Select the files you need, click Recover, and choose a destination folder on your computer’s local hard drive to complete the process safely.
- Related Tip: If you are trying to find missing files on your local drive instead, check out our guide on where is Recycle Bin in Windows 10.
- Related Tip: If you accidentally deleted browser backups, you can learn how to locate the Firefox bookmarks location to secure your internet data.
- Related Tip: For an immediate, rapid solution to missing media files, read our quick tutorial on how to get recently deleted photos back.
Intermediate Level: Resolving Logical Corruption and RAW Drives
When a USB drive displays a “You need to format the disk” error, the partition table or the file system header is likely corrupted.
Step 1: Assign a New Drive Letter via Disk Management
Sometimes, Windows conflicts cause a drive to become temporarily inaccessible. Press Windows Key + X and select Disk Management. Locate your USB drive in the lower visual grid, right-click its partition, and choose Change Drive Letter and Paths. Click Change, assign a new letter (e.g., M:), and click OK.
Step 2: Repair Logical File Errors with CHKDSK
If changing the drive letter does not grant access, you can attempt to repair the file system structure. Press Windows Key + R, type cmd, and press Ctrl + Shift + Enter to launch the elevated Command Prompt. Type the following command and press Enter:
chkdsk M: /f(Replace M: with the actual drive letter assigned to your USB flash drive).
Warning: While CHKDSK can fix directory errors, it can occasionally modify corrupted file fragments permanently. If the command returns an error stating “CHKDSK is not available for RAW drives,” immediately stop and use PandaOffice Drecov data recovery software to extract the data safely without modifying the raw drive structure.
Advanced Level: Fixing Driver Conflicts and Registry Glitches
If your USB drive is completely undetected by your operating system, the issue might stem from corrupted device drivers or invalid entries within the Windows Registry.
Step 1: Reinstall USB Controller Drivers
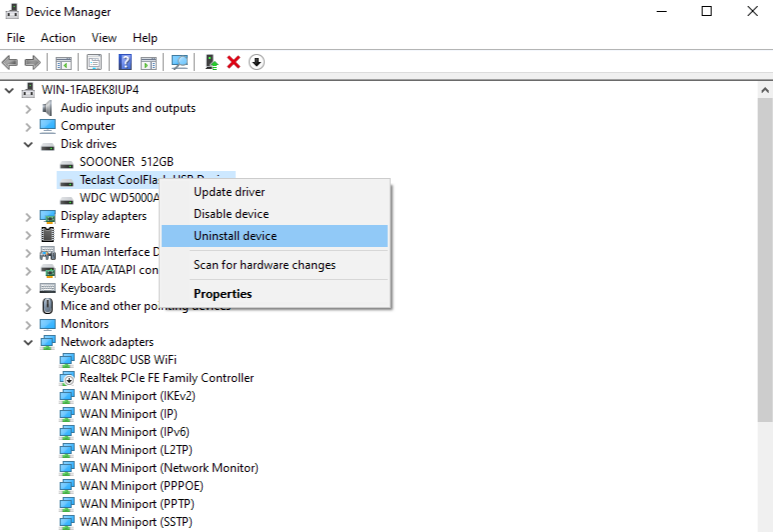
Press Windows Key + X and open Device Manager. Scroll down and expand the Universal Serial Bus controllers section. Right-click your USB Mass Storage Device or the Host Controller and select Uninstall device. Disconnect your USB flash drive, restart your computer, and plug the drive back in. Windows will automatically reinstall a fresh copy of the driver.
Step 2: Clear Corrupted MountPoints via the Registry Editor
Old, corrupted registry keys can prevent a flash drive from mounting correctly. Press Windows Key + R, type regedit, and hit Enter to open the Registry Editor. Navigate carefully to the following system path:HKEY_CURRENT_USER\Software\Microsoft\Windows\CurrentVersion\Explorer\MountPoints2
Right-click the specific subkey corresponding to your problematic USB drive volume and select Delete. Restart your PC to force the operating system to build a clean connection path for the device.
Alternative or Complementary Methods: Open-Source Solutions
If you prefer to try open-source command-line software before using automated proprietary tools, several community-driven utilities exist. These tools are free and highly transparent, though they generally require a solid grasp of technical syntax.
1. TestDisk & PhotoRec
TestDisk focuses on recovering lost partitions and fixing boot sectors, while its companion tool, PhotoRec, handles file carving. PhotoRec ignores the file system entirely and reads the raw underlying data blocks, making it highly effective for broken storage structures. However, it lacks a graphical interface and strips away original file names during extraction.
2. ddrescue
This GNU data recovery tool is designed to copy data from one file or block device to another. It excels at salvaging data from drives experiencing hardware read errors because it intelligently skips damaged sectors and circles back to them later. Because it runs purely via the Linux terminal, it requires a secondary system or a live USB environment to operate.
Structural Comparison
| Recovery Method | Success Rate | Ease of Use | Risk Level |
|---|---|---|---|
| PandaOffice Drecov | Extremely High (98%) | Very Easy | Safe |
| PhotoRec (Open Source) | High | Difficult (Command-line Interface) | Low (Read-only) |
| GNU ddrescue (Open Source) | High (For Bad Sectors) | Expert Level (Terminal-based) | Moderate (Requires cloning drive) |
| Windows File Recovery (CMD) | Moderate | Difficult (Command-line only) | Low |
While open-source applications provide unparalleled flexibility for engineers, they lack the polished automation found in premium usb flash memory recovery programs. Using professional software ensures that your original storage media is parsed correctly without the risk of accidentally running an incorrect terminal command that could overwrite your data.
Tips & Best Practices for Successful USB Data Recovery
Optimizing Recovery Success
- Stop Using the Drive Immediately: The absolute moment you realize files are missing, unplug the flash drive. Writing any new data to the device can permanently overwrite the lost sectors.
- Scan Using a Rear USB Port: If you are using a desktop computer, plug your flash drive directly into the motherboard ports on the back of the case. These ports provide a more stable power supply than front-panel ports, reducing scan interruptions.
- Save Recovered Files to a Different Drive: Never restore files back onto the same USB drive during the recovery process. Always save them to your local hard disk first.
Pitfalls to Avoid
Avoid running CHKDSK adjustments on drives that contain heavily corrupted files, as this process can accidentally delete partial file fragments. In addition, beware of untrusted, unverified online download links. Always reference reliable cybersecurity resources, such as the Microsoft Software Support Documentation, to verify safe system practices and ensure your data recovery process remains secure.
Frequently Asked Questions
Can I recover files from a physically broken USB drive?
No, if the actual NAND flash chip inside the drive is cracked or physically broken, software utilities cannot communicate with the device. In these situations, you must contact a specialized physical cleanroom service.
Why does my USB flash drive show up as RAW?
A RAW status means the operating system can no longer recognize the file system layout (such as FAT32 or exFAT). Consequently, you will need to utilize usb flash memory recovery programs to extract the data before formatting the partition back to a usable state.
How long does a deep scan take with usb data recovery software?
The total scanning time depends entirely on the storage capacity of your flash drive and its connection speed. For example, a standard 32GB USB 3.0 drive usually takes between 10 to 20 minutes to complete a comprehensive sector-by-sector scan.
Conclusion
Losing critical files from a flash drive is undoubtedly stressful, but it does not have to be permanent. By utilizing a methodical approach—ranging from basic driver updates to executing dedicated usb flash memory recovery programs—you can successfully salvage your valuable digital assets.
Investing in a robust utility like PandaOffice Drecov data recovery software gives you a distinct advantage, providing an intuitive automated interface alongside powerful scanning capabilities. To safeguard your work moving forward, establish a proactive backup routine and always use the “Safely Remove Hardware” option before unplugging your devices.


