


In the digital age, the humble USB flash drive remains an essential tool for transferring files, creating bootable installers, and storing physical backups. However, there comes a time in every drive’s life when it starts acting up. Perhaps it is showing the wrong capacity, or maybe a “disk is write-protected” error is preventing you from saving your thesis. When these issues arise, knowing how to reformat a usb drive is the most effective way to restore functionality.
In this comprehensive guide, we will explore the nuances of formatting, delve into advanced troubleshooting for when things go wrong, and provide a professional-grade solution for recovering data if you accidentally hit “format” too soon.
Understanding the Basics: Why and How to Format USB Drive
Before we dive into the technical steps, it is important to understand what formatting actually does. Essentially, formatting a drive prepares the storage medium for use by an operating system by creating a file system. This process acts as a “factory reset” for the drive’s logical structure.
Common Scenarios Requiring a Format
You might find yourself wondering how to format usb drive correctly when:
- File System Incompatibility: You need to move a file larger than 4GB, but your drive is stuck on the old FAT32 system.
- Corruption: The drive is recognized by the computer but refuses to open files.
- Malware Removal: A deep format is often the only way to ensure a stubborn boot-sector virus is truly gone.
- Performance Issues: Over time, flash memory can become “sluggish” due to file fragmentation and directory errors.
Choosing the Right File System
When you initiate the process of how to reformat a usb drive, you will be prompted to choose a file system. This is a critical decision.
| File System | Best Use Case | Max File Size | Compatibility |
| FAT32 | Legacy devices (Car stereos, older printers) | 4 GB | Universal (Windows, Mac, Linux) |
| exFAT | Modern USB drives & SD cards | No practical limit | Excellent (Windows & Mac) |
| NTFS | Internal Windows drives | No practical limit | Windows-centric (Read-only on Mac) |
Standard Methods: How to Reformat a USB Drive on Windows
Windows offers several layers of tools to handle formatting, ranging from simple graphical interfaces to powerful command-line utilities.
Method 1: File Explorer (The Standard Approach)
For 90% of users, this is the quickest way to handle a healthy drive.
- Step 1: Insert your USB drive into an available port.
- Step 2: Open File Explorer (Windows Key + E).
- Step 3: Locate your drive under “This PC,” right-click it, and select Format…
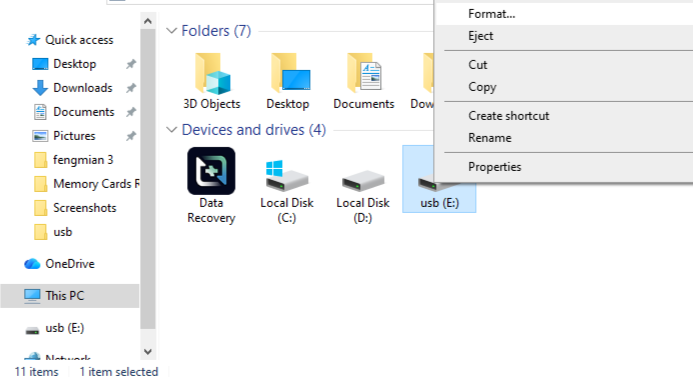
- Step 4: In the dialog box, select your desired File System (exFAT is recommended for modern use).
- Step 5: Ensure “Quick Format” is checked if the drive is healthy. Uncheck it if you suspect bad sectors.
- Step 6: Click Start and confirm the warning.
Method 2: Disk Management (For “Invisible” Drives)
If your drive doesn’t show up in File Explorer, it might not have a drive letter assigned.
- Step 1: Right-click the Start button and select Disk Management.
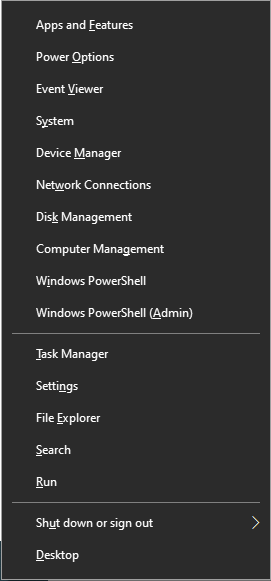
- Step 2: Find your USB drive in the list (usually labeled as “Removable”).
- Step 3: If the bar is black (Unallocated), right-click and select New Simple Volume.
- Step 4: If the bar is blue, right-click and select Format.
- Step 5: Follow the wizard to assign a drive letter and file system.
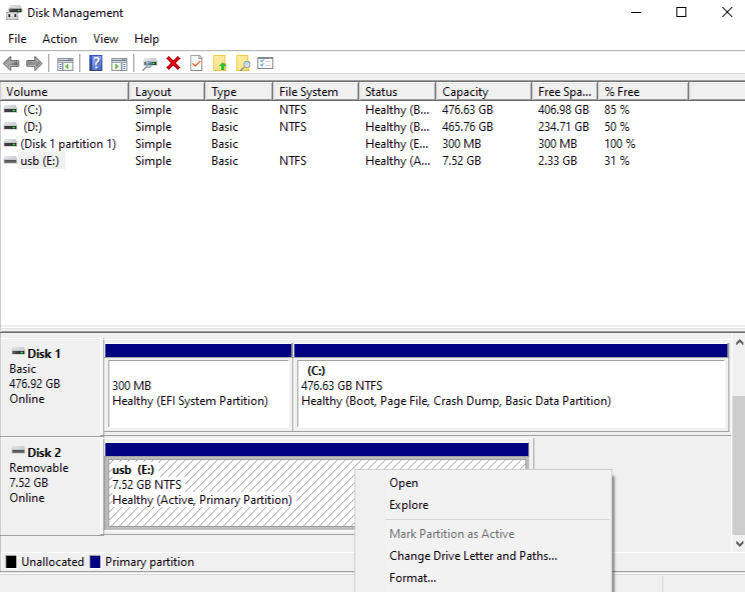
Advanced Troubleshooting: Unable to Format a USB Stick After Using Rufus
Many tech enthusiasts use Rufus, an excellent tool for creating bootable Linux or Windows installers. However, Rufus often creates multiple non-standard partitions or uses “ISO Image” mode which can make a drive appear “broken” to Windows File Explorer afterward.
If you find yourself unable to format a usb stick after using rufus, the standard right-click method will likely fail with an “unsupported” or “read-only” error. To fix this, we must use the Diskpart utility to wipe the partition table entirely.
Method 3: Using Diskpart (The “Nuclear” Option)
Warning: This method erases everything on the selected disk. Ensure you select the correct disk number to avoid wiping your primary hard drive.
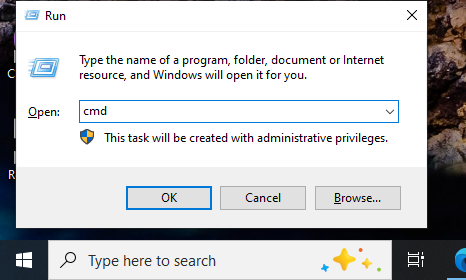
- Step 1: Click the Start menu, type
cmd, right-click it, and select Run as Administrator.
- Step 2: Type
diskpartand press Enter. - Step 3: Type
list diskto see all connected drives. Identify your USB by its size (e.g., Disk 2). - Step 4: Type
select disk X(Replace X with your actual USB disk number). - Step 5: Type
clean. This removes all partition information and is the primary fix when you are unable to format a usb stick after using rufus. - Step 6: Type
create partition primary. - Step 7: Type
format fs=exfat quick. - Step 8: Type
assignto give it a drive letter, thenexit.
How to Reformat a USB Drive on macOS
Apple’s macOS handles formatting through a built-in tool called Disk Utility. The process is straightforward but requires a specific choice regarding “Schemes.”
- Step 1: Connect the USB drive to your Mac.
- Step 2: Open Disk Utility via Spotlight (Command + Space) or through Applications > Utilities.
- Step 3: Click View in the top left and select Show All Devices. This is crucial to see the physical drive, not just the volume.
- Step 4: Select the root drive name in the left sidebar.
- Step 5: Click the Erase button at the top.
- Step 6: Choose a name, select exFAT for the format, and GUID Partition Map for the scheme.
- Step 7: Click Erase and wait for the process to complete.
Data Recovery: Using PandaOffice Drecov Before or After Formatting
We have all been there—the sinking feeling in your stomach when you realize you formatted the wrong drive or forgot to back up a folder. Fortunately, a “Quick Format” doesn’t actually erase the data; it simply deletes the “map” that tells the computer where the data is. As long as you don’t write new files to the drive, the data is recoverable.
PandaOffice Drecov is a professional-grade recovery tool designed to handle these exact scenarios. It utilizes deep-sector scanning to reconstruct lost file paths.
⚠ Warning: Install it on a drive different from the one where your data was lost to prevent overwriting.
Step-by-Step Recovery with PandaOffice Drecov
- Step 1: Select the DriveLaunch the application. On the main interface, you will see a list of available drives. Select your USB drive from the “Removable Drives” section and click the Scan button.

- Step 2: Deep Scan ExecutionPandaOffice Drecov will perform two types of scans. The Quick Scan finds recently deleted files, while the Deep Scan (highly recommended for formatted drives) looks for raw data signatures. This may take several minutes depending on the size of the drive.

- Step 3: Preview and FilterOnce the scan is complete, browse the files using the sidebar. You can filter by file type (e.g., .jpg, .docx, .mp4). Use the Preview function to verify that the file is intact before recovering.

- Step 4: Recover to a Safe LocationSelect the files you wish to save and click Recover.
Important: Always save the recovered files to your computer’s internal hard drive or a different external disk. Never save them back to the USB drive you are recovering from until you are 100% sure the process is finished.
Pro-Level Maintenance: Keeping Your USB Healthy
Knowing how to reformat a usb drive is only half the battle. To prevent future data loss and ensure your drive lasts for years, follow these expert tips:
- Always Eject Safely: Most modern systems use “write caching.” If you pull the drive out while the OS is still writing data in the background, you will corrupt the file system.
- Avoid Full Formats on SSDs/Flash: Unless you are trying to wipe sensitive data permanently, stick to “Quick Format.” A full format writes zeros to every cell, which contributes to the wear-and-tear of the flash memory.
- Check for Errors Periodically: In Windows, right-click the drive > Properties > Tools > Check. This will find and fix file system errors before they require a full reformat.
- Hardware Quality Matters: Cheap, generic USB drives often use “Grade B” flash chips that are prone to sudden failure. Invest in reputable brands for important data.
Additional Data Recovery Resources
If you have successfully mastered how to reformat a usb drive but are facing more complex hardware or connectivity issues, explore our expert guides below:
- Troubleshooting Hardware Detection: Sometimes a format isn’t possible because the PC won’t see the drive. Learn how to diagnose and fix a USB drive not showing up like a pro.
- Peripheral Connectivity: Having trouble with more than just storage? If your console peripherals are acting up, check out why your PS4 controller won’t connect to PS4 with USB.
- Emergency Data Salvage: If your memory stick is failing physically, here are 5 easy ways to save your data and fix USB flash memory.
How to Format USB Drive FAQs
1. Why does my 64GB USB drive only show 32GB after formatting?
This is a common limitation of the Windows built-in formatter. Windows often restricts FAT32 partitions to a maximum of 32GB. If you are unable to format a usb stick to its full capacity using the standard right-click method, you should use the Diskpart utility or a third-party tool to format it as exFAT or NTFS. These modern file systems easily support larger capacities, restoring your drive to its full storage potential.
2. Can I reformat a USB drive that is “Write Protected”?
A write-protected drive prevents any changes, including formatting. First, check if your USB has a physical “Lock” switch on the side. If it doesn’t, the protection is likely software-based. You can often bypass this by using the attributes disk clear readonly command within Diskpart. However, if these software fixes fail, it often indicates the flash memory chip has reached its “end-of-life” and has locked itself to protect your remaining data.
3. Is it possible to change the file system without losing data?
Generally, no. The process of how to reformat a usb drive inherently involves wiping the “address book” of the disk, which makes the data inaccessible. While there are some command-line tricks in Windows (like the convert command for FAT32 to NTFS), they are prone to errors and can lead to data corruption. It is always safer to move your files to a cloud drive or your desktop, format the USB, and then move the files back.
4. How many times can I reformat a USB drive before it breaks?
USB drives use NAND flash memory, which has a limited number of “write/erase” cycles. While a Quick Format only writes to a tiny portion of the drive and has a negligible impact on its lifespan, a Full Format scans every sector and is more taxing. For the average user, you could format a drive thousands of times without issue, but you should avoid unnecessary full formats to keep the hardware healthy for as long as possible.
5. What is the “Allocation Unit Size” and should I change it?
When you start the process of how to format usb drive, you’ll see an option for “Allocation Unit Size” (or cluster size). This represents the smallest block of space that can hold a file.
- Smaller clusters: Better for many small files (saves space).
- Larger clusters: Better for large files like movies (can slightly improve read/write speeds). For 99% of tasks, it is best to leave this at “Default.” Choosing an unusual size can sometimes cause compatibility issues with devices like car stereos or smart TVs.
Conclusion
Mastering how to reformat a usb drive is a fundamental skill for anyone using modern technology. Whether you are performing a routine cleanup or solving the nightmare of being unable to format a usb stick after using rufus, the tools built into Windows and Mac are incredibly capable. However, the most important takeaway is to treat your data with care.
Always keep backups, use tools like PandaOffice Drecov when accidents happen, and remember that a quick format is your best friend for routine maintenance. By following the steps outlined in this guide, you can ensure your USB drives remain reliable, fast, and ready for whatever files you throw at them.


