


The Windows Recycle Bin is one of the most iconic and essential features of the Microsoft operating system. Whether you are using a legacy version or the latest build, this digital safety net has saved countless users from the heart-wrenching moment of realizing they just deleted a critical file. In this comprehensive guide, we will explore everything from basic navigation to advanced data recovery, ensuring you never lose a file permanently by accident again.
What is Windows Recycle Bin?
Definition and Core Purpose
Let’s start with something you probably see every day but rarely think about—the Windows Recycle Bin. It’s that small icon sitting quietly on your desktop, often ignored until something goes wrong. However, behind that simple icon lies one of the most important safety features in the entire Windows operating system. The Windows Recycle Bin acts as a temporary holding area for files you delete, giving you a second chance before those files are permanently erased from your system.
Imagine tossing a crumpled piece of paper into a trash can in your room. You haven’t taken it outside yet, so you can still grab it if you change your mind. That’s exactly how the Windows Recycle Bin works. When you delete a file normally, Windows doesn’t immediately wipe it out—it moves it into the bin instead. This means your file is still physically present on your storage drive, ready to be restored at any moment.
Why It Exists in Windows Systems
The existence of the Windows Recycle Bin isn’t accidental—it’s a deliberate design choice aimed at improving user experience and preventing data loss. Early computer systems didn’t have this feature, and deleting a file meant it was gone instantly. Microsoft introduced this tool to make file management more forgiving.
From a technical perspective, the Windows Recycle Bin also helps manage storage more efficiently. Instead of permanently deleting files right away, the system temporarily stores them in a controlled environment. This allows users to review what they’ve deleted and decide whether to keep or remove it permanently. It’s like having a “cooling-off period” for your digital decisions.
How the Recycle Bin Works
File Deletion Process
When you delete a file in Windows, the process is more sophisticated than it appears. Instead of erasing the file immediately, the system moves it to a hidden location. The file remains intact, including its data and structure, which is why it can be restored later. This process happens almost instantly, which is why it feels like the file has disappeared. But in reality, it’s just been relocated.
The system also records important metadata about the file, such as its original location and deletion date. This information is crucial for the “Restore” function to work correctly. If you use the Shift + Delete shortcut, however, the file bypasses the Windows Recycle Bin entirely and is marked for permanent deletion.
Temporary Storage Mechanism
The Windows Recycle Bin operates as a temporary storage system with its own rules. Each drive on your computer has its own designated area for deleted files. Furthermore, there’s a size limit to how much data it can hold. Once this limit is reached, older files are automatically removed to make space for new ones. Think of it like a rotating shelf; new items come in, and the oldest ones get pushed off the edge.
Where Deleted Files Are Stored
The Hidden $Recycle.Bin Folder
Behind the scenes, all deleted files are stored in a hidden system folder called $Recycle.Bin. This folder exists on every partition of your hard drive. While the desktop interface provides a user-friendly way to interact with these files, the $Recycle.Bin folder is where the physical data resides. The folder is hidden by default to prevent accidental modification, which could lead to system errors.
Per-Drive Storage Structure
Each drive on your system—whether it’s an internal SSD or an external HDD—has its own $Recycle.Bin folder. This means if you delete a file from your D: drive, it stays on the D: drive’s hidden bin folder. This architecture ensures that Windows doesn’t have to move large amounts of data across different physical disks just to “delete” them, which saves time and system resources.
Where is the Recycle Bin in Windows 10?
For many users transitioning from older systems, finding the recycle bin windows 10 icon is usually straightforward, as it is placed on the desktop by default. However, if you’ve recently performed a clean installation or changed your theme, it might be missing.
How to locate or show the icon:
- Step 1: Right-click on an empty space on your desktop and select Personalize.
- Step 2: On the left sidebar, click on Themes.
- Step 3: Scroll down or look to the right side for Desktop icon settings.
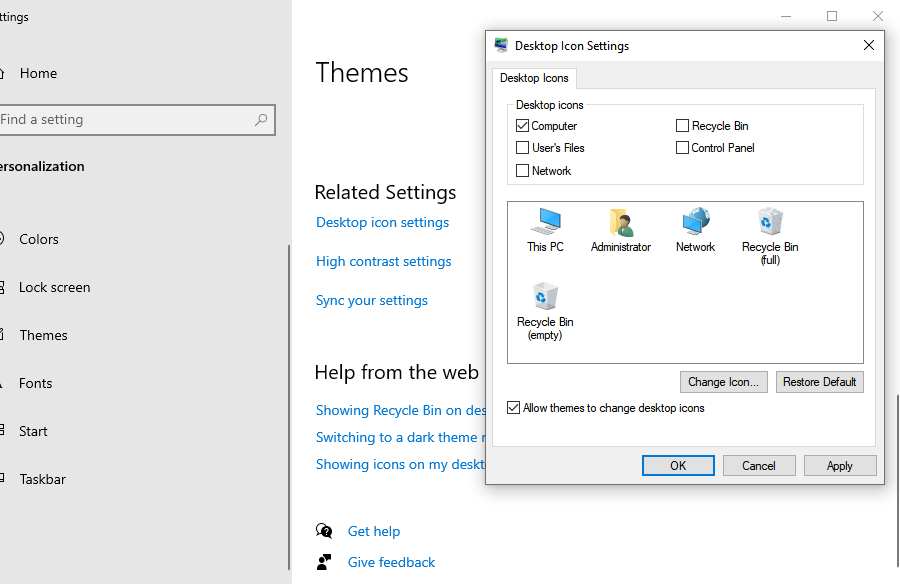
- Step 4: In the pop-up window, ensure the checkbox for Recycle Bin is checked, then click OK.
Knowing where is the recycle bin in windows 10 is the first step toward effective data management. If you prefer a cleaner desktop, you can also access it by typing “Recycle Bin” into the Windows Search bar or by entering shell:RecycleBinFolder in the File Explorer address bar.
Where is the Recycle Bin in Windows 11?
With the redesign of the user interface, many users ask where is the recycle bin in windows 11. While the logic remains the same as its predecessor, the menu locations have shifted slightly to match the modern “Settings” app layout.
Steps to find the icon in Windows 11:
- Step 1: Open the Settings app by pressing
Win + I. - Step 2: Navigate to Personalization > Themes.
- Step 3: Click on the Desktop icon settings option located toward the bottom of the page.
- Step 4: Check the box for Recycle Bin and click Apply.
The recycle bin windows 11 experience is more integrated with the “Storage Sense” feature, which can automatically empty the bin for you. Even so, the classic desktop shortcut remains the most direct way to manage your deleted items. For more official information on desktop icons, you can visit the Microsoft Support page.
How to Use the Recycle Bin
Opening the Windows Recycle Bin is as simple as double-clicking the icon. Once inside, you will see a list of files you have deleted. You can sort these files by “Date Deleted,” “Original Location,” or “Size” to help you find specific items.
Restoring Files Step-by-Step
If you realize you’ve made a mistake, restoring a file is a breeze:
- Step 1: Open the Windows Recycle Bin.
- Step 2: Locate the file or folder you wish to bring back.
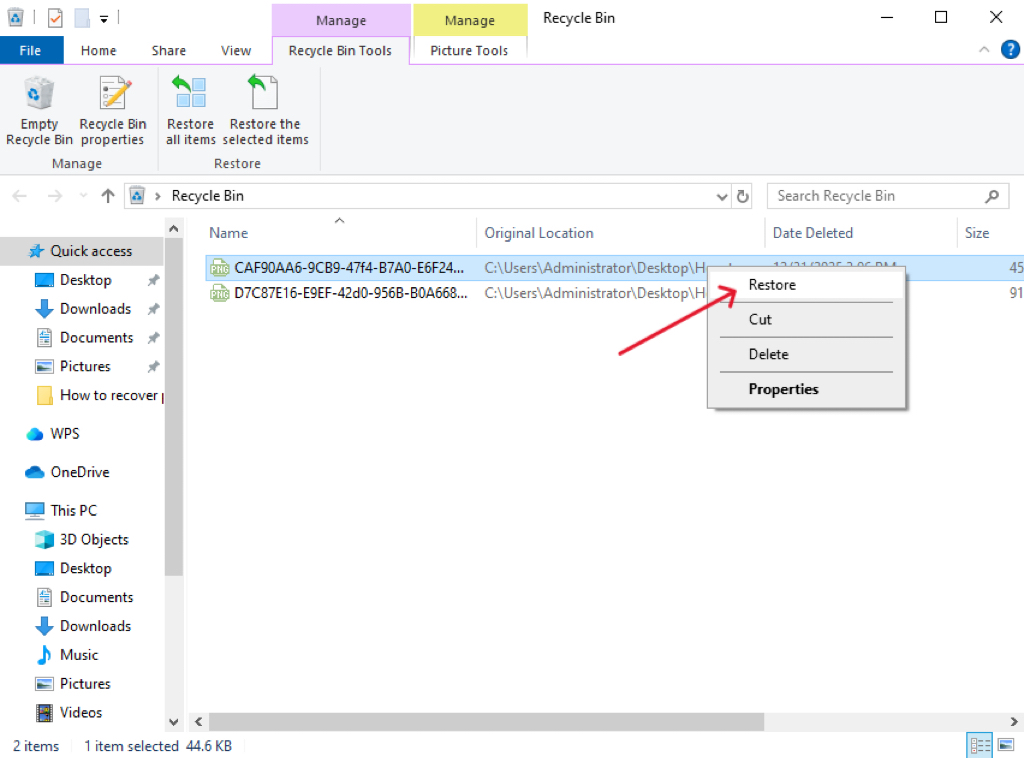
- Step 3: Right-click the item and select Restore.
- Step 4: The file will immediately return to its original location prior to deletion.
Managing Recycle Bin Storage
Customizing Size Settings
Did you know you can control how much space the Windows Recycle Bin uses? If you have a small SSD, you might want to limit this space.
- Step 1: Right-click the Recycle Bin icon on your desktop and select Properties.
- Step 2: Select the drive you want to configure (e.g., C: or D:).
- Step 3: Choose Custom size and enter the maximum amount of MB you want to allocate.
- Step 4: Click Apply and then OK.
Emptying the Bin
To free up space, you can empty the bin manually by right-clicking the desktop icon and selecting Empty Recycle Bin. Alternatively, Windows 10 and 11 offer Storage Sense, which can be found in Settings > System > Storage. When enabled, it automatically removes files that have been in the bin for more than 30 days.
Common Issues: Missing or Corrupted Bin
Sometimes the recycle bin windows 10 or recycle bin windows 11 might fail. You might see an error saying the bin is corrupted, or the icon might not update to show it’s full.
How to Fix a Corrupted Recycle Bin:
- Step 1: Press
Win + Xand select Command Prompt (Admin) or Terminal (Admin). - Step 2: Type the command
rd /s /q C:\$Recycle.binand press Enter. (Note: ReplaceC:with other drive letters if necessary). - Step 3: Restart your computer. Windows will automatically recreate a fresh, working version of the folder.
Advanced Data Recovery with PandaOffice Drecov
What happens if you empty the Windows Recycle Bin and then realize you needed those files? Or what if you used Shift + Delete? This is where professional tools like PandaOffice Drecov come into play. When a file is “permanently” deleted, the data isn’t gone; the space is simply marked as “available.” PandaOffice Drecov scans these sectors to piece the files back together.
⚠ Warning: Install it on a drive different from the one where your data was lost to prevent overwriting.
Steps to Recover Data using PandaOffice Drecov:
- Step 1: Select the Location. Upon launching the app, select the Recycle Bin option or the specific drive where your files were originally stored.

- Step 2: Scan for Lost Files. Click the Scan button. The software will perform a Quick Scan followed by a Deep Scan to find fragments of deleted data that the system no longer tracks.

- Step 3: Preview and Filter. Once the scan is complete, browse through the results. Use the preview feature to check the integrity of photos or documents before recovering them.

- Step 4: Recover to a Safe Location. Select the files you want back and click Recover.
Warning: Always save the recovered files to a different drive (like a USB flash drive) to ensure the original data isn’t corrupted during the process.
Best Practices for Data Safety
While the Windows Recycle Bin is a great first line of defense, it shouldn’t be your only one.
- Avoid Accidental Deletion: Double-check files before hitting the delete key. Enable the “Display delete confirmation dialog” in the Recycle Bin Properties if you find yourself deleting things too quickly.
- Regular Backups: Use Windows Backup or OneDrive to keep copies of your most important folders in the cloud.
- Storage Maintenance: Don’t let your Windows Recycle Bin grow too large, as it can occasionally slow down file explorer performance on older hard drives.
After you have mastered these recovery steps, you might want to dive deeper into specific Windows management tasks. For instance, you can learn more about:
- How to recover files deleted from the recycle bin
- Windows 10/11: How to remove the recycle bin from desktop
- How do I recover items deleted from recycle bin?
Windows Recycle Bin FAQs
1. Can I recover files from a Recycle Bin on a different user account?
No. For privacy and security reasons, each user account on a Windows PC has its own unique $Recycle.Bin subfolder. You cannot view or restore files deleted by another user unless you have administrative privileges and navigate directly to the hidden system folders on the C: drive.
2. Why don’t files deleted from a USB flash drive go to the Recycle Bin?
By default, Windows treats removable drives (like USB sticks or SD cards) as external storage. Files deleted from these devices are bypassed and permanently erased immediately. To recover these, you must use a specialized tool like PandaOffice Drecov since the Windows Recycle Bin doesn’t catch them.
3. What is the “Size Limit” for a single file in the Recycle Bin?
If a file is larger than the total capacity you have allocated for the recycle bin windows 10 or 11, Windows will ask if you want to “Permanently Delete” it immediately. It cannot “partially” store a file; it must fit within the current maximum storage settings of that specific drive.
4. How can I stop the “Are you sure you want to delete this?” prompt?
If you find the pop-up annoying, right-click the Windows Recycle Bin icon, select Properties, and uncheck the box labeled “Display delete confirmation dialog.” Once applied, files will move to the bin instantly when you press Delete, streamlining your workflow.
5. Can I change the Recycle Bin icon to something custom?
Yes! In both windows 10 and windows 11, you can change the icon via Desktop Icon Settings. You can even set different icons for “Full” and “Empty” states. This is a popular way to personalize your desktop while keeping the recovery functionality intact.
Conclusion
The Windows Recycle Bin is a fundamental tool that every PC user should understand. From knowing where is the recycle bin in windows 10 to performing advanced recovery with PandaOffice Drecov, being prepared is the key to digital longevity. By following the steps outlined in this guide, you can navigate file deletions with confidence, knowing that your data is never truly lost as long as you have the right knowledge and tools at your disposal.


