


A USB drive is supposed to make life easier. You plug it in, transfer files, save backups, and move data between devices within seconds. But when you suddenly see the frustrating message “The disk is write-protected,” everything comes to a stop. You cannot copy files, delete documents, format the drive, or even make simple edits. It feels like your USB drive has locked itself behind an invisible wall. That is exactly why so many users search for ways to remove right protection on usb drives every single day.
This complete guide explains everything you need to know about removing write protection from USB drives, including common causes, step-by-step fixes, formatting methods, command-line solutions, registry edits, and prevention tips to avoid future problems.
Understanding the “Read-Only” Barrier
Before diving into the technical fixes to remove right protection on usb, it is essential to understand what is happening under the hood. Write protection is a security feature designed to prevent files from being modified or deleted accidentally. In some situations, it protects important data from viruses or accidental overwriting. The problem begins when write protection appears unexpectedly and blocks normal USB usage completely. Sometimes the issue comes from a physical lock switch on the device. Other times it is caused by corrupted system files, damaged USB sectors, registry settings, malware infections, or software errors.
The good news is that most write protection problems can be fixed without buying a new USB drive. Whether you use Windows, macOS, or Linux, there are multiple methods available to remove right protection on usb and restore normal functionality. Think of write protection like a locked door. The challenge is figuring out which key opens it because different causes require different solutions.
Common Causes of USB Write Protection
Several issues can trigger the need to remove right protection on usb. By identifying the root cause, you save time and effort.
| Cause | Description |
| Physical lock switch | Manual protection enabled on the device body. |
| Corrupted file system | Logical damage to the storage structure. |
| Malware infection | Viruses restricting access to prevent removal. |
| Registry errors | Windows configuration issues blocking write access. |
| Damaged USB sectors | Hardware-level degradation of flash memory. |
| Permission restrictions | Administrative settings on the local PC. |
Level 1: Basic Hardware and Software Checks
Before using complex tools to remove right protection on usb, always start with the simplest explanations.
Check for a Physical Write Protection Switch
Some USB flash drives, especially older models or SD card adapters, include a tiny physical switch. If this switch is toggled to the “Lock” position, no software command in the world will allow you to write data to it.
- Step 1: Remove the USB drive from the port.
- Step 2: Examine the sides and back carefully for a small sliding switch.
- Step 3: If you see a “Lock” icon, slide the switch to the opposite direction.
- Step 4: Reinsert the drive and check if you can now remove right protection on usb tasks.
Restart Your Computer
It sounds like a cliché, but restarting your computer can clear temporary system glitches. Sometimes, a specific process “hangs” while accessing the USB, locking the file system. A reboot refreshes the USB controllers and reloads the device drivers, which might remove right protection on usb automatically.
Level 2: Advanced System Fixes for Specific Brands
Different manufacturers sometimes require specific utilities. If you are using popular brands, you might need a brand-specific remove right protection on usb approach.
SanDisk usb write protected remove tool
SanDisk drives are incredibly popular but are known to occasionally trigger a “read-only” mode if the internal controller detects a potential failure. While SanDisk does not provide a single “one-click” SanDisk usb write protected remove tool for all models, they recommend using their “SanDisk RescuePRO” or checking for firmware updates. If the drive is under warranty and has switched to read-only mode due to a hardware defect, the best SanDisk usb write protected remove tool might actually be a replacement request from the manufacturer.
Kingston flash drive write protected removal
For Kingston users, the process of Kingston flash drive write protected removal often involves using the “Kingston Format Utility.”
- Step 1: Download the official Kingston Format Utility from their website.
- Step 2: Run the application as an Administrator.
- Step 3: Select your drive from the dropdown menu and click “Format.
Note: This is a powerful form of Kingston flash drive write protected removal, but it will erase your data. Always check for the physical switch on Kingston “DataTraveler” models first.
Level 3: Using Windows Command-Line Tools
If the basic checks fail, it is time to use the internal Windows engine to remove right protection on usb.
Remove Write Protection Using DiskPart
DiskPart is a command-line utility that provides granular control over partitions and attributes.
- Step 1: Press Windows + S, type
cmd, and select Run as Administrator. - Step 2: In the black window, type
diskpartand press Enter. - Step 3: Type
list diskto see all connected drives. Identify your USB drive by its size (e.g., Disk 2 might be 14GB for a 16GB drive). - Step 4: Type
select disk X(Replace X with your actual disk number). - Warning: Selecting the wrong disk number could lead to data loss on your hard drive.
- Step 5: Type
attributes disk clear readonlyand press Enter. This command is specifically designed to remove right protection on usb at the software attribute level. - Step 6: Type
exitand try using your drive again.
Level 4: Registry and Group Policy Tweaks
Sometimes, the “lock” isn’t on the USB drive, but within the Windows Registry itself.
Fix Write Protection Through Windows Registry
- Step 1: Press Windows + R, type
regedit, and hit Enter. - Step 2: Navigate to the following path:
HKEY_LOCAL_MACHINE\SYSTEM\CurrentControlSet\Control\StorageDevicePolicies - Step 3: If the
StorageDevicePoliciesfolder doesn’t exist, right-click Control, select New > Key, and name it accordingly. - Step 4: Inside that key, look for a value named WriteProtect.
- Step 5: Double-click it and change the Value Data to 0.
- Step 6: Restart your PC. This change should effectively remove right protection on usb for any drive plugged into this specific computer.
Level 5: Data Recovery and Software Solutions
What happens if the drive is still locked, or you are terrified of losing your files? Many users prioritize how to fix write protected usb without losing data before they attempt a destructive format.
PandaOffice Drecov data recovery software
When system tools fail, a professional recovery tool like PandaOffice Drecov data recovery software becomes your best ally. This tool is specifically designed to bypass logical locks and “read” the raw data from a drive that the operating system refuses to touch.
⚠ Warning: Install it on a drive different from the one where your data was lost to prevent overwriting.
Here is how to use PandaOffice Drecov data recovery software to save your files:
- Step 1: Launch the program and connect your write-protected USB drive. Select the USB drive from the list of available storage devices in the Drecov interface.

- Step 2: Click on the “Scan” button. The software will perform a deep dive into the memory cells, ignoring the write-protection flag.

- Step 3: Once the scan is complete, preview the files. Select the documents, photos, or videos you need.

- Step 4: Click “Recover” and choose a destination on your local hard drive (not the USB) to save the files.
Key Point: Using PandaOffice Drecov data recovery software ensures that even if you have to perform a destructive format later to remove right protection on usb, your precious memories are already safe.
Recover data from write protected usb without formatting
The primary goal for many is to recover data from write protected usb without formatting. Since write protection only stops you from writing new data, you can often still read existing data. If File Explorer won’t let you copy-paste, using a dedicated tool like Drecov is the most reliable way to recover data from write protected usb without formatting. This ensures that the original file structure remains intact during the transfer.
Fix write protected usb without losing data
If you want to fix write protected usb without losing data, the order of operations is vital. You should always:
- Try the DiskPart “clear readonly” method first (non-destructive).
- Check the Registry settings (non-destructive).
- Use PandaOffice Drecov to extract files (non-destructive).
- Only after your data is safe should you attempt to remove right protection on usb via formatting.
Level 6: Formatting as a Final Resort
If you have successfully used PandaOffice Drecov to back up your files, you can now proceed to format the drive to remove right protection on usb permanently.
Force Format via Disk Management
- Step 1: Right-click the Start button and select Disk Management.
- Step 2: Locate your USB drive in the list.
- Step 3: Right-click the partition and select Format.
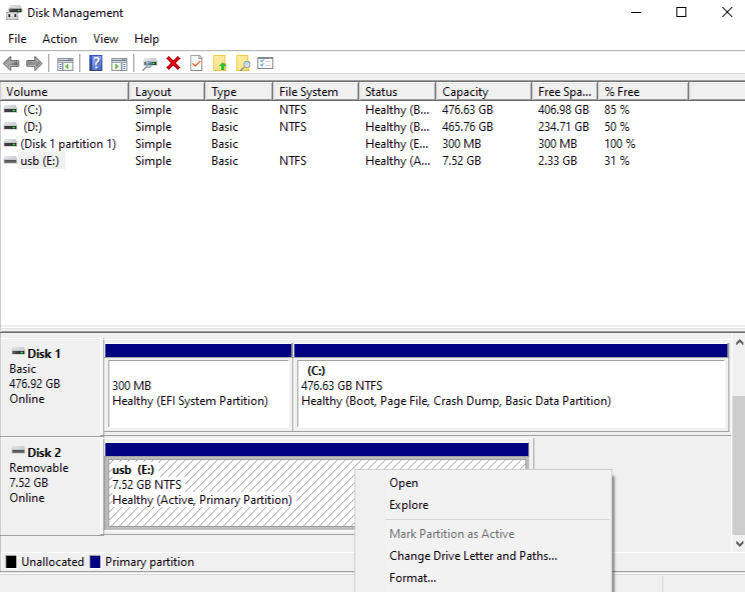
- Step 4: Choose FAT32 for compatibility or NTFS for large files.
- Step 5: Uncheck “Perform a quick format” if the drive has been problematic, as a full format can help map out bad sectors.
Summary of Methods to Remove Right Protection on USB
To help you choose the best path, refer to this complexity table:
| Method | Technical Level | Risk to Data | Recommended For |
| Physical Switch | Beginner | Zero | SD Cards, Specialized USBs |
| DiskPart Command | Intermediate | Low | Software-level locks |
| Registry Edit | Advanced | Medium | System-wide restrictions |
| Drecov Software | Beginner | Zero | Fix write protected usb without losing data |
| Full Format | Beginner | High | Corrupted file systems |
Internal Resources for Further Help
Once you have successfully mastered the ability to remove right protection on usb and recovered your data, you might find these other recovery guides helpful for different scenarios:
- If you’ve lost more than just USB files, learn how to get your Google Chrome bookmarks back to restore your browsing workflow.
- Mobile users can find utility in our guide on how to find recently deleted apps on iPhone or Android.
- For those dealing with storage location issues on PC, check out how to fix a Windows save as default location stuck on OneDrive.
Preventing Future Write Protection Issues
The journey to remove right protection on usb is long, so it’s better to avoid it in the future.
- Always Eject Safely: Abruptly pulling a USB drive out while it is still “writing” is the #1 cause of file system corruption that triggers write protection.
- Regular Virus Scans: Some malware specifically toggles the write-protect bit to prevent antivirus software from deleting the infected files on the drive.
- Avoid Public Terminals: Library or print-shop computers often have group policies that might automatically remove right protection on usb options or, conversely, force them into read-only mode to prevent virus spread.
- Buy Quality Hardware: High-end drives from reputable brands have better controllers that handle errors more gracefully than generic, unbranded “bargain” sticks.
Conclusion
Finding out your drive is locked can be a nightmare, but as we’ve explored, the steps to remove right protection on usb are logical and manageable. Whether it’s a simple flick of a physical switch, a quick command in DiskPart, or using professional tools like PandaOffice Drecov data recovery software to recover data from write protected usb without formatting, there is almost always a solution.
Always prioritize your data. Before you try to “fix” the drive, ensure the files inside are safe. Once you have a backup, you can aggressively pursue the various system and registry tweaks until your USB is back to its helpful, writable self. Digital storage should work for you, not against you—now you have the toolkit to ensure it stays that way.


