


Losing files from a USB flash drive almost always happens at the worst possible moment. You plug in the drive to send a presentation, back up photos, or update firmware—then suddenly everything is gone. A wrong click, an accidental Shift + Delete, or a rushed format can wipe out important data in seconds. This is exactly when many users start searching for recuva for usb drive, hoping there is still a way back.
The good news is that USB data loss is often not permanent. In many cases, deleted files are still recoverable if you act quickly and choose the right method. By the end of this article, you will clearly understand why deleted USB files can come back, how recuva for usb drive works in practice, when to switch to PandaOffice Drecov, and what to do if software recovery is no longer enough.
Part 1: How USB File Recovery Works
Before jumping into recuva for usb drive, it helps to understand a key concept: your files are not physically erased right after deletion.
The “Sticky Note” Analogy
Imagine your USB drive as a storage room filled with labeled boxes. Each box holds a file, and a list on the door tells the system where everything is. When you delete a file, the system usually removes the label from the list—but the box itself stays in the room.
As long as no new box replaces it, the original content still exists. That is the core reason tools like recuva for usb drive can work.
What Really Happens When You Delete USB Files
On most USB flash drives (FAT32, exFAT, or NTFS):
- The file entry is marked as “available”
- The actual data blocks remain untouched
- New data may overwrite those blocks later
Why Timing Matters So Much
The longer you keep using the USB drive after deletion, the higher the risk of overwriting. Even small actions like copying a document or opening an app that creates cache files can reduce recovery chances. That is why every recovery tutorial starts with the same advice: stop using the USB immediately.
Part 2: Core Rules Before Using Recuva for USB Drive Recovery
Before you try recuva for usb drive or any other recovery method, follow these essential rules:
- Do not copy new files to the USB
- Do not format the drive again
- Do not install recovery software on the USB
- Use a stable USB port (avoid hubs)
These simple precautions dramatically improve the success rate of recuva for usb drive and other recovery tools.
Method 1: Recuva
For many users, recuva is the first tool they try—and for good reason. It is free, lightweight, and easy to use.
When Recuva for USB Drive Works Best
Recuva performs well in cases such as:
- Recently deleted files
- USB drives without formatting
- Minimal overwrite activity
It may struggle with deep corruption, but for basic deletion, it is often enough.
Step-by-Step: How to Use Recuva
Step 1: Install Recuva on Your Computer
Download the latest version of Recuva and install it on your internal hard drive. Never install recuva for usb drive directly onto the USB you want to recover.
Step 2: Connect the USB Drive
Insert the USB drive directly into your computer. Make sure it appears with a drive letter (for example, E: or F:).
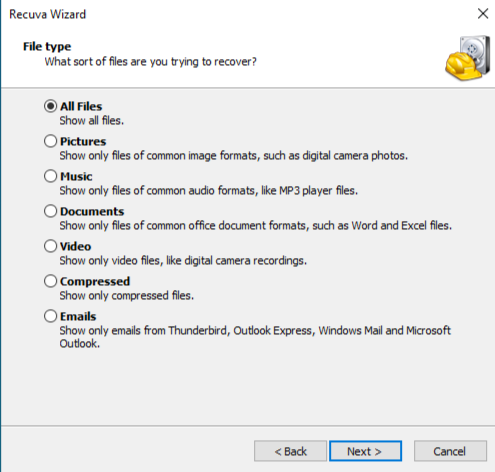
Step 3: Launch Recuva Wizard
Open Recuva and choose the file type you want to recover. If unsure, select All Files.
Step 4: Select File Location
Choose In a specific location, then browse to your USB drive. This step is crucial for recuva for usb drive to scan the correct device.
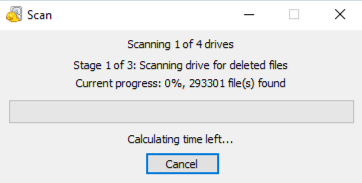
Step 5: Enable Deep Scan
Check Enable Deep Scan. It takes longer, but significantly improves results.
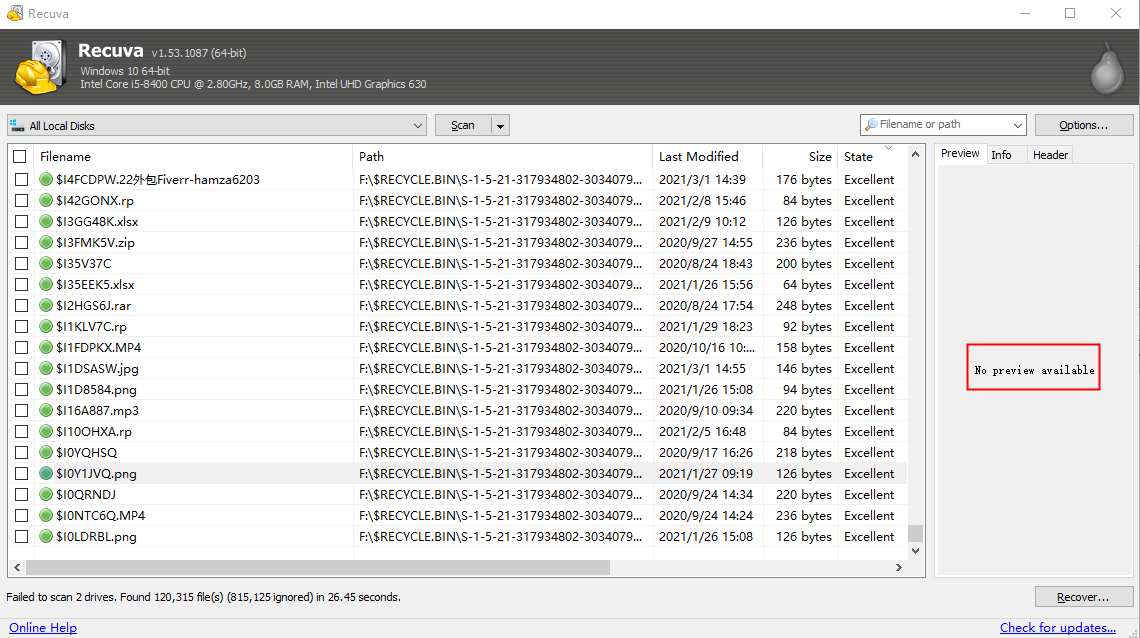
Step 6: Preview Scan Results
Recuva shows file status using colors:
- Green: excellent
- Orange: partial
- Red: poor
Step 7: Recover Files Safely
Select the files you need and save them to your computer—not back to the USB.
Common Mistakes When Using Recuva to recovery USB data
Many recovery failures happen because users:
- Recover files to the same USB
- Skip deep scan
- Continue using the USB before recovery
Avoid these mistakes to get the best results from recuva to recovery usb data.
Method 2: PandaOffice Drecov
When recuva cannot find your files, you need a deeper approach. PandaOffice Drecov is designed for more complex USB data loss scenarios. This tool handles it all, whether you are dealing with:
- Accidental Desktop Deletions: Instantly retrieving files wiped from your local workspace.
- Disk Formatting Errors: Salvaging files from drives that have been completely wiped or reformatted.
- External Media Rescue: Recovering lost data from formatted or corrupted SD cards and USB flash drives.
- Sync Conflict Resolution: Reversing data loss caused by synchronization errors between your PC and the OneDrive cloud.
- Browser Metadata Recovery: Restoring lost Chrome bookmarks and other essential application data.”
Why PandaOffice Drecov Is Different
Unlike recuva for usb drive, PandaOffice Drecov focuses on:
- Sector-level scanning
- Rebuilding file structures
- Recovering data from formatted USB drives
This makes it especially useful when file tables are damaged.
PandaOffice Drecov Three-Step Recovery Method
Step 1: Select the USB Drive
Launch PandaOffice Drecov and choose your USB device from the list.

Step 2: Start Deep USB Scan
Select USB Recovery Mode. The software scans raw data sectors to locate recoverable files.

Step 3: Preview and Recover
Preview files before recovery and export them to your computer.
At this point, many users prefer visual confirmation before proceeding. A step-by-step recovery video clearly demonstrates each stage—from USB detection to deep scanning and final recovery—helping users follow the three-step method with confidence and avoid common mistakes.
Method 3: Official Data Recovery Services
If neither recuva nor PandaOffice Drecov works, professional recovery services may help.
Step-by-Step: How Official Recovery Works
Step 1: Stop using the USB immediately
Step 2: Contact an official data recovery provider
Step 3: Ship or deliver the USB device
Step 4: Wait for diagnosis and quote
Step 5: Approve recovery and receive data
Important Warnings
- Costs can be high
- Recovery is not guaranteed
- Turnaround time may be days or weeks
This method is best for business-critical data.
Comparison Table: Three USB Recovery Methods
| Method | Best Use Case | Advantages | Limitations |
|---|---|---|---|
| Recuva for USB Drive | Simple deletions | Free, easy | Limited deep recovery |
| PandaOffice Drecov | Formatted/corrupted USB | Deep scan, preview | Paid |
| Official Recovery | Hardware damage | Professional tools | Expensive, slow |
PandaOffice Drecov clearly stands out between recuva and official recovery by balancing power and usability.
Common Questions About USB File Recovery
1. Can Recuva for USB Drive recover files after formatting?
Sometimes, but success depends on the format type. PandaOffice Drecov performs better.
2. Is Recuva for USB Drive safe to use?
Yes, when installed on your computer and used correctly.
3. Why does Recuva for USB Drive show files but fail to recover them?
Overwriting or fragmentation often causes this issue.
4. How long does Recuva for USB Drive scanning take?
Quick scans take minutes; deep scans may take hours.
5. What should I do if Recuva for USB Drive finds nothing?
Switch to a deep recovery tool like PandaOffice Drecov.
Conclusion
Understanding recuva for usb drive gives you a strong starting point for USB file recovery. It works well for recent deletions and simple scenarios. However, when data loss becomes more complex, PandaOffice Drecov provides deeper scanning and better recovery chances. Official recovery services remain the final option for severe cases.
The most important lesson is simple: act fast, stop using the USB, and choose the right recovery method early.


