


Imagine you are in the middle of a high-stakes project, rushing to save a final draft to your desktop. Suddenly, a red “X” appears, and a persistent notification interrupts your workflow: “OneDrive is full. Buy more storage to continue syncing.” You never asked for this cloud integration, yet it has hijacked your local folders, slowed down your system’s boot time, and is now demanding a monthly subscription. This common frustration is exactly why so many power users eventually decide to delete onedrive windows 10 to reclaim their digital sovereignty. Whether you are concerned about privacy, tired of the constant resource drain, or simply prefer keeping your files strictly on local hardware, knowing how to properly remove this pre-installed service is essential for a clean, efficient computing experience.
In this comprehensive guide, we will walk through the surgical removal of OneDrive and, crucially, how to handle the “oops” moment if you accidentally wipe out important data during the process.
Part 1: How to Safely Delete OneDrive Windows 10
Before we dive into the “delete” button, we must distinguish between unlinking, disabling, and fully removing the application. Since OneDrive is baked into the OS, a blunt-force deletion can sometimes leave broken registry keys or empty “Ghost Folders.”
Method 1: The Standard Uninstallation (For Home Users)
If you want to delete OneDrive Windows 10 through official channels, the Settings menu is your first stop.
- Step 1: Click the Start button and select the Settings (gear icon).
- Step 2: Navigate to Apps > Apps & features.
- Step 3: Scroll down or use the search bar to find Microsoft OneDrive.
- Step 4: Click on the entry and select Uninstall.
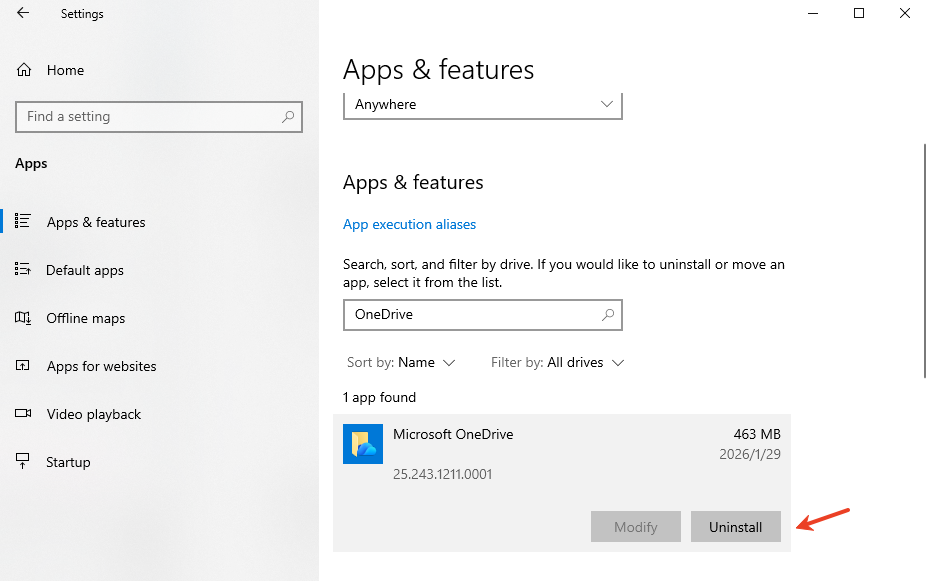
- Step 5: Confirm the prompt. Windows will now remove the application binaries from your system.
Method 2: Disabling via Group Policy (For Pro/Enterprise Users)
If you cannot delete OneDrive Windows 10 because the system claims it is “in use,” or if you want to ensure it never comes back after an update, use the Group Policy Editor.
- Step 1: Press
Win + R, typegpedit.msc, and hit Enter. - Step 2: Go to Computer Configuration > Administrative Templates > Windows Components > OneDrive.

- Step 3: Double-click Prevent the usage of OneDrive for file storage.
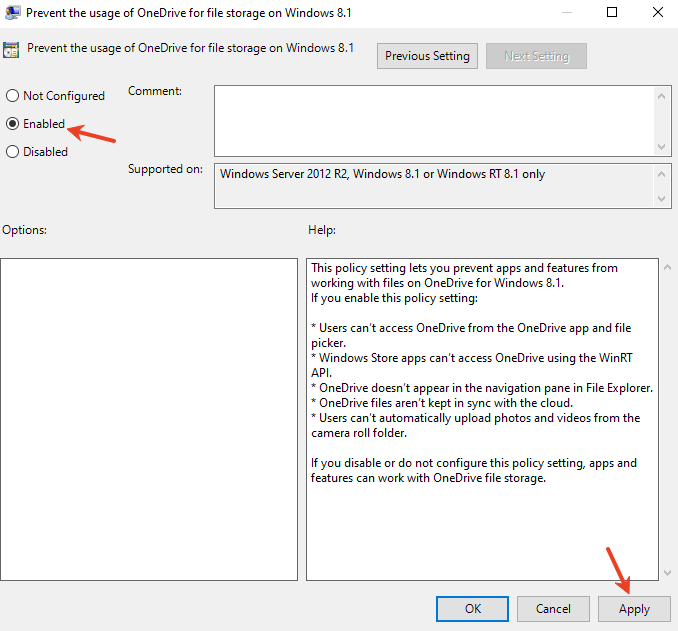
- Step 4: Set it to Enabled, click Apply, and then OK.
Method 3: The Command Prompt “Nuke” (Advanced)
Sometimes the GUI fails. In such cases, a forced command-line approach is the most effective way to delete OneDrive Windows 10 components.
- Step 1: Type
cmdin the search bar, right-click it, and select Run as Administrator.
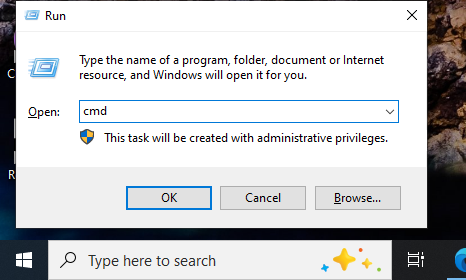
- Step 2: Kill the OneDrive process by typing:
taskkill /f /im OneDrive.exe - Step 3: To uninstall, type the following (use the 64-bit path if applicable):
- 32-bit:
%SystemRoot%\System32\OneDriveSetup.exe /uninstall - 64-bit:
%SystemRoot%\SysWOW64\OneDriveSetup.exe /uninstall
- 32-bit:
Part 2: The Aftermath—Recovering Data After Removal
A significant risk when you delete OneDrive Windows 10 is the “Disappearing File Syndrome.” Because OneDrive often redirects your Documents, Pictures, and Desktop folders to the cloud, removing the app might leave your local folders empty.
If you realize your files were synced to the cloud and not saved locally before you hit uninstall, don’t panic. You can still get them back.
The Professional Solution: PandaOffice Drecov
While the Recycle Bin is a fine first check, professional-grade data loss requires a specialized tool. PandaOffice Drecov is a robust data recovery suite designed to scan deep sectors of your hard drive to find fragments of files that were “de-synced” or deleted during a software removal.
How to use PandaOffice Drecov to Restore Missing Files:
- Step 1: Installation and Launch. Download and install PandaOffice Drecov.
Ensure you install it on a drive different from where the lost data was located (e.g., if you lost files from the C: drive, install the software on D: or an external USB).
- Step 2: Select the Location. Upon launching, the software will display a list of drives. Select your primary drive (usually
C:) where the OneDrive folder resided.

- Step 3: Deep Scan Initiation. Click the Scan button. PandaOffice Drecov will perform a “Quick Scan” followed by a “Deep Scan.” The Deep Scan is vital after you delete OneDrive Windows 10, as it looks for file signatures that the operating system no longer tracks.
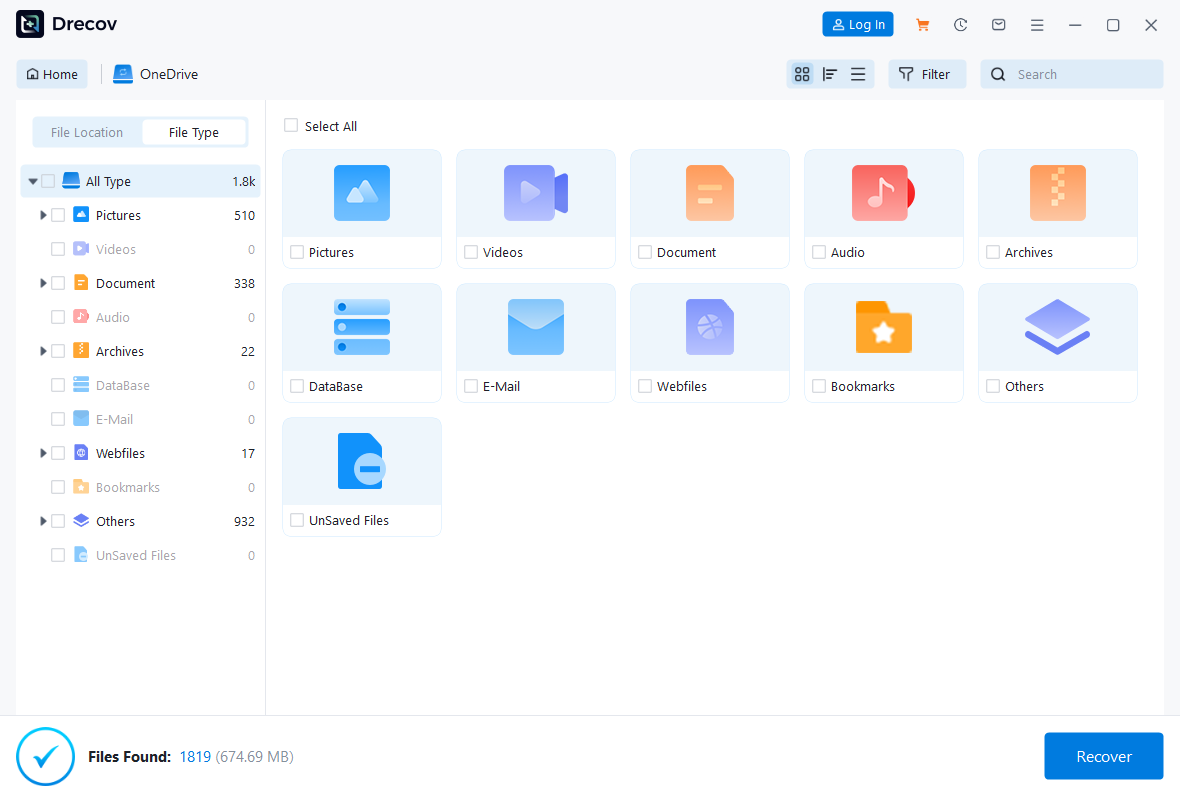
- Step 4: Filter and Preview. Use the sidebar to filter results by file type (e.g.,
.docx,.jpg). One of the best features of PandaOffice Drecov is the Preview function—you can see if a photo or document is intact before committing to the recovery.
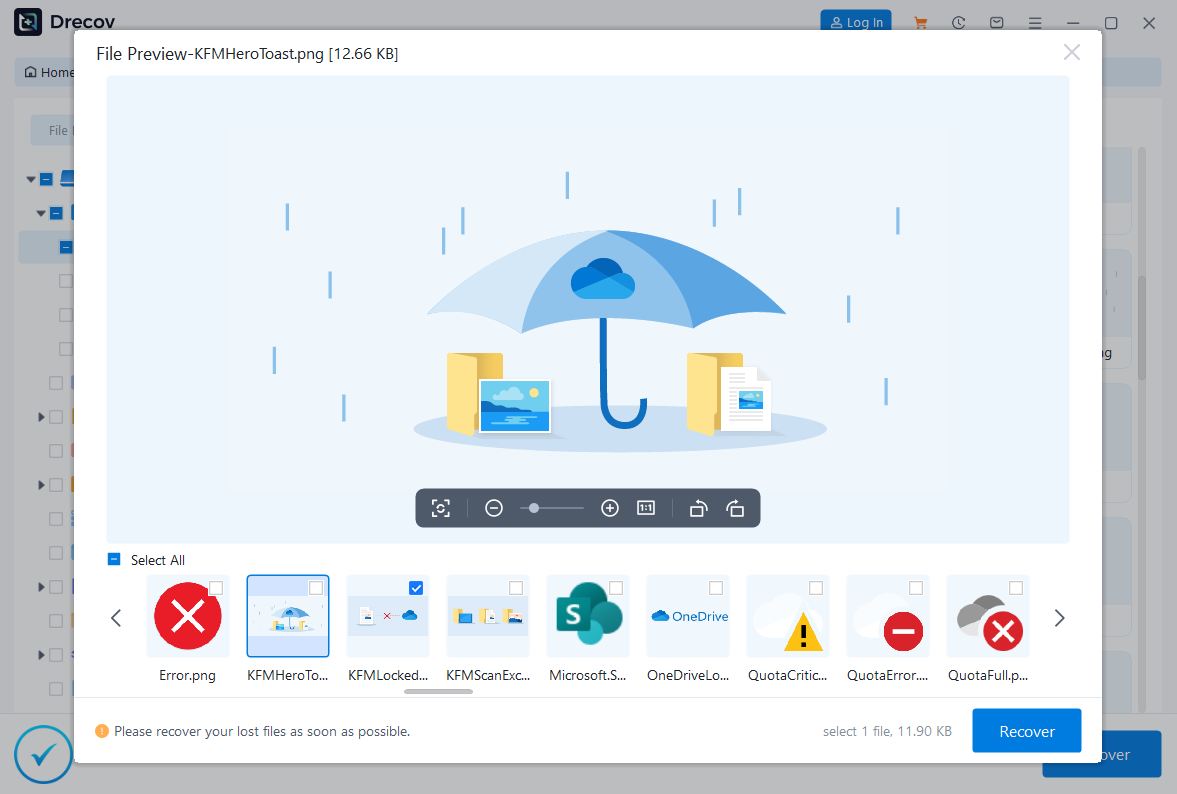
- Step 5: Recovery. Check the boxes next to your missing files and click Recover. Select a safe destination folder (not the original OneDrive path!) to save your restored data.
If you need more ways to secure your data, combining local recovery with cloud-native options ensures total peace of mind. Here is how to explore further:
Disabling onedrive windows 10 FAQs:
Q1: If I delete OneDrive Windows 10, will my files be deleted from the cloud?
A: No. Removing the app from your PC only stops the synchronization. Your files remain safe at OneDrive.com. However, if you chose the “Files On-Demand” setting, those files aren’t actually on your hard drive; you must download them before uninstallation.
Q2: Can I just “hide” OneDrive instead of deleting it?
A: Absolutely. You can right-click the OneDrive icon in the taskbar, go to Settings, and uncheck Start OneDrive automatically when I sign in to Windows. This stops the resource drain without a full deletion.
Q3: Why does OneDrive keep reappearing after Windows Updates?
A: Windows considers OneDrive a core component. Major feature updates may reinstall it. To permanently delete OneDrive Windows 10 behavior, the Registry Editor or Group Policy method (Method 2 above) is the most permanent solution.
Q4: Is PandaOffice Drecov safe for SSDs?
A: Yes. It uses read-only scanning technology, meaning it won’t write new data to your drive while searching for lost files, which is crucial for maintaining the integrity of deleted data on an SSD.
Conclusion
To delete OneDrive Windows 10 is to take back control of how your data is managed. Whether you chose the straightforward Settings uninstallation or the advanced Command Prompt “nuke,” the goal is a cleaner, faster PC.
However, always remember the golden rule of data management: Backup before you Break. If the removal process leaves you with missing folders, tools like PandaOffice Drecov act as a vital safety net, ensuring that your quest for a bloatware-free system doesn’t cost you your precious memories or work documents.


