


Imagine you are finishing a critical project. Suddenly, a “Storage Full” notification pops up, blocking your save. Or perhaps you’ve noticed your PC slowing down because a background process is constantly syncing files you never asked it to. This is the reality for many Windows users. While Microsoft’s cloud service is powerful, the question “how do i completely remove onedrive personal from my computer” is one of the most searched queries for those seeking a leaner, more private computing experience.
Whether it’s the aggressive integration, the confusing “File On-Demand” icons, or simply a preference for local storage, you deserve full control over your machine. This guide provides an exhaustive walkthrough to help you reclaim your disk space and privacy.
Phase 1: Preparation – What You Must Know Before Deleting
Before we dive into the “how,” we must address the “what happens next.” OneDrive is deeply woven into the Windows 10 and 11 fabric.
- Files in the Cloud: Deleting the app doesn’t delete your files from OneDrive.com. They remain safe in the cloud.
- Local Files: If you use “Files On-Demand,” some files might only exist as thumbnails. You must download them locally before proceeding.
- Settings Sync: Removing the personal client stops your settings and desktop icons from syncing across other devices.
Phase 2: How Do I Completely Remove OneDrive Personal From My Computer?
We will tackle this using a tiered approach, starting from the simplest method to the most advanced technical deep-clean.
Method 1: The Standard Windows Uninstallation
For most users, this is the first logical step. It removes the executable application but may leave behind some configuration folders.
- Step 1: Right-click the Start button and select Settings.
- Step 2: Navigate to Apps > Installed Apps (or Apps & Features).
- Step 3: Scroll down or use the search bar to find Microsoft OneDrive.
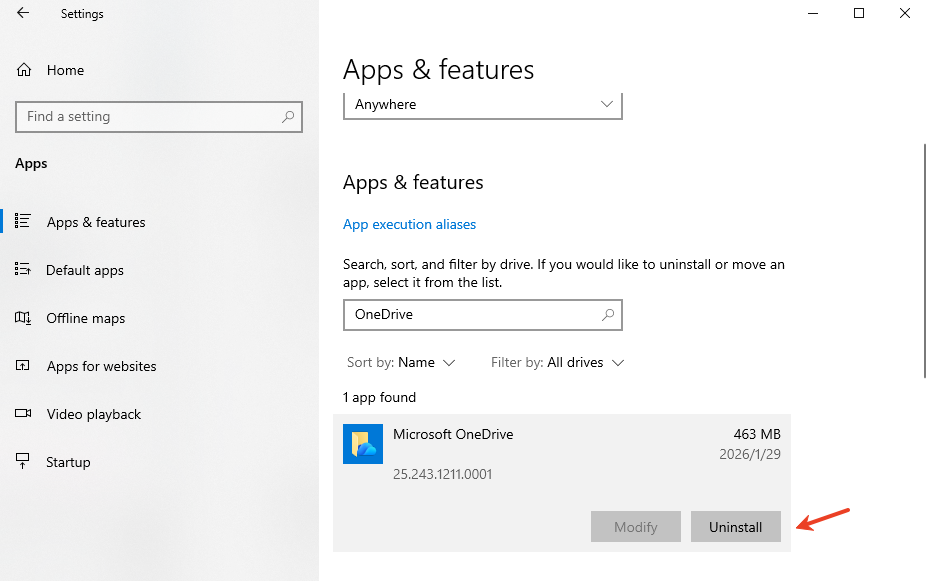
- Step 4: Click the three dots (ellipsis) and select Uninstall. Confirm the prompt.
Method 2: Disabling via Group Policy (Pro/Enterprise Users)
If you want to ensure OneDrive never reinstalls itself during a Windows update, you can disable it at the system policy level.
- Step 1: Press
Win + R, typegpedit.msc, and hit Enter. - Step 2: Navigate to:
Computer Configuration>Administrative Templates>Windows Components>OneDrive.

- Step 3: Double-click Prevent the usage of OneDrive for file storage.
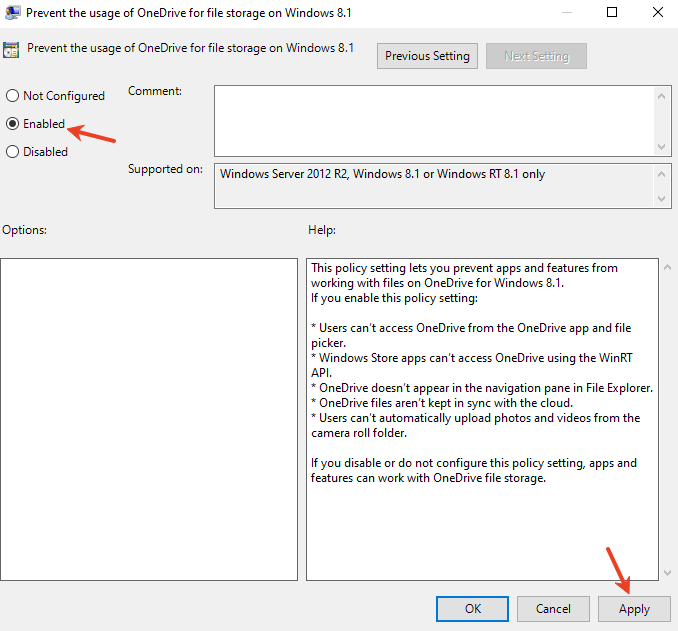
- Step 4: Select Enabled, then click Apply and OK.
Method 3: The Command Prompt “Nuclear” Option
Sometimes the standard uninstaller fails. Using the Command Prompt ensures the process is killed and the underlying installer is purged.
- Step 1: Type
cmdin the Windows search bar, right-click it, and Run as Administrator. - Step 2: Task-kill the app by typing:
taskkill /f /im OneDrive.exeand press Enter. - Step 4: To uninstall, type the following (choose the one matching your system):
- 64-bit:
%SystemRoot%\SysWOW64\OneDriveSetup.exe /uninstall - 32-bit:
%SystemRoot%\System32\OneDriveSetup.exe /uninstall
- 64-bit:
Method 4: Cleaning the Registry Leftovers
Even after uninstallation, you might still see the “OneDrive” folder in the File Explorer sidebar. This requires a quick registry edit.
Warning: Always back up your registry before making changes. Incorrect edits can cause system instability.
- Step 1: Press
Win + R, typeregedit, and press Enter. - Step 2: Navigate to:
HKEY_CLASSES_ROOT\CLSID\{018D5C66-4533-4307-9B53-224DE2ED1FE6}.
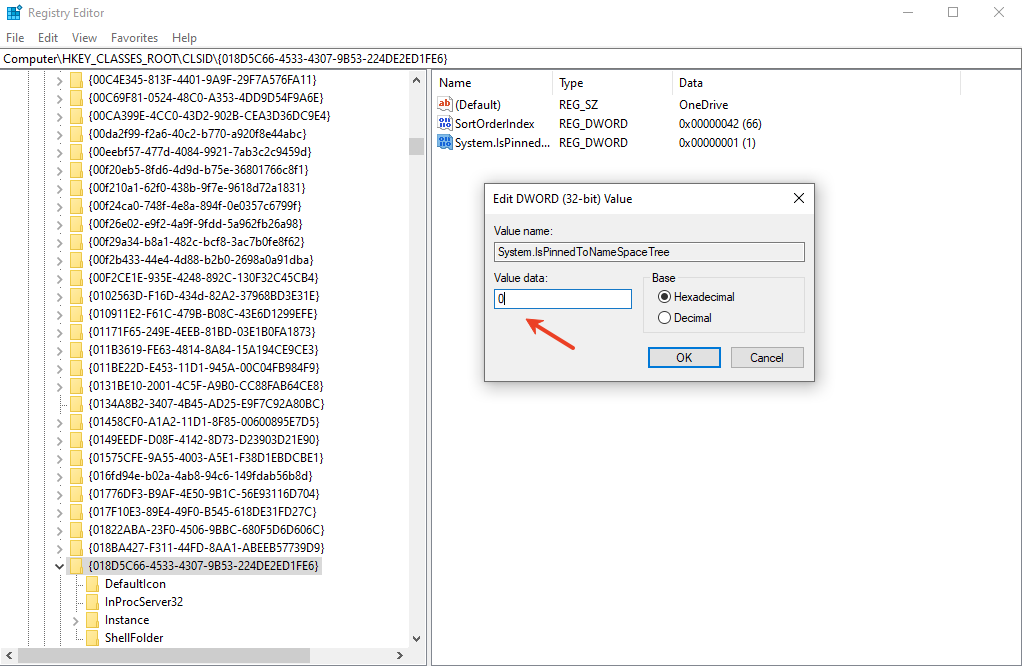
- Step 3: Find the key System.IsPinnedToNameSpaceTree.
- Step 4: Double-click it and change the Value Data from
1to0.
Phase 3: A Comprehensive Strategy to Recover Your OneDrive Data
When users execute the steps for “how do i completely remove onedrive personal from my computer,” the most common unintended consequence is the disappearance of local folders that were previously “synced” but not “downloaded.” To address this, you need a holistic recovery strategy that covers both cloud and local storage.
Beyond the App: How to Recover Deleted Files from OneDrive Successfully
If you discover missing data post-uninstallation, don’t lose hope. A truly comprehensive approach involves three distinct layers of recovery:
1. The Cloud Safety Net (Online Recycle Bin) Before assuming the data is gone forever, log in to OneDrive.com. Microsoft’s server-side Recycle Bin acts as a buffer. Even if the application is removed from your PC, the cloud might still hold your files for 30 days. This is often the first step in Restore your OneDrive files.
2. The Windows “Previous Versions” Feature If you have “System Protection” enabled, Windows might have captured a Shadow Copy of your OneDrive folder. By right-clicking the parent folder and selecting “Restore previous versions,” you might find your files as they existed before the uninstallation.
3. Advanced Local Recovery with PandaOffice Drecov When the cloud bin is empty and system snapshots are missing, the files are likely “orphaned” on your hard drive. This is where professional-grade software becomes indispensable. PandaOffice Drecov is specifically engineered to handle the complexities of NTFS and ReFS file systems where OneDrive typically resides.
Why Use PandaOffice Drecov?
Unlike standard undelete tools, PandaOffice Drecov is optimized for modern SSDs and complex file structures created by cloud syncing services. It bypasses the operating system’s file markers to find data that has been “orphaned” by the uninstallation process.
Step-by-Step Recovery Guide
- Step 1: Installation and Selection
Download and install PandaOffice Drecov on a drive different from where your OneDrive files were stored (to avoid overwriting data). Launch the program and select the primary partition (usually C:) where your User profile resides.
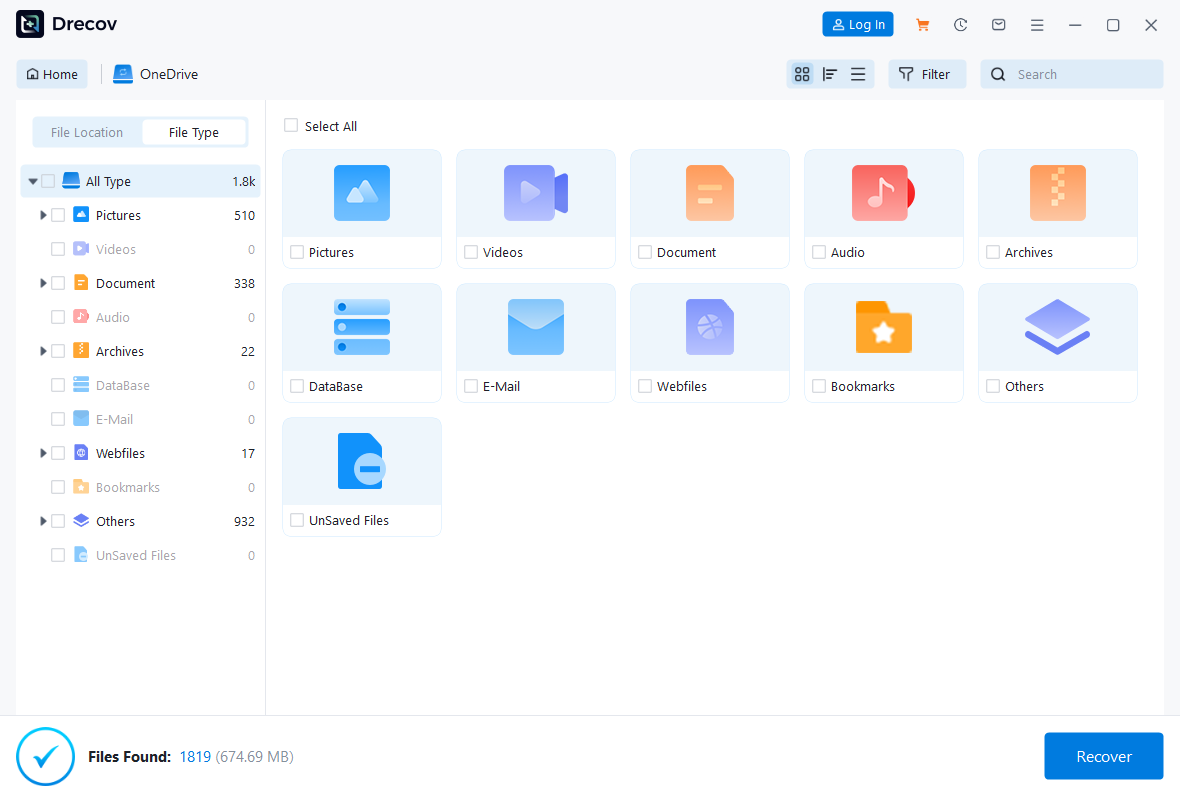
- Step 2: Deep Scanning
Click the Scan button. The software will perform a Quick Scan followed by a Deep Scan. The Deep Scan is essential here because cloud-synced files often leave fragmented signatures that require bit-by-bit analysis.

- Step 3: Filtering for OneDrive Paths
Once the scan is complete, use the search bar or the folder tree on the left. Look specifically for paths like:
C:\Users\[YourUsername]\OneDrive or C:\Users\[YourUsername]\Documents.
- Step 4: Preview and Validate
PandaOffice Drecov allows you to preview images and documents before recovery. This ensures the file is intact and not a corrupted “placeholder” file.
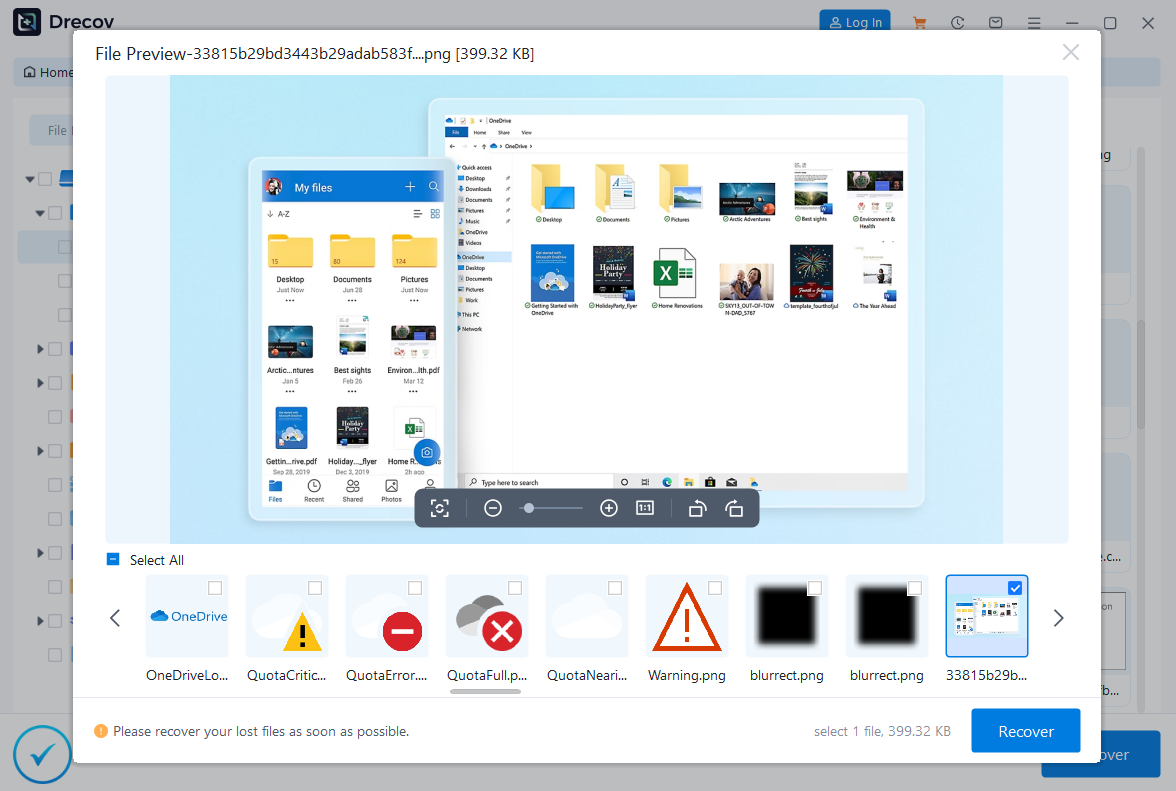
- Step 5: Secure Recovery
Select the files you need and click Recover. Choose an external drive or a secondary internal disk as the destination.
How can i remove onedrive from windows FAQs
Q1: Will removing OneDrive delete my photos?
No. Your photos remain in the cloud at OneDrive.com. However, if you didn’t download them before uninstalling, they will no longer appear in your local “Pictures” folder.
Q2: How do I stop OneDrive from coming back after a Windows Update?
The Group Policy method (Method 2) is the most effective way to prevent Windows from “helpfully” reinstalling the service during major feature updates.
Q3: Can I just remove the “Personal” account and keep a “Work” account?
Yes. In OneDrive Settings > Account, you can “Unlink this PC” for your personal email specifically while keeping your corporate account active.
Q4: Is it safe to delete the OneDrive folder in my User directory?
Only after you have unlinked the account. If you delete it while it is still syncing, it might delete the files from the cloud as well.
Conclusion
Understanding how do i completely remove onedrive personal from my computer is about more than just clicking “Uninstall.” It involves cleaning the registry, managing system policies, and ensuring your data remains accessible. By following the steps outlined—from the Command Prompt purge to the registry cleanup—you can achieve a truly “clean” system. Should you lose any files during this transition, tools like PandaOffice Drecov provide a reliable safety net to restore your digital life.


