


Imagine this: You are in the middle of a high-stakes presentation. Suddenly, your laptop slows to a crawl. You notice a tiny blue cloud icon in your taskbar spinning frantically, uploading 5GB of “temporary” video edits you never intended to sync. Your local disk space is vanishing, and your bandwidth is being throttled by a service you barely remember setting up. This scenario is exactly why many power users and privacy-conscious individuals seek to learn how to disable Microsoft OneDrive to regain control over their file management and system resources.
While OneDrive is a powerhouse for collaboration, its aggressive integration into Windows can feel intrusive. Whether you prefer local storage, use a competing service like Dropbox, or simply want to stop the constant sync notifications, knowing the right way to sever the tie is essential.
What is Microsoft OneDrive?
Before we dive into the technicalities of how to disable Microsoft OneDrive, it is crucial to understand what this service actually is and why it’s so deeply embedded in your Windows ecosystem.
Microsoft OneDrive is a cloud-based storage service that serves as the backbone of Microsoft’s “modern workplace” vision. It is designed to act as a bridge between your local device and the cloud, automatically syncing folders like Desktop, Documents, and Pictures. For many, it is a lifesaver: it allows you to start a Word document on your PC and finish it on your smartphone, or recover an older version of a file thanks to its “Version History” feature.
However, OneDrive’s integration is often “aggressive” by design. It utilizes a feature called Files On-Demand, which shows you your files in File Explorer even if they aren’t actually stored on your hard drive. While this saves disk space, it can lead to confusion and frustration. Users often find their internet bandwidth consumed by background uploads, or discover that their most important files are inaccessible when they are offline. For those who value privacy or prefer manual backups, the constant “syncing” status becomes a nuisance rather than a benefit. Understanding these mechanics is the first step in deciding which method to use when you search for how to disable Microsoft OneDrive.
Part 1: Comprehensive Methods on How to Disable Microsoft OneDrive
Disabling OneDrive isn’t a one-size-fits-all task. Depending on your Windows version (Home vs. Pro) and how deeply you want to remove it, different paths exist. Here is the logical progression of methods, from the simplest to the most advanced.
Method 1: Unlinking the Account (The “Soft” Disable)
If you want to stop syncing without deleting the app, unlinking is the best first step. This stops the “How to disable Microsoft OneDrive” search right in its tracks for casual users.
- Step 1: Click the OneDrive icon (blue or white cloud) in your system tray.
- Step 2: Click the Settings (gear icon) and select Settings from the menu.
- Step 3: Navigate to the Account tab.
- Step 4: Click Unlink this PC. Confirm by clicking Unlink account in the pop-up.
Method 2: Pausing Sync and Disabling Startup
To keep the app installed but dormant, you should prevent it from launching when you boot your PC.
- Step 1: Press
Ctrl + Shift + Escto open Task Manager. - Step 2: Click the Startup apps tab.
- Step 3: Locate OneDrive, right-click it, and select Disable.
Method 3: Using Group Policy Editor (Windows Pro/Enterprise)
For a more permanent solution that prevents the app from running at a system level, the Local Group Policy Editor is the professional’s choice.
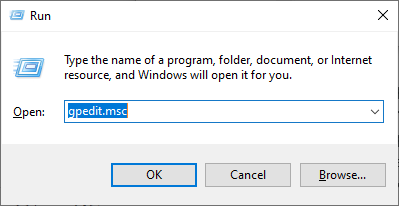
- Step 1: Press
Win + R, typegpedit.msc, and hit Enter. - Step 2: Navigate to:
Computer Configuration>Administrative Templates>Windows Components>OneDrive.

- Step 3: Double-click the policy named Prevent the usage of OneDrive for file storage.
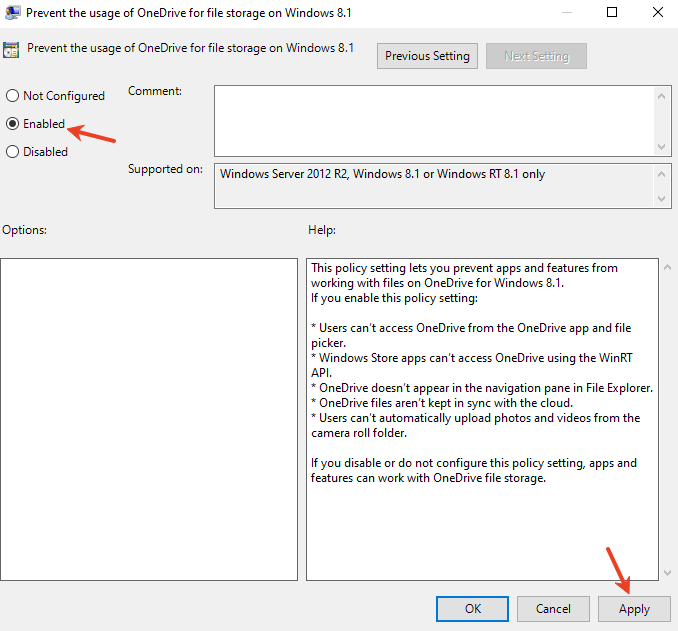
- Step 4: Select Enabled, then click Apply and OK.
Method 4: Modifying the Windows Registry (Windows Home)
If you don’t have access to Group Policy, you can achieve the same result via the Registry.
Warning: Always back up your registry before making changes.
- Step 1: Press
Win + R, typeregedit, and press Enter.
- Step 2: Navigate to:
HKEY_LOCAL_MACHINE\SOFTWARE\Policies\Microsoft\Windows.
- Step 3: Right-click Windows, select New > Key, and name it
OneDrive. - Step 4: Inside the OneDrive key, right-click, select New > DWORD (32-bit) Value, and name it
DisableFileSyncNGSC. - Step 5: Double-click it and set the Value data to
1.
Part 2: Why Do Files “Disappear” After Disabling OneDrive?
The moment you finalize the process of how to disable Microsoft OneDrive, a sudden wave of panic often sets in. You open your “Documents” or “Desktop” folder, and it appears empty, or your shortcuts have turned into broken white icons. To the average user, it looks like a catastrophic data wipe. However, the reality is rooted in Windows’ folder redirection and the “Files On-Demand” architecture.
When OneDrive is active, it doesn’t just copy your files; it hijacks the default user paths. Your local C:\Users\Name\Documents is redirected to C:\Users\Name\OneDrive\Documents. If you disable the service without first moving these files back to a local-only directory, Windows may lose the “map” to your data. Furthermore, if you were using the Files On-Demand feature, many of those files were never actually on your hard drive—they were “ghost” files (placeholders). Once the sync engine is killed, the link to the cloud is severed, and those placeholders become inaccessible, leading many to search frantically for recovery solutions after learning how to disable Microsoft OneDrive.
Part 3: The Aftermath—Recovering Data After Disabling OneDrive
A common side effect of learning how to disable Microsoft OneDrive is the sudden “disappearance” of files. Because OneDrive often redirects your Desktop, Documents, and Pictures folders to the cloud, disabling the service can leave these local folders empty.
If you find that your important work has vanished after unlinking or uninstalling, don’t panic. You can recover these files using professional-grade tools like PandaOffice Drecov.
Understanding Data Loss Post-Disablement
When OneDrive is disabled, the “Files On-Demand” feature may remove the local cache of your documents to save space, leaving only “placeholders.” If the connection is severed improperly, these files become inaccessible.
How to Use PandaOffice Drecov for Data Recovery
PandaOffice Drecov is specifically designed to handle deep-sector scanning, making it ideal for retrieving files that were managed by cloud sync engines.
- Step 1: Launch and Select Location. Open PandaOffice Drecov. On the main interface, select the drive where your OneDrive folder was located.

- Step 2: Initiate Deep Scan. Click the Scan button. The software will perform a Quick Scan followed by a Deep Scan to locate file fragments that the Windows indexing system might have missed.
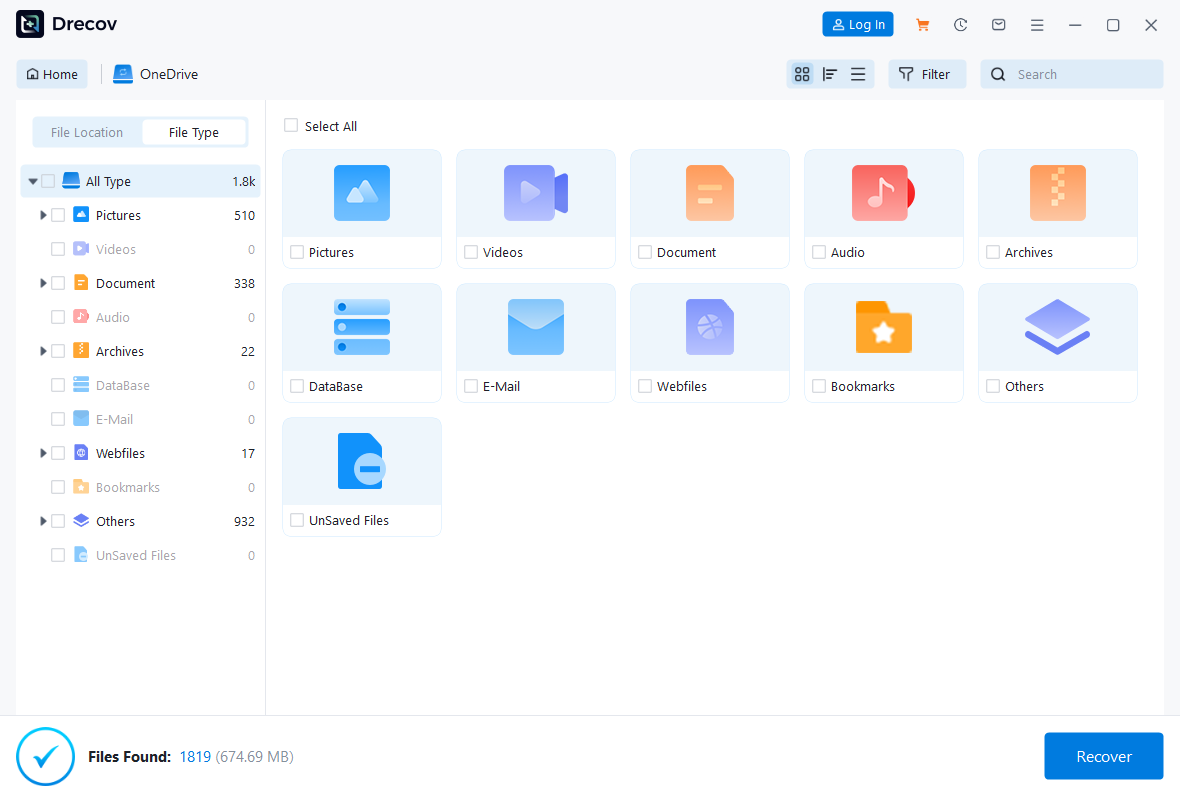
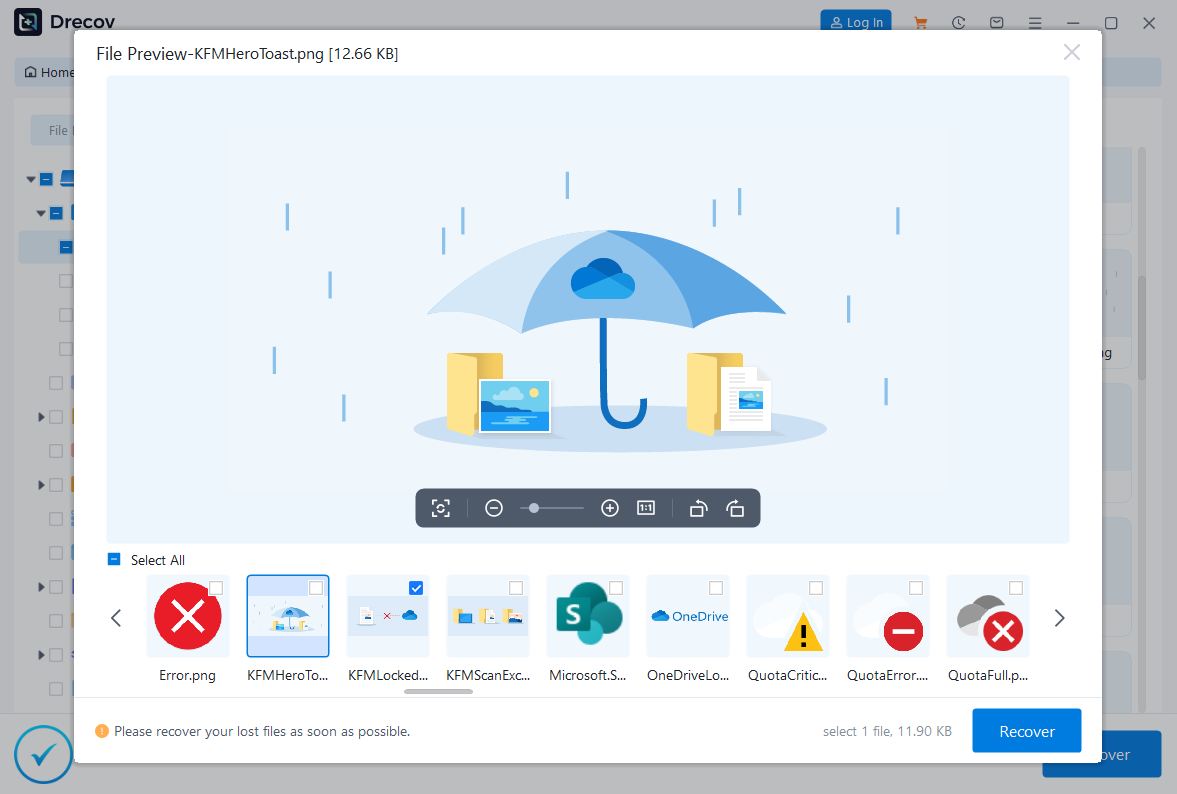
- Step 3: Filter and Preview. Use the file type filter (e.g., .docx, .jpg) to narrow down results. Drecov allows you to preview files before recovery to ensure they aren’t corrupted.
- Step 4: Execute Recovery. Select the files you need and click Recover. Ensure you save these files to an external drive or a different partition to prevent overwriting the data you are trying to save.
Part 4: Best Practices for Post-OneDrive File Management
Once you have successfully mastered how to disable Microsoft OneDrive, you shouldn’t leave your data in a vacuum. Transitioning to a local-first workflow requires a new set of habits to ensure your PC remains organized and your data remains safe.
- Redirect Your Libraries Manually: After disabling the sync, right-click your Desktop, Documents, and Pictures folders, go to Properties > Location, and click Restore Default. This ensures Windows looks at your local disk again rather than an empty OneDrive path.
- Implement the 3-2-1 Backup Rule: Since you no longer have automatic cloud syncing, you are responsible for your own backups. Keep 3 copies of your data, on 2 different media types (e.g., an internal SSD and an external HDD), with 1 copy offsite (perhaps a different, less intrusive cloud provider or a physical drive at a different location).
- Use Lightweight Alternatives: If you still need occasional file sharing but hate the bloat of OneDrive, consider using Portable Sync Tools or browser-based uploads. This gives you the benefits of the cloud without the system-level interference.
- Keep a Recovery Tool Handy: Data loss often happens when we least expect it—during Windows updates or software uninstalls. Keeping a licensed copy of PandaOffice Drecov on a bootable media ensures that even if a future update tries to force-enable or reconfigure your storage, you can undo any accidental deletions instantly.
How do i turn off onedrive in windows 10 FAQs
Q1: Will I lose my files if I disable OneDrive?
Nope! Your files stay securely on the OneDrive servers. However, since the local folder might become empty after unlinking, it’s always good practice to check the official Microsoft support guide to see how Windows handles file placeholders during the transition.
Q2: How to disable Microsoft OneDrive on a Mac?
Click the OneDrive icon in the menu bar, go to Settings, and select Quit OneDrive. To prevent it from starting up, go to System Settings > General > Login Items and remove OneDrive.
Q3:Can I simply uninstall Microsoft OneDrive instead of just disabling it?
Absolutely. If you want a more permanent solution than just pausing the service, you can remove it entirely. Go to Settings > Apps > Installed Apps, locate Microsoft OneDrive in the list, and click the Uninstall button. Advanced Ways to Completely Remove OneDrive.
Q4: Why does OneDrive keep coming back after updates?
Windows updates sometimes reset “essential” services. Using the Registry or Group Policy methods (Methods 3 and 4) is the best way to ensure it stays disabled permanently.
Conclusion
Mastering how to disable Microsoft OneDrive is about taking back ownership of your operating system. Whether you choose to simply unlink your account, use the Registry to block the service, or utilize Group Policy for a permanent ban, the steps provided ensure a cleaner, faster PC experience. Remember, if files go missing during the transition, tools like PandaOffice Drecov act as a vital safety net to restore your digital life. By following this guide, you can balance the power of the cloud with the stability of local storage.


