


In the modern digital landscape, cloud storage has become a cornerstone of productivity. However, many users find that Microsoft’s aggressive integration of its cloud service can be more of a hindrance than a help. If you are looking for how to disable OneDrive Windows 11, you have come to the right place. This comprehensive guide will walk you through every method available, from simple setting tweaks to advanced registry modifications, while ensuring your data remains safe and recoverable.
What is OneDrive and Why Is It Enabled by Default?
Overview of OneDrive Integration in Windows 11
If you’ve ever set up a fresh Windows 11 PC, you probably noticed that OneDrive quietly integrates itself into your system without asking too many questions. It’s like that roommate who moves in and starts organizing your stuff before you’ve even unpacked. Microsoft designed OneDrive as a cloud storage solution that seamlessly syncs files between your computer and the cloud, making them accessible across devices. From your desktop files to documents and photos, everything can be automatically backed up.
Windows 11 goes a step further by embedding OneDrive into the File Explorer. This means your files aren’t just stored locally—they’re often synced in real time. While this is convenient for many users, especially those who work across multiple devices, it can feel intrusive for others. The default setup often enables automatic syncing, which may not align with your preferences. This deep integration is why many users search for windows 11 disable onedrive instructions shortly after booting up a new machine.
Benefits and Drawbacks of Using OneDrive
There’s no denying that OneDrive has its perks. It offers automatic backup, easy sharing, and access from anywhere. Imagine working on a document at home and instantly picking it up from your office laptop—pretty neat, right? The “Files On-Demand” feature also allows you to see all your cloud files in File Explorer without them taking up space on your hard drive until you need them.
But let’s flip the coin. OneDrive can consume system resources, use internet bandwidth, and sometimes even override your local file organization. Users with limited storage or slower internet connections often find it more frustrating than helpful. Furthermore, the sync process can sometimes lead to file conflicts or accidental deletions if multiple devices are involved. And then there’s the privacy angle—some people simply prefer keeping their data offline. So, how to disable OneDrive Windows 11 becomes less of a technical tweak and more of a personal choice for data sovereignty.
Why You Might Want to Disable OneDrive
Privacy Concerns
In today’s digital world, privacy isn’t just a buzzword—it’s a necessity. OneDrive automatically syncs files to the cloud, which means your data is stored on remote servers owned by Microsoft. While Microsoft employs strong security measures and encryption, not everyone is comfortable with their personal files, sensitive scans, or private documents being stored online.
If you handle sensitive information or just prefer full control over your data, disabling OneDrive can give you peace of mind. Think of it like locking your valuables in a safe instead of storing them in a shared vault. By learning how can i disable onedrive, you ensure that your “Local” folders stay strictly local.
Performance and Resource Usage
Have you ever noticed your system slowing down during file syncing? That’s OneDrive working in the background. It consumes CPU cycles, RAM, and significant network bandwidth, which can impact performance—especially on lower-end devices or during gaming sessions. For users on metered connections, the constant uploading of large files can also lead to unexpected data charges.
For gamers, content creators, or anyone who needs maximum performance, disabling unnecessary background processes like OneDrive can make a noticeable difference. It’s like removing extra weight from a car—you instantly feel the boost in responsiveness and system boot times.
Storage Limitations
OneDrive offers limited free storage (usually 5GB), and once you hit that cap, you’re prompted to upgrade to a paid subscription constantly. If you don’t want to pay for additional storage, you might prefer managing your files locally or using alternative solutions like external hard drives or NAS systems. When the storage is full, OneDrive often stops syncing or displays annoying “Storage Full” notifications, which is a primary motivator for users wanting to know how to disable OneDrive Windows 11.
Methods to Disable OneDrive in Windows 11
We have organized these methods in ascending order of technical difficulty. Whether you are a casual user or an IT professional, there is a solution here for you.
Method 1: Pause OneDrive Sync (Lowest Difficulty)
Steps to Pause Syncing
Pausing OneDrive is the simplest way to temporarily stop it without making permanent changes. This is perfect if you are on a slow Wi-Fi connection or need every bit of CPU power for a specific task.
- Step 1: Locate the OneDrive icon (the little blue or white cloud) in the system tray at the bottom right of your taskbar. (If you don’t see it, click the upward arrow ^).
- Step 2: Click the icon to open the OneDrive flyout menu.
- Step 3: Click on the Gear icon (Settings) in the top right corner.

- Step 4: Hover over Pause syncing and select a duration: 2 hours, 8 hours, or 24 hours.
Key Point: This is a temporary fix. OneDrive will automatically resume syncing once the timer expires.
Method 2: Unlink OneDrive Account (Easy)
Steps to Unlink Your PC
If you want to stop syncing permanently but keep the app installed for potential future use, unlinking is the best answer to how can i disable onedrive.
- Step 1: Click the OneDrive icon in the system tray.
- Step 2: Click the Gear icon and select Settings.
- Step 3: On the left sidebar, click on the Account tab.
- Step 4: Click the link that says Unlink this PC.
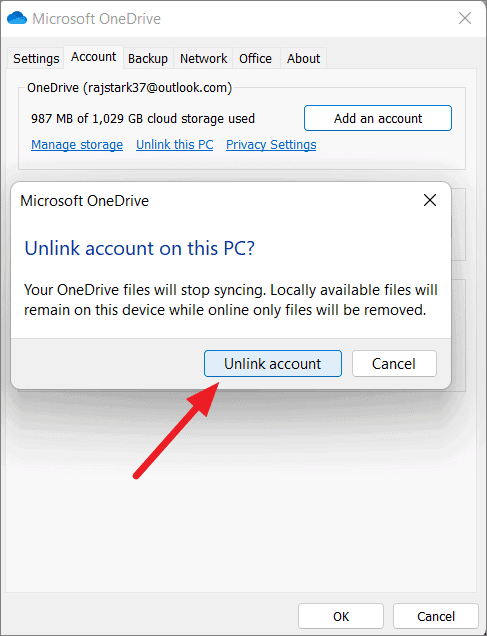
- Step 5: A confirmation window will appear. Click Unlink account.
After doing this, your files will remain on your computer, but they won’t sync with the cloud anymore. It’s like cutting the cord without moving out of the house.
Method 3: Disable OneDrive Startup (Medium Difficulty)
Using Task Manager
Even if you aren’t signed in, the OneDrive process often starts with Windows. Disabling the startup entry ensures it doesn’t eat resources from the moment you turn on your PC.
- Step 1: Press Ctrl + Shift + Esc on your keyboard to open the Task Manager.
- Step 2: Click on the Startup apps tab (icon looks like a speedometer).
- Step 3: Find Microsoft OneDrive in the list.
- Step 4: Right-click it and select Disable.
By doing this, you prevent OneDrive from launching when your computer starts. This effectively stops the “windows 11 disable onedrive” requirement at the boot level.
Method 4: Disable via Group Policy Editor (Advanced)
Step-by-Step Guide
This method is only available for Windows 11 Pro, Enterprise, or Education editions. It provides a “hard” disable that prevents the app from running at all.
- Step 1: Press Win + R, type
gpedit.msc, and hit Enter. - Step 2: In the left pane, navigate to:
Computer Configuration>Administrative Templates>Windows Components>OneDrive. - Step 3: In the right pane, find the policy named Prevent the usage of OneDrive for file storage.
- Step 4: Double-click it, select Enabled, then click Apply and OK.
Method 5: Disable via Registry Editor (Advanced/Home Users)
Registry Modification Steps
If you are using Windows 11 Home, you don’t have the Group Policy Editor. You must use the Registry Editor to achieve the same result.
- Step 1: Press Win + R, type
regedit, and press Enter. - Step 2: Navigate to the following path:
HKEY_LOCAL_MACHINE\SOFTWARE\Policies\Microsoft\Windows - Step 3: Right-click the Windows folder, select New > Key, and name it
OneDrive. - Step 4: Select the new OneDrive key. In the right pane, right-click and select New > DWORD (32-bit) Value.
- Step 5: Name it
DisableFileSyncNGSC. - Step 6: Double-click it and set the Value data to
1. Click OK.
Warning: Editing the registry can be risky. If you delete the wrong key, your system may become unstable. Always create a system restore point before proceeding.
Method 6: Uninstall OneDrive Completely (Final Solution)
Using Settings App
If you are certain you never want to use the service again, you can remove it entirely. This is the most thorough way to handle how to disable OneDrive Windows 11.
- Step 1: Press Win + I to open the Settings app.
- Step 2: Go to Apps > Installed apps.
- Step 3: Use the search bar to find Microsoft OneDrive.
- Step 4: Click the three dots (…) next to it and select Uninstall.
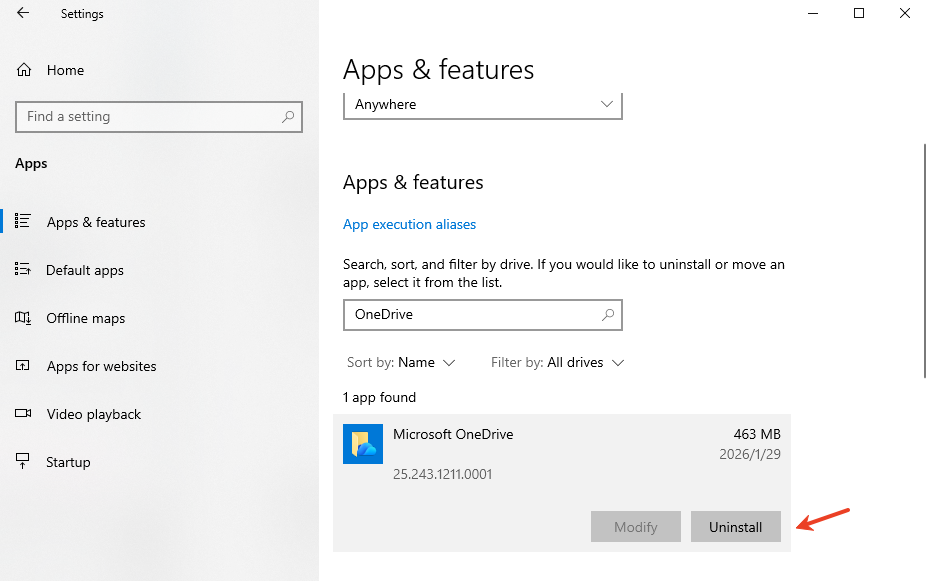
- Step 5: Follow the prompts to finish the removal.
Data Recovery: Recovering Files After Disabling or Uninstalling
Sometimes, when users attempt to windows 11 disable onedrive, they realize some of their files were “Online-only.” When the app is uninstalled or unlinked, those files may disappear from the local “OneDrive” folder in File Explorer because they were never actually downloaded to the hard drive.
If you find yourself missing important documents after following these steps, do not panic. This is where professional data recovery software becomes essential.
Introducing PandaOffice Drecov Tool
PandaOffice Drecov is a powerful yet user-friendly data recovery solution designed to retrieve lost, deleted, or formatted files. Whether your files were lost during a OneDrive sync error or deleted during an uninstallation process, Drecov can scan your drive and bring them back.
Install it on a drive different from the one where the files were lost to avoid overwriting data.
How to Use PandaOffice Drecov for File Recovery
- Step 1: Select Location: Launch the tool. You will see a list of drives. Select your C: drive (or the drive where your OneDrive folder was located).

- Step 2: Scan for Files: Click the Scan button. Drecov will perform a deep scan to find traces of files that were managed by OneDrive.

- Step 3: Preview and Recover: Once the scan is complete, browse through the results. You can use the search bar to find specific file names. Select the files you need and click Recover.

- Step 4: Save Safely: Choose a destination on an external drive or a different partition to save your recovered files.
Warning: Stop using your computer immediately if you notice files are missing. New data written to the disk can overwrite the space where your old files were stored, making recovery impossible.
Comparison of All Methods
| Method | Difficulty | Permanence | Best For |
| Pause Sync | Very Easy | Temporary | Short-term bandwidth saving |
| Unlink Account | Easy | Semi-permanent | Stopping cloud uploads while keeping the app |
| Disable Startup | Easy | Moderate | Speeding up PC boot times |
| Group Policy | Medium | Permanent | Pro/Enterprise users wanting a clean system |
| Registry Editor | Advanced | Permanent | Home users who want a deep disable |
| Uninstall | Easy | Permanent | Users who want OneDrive gone for good |
What Happens After Disabling OneDrive?
File Access and Local Storage
Once you have successfully mastered how to disable OneDrive Windows 11, your files will remain in their last known state. If the files were fully downloaded (indicated by a green checkmark), they will stay on your hard drive. If they were “online-only” (indicated by a blue cloud icon), you will no longer be able to open them without re-enabling OneDrive.
It is vital to check your C:\Users[YourUsername]\OneDrive folder. You may want to move these files to your standard “Documents” or “Pictures” folders to ensure they aren’t tucked away in a defunct OneDrive directory.
Effects on System Performance
Disabling OneDrive can significantly improve performance, especially on systems with limited resources. You’ll notice reduced background activity, faster startup times, and potentially better battery life on laptops. Furthermore, you will no longer see the “Syncing” overlays on your file icons, which can sometimes cause File Explorer to hang or refresh unexpectedly.
Best Practices Before Disabling OneDrive
Before you pull the plug on the service, follow these safety steps to ensure no data is lost:
- Download All Files: Right-click your OneDrive folder in File Explorer and select “Always keep on this device.” Wait for all icons to turn into solid green circles.
- Manual Backup: Copy your important files to an external USB drive or another cloud service like Google Drive or Dropbox.
- Check Redirection: Windows sometimes redirects your “Desktop” or “Documents” folders directly into the OneDrive path. Ensure you know where your actual files are stored.
- Official Support: For specific account issues, you can always refer to the official Microsoft OneDrive support page.
If you encounter issues where your default save location is stuck on the cloud, check out this guide on fixing Windows save as default location stuck on OneDrive.
Common Mistakes to Avoid
One common mistake is deleting synced folders from the OneDrive website or another device after unlinking your PC. If you ever relink the account, those deletions might sync back and delete your local files.
Another frequent error is uninstalling the app without checking if files were “Online-only.” This leads to the “disappearing file” syndrome. If this happens, remember to use PandaOffice Drecov as soon as possible. For more details on the removal process, read about how to uninstall OneDrive on Windows and Mac or learn to delete OneDrive the right way so you don’t lose your life’s work.
Disable Onedrive Windows 11 FAQs
1. Can I re-enable OneDrive after disabling it?
Yes, you can easily reinstall the app from the Microsoft Store or sign back into the settings menu if you change your mind.
2. Will disabling OneDrive delete my files?
No, disabling the service does not delete local files. However, it will cut off access to files that were only stored in the cloud and not downloaded to your PC.
3. Is it safe to uninstall OneDrive?
Yes, it’s completely safe and won’t affect core Windows 11 functionality. Windows will simply use local folders for your documents and pictures instead of the cloud-synced versions.
4. Does disabling OneDrive improve performance?
In many cases, yes—especially on systems with slower HDDs or limited RAM, as the background sync process is quite resource-heavy.
5. Which method is best for beginners?
Unlinking your account (Method 2) is the best balance of safety and effectiveness for most users.
Conclusion
Disabling OneDrive in Windows 11 isn’t just a technical adjustment—it’s about tailoring your system to your needs. Whether you’re concerned about privacy, performance, or storage, there’s a method that fits your situation perfectly. From simple tweaks like pausing sync to more advanced solutions like registry edits, you have full control over how OneDrive behaves—or whether it exists at all.
By taking these steps, you reclaim your system resources and ensure that your data stays where you want it. Remember to always keep a local backup, and if things go wrong, reliable tools like PandaOffice Drecov are there to help you recover what was lost.


