


Navigating the administrative landscape of Windows 11 is a fundamental skill for any power user. Whether you are troubleshooting system permissions or setting up a new device for a family member, knowing how to change administrator on windows 11 is the first step toward total system control. However, as a data recovery expert, I must warn you: modifying user accounts and permissions carries an inherent risk. If a profile becomes corrupted or a password is lost during the transition, you could find yourself locked out of your own files.
In this comprehensive guide, we will explore every method to change administrator windows 11 users need to know, ranging from simple Settings tweaks to advanced Command Prompt execution. Furthermore, we will integrate professional data recovery strategies using PandaOffice Drecov to ensure your digital life remains intact throughout the process.
Understanding Windows 11 Account Types
Before we dive into the “how-to,” it is vital to understand the “what.” Windows 11 distinguishes between Standard Users and Administrators.
- Standard Users can run apps and change settings that don’t affect other users.
- Administrators have full access to the computer and can make any changes, including installing software and accessing system files.
Transitioning between these roles requires precision. If you perform these steps incorrectly, you might accidentally strip yourself of permissions, necessitating a deep dive into recovery tools.
Method 1: Using Settings (The Simplest Way)
For 90% of users, the Settings app is the most straightforward path. This method is safe, user-friendly, and requires the least amount of technical knowledge.
How to change administrator account on Windows 11 via Settings
- Step 1: Press the Windows Key + I simultaneously to open the Settings menu.
- Step 2: On the left-hand sidebar, click on Accounts.
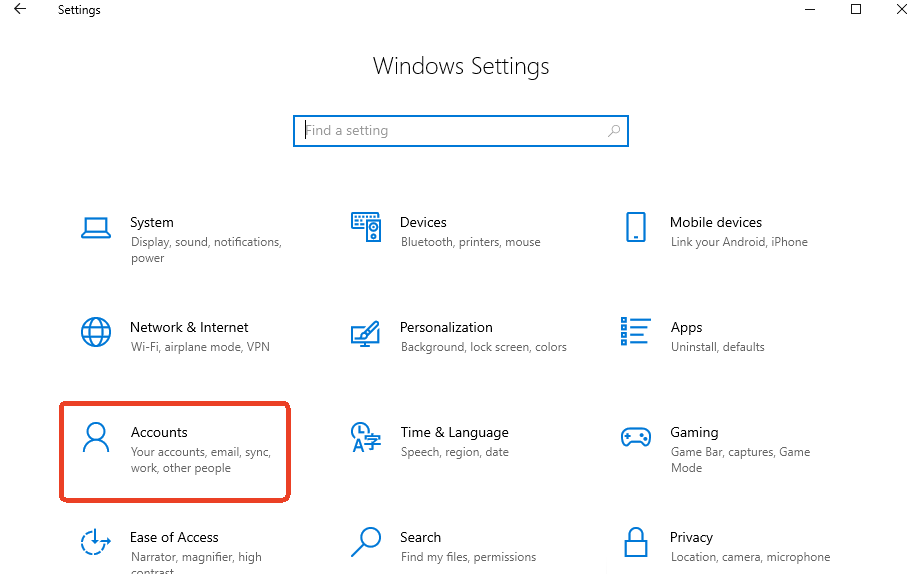
- Step 3: Select the Family & other users (or just “Other users”) tile.
- Step 4: Find the account you wish to modify under the “Other users” section and click the small arrow to expand it.
- Step 5: Click the Change account type button.
- Step 6: In the pop-up window, change the dropdown menu from Standard User to Administrator.
- Step 7: Click OK to save the changes.
Warning: Always ensure at least one active account has Administrator privileges before demoting your current account. Being left with only Standard accounts is a common cause for “Access Denied” errors that lead users to seek data recovery help.
Method 2: Using the Control Panel (Classic Approach)
If you prefer the “old school” Windows interface, the Control Panel remains a reliable tool. This is often more stable if the modern Settings app is lagging or crashing.
Change administrator account Windows 11 via Control Panel
- Step 1: Press the Windows Key, type
Control Panel, and hit Enter.
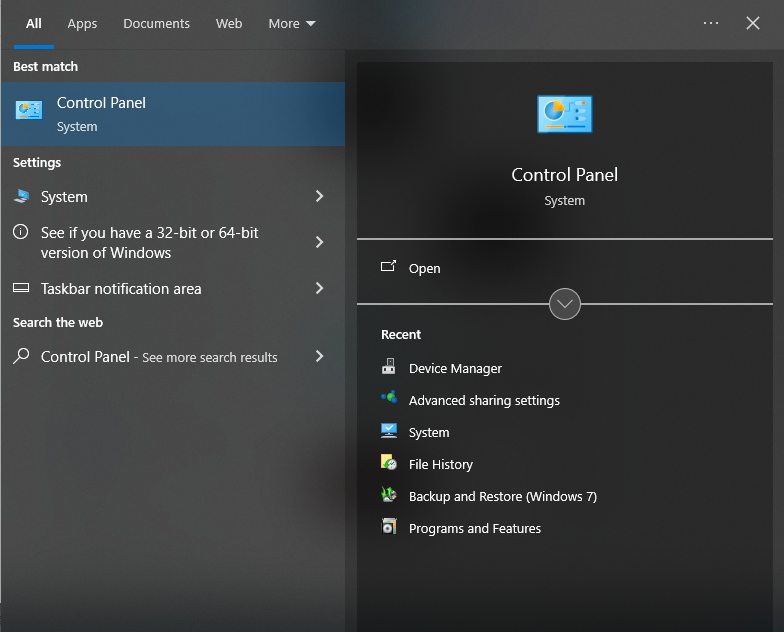
- Step 2: Set the “View by” option in the top right to Category.
- Step 3: Under the User Accounts section, click on Change account type.
- Step 4: Select the specific user account you want to elevate or demote.
- Step 5: Click Change the account type on the left side of the screen.
- Step 6: Select the Administrator radio button and click Change Account Type.
Method 3: Advanced User Management (netplwiz)
For those who want a more granular view of their system’s users, the netplwiz command is a hidden gem. It bypasses the flashy UI of Windows 11 for a more functional approach.
How to change Windows administrator using netplwiz
- Step 1: Press Windows Key + R to open the Run dialog box.
- Step 2: Type
netplwizand press Enter.
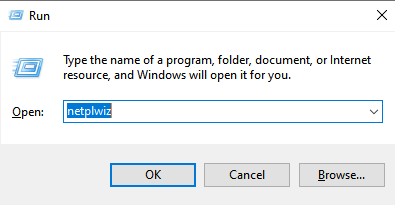
- Step 3: In the User Accounts window, select the user you want to edit.
- Step 4: Click the Properties button.
- Step 5: Navigate to the Group Membership tab.
- Step 6: Select Administrator and click Apply, then OK.
Method 4: Command Prompt (The Pro Choice)
When the graphical interface fails—perhaps due to a system glitch or a partial profile corruption—the Command Line is your best friend. This method is incredibly fast but requires exact syntax.
Change administrator Windows 11 using CMD
- Step 1: Press the Windows Key, type
cmd, and select Run as administrator. - Step 2: To see all users on your system, type the following command and press Enter:
net user - Step 3: To change a user to an administrator, type the following command (replace “UserName” with the actual name of the account):
net localgroup Administrators "UserName" /add - Step 4: If you need to remove administrator rights, use:
net localgroup Administrators "UserName" /delete
For more official documentation on user management, you can visit the Microsoft Support Page.
Method 5: Managing the Microsoft Account Email
Sometimes, “changing the administrator” doesn’t mean changing the user role, but rather updating the credentials associated with it.
How to change administrator email on Windows 11
- Step 1: Navigate to Settings > Accounts > Your info.
- Step 2: Under the “Account settings” section, click on Manage my accounts (this will open your browser).
- Step 3: Sign in to your Microsoft Dashboard.
- Step 4: Click on Your info in the top menu, then select Edit account info.
- Step 5: Here you can add a new email alias and set it as the Primary alias.
- Step 6: Once the new email is primary, you can remove the old one.
The Hidden Risk: Data Loss During Account Changes
Changing an administrator account seems like a routine task, but in the world of data recovery, we see things go wrong frequently. A “Profile Service Failed the Sign-in” error or a corrupted registry hive can suddenly make your C:\Users\[Name] folder inaccessible.
If you find that your files have disappeared after an account change, or if you accidentally deleted a user profile while trying to change administrator windows 11, you need a professional-grade recovery tool.
Recovering Lost Data with PandaOffice Drecov
PandaOffice Drecov is a premier data recovery solution designed to handle the complex file structures of Windows 11. Whether your data was lost due to account deletion, partition formatting, or system crashes, Drecov can reconstruct the lost paths.
⚠ Warning: Install it on a drive different from the one where your data was lost to prevent overwriting.
Step 1: Select the Location
Launch the software. You will see a list of drives and common locations. Select the C: Drive or specifically the Desktop/Documents folder where your administrator files were stored.

Step 2: Scan for Lost Files
Click the Scan button. PandaOffice Drecov will perform a “Quick Scan” followed by a “Deep Scan.” The Deep Scan is essential for recovering data from deleted user accounts as it searches the raw sectors of the disk.

Step 3: Preview and Filter
One of Drecov’s best features is the preview mode. You can look at photos, documents, and spreadsheets before committing to the recovery. Use the filter sidebar to search for specific file types like .docx or .jpg.

Step 4: Execute Recovery
Select the files you need and click Recover. Choose a safe destination (like a USB drive) to save the recovered data.
Key Operation Point: Never save recovered files back to the same partition they were lost from. This prevents data corruption.
Warning Prompt: If your hard drive is making clicking noises, stop immediately. Software recovery is only for logical errors, not physical mechanical failure.
Proactive Data Protection Strategies
Knowing how to change administrator on windows 11 is only half the battle; protecting the data within those accounts is the other half.
The 3-2-1 Backup Rule
As a data recovery expert, I always recommend the 3-2-1 rule:
- Keep 3 copies of your data.
- Store them on 2 different media types (e.g., Internal HDD and Cloud).
- Keep 1 copy off-site (e.g., OneDrive or a physical drive at a relative’s house).
Maintaining System Health
Regularly check your disk health using the chkdsk command. If you notice your system slowing down significantly after you change administrator account windows 11, it may be a sign of underlying file system issues that PandaOffice Drecov can help mitigate if a crash occurs.
More Data Recovery Resources
Managing accounts and ensuring data integrity is a continuous process. If you are moving between different versions of Windows, the steps can vary slightly, and the risks to your data remain just as high.
For a specialized look at how these processes work on older systems, check out our guide on how to change administrator on Windows 10 . This resource is invaluable if you are managing a fleet of computers with mixed operating systems.
How to change administrator account on windows 11 FAQs
Q1: I lost my only administrator password and cannot log in. What are my options?
A: This is a critical situation that often requires entering the Windows Recovery Environment (WinRE). From there, you can use the Command Prompt to activate the hidden “built-in” administrator account using the command net user administrator /active:yes. If you manage to regain access but find your profile folders empty, it is likely the system created a temporary profile. In such cases, using PandaOffice Drecov is the most reliable way to scan the drive and pull your original files from the “Users” directory before they are overwritten.
Q2: Does changing the account type from Standard to Administrator delete my existing files?
A: No, simply changing the account type (elevating or demoting) does not delete your personal files, photos, or documents. However, if you choose to change administrator windows 11 by deleting an old account and creating a brand new one, Windows will ask if you want to keep or delete the files. If you accidentally select “Delete Files,” you will need a data recovery tool immediately to undo that action.
Q3: Can I have multiple Administrator accounts on a single Windows 11 PC?
A: Absolutely. In fact, as a data recovery expert, I highly recommend having at least two accounts with administrator privileges. If one profile becomes corrupted due to a registry error or a failed Windows Update, you can log into the secondary admin account to fix the primary one. This redundancy acts as a first line of defense against being locked out of your own hardware.
Q4: What should I do if the “Change account type” button is greyed out in Settings?
A: This usually happens because you are currently logged into a Standard User account and do not have the permissions to change your own status. To bypass this, you must log in as an existing Administrator. If no other admin account exists, you may need to boot into Safe Mode with Command Prompt to manually grant yourself privileges using the net localgroup command. Always ensure your data is backed up before performing these deep-system overrides.
Q5: Why did my desktop icons and documents disappear after I changed my administrator email?
A: When you change administrator email on windows 11, Windows sometimes treats it as a synchronization event. If you switched from a Local Account to a Microsoft Account (or vice versa), the system might have moved your files to a different sub-folder under C:\Users\. If you cannot find them, don’t panic. Run PandaOffice Drecov to perform a deep scan of the C: drive; it will find the original file paths even if the Windows indexing service has lost track of them.
Conclusion
To wrap up, mastering how to change administrator on windows 11 involves more than just clicking a few buttons. It requires an understanding of system permissions and a commitment to data safety.
- Use the Settings app for simple changes.
- Use Command Prompt for troubleshooting or automation.
- Always keep a backup before modifying user permissions.
- Keep PandaOffice Drecov ready in your toolkit for “just in case” scenarios.
By following these steps, you ensure that your transition to a new administrative setup is smooth, professional, and—most importantly—safe for your data.


