


In our digital-first world, USB flash drives remain the unsung heroes of data portability. However, there is nothing more frustrating than needing to save an urgent presentation only to be met with the dreaded “Disk is Full” notification. Learning how to clear usb storage is not just about hitting the delete key; it is about optimizing performance, ensuring data integrity, and occasionally, recovering what you thought was lost.
Whether you are a student, a creative professional, or someone just trying to organize family photos, this comprehensive guide will walk you through every method—from simple deletions to deep-level formatting—while keeping your data safe.
Understanding USB Storage Basics
What Is USB Storage and How It Works
USB storage devices are like tiny portable closets for your digital life. Whether it’s a flash drive, external SSD, or memory stick, these devices allow you to carry files anywhere without relying on internet access. When you plug a USB drive into your computer, the system treats it as an external storage unit, letting you read, write, copy, and delete files freely. It’s simple, fast, and incredibly convenient—until it suddenly fills up.
Behind the scenes, a USB drive uses NAND flash memory to store data, which means there are no moving parts like traditional hard drives. This makes them durable but also somewhat limited in terms of storage management. Over time, files accumulate—documents, photos, videos, system files—and before you know it, your USB is packed to the brim. You might even encounter situations where the drive appears full despite deleting files. That’s where understanding how to clear usb storage properly becomes essential.
Think of your USB drive like a backpack you never clean out. At first, everything fits perfectly. But after weeks of stuffing things inside, it becomes cluttered, heavy, and hard to manage. Clearing it regularly keeps it functional and efficient.
Common Reasons USB Storage Gets Full
It’s easy to underestimate how quickly a USB drive fills up. One large video file or a batch of high-resolution photos can eat up gigabytes in seconds. Many users also forget about duplicate files—copies of the same document saved multiple times—which silently consume valuable space. Temporary files and hidden system data can also take up room without you even noticing.
Another common issue is improper deletion. Sometimes, files appear to be removed but still occupy space due to system errors or hidden recycle bins (like the .Trashes folder on macOS). Malware or corrupted files can also block storage capacity, making it seem like your USB is full when it’s not.
All these factors combine to create a frustrating situation. You plug in your USB expecting to store something important, only to see that dreaded “storage full” message. Clearing your USB storage effectively requires more than just hitting the delete button—it involves understanding what’s really taking up space.
Why Clearing USB Storage Matters
Performance Improvement
A cluttered USB drive doesn’t just limit storage—it can also slow things down. When a USB is overloaded, file access becomes sluggish, transfers take longer, and the overall experience feels frustrating. This happens because the file system has to work harder to find contiguous free blocks to write new data. Clearing storage helps your device perform more efficiently, much like cleaning up a messy workspace helps you think clearly.
Imagine trying to find a single document in a pile of hundreds. That’s what your USB drive experiences when it’s packed with unnecessary files. By removing clutter, you make it easier for the system to locate and process data quickly. If you’ve noticed your transfer speeds dropping from 100 MB/s to a crawl, it’s time to learn how to clear usb storage.
Preventing File Corruption
Overloaded storage can also increase the risk of file corruption. When there’s little free space left, the system struggles to write new data properly, often leading to fragmentation. This can lead to incomplete file transfers or damaged files that won’t open.
Clearing your USB storage regularly reduces this risk. It ensures there’s always enough space for smooth operations, protecting your important files from unexpected errors. Furthermore, a clean drive is less likely to trigger “write protection” errors that occur when the controller detects a storage anomaly.
Things to Check Before Clearing USB Storage
Backing Up Important Files
Before you start deleting anything, take a moment to back up your important data. It’s surprisingly easy to accidentally remove something you didn’t mean to. Copy essential files to your computer’s local drive, a cloud service like Google Drive, or another physical storage device to avoid permanent loss.
Think of this step as a safety net. You hope you won’t need it, but you’ll be glad it’s there if something goes wrong. If you are planning a full format, this step is non-negotiable.
Checking for Hidden Files
Hidden files are like dust under the rug—you don’t see them, but they’re still there. Many operating systems hide system files or cached data by default, which can take up significant space. Revealing these files allows you to identify and remove unnecessary data that doesn’t show up in the standard view. We will cover how to clear usb storage by revealing these culprits later in the guide.
Method 1: Manually Deleting Files
Manual deletion is the most common way to free up space. It is ideal when you only need to remove a few specific items rather than wiping the whole drive.
Step-by-Step on Windows
- Step 1: Insert your USB drive into a USB port.
- Step 2: Open File Explorer (Win + E) and click on This PC.
- Step 3: Double-click your USB drive to view its contents.
- Step 4: Highlight the files or folders you want to remove. You can hold
Ctrlto select multiple individual files. - Step 5: Press the
Deletekey. - Step 6: Right-click your Recycle Bin on the desktop and select Empty Recycle Bin. Windows often “reserves” space for deleted files until the bin is emptied.
Step-by-Step on Mac
- Step 1: Plug in your USB drive. It should appear on your desktop or in the Finder sidebar.
- Step 2: Open Finder and navigate to the drive.
- Step 3: Select unwanted files and drag them to the Trash icon in your dock, or press
Command + Delete. - Step 4: You must empty the Trash while the USB is plugged in. Right-click the Trash and select Empty Trash. On macOS, the system creates a hidden folder on the USB called
.Trashes. If you don’t empty it, the files are still physically taking up space on the drive!
Method 2: Formatting USB Drive
If your drive is a mess and you want a fresh start, formatting is the most effective way to learn how to clear usb storage.
Quick Format vs Full Format
Formatting is like hitting the reset button.
- Quick Format: Removes the file system table, making the space “available” for new data. It is fast but doesn’t actually overwrite the old data.
- Full Format: Scans the entire drive for bad sectors and overwrites every bit of data with zeros. This is much slower but much more secure and thorough.
Step-by-Step Formatting Guide
For Windows users:
- Step 1: Open This PC.
- Step 2: Right-click your USB drive and select Format….
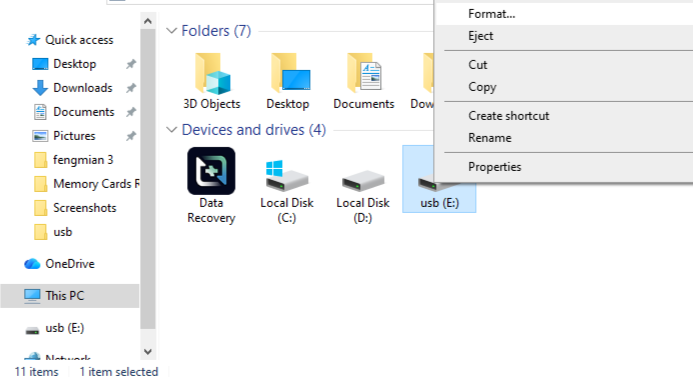
- Step 3: Choose the File System. Use FAT32 for maximum compatibility (but 4GB file limit) or exFAT for modern systems and large files.
- Step 4: Ensure “Quick Format” is checked if you are in a rush, or uncheck it for a deep clean.
- Step 5: Click Start and confirm the warning.
Method 3: Using Disk Management Tools
Sometimes a simple format through File Explorer fails. This is where system-level tools come in handy.
Windows Disk Management
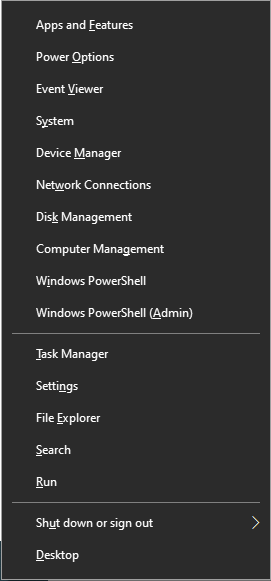
- Step 1: Right-click the Start button and select Disk Management.
- Step 2: Locate your USB drive in the list (usually Disk 1 or Disk 2).
- Step 3: Right-click the primary partition (the colored bar) and select Delete Volume.
- Step 4: Once it shows as “Unallocated,” right-click it again and select New Simple Volume.
- Step 5: Follow the wizard to assign a drive letter and format it. This solves issues where the USB doesn’t show its full capacity.
macOS Disk Utility
- Step 1: Press
Command + Spaceand type Disk Utility, then hit Enter. - Step 2: Select your USB drive from the external list on the left.
- Step 3: Click the Erase button at the top.
- Step 4: Choose a name and format (APFS for Mac-only, exFAT for cross-platform).
- Step 5: Click Erase to finalize the process.
Method 4: Removing Hidden and System Files
How Hidden Files Consume Space
Hidden files often include System Volume Information, thumbnails (.DS_Store on Mac), or temporary logs. Over years of use, these small files can add up to hundreds of megabytes or even gigabytes of “ghost” storage.
How to Reveal and Delete Them
On Windows:
- Step 1: Open your USB drive in File Explorer.
- Step 2: Click the View tab at the top.
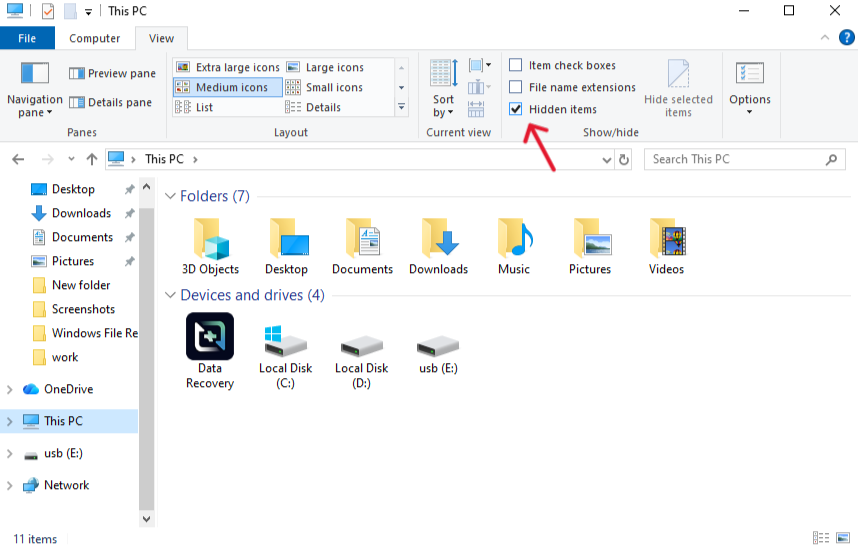
- Step 3: Check the box for Hidden items.
- Step 4: Review the newly visible items. Delete folders like
$RECYCLE.BINif they are unnecessarily large.
Data Recovery: What to Do If You Cleared Too Much?
Sometimes, in our enthusiasm to learn how to clear usb storage, we delete something vital. This is where professional tools like PandaOffice Drecov become lifesavers. Even after a format, data often remains on the disk; it’s just hidden from the OS.
Using PandaOffice Drecov for USB Recovery
PandaOffice Drecov is a powerful, user-friendly data recovery product designed to handle accidental deletions, formatted drives, and even RAW partition errors.
⚠ Warning: Install it on a drive different from the one where your data was lost to prevent overwriting.
- Step 1: Connect and Launch. Connect your USB drive to the PC and launch the PandaOffice Drecov software. Ensure the drive is recognized by the system.
- Step 2: Select the USB Drive. On the main interface, you will see a list of drives. Select your USB storage device from the “External Devices” section and click Scan.

- Step 3: Deep Scan for Files. The software will perform a Quick Scan followed by a Deep Scan. The Deep Scan is highly effective at finding files lost after formatting.Note: Do not unplug the USB during this process, as it could lead to further errors.

- Step 4: Preview and Filter. Once the scan is complete, use the filter sidebar to find specific file types (e.g., .jpg, .docx). PandaOffice Drecov allows you to Preview files before recovering them to ensure they aren’t corrupted.

- Step 5: Recover to a Safe Location. Select the files you want back and click Recover.
Warning: Never save the recovered files back onto the same USB drive immediately. Save them to your computer’s desktop or a different drive first to prevent overwriting the very data you are trying to save.
After you have successfully recovered your data, you might want to learn more about maintaining your drive. Check out these helpful resources:
- How to repair corrupted USB flash drive without losing data
- Wipe vs Format: How to clear a USB drive like an expert
- How to repair USB drive and recover data step-by-step
Troubleshooting USB Storage Issues
USB Not Showing Full Space
Is your 64GB drive only showing 2MB? This usually happens due to a corrupted partition table or if the drive was used as a “bootable” installer for Linux or Windows.
To fix this, use the Diskpart command on Windows:
- Open Command Prompt as Administrator.
- Type
diskpartand press Enter. - Type
list diskand identify your USB number. - Type
select disk X(replace X with your USB number). - Type
clean. Warning: This wipes everything. - Go back to Disk Management to create a new partition.
Files Not Deleting Properly
If you get an error saying “The file is in use” or “Access Denied,” try these tips:
- Check the physical “Lock” switch on the side of the USB (common on SD cards with USB adapters).
- Restart your computer to close any background programs accessing the drive.
- Run a Disk Check by right-clicking the drive -> Properties -> Tools -> Check.
Best Practices for Maintaining USB Storage
Regular Cleanup Habits
Don’t wait for the “Storage Full” error. Make it a habit to audit your USB drive every month. Move finished projects to long-term cold storage (like an HDD) and keep only the essentials on your thumb drive. This is the most proactive way to master how to clear usb storage.
Safe Ejection and Usage
We’ve all been guilty of “yanking” the USB out. However, if the OS is still writing data (even in the background), you risk corrupting the file system. Always use the “Safely Remove Hardware” icon in the Windows system tray or the “Eject” icon in Mac’s Finder.
Clear USB Storage FAQs
1. Does formatting a USB delete everything permanently?
Technically, a Quick Format only removes the “map” to the data. A Full Format or using a “Wipe” tool makes recovery much harder. If you are selling the drive, use a “Wipe” method.
2. Why is my USB still full after deleting files?
On Macs especially, this is usually because the Trash hasn’t been emptied while the drive is connected. On Windows, it could be hidden system files or a large “System Volume Information” folder.
3. Can I recover files after clearing USB storage?
Yes, if you used “Delete” or “Quick Format.” Tools like PandaOffice Drecov can scan the raw sectors of the drive to find files that haven’t been overwritten by new data yet.
4. How often should I clear my USB drive?
If you use it daily for transfers, a weekly “check-up” and a monthly “deep clean” (formatting) are recommended to keep the flash memory healthy.
5. Is it safe to remove system files from USB?
Usually, yes. Folders like RECYCLE.BIN or System Volume Information are recreated by the OS when needed. However, never delete folders you don’t recognize if you use the USB for specific software or encryption.
Conclusion
Mastering how to clear usb storage is a fundamental digital literacy skill. By understanding the difference between manual deletion and formatting, and by knowing how to handle hidden files, you ensure that your portable storage remains a reliable tool rather than a source of stress.
Remember, the goal is not just to free up space, but to do so safely. Always back up your data before a major clear-out, and keep a tool like PandaOffice Drecov in your digital toolkit just in case an “oops” moment happens. A well-maintained USB drive works faster, lasts longer, and keeps your important files accessible whenever you need them.


