






An “MBR missing” search often begins with a PC that will not boot, but the words on the screen may say “BOOTMGR is missing,” “Operating system not found,” or something else. Write down the exact message first. Then check whether the firmware can still see the Windows drive and whether the machine is starting in the same boot mode it used before. Do not run a boot-record command, initialize a disk, or reinstall Windows merely because an article uses the word MBR. If important files exist only on this machine, protect them before changing disk structures.
First identify what the boot message actually says
The master boot record is part of the traditional BIOS-and-MBR startup path. Newer Windows PCs commonly use UEFI firmware and a GPT disk instead. Those systems load Windows through an EFI System Partition, not through the same MBR boot code. If you do not know which arrangement your PC uses, that uncertainty is a reason to inspect it, not a reason to try both kinds of repairs.
Take a photo of the whole error screen. Include any drive name, code, or instruction below the headline. “BOOTMGR is missing” points to the Windows boot manager in a BIOS-style installation; it is not proof that the MBR itself disappeared. “No bootable device” can appear when the firmware selected the wrong device, the drive was not detected, or startup files cannot be read. A blinking cursor after the manufacturer’s logo gives even less information. Microsoft’s Windows boot troubleshooting reference separates these startup phases and cautions that an MBR repair does not fix every partition-table problem.
Note what changed shortly before the failure. A BIOS reset, a drive clone, an unplugged external device, or a partition operation suggests a different first check from a drive that began clicking or disconnecting. This history narrows the test; it does not justify modifying the disk without a backup.
Check detection and boot selection without writing to the drive
Does firmware list the internal drive?
Disconnect nonessential USB storage, then enter the firmware setup using the key displayed by your PC maker. In its storage or information screen, look for the internal drive’s model and plausible capacity. If the drive is absent, do not keep restarting or trying software scans. A loose connection, controller problem, or failed device may be involved. A laptop that is under warranty or difficult to open should be handled according to its manufacturer’s service advice rather than taken apart just to test a cable.
If the drive appears with the wrong capacity, disappears between restarts, or makes unusual mechanical sounds, treat the media as unstable. Repeated boot repair attempts can increase reads and writes without recovering a single file. Imaging by a qualified technician or professional data recovery may be safer than direct scanning.
Is the intended Windows entry first?
When the drive is detected consistently, check the one-time boot menu. A forgotten installation USB or another disk can take priority over the internal Windows entry. On UEFI systems, the entry may be named Windows Boot Manager rather than the physical drive model. Select the intended entry once and see whether the error changes. Do not change every firmware setting at once; record the original order so you can reverse a test.
Boot-mode changes matter after firmware resets. Switching between UEFI and Legacy/CSM can make a sound installation appear unbootable. Do not toggle the mode blindly. If someone recently changed it, restore the documented former setting. If you cannot determine the prior mode, inspect the disk layout from a trusted recovery environment before deciding what to change.
Protect the files before rebuilding startup records
A boot failure does not mean that the documents on the Windows partition are gone. Conversely, seeing a familiar drive name in firmware does not prove that every file is readable. First check an existing cloud or external backup from another device. Keep any BitLocker recovery information available before accessing an encrypted volume. Avoid a reset, clean installation, partition rebuild, or format until you know whether your only copy of important data is safe.
If the computer cannot reach Windows, you need an appropriate access route before trying recovery software. A Windows recovery environment can help diagnose startup, but a file-recovery application needs access to the original storage through its supported mode or through another working Windows computer. Do not install software onto the affected Windows partition. If moving a drive to another PC is not practical or safe, use a supported crashed-PC workflow or ask a technician for help. Keep the original disk unchanged while you choose the route.
At this point the decision is simple: if files matter and no verified copy exists, file protection comes before boot repair. The file-recovery overview covers that separate task. If a recent, complete backup has already been opened and sampled successfully, you can concentrate on restoring the startup path. A backup label alone is not proof that it contains the newest documents.
Drecov is Windows data recovery software, not an MBR repair utility. It can search a readable, stable Windows drive for local files using Quick Scan, Deep Scan when needed, filters, previews, and recovery to a separate healthy location. It also has a Lost Partition Recovery mode for a missing partition that remains recoverable. That mode retrieves data; it does not rebuild the partition table or make Windows boot automatically. The lost-partition guide explains the distinct recovery task.
Use this path only after arranging safe access to the original device. A PC that merely boots from the wrong USB drive does not need a recovery scan. A disk that vanishes, repeatedly disconnects, or produces severe read errors is not a good candidate for repeated direct scans. Drecov cannot repair physical damage, and no software can promise to retrieve fully overwritten data.
⚠ Warning: Install it on a drive different from the one where your data was lost to prevent overwriting.
Step 1: Select the original source
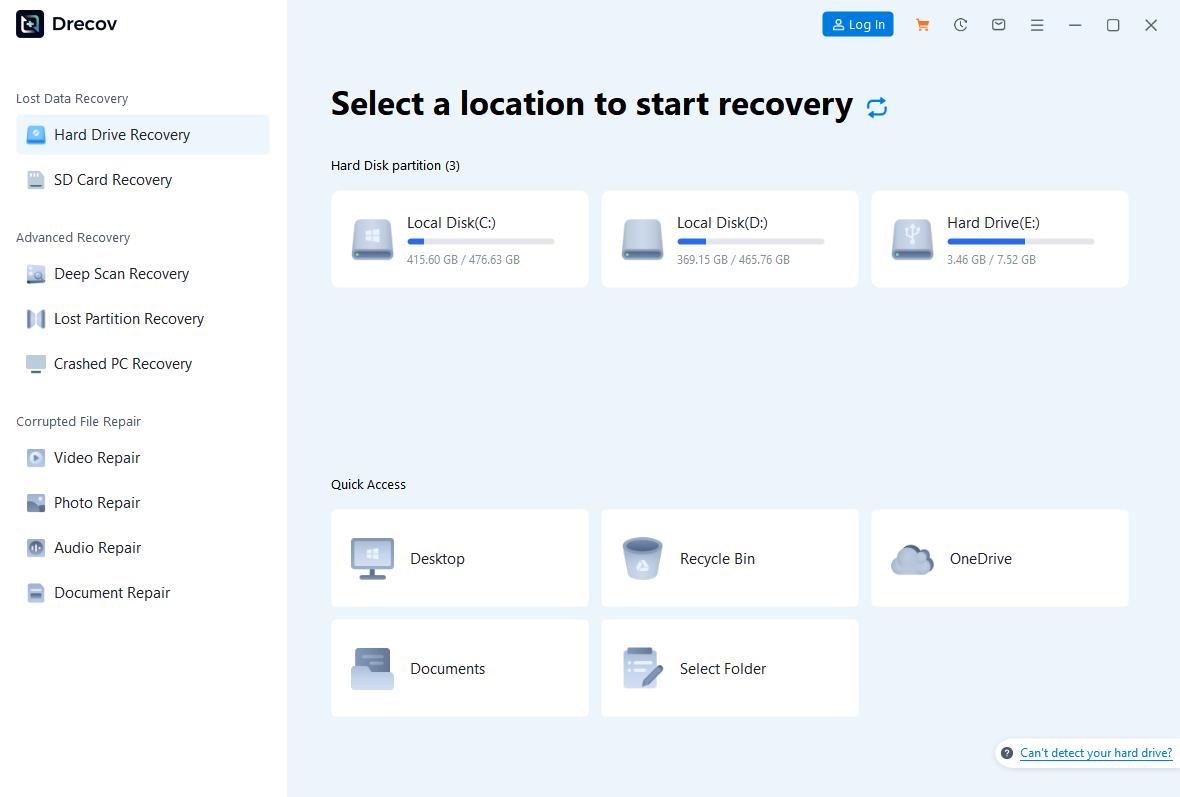
Prepare another healthy drive with room for recovered files. Open Drecov from a working Windows environment or its applicable supported crashed-PC route, then select the original Windows disk or partition that held your documents. If a partition is missing but the device is stable and readable, consider Lost Partition Recovery rather than guessing a new partition layout. Do not install Drecov on, or save output to, the affected disk.
Step 2: Scan and identify real files
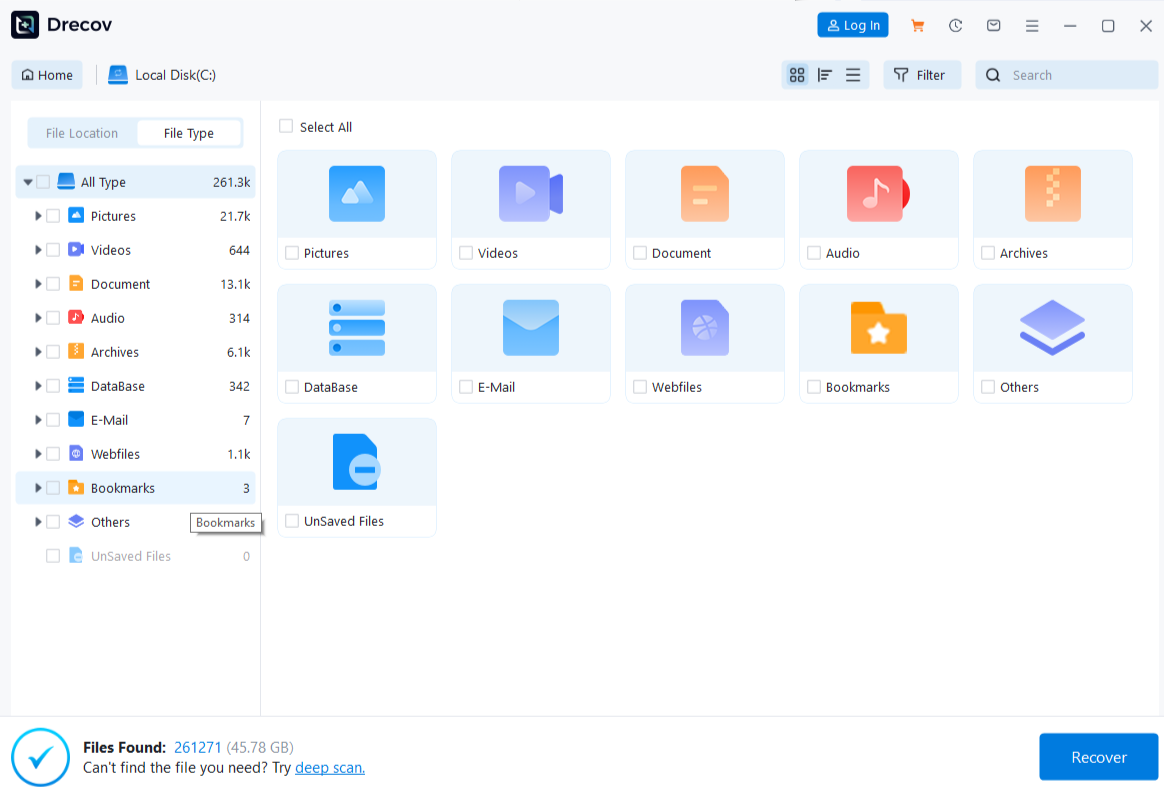
Start with Quick Scan. Browse the expected user folders and look for the document, photo, archive, or project types you actually need. If the target is absent and the device remains stable, run Deep Scan. Use available file-type, name, and path filters to narrow the results. Preview several representative files. A preview supports choosing candidates, but it does not certify every page, frame, or linked resource inside a recovered file.
Step 3: Recover elsewhere, then test
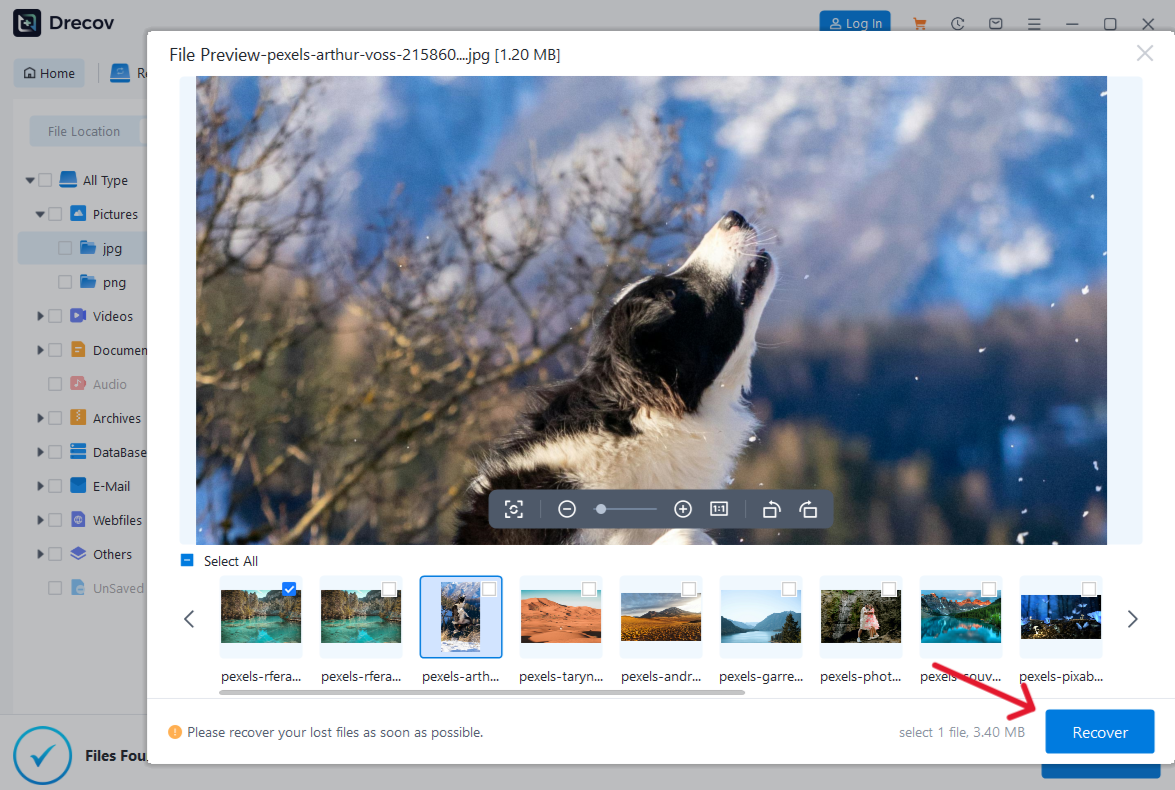
Recover selected files to the healthy destination, never back to the source disk. If output is not in the expected folder, check the Drecov folder or Recovery folder. Open a sample of documents and media, verify dates or contents, and compare them with your backup. Only then decide whether to repair Windows startup. If the scan stalls because the source disconnects or reports serious errors, stop instead of repeating it.
⚠ Warning: Install it on a drive different from the one where your data was lost to prevent overwriting.
Repair startup only after the data decision
When the drive is stable and important files are secured, Windows Startup Repair is a reasonable built-in first attempt. Boot from an appropriate Windows recovery or installation environment, choose Repair your computer rather than Install, and open Troubleshoot > Advanced options > Startup Repair. Select the Windows installation when prompted and let the tool report its result. A failed repair is information to interpret, not permission to run an online list of commands.
If Startup Repair cannot fix the problem, inspect the actual boot arrangement before choosing a command. An MBR-and-BIOS installation, a UEFI-and-GPT installation, and a disk with a damaged partition table require different approaches. Writing new MBR code does not restore a lost partition table and may not address a missing Windows Boot Manager. The separate MBR repair-tool explanation is useful once you have identified the correct target and have a verified copy of your files.
After any repair, remove the recovery USB and restart once from the intended internal entry. Verify that Windows signs in, then open several important files rather than treating a successful desktop as the entire test. If the error returns, capture its exact wording. A new message can show that the boot process advanced to another failing stage.
FAQs
Is “MBR missing” always the exact Windows error?
No. People often use it as shorthand for several startup messages. Photograph the actual wording before choosing a repair. “BOOTMGR is missing” and “No bootable device” do not by themselves prove the MBR code is gone.
Will repairing the MBR recover my files?
No. Boot repair changes how the PC starts; data recovery finds and copies files. Protect important files first when the drive is readable and no verified backup exists.
Can a UEFI computer have this problem?
A UEFI/GPT PC can fail to boot, but its usual Windows startup path uses an EFI System Partition rather than legacy MBR boot code. Check the firmware mode and disk layout before following MBR-specific directions.
Should I initialize a drive that Windows does not recognize?
Not while you still need files from it. Initialization writes storage metadata and is not a recovery step. An unstable or undetected drive needs a different diagnosis, possibly specialist help.
What if the drive disappears during a scan?
Stop scanning. Repeated disconnects indicate that direct software work may be unsafe or ineffective. Consider a controlled image or a professional recovery service.
Conclusion
When an MBR appears to be missing, first verify the exact message, drive detection, and boot mode. Those checks prevent a wrong repair on the wrong startup path. If the files matter, secure them before modifying boot records or partitions. Drecov can help retrieve local files from a stable, readable source and save them to another drive; it cannot repair a failing device or make the boot loader work. Test recovered files and the final Windows startup separately.
⚠ Warning: Install it on a drive different from the one where your data was lost to prevent overwriting.