






Drecov 2.1.3.0 is now available, adding support for running on Windows PCs powered by ARM processors. This release also improves image thumbnails, device detection when USB drives and external hard drives are connected or disconnected, and the handling of special characters in filenames. Lower memory use and interface fixes make the application smoother to use.
These changes support the everyday work of finding and saving lost files. You can browse smoother image thumbnails, work with improved removable-device detection, and recover files with fewer interruptions caused by filenames that do not meet system naming requirements.
What’s New in Drecov 2.1.3.0?
PandaOffice Drecov is Windows data recovery software for people looking for lost photos, videos, documents, emails, audio files and archives. It works with supported hard drives, SSDs, USB drives, SD cards, memory cards and external storage devices. Recovery scenarios include accidental deletion, formatting and partition loss when recoverable data remains on the device.
Drecov combines Quick Scan and Deep Scan with search, filtering and preview features. Its read-only scanning process searches the source storage without modifying it. After reviewing the results, you can select the files you need and save them to another healthy device. Version 2.1.3.0 expands computer compatibility and improves several parts of this process.
⚠ Warning: Install it on a drive different from the one where your data was lost to prevent overwriting.
- Windows on ARM support: Drecov can now run on Windows computers equipped with ARM processors.
- Smoother image thumbnails: Improved thumbnail rendering reduces jagged edges when browsing images.
- Improved removable-device detection: Optimized device detection for scanning when USB drives, external hard drives and similar devices are connected or disconnected.
- Interface display fixes: Resolved certain display issues for a smoother application experience.
- Better filename handling: Improved handling of special characters to avoid recovery failures caused by filenames that do not meet system requirements.
- Lower memory use: Reduced the application’s memory consumption for smoother operation.
Run Drecov on Windows PCs with ARM Processors
The main addition in this update is support for Windows computers powered by ARM processors. Users of these PCs can now run Drecov and begin the familiar process of selecting a source, scanning for lost files, reviewing results and recovering their selection.
For someone using an ARM-powered Windows computer as their everyday PC, this expands the available recovery workflow on that computer. If you need to look for files on supported storage, version 2.1.3.0 provides the application compatibility needed to get started. Install Drecov away from the location where data was lost, then choose the relevant source inside the application.
Once Drecov is running, the condition of the source storage remains important. Keep a connected drive stable throughout scanning and recovery, and prepare a separate destination with enough space for the files you want to save. Before beginning a new recovery attempt, check any existing backups for copies of the missing data.
Smoother Image Thumbnails for Browsing Scan Results
Drecov 2.1.3.0 improves image thumbnail rendering to reduce jagged edges and make displayed images look smoother. When you are browsing a large group of photos, thumbnail appearance helps you recognize subjects and decide which files deserve a closer look.
This is especially relevant when several results have similar names or when you remember a photo’s contents more clearly than its filename. A visual overview lets you look for familiar people, places or objects before opening individual previews. Smoother thumbnail rendering makes that overview more comfortable to browse.
After identifying a likely match, open its supported preview and inspect the details you need. Then save your selection and check the recovered image in your usual viewer. This gives you a more complete way to assess the file than relying on a small thumbnail alone. Learn more about the available workflow on the Drecov photo recovery.
Improved Detection of USB Drives and External Storage
This release optimizes device detection for scanning when removable storage is connected or disconnected. The improvement covers devices such as USB flash drives and external hard drives, helping Drecov handle changes in connected storage more smoothly as you prepare a scan.
When working with several storage devices, choosing the correct source is an important first step. Connect the device that held the missing files, allow it to be detected, and check the source selection in Drecov. Confirm the device details before starting so that you search the location where the files were actually stored.
Once a scan begins, keep the source connected until the operation is finished. If you need to remove it, stop the operation before disconnecting. A stable connection allows the application to continue reading the device while it searches for recoverable files. For device-specific recovery information, see the Drecov USB data recovery.
If a storage device repeatedly disconnects or reports severe read errors, stop repeated scanning and seek professional assistance. Also avoid accepting a format or initialization prompt while you still need the data. Those actions change the source storage and should wait until the required files have been recovered and verified.
Better Handling of Special Characters in Filenames
Finding a file and saving it to a destination are separate parts of recovery. A filename that does not meet the system’s naming requirements can cause the saving stage to fail, even when the file has appeared in scan results. Version 2.1.3.0 improves the handling of special characters to address this source of recovery failure.
For users, the benefit is fewer recovery interruptions caused by incompatible filenames. The update addresses the naming issue during the recovery process, helping files affected by this problem be saved to the selected destination.
If a previous recovery attempt failed because of a filename issue, update Drecov before making another attempt. Select a healthy destination with sufficient free space, recover the needed files and check the saved output. Open important documents, photos and videos in their usual applications to confirm that their contents are usable.
When checking the output, use file type, size and contents alongside the displayed name to identify the items you need. For a group of related files, check that the important items are present before organizing or moving the recovered copies. Keep the recovered output available until you have completed that review.
Lower Memory Use and Interface Display Fixes
Drecov 2.1.3.0 reduces memory consumption while the software is running. This improves resource efficiency and helps the application operate more smoothly as you work through recovery. The update also fixes certain interface display problems, improving the experience of using the application.
These improvements matter across a recovery session, from choosing a source to reviewing files and selecting a destination. They are relevant both to existing users updating their installation and to people starting a recovery attempt for the first time.
Actual performance will vary with the computer, connected storage and work being performed. A large device or a thorough deep scan can still require time. Keep the computer powered and the source connected while the scan runs, and leave enough room on the destination for your recovered selection.
Update Drecov and Start Recovering Files
Download the Windows installer from the official Drecov website and follow its installation prompts. If the missing files were stored on a local drive, choose an installation location away from the affected storage. Prepare another healthy device for the output before starting recovery.
Existing users who encountered thumbnail display issues, removable-device detection problems or filename-related recovery failures can use this release for their next attempt. Users of ARM-powered Windows PCs can now begin with version 2.1.3.0 as well. The steps below outline the recovery process.
⚠ Warning: Install it on a drive different from the one where your data was lost to prevent overwriting.
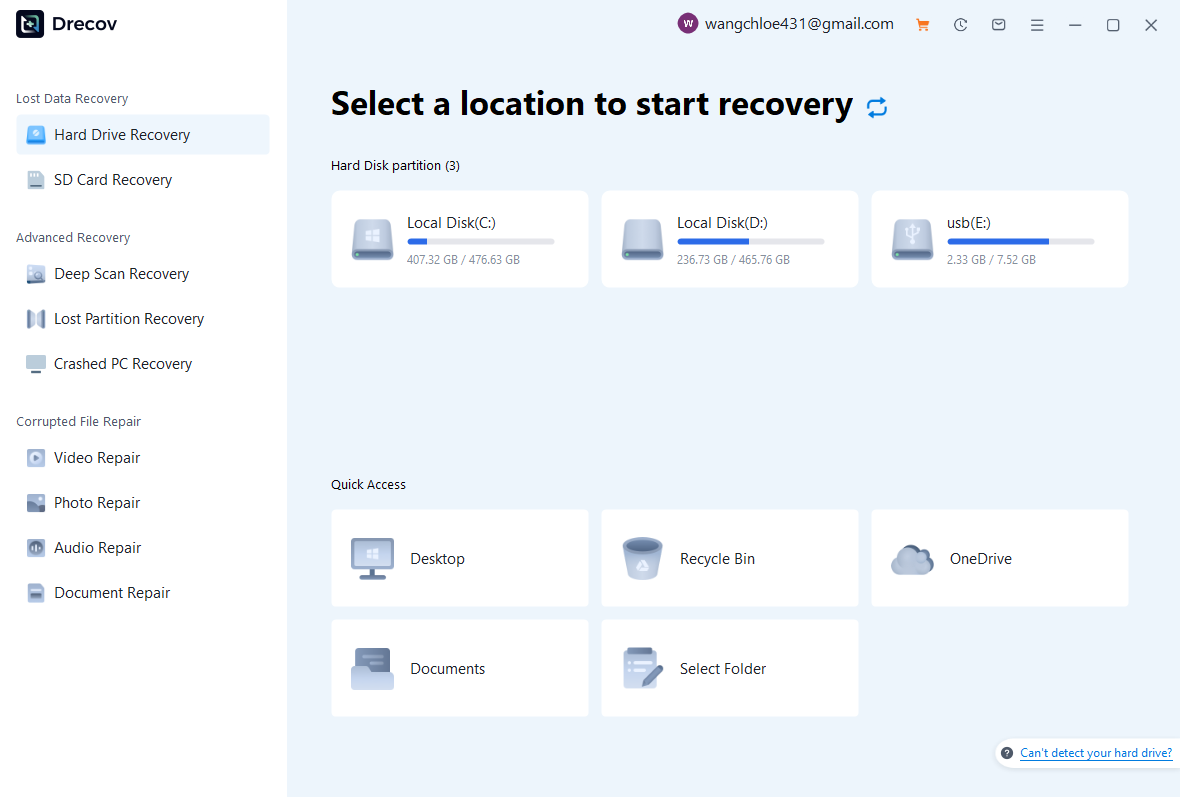
Step 1: Open Drecov and Select the Source
Launch Drecov and choose the location where the files were lost. Use the relevant recovery mode for your situation, such as Hard Drive Recovery, SD Card Recovery or Lost Partition Recovery. For removable storage, connect the source first and confirm that you are selecting the correct device.
Step 2: Scan for the Missing Files
Run Quick Scan and review its results. If it does not locate the files you need and the device remains stable, use Deep Scan for a more thorough search. Keep the original storage connected while scanning. If the device shows signs of physical failure, stop and seek professional recovery assistance.
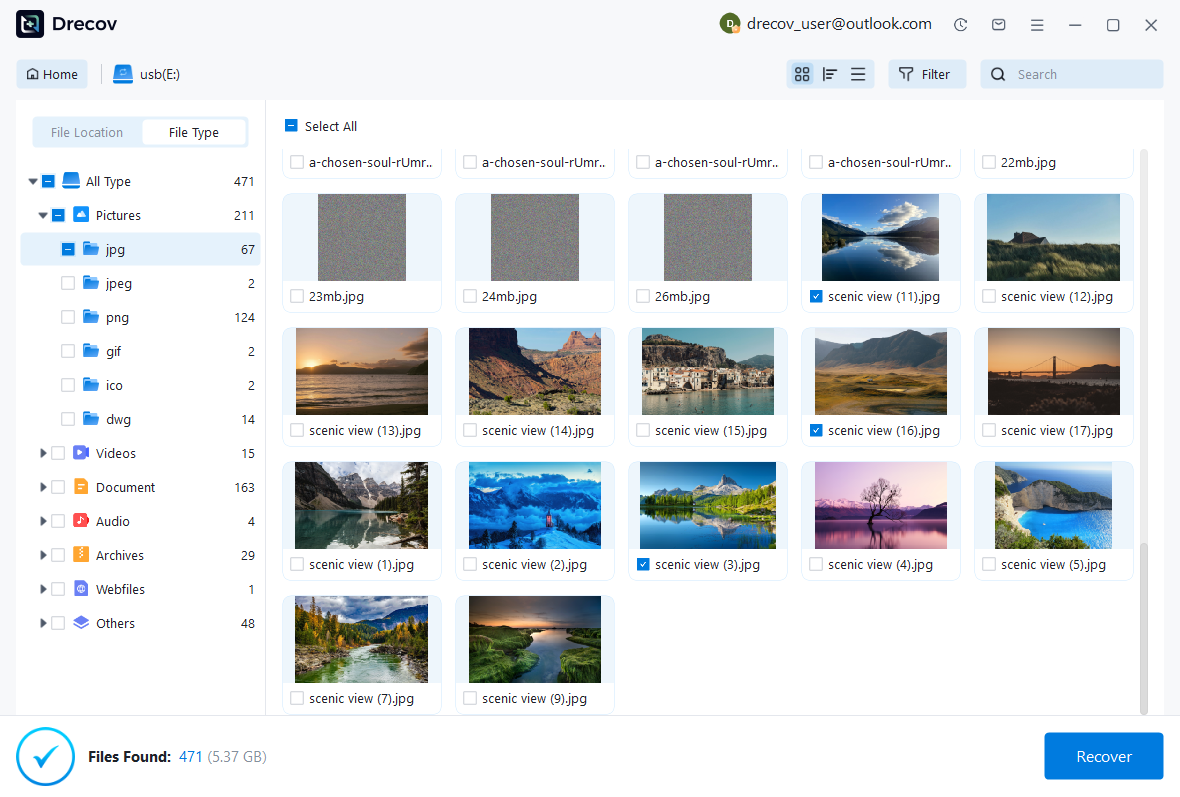
Step 3: Browse, Filter and Preview Results
Use search and filtering to narrow the results, then browse the relevant folders or file categories. Image thumbnails can help you recognize likely matches. Open supported previews to inspect the contents before selecting files for recovery, especially when several items have similar names.
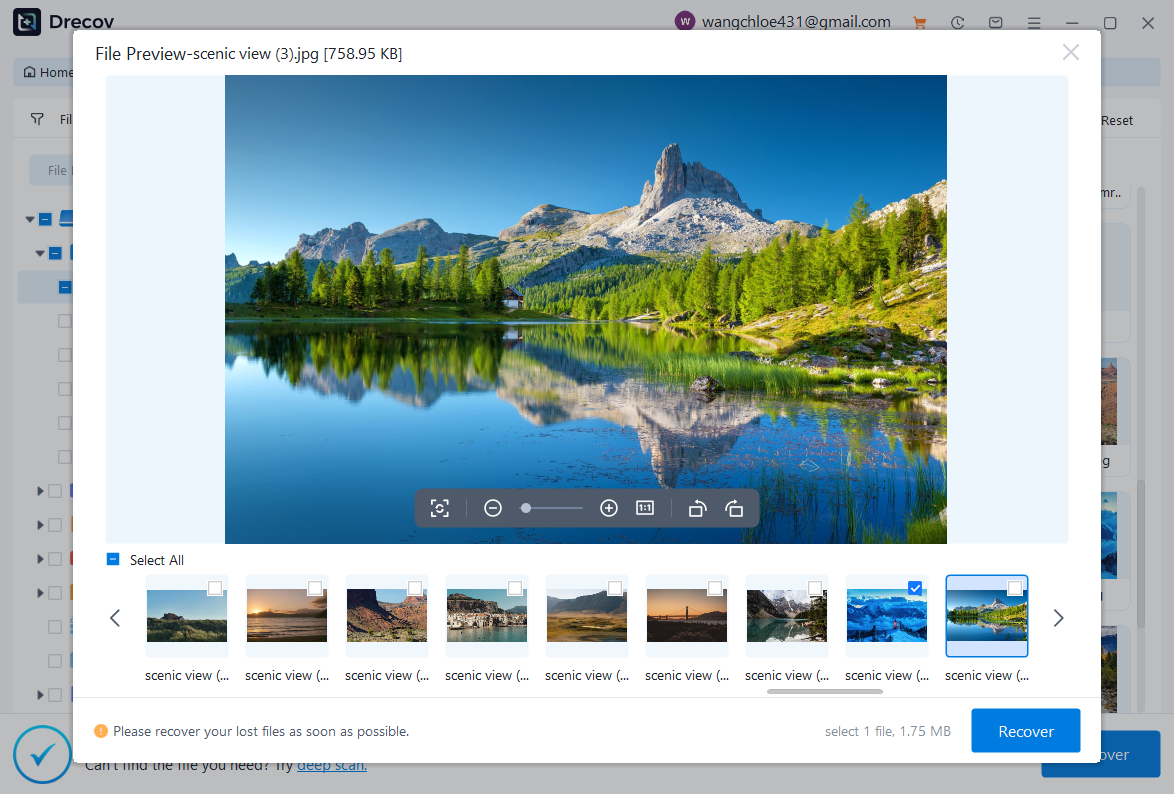
Step 4: Recover to Another Healthy Device and Verify
Choose the required files and click Recover. Save them to another healthy storage device with enough available space. Using a separate destination helps protect data that is still on the original source from being overwritten by recovered output.
Open the recovered copies and check their contents before returning to normal use of the affected device. If the files are not where expected, check the selected destination and any Drecov folder or Recovery folder created there. The Drecov user guide provides additional recovery instructions.
Get Drecov 2.1.3.0 for Windows
With Windows on ARM support, smoother thumbnails, improved removable-device detection and better filename handling, Drecov 2.1.3.0 addresses both compatibility and day-to-day recovery tasks. Reduced memory consumption and interface fixes further improve the application experience.
Get the update from the PandaOffice Drecov. Install it away from the affected drive, scan the original loss location and preview supported files before recovering your selection to a separate healthy device.
⚠ Warning: Install it on a drive different from the one where your data was lost to prevent overwriting.