






To boot an Acer Aspire 3 from USB, connect a genuinely bootable drive, power the laptop on, and try the F12 boot menu while the Acer logo appears. Some Aspire 3 models need that menu enabled in firmware first, so a silent F12 key does not mean the USB is broken. Before changing firmware settings, note the laptop’s exact A315 or other model suffix and why you want USB boot. A rescue environment is different from a Windows installer: choosing Install, deleting partitions, or accepting a factory reset can put the only copy of your files at risk.
Identify the Aspire 3 and the USB’s purpose
“Aspire 3” names a family, not one fixed firmware screen. Look at the model sticker, packaging, or the system information shown in firmware. A315-56 and A315-510P, for example, need not show identical menu labels. Record the model suffix before following any key sequence or setting from a forum post. Acer’s F12 Boot Menu guidance says that the feature is not available on every notebook and may need enabling in BIOS setup.
Next, decide what the stick is meant to do. A Windows installation USB, an Acer recovery drive, and a general file-transfer USB are not interchangeable. Copying an ISO file onto an ordinary stick does not automatically make it bootable. If the aim is simply to retrieve documents from a laptop that will not start, avoid an installer path that may offer to erase or repartition the internal disk.
Check the USB on a second compatible computer if you can do so without changing its contents. Confirm that it opens and was created by the intended official media tool. A known-good boot stick is more useful for diagnosis than repeatedly changing Aspire firmware settings around a questionable device.
Use F12 during startup
With the Aspire fully powered off, insert the bootable USB directly into a laptop port, not a hub. Turn the laptop on and tap F12 as the Acer logo appears. On some keyboards you may need the Fn key as well, depending on how the function keys are configured. Do not hold several keys at once and assume which one worked. If a menu opens, look for the USB by its brand or for a UEFI entry that names it. Select that entry once and observe the next screen.
Choosing a temporary USB entry does not make it the permanent first boot device. That is helpful during diagnosis: unplug the stick later and the laptop can return to its usual Windows entry. If the USB starts and shows a Windows setup screen, stop there unless installation is actually your goal. Use the repair or recovery route only after protecting local files that lack a backup.
If F12 does nothing
Restart and use F2 at the Acer logo to enter firmware setup. Find the F12 Boot Menu option if your specific model provides one, record its current value, and enable it. Save the change as the firmware screen instructs, then try F12 again. If the option is absent, do not hunt for a hidden switch by changing unrelated security settings. Check your exact model’s Acer manual or support page.
A laptop that skips the Acer logo or starts Windows too quickly may be hard to catch with a key press. If Windows still opens, use its advanced startup path to reach firmware settings where available. That route is preferable to making repeated forced shutdowns solely to catch F2. Keep a note of the original settings so that one test can be reversed.
The USB appears but will not start
Presence in the boot menu proves that firmware detected the stick; it does not prove the files on it form a usable boot environment. A blinking cursor, immediate return to the menu, or a “no bootable media” message calls for checking how the USB was created. Recreate it on a different, healthy stick using the official tool for the environment you need. This operation erases the selected USB, so first copy any files from that stick elsewhere and verify the copy.
Boot mode also matters. A stick prepared only for one mode may not start under another. Do not switch the laptop from UEFI to Legacy/CSM merely because an old tutorial says so; newer Aspire models may not offer Legacy mode, and a boot-mode change can make the existing Windows installation appear missing. Check the media tool’s supported firmware mode and compare it with the Aspire’s current configuration.
If the USB begins to boot but then reports missing files, test a second stick or recreate the media. If only one laptop rejects the same known-good media, inspect firmware settings and the selected port. Avoid disabling Secure Boot without understanding why the selected boot environment requires it. Record any security-setting change and restore it after the test.
The USB does not appear at all
First remove other removable drives so the menu is easier to read. Try another built-in USB port and reconnect the stick once. If a mouse and other USB device also fail in that port, the port may be at fault. If the stick works on another PC but not the Aspire, compare whether firmware detects any USB storage. A Windows driver update cannot fix a device that firmware never sees before Windows starts.
Some boot menus show a USB only when the media has a boot structure compatible with the current mode. Therefore “not listed” and “not bootable” can look similar. A second verified boot stick helps separate those cases. If neither appears, return to the model-specific firmware manual rather than formatting the Aspire’s internal drive. If the internal drive is also missing from firmware, that is a separate and more serious storage-detection question.
Do not mistake a normal data stick for a failed boot stick. File Explorer can read documents from it even though firmware offers no boot option. The broader USB boot overview explains media creation across PC brands; this page stays with the Aspire 3 menu and its model-dependent checks.
Protect the internal files before repair or reinstall
When USB boot is a way to fix an Aspire that no longer starts Windows, pause before choosing a reset or clean installation. Check existing OneDrive or external backups from another device. If the internal drive still appears in firmware and remains stable, there may be a way to copy or recover files before changing the system. The file-recovery overview covers that separate decision. A drive that clicks, vanishes between boots, or reports serious read errors should not undergo repeated direct scans; imaging or professional help is safer.
Drecov is Windows data recovery software for files on a readable local disk. Its Quick Scan, Deep Scan, filters, previews, and recovery to another healthy location can help when documents, photos, or other files are missing. Drecov also has a Crashed PC Recovery mode and Lost Partition Recovery for applicable situations, but it does not fix firmware, make an unbootable USB boot, or repair hardware. Arrange a supported way to access the stable source before running a scan. A rescue USB must not become a pretext to write recovered files back onto the Aspire’s affected drive.
⚠ Warning: Install it on a drive different from the one where your data was lost to prevent overwriting.
Step 1: Open Drecov and choose the original drive
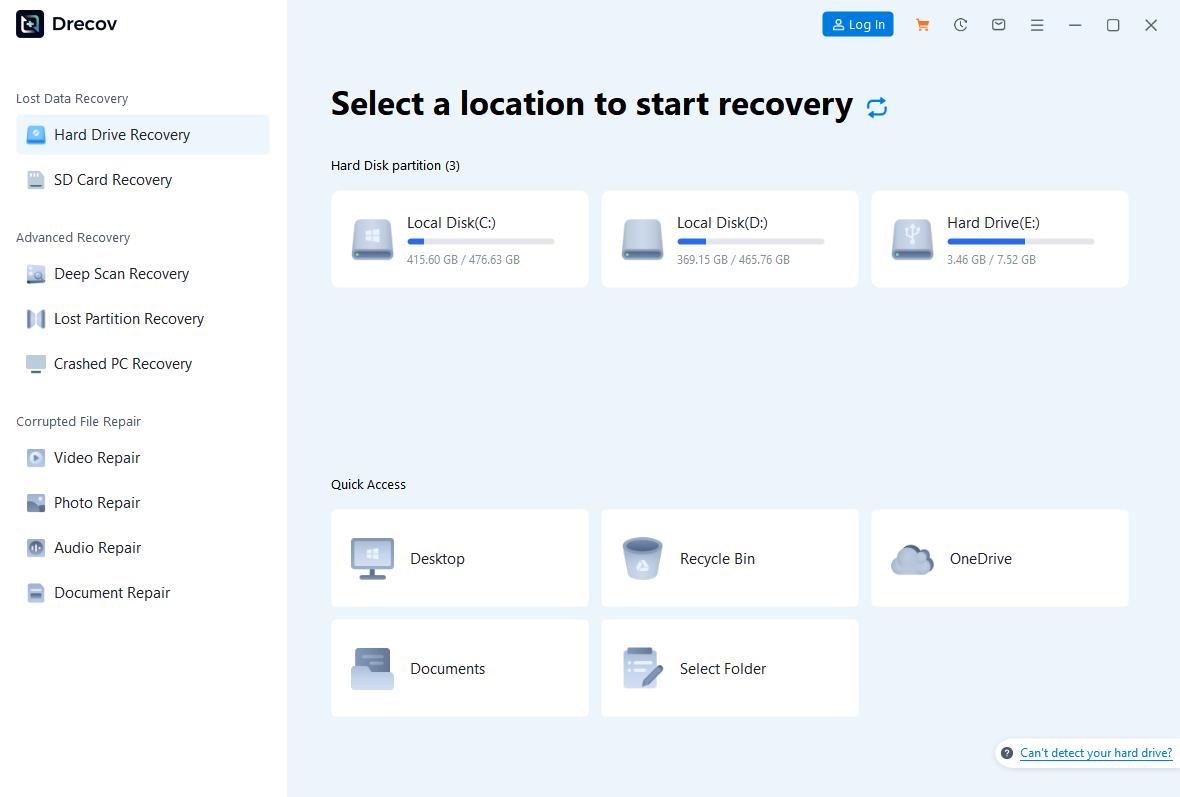
Prepare a separate healthy destination with enough space. From a working Windows environment or an applicable supported crashed-PC route, open Drecov and select the original Aspire storage location that held the missing files. If you must move a drive to another PC, use qualified help when opening the laptop would be unsafe or affect a warranty. Do not install software onto the source partition.
Step 2: Scan and verify likely candidates
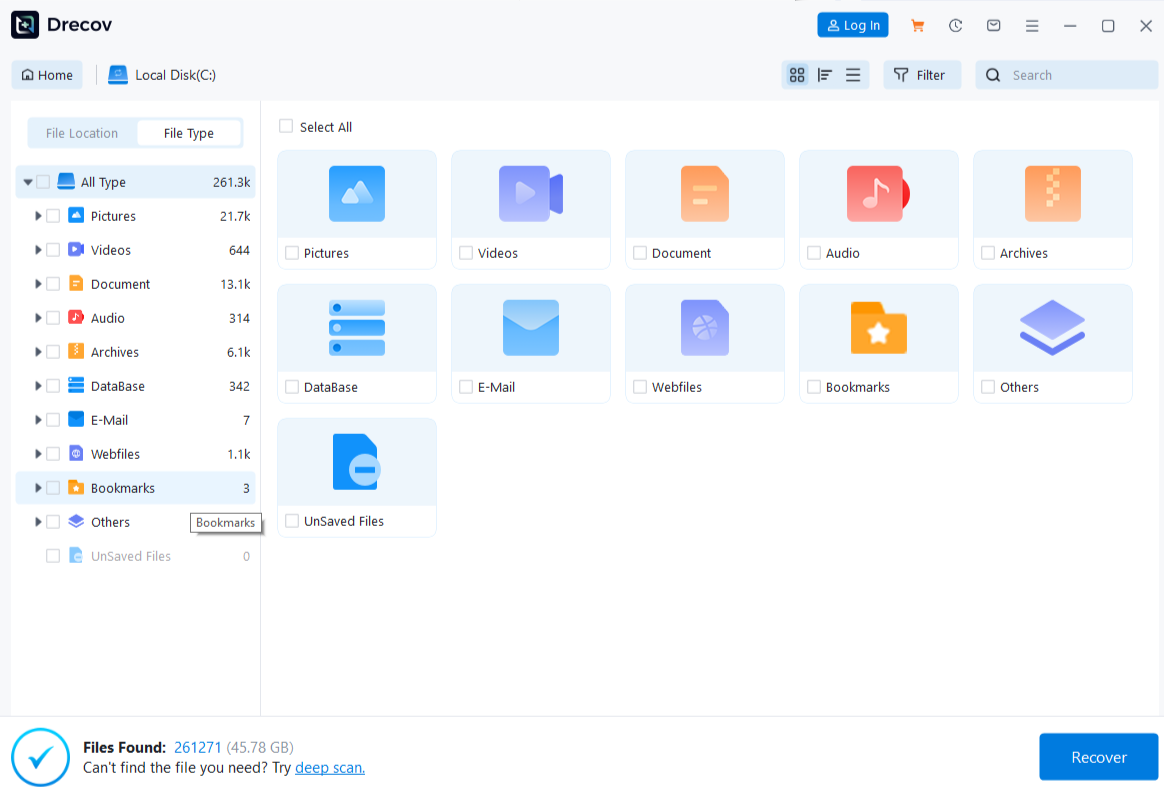
Run Quick Scan first. Look in the former user folders for the file types you need. If files are absent and the disk remains stable, try Deep Scan. Filter by name, type, or path where available, then preview representative documents or images. A preview helps identify candidates but cannot prove every embedded page or media frame is intact.
Step 3: Save elsewhere and inspect the output
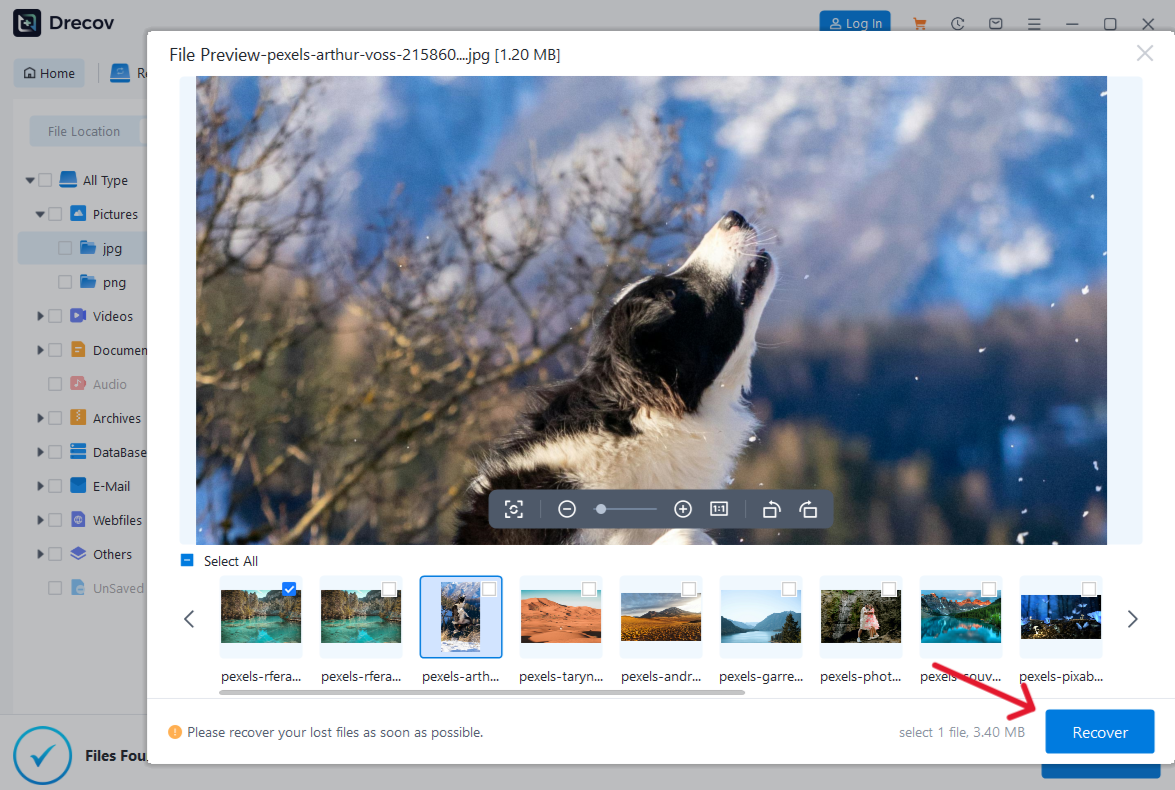
Recover selected items to the other healthy device, never to the Aspire’s original disk. If output is not where you expected, check the Drecov folder or Recovery folder. Open several files, compare them with backups, and confirm that the newest needed work is present. Only after this check should you return to startup repair, an Acer reset, or a Windows reinstall. The separate Acer factory-restore article covers that later, more destructive decision.
⚠ Warning: Install it on a drive different from the one where your data was lost to prevent overwriting.
FAQs
Is F12 the USB boot key on every Acer Aspire 3?
No. F12 is the usual temporary boot-menu route on many Acer notebooks, but availability and firmware labels vary by model. Check your exact Aspire 3 suffix and enable the F12 menu in setup if the option exists.
Why does F2 open setup but F12 show nothing?
The F12 menu may be disabled or unavailable on that model. Inspect the firmware’s F12 Boot Menu setting and save a deliberate change; do not alter unrelated boot or security settings blindly.
Does the USB have to be empty?
Creating boot media generally rewrites the selected USB. Back up and verify any existing files before using a media-creation tool. An ordinary file copy is not the same as preparing a bootable device.
Should I disable Secure Boot to make the stick appear?
Not as a default first step. Confirm the USB’s boot mode and provenance first. Change Secure Boot only when a trustworthy environment specifically requires it, and record the original setting.
No. Drecov addresses recoverable files on accessible, stable storage. It does not change firmware settings or repair a faulty USB port. Its role is to protect data before risky system changes.
Conclusion
For an Acer Aspire 3 USB boot, identify the exact model and confirm that the stick is truly bootable. Try the temporary F12 menu, then inspect the F12 setting through F2 only if needed. Separate a missing menu entry from media that appears but fails to start. If the goal is to rescue an unbootable laptop, protect its files before reset or reinstall. Drecov can help retrieve local data from a stable, accessible source, but the boot-menu and firmware problem requires its own fix.
⚠ Warning: Install it on a drive different from the one where your data was lost to prevent overwriting.